


Tensorflow语法学习笔记(一):变量:创建、初始化、保存和加载
参考:http://blog.csdn.net/u014595019/article/details/52728886
当训练模型时,用变量来存储和更新参数。变量包含张量 (Tensor)存放于内存的缓存区。建模时它们需要被明确地初始化,模型训练后它们必须被存储到磁盘。这些变量的值可在之后模型训练和分析是被加载。
本文档描述以下两个TensorFlow类。可查看完整的API文档:
- tf.Variable 类
- tf.train.Saver类
1、Tensor
导入tensorflow,命令:import tensorflow as tf
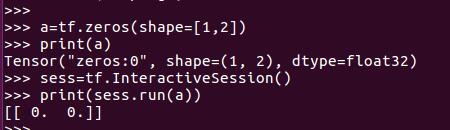
注意:因为在训练开始前,所有的数据都是抽象的概念,也就是说,此时a只是表示这应该是个1*5的零矩阵,而没有实际赋值,也没有分配空间,所以如果此时print,就会出现如下情况:

只有在训练过程开始后,才能获得a的实际值。
2、变量:
(1)创建
当创建一个变量时,你将一个张量作为初始值传入构造函数Variable()。TensorFlow提供了一系列操作符来初始化张量,初始值是常量或是随机值。
注意:所有这些操作符都需要你指定张量的shape。那个形状自动成为变量的shape。变量的shape通常是固定的,但TensorFlow提供了高级的机制来重新调整其行列数。
只输入一个Tensor也是可以的
W = tf.Variable(tf.zeros(shape=[1,2]))
注意,此时W一样是一个抽象的概念,而且与Tensor不同,Variable必须初始化以后才有具体的值。
	tensor = tf.zeros(shape=[1,2])
	variable = tf.Variable(tensor)
	sess = tf.InteractiveSession()
	# print(sess.run(variable))  # 会报错
	sess.run(tf.initialize_all_variables()) # 对variable进行初始化
	print(sess.run(variable))

(2)初始化
变量的初始化必须在模型的其它操作运行之前先明确地完成。最简单的方法就是添加一个给所有变量初始化的操作,并在使用模型之前首先运行那个操作。
使用tf.initialize_all_variables()添加一个操作对变量做初始化。记得在完全构建好模型并加载之后再运行那个操作
	# Create two variables.
	weights = tf.Variable(tf.random_normal([784, 200], stddev=0.35),
                      name="weights")
	biases = tf.Variable(tf.zeros([200]), name="biases")
	...
	# Add an op to initialize the variables.
	init_op = tf.initialize_all_variables()

	# Later, when launching the model
	with tf.Session() as sess:
  	# Run the init operation.
  	sess.run(init_op)
 	...
  	# Use the model
  	...
(3)由另一个变量初始化
由于tf.initialize_all_variables()是并行地初始化所有变量,所以在有这种需求的情况下需要小心。
用其它变量的值初始化一个新的变量时,使用其它变量的initialized_value()属性。你可以直接把已初始化的值作为新变量的初始值,或者把它当做tensor计算得到一个值赋予新变量。
	# Create a variable with a random value.
	weights = tf.Variable(tf.random_normal([784, 200], stddev=0.35),
                      name="weights")
	# Create another variable with the same value as 'weights'.
	w2 = tf.Variable(weights.initialized_value(), name="w2")
	# Create another variable with twice the value of 'weights'
	w_twice = tf.Variable(weights.initialized_value() * 0.2, name="w_twice")
(4)保存和加载
最简单的保存和恢复模型的方法是使用tf.train.Saver对象。构造器给graph的所有变量,或是定义在列表里的变量,添加save和restoreops。saver对象提供了方法来运行这些ops,定义检查点文件的读写路径。
(5)保存变量
用tf.train.Saver()创建一个Saver来管理模型中的所有变量。
# Create some variables.
v1 = tf.Variable(..., name="v1")
v2 = tf.Variable(..., name="v2")
...
# Add an op to initialize the variables.
init_op = tf.initialize_all_variables()

# Add ops to save and restore all the variables.
saver = tf.train.Saver()

# Later, launch the model, initialize the variables, do some work, save the
# variables to disk.
with tf.Session() as sess:
  sess.run(init_op)
  # Do some work with the model.
  ..
  # Save the variables to disk.
  save_path = saver.save(sess, "/tmp/model.ckpt")
  print "Model saved in file: ", save_path
(6)恢复变量
用同一个Saver对象来恢复变量。注意,当你从文件中恢复变量时,不需要事先对它们做初始化。
# Create some variables.
v1 = tf.Variable(..., name="v1")
v2 = tf.Variable(..., name="v2")
...
# Add ops to save and restore all the variables.
saver = tf.train.Saver()

# Later, launch the model, use the saver to restore variables from disk, and
# do some work with the model.
with tf.Session() as sess:
  # Restore variables from disk.
  saver.restore(sess, "/tmp/model.ckpt")
  print "Model restored."
  # Do some work with the model
  ...
3、placeholder
placeholder又叫占位符,同样是一个抽象的概念。用于表示输入输出数据的格式。告诉系统:这里有一个值/向量/矩阵,现在我没法给你具体数值,不过我正式运行的时候会补上的!例如下式中的x和y。因为没有具体数值,所以只要指定尺寸即可。
	 x = tf.placeholder(tf.float32,[1, 5],name='input')
		y = tf.placeholder(tf.float32,[None, 5],name='input')
第一个x,表示输入是一个[1,5]的横向量。
而第二种形式,表示输入是一个[?,5]的矩阵。那么什么情况下会这么用呢?就是需要输入一批[1,5]的数据的时候。比如我有一批共10个数据,那我可以表示成[10,5]的矩阵。如果是一批5个,那就是[5,5]的矩阵。tensorflow会自动进行批处理。
4、Session
session,也就是会话。我的理解是,session是抽象模型的实现者。为什么之前的代码多处要用到session?因为模型是抽象的嘛,只有实现了模型以后,才能够得到具体的值。同样,具体的参数训练,预测,甚至变量的实际值查询,都要用到session,看后面就知道了
5、模型构建
官方实例的mnist数据集的分类,公式可以写作
我们也需要加入一个额外的偏置量(bias),因为输入往往会带有一些无关的干扰量。因此对于给定的输入图片 x 它代表的是数字 i 的证据可以表示为
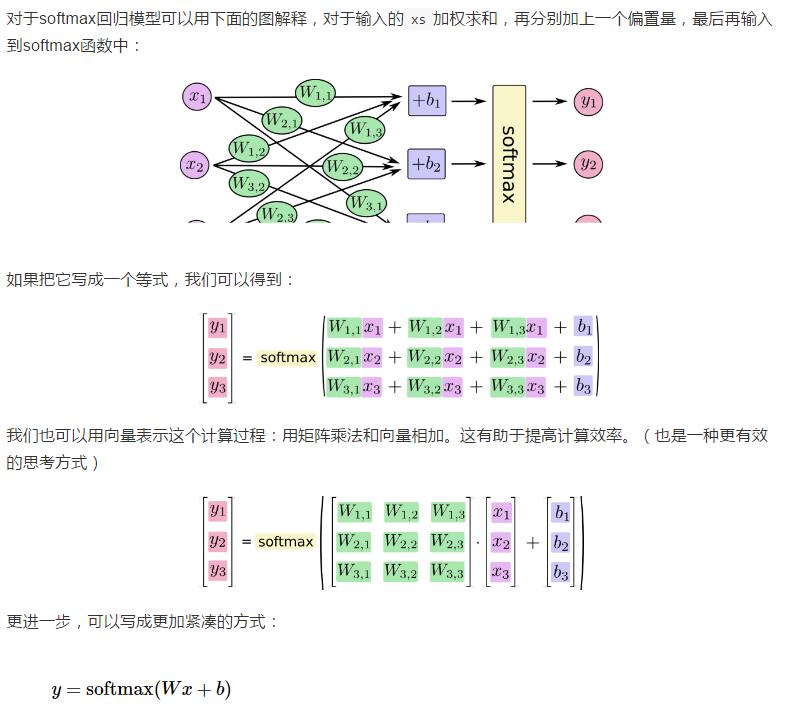
(1)该模型的代码描述为
# 建立抽象模型
x = tf.placeholder(tf.float32, [None, 784]) # 输入占位符
y = tf.placeholder(tf.float32, [None, 10])  # 输出占位符(预期输出)
W = tf.Variable(tf.zeros([784, 10]))
b = tf.Variable(tf.zeros([10]))
a = tf.nn.softmax(tf.matmul(x, W) + b)      # a表示模型的实际输出

# 定义损失函数和训练方法
cross_entropy = tf.reduce_mean(-tf.reduce_sum(y * tf.log(a), reduction_indices=[1])) # 损失函数为交叉熵
optimizer = tf.train.GradientDescentOptimizer(0.5) # 梯度下降法,学习速率为0.5
train = optimizer.minimize(cross_entropy)  # 训练目标:最小化损失函数
模型中的所有元素(图结构,损失函数,下降方法和训练目标)都已经包括在train里面。可以把train叫做训练模型。那么我们还需要测试模型:
correct_prediction = tf.equal(tf.argmax(a, 1), tf.argmax(y, 1))
accuracy = tf.reduce_mean(tf.cast(correct_prediction, tf.float32))
上述两行代码,tf.argmax表示找到最大值的位置(也就是预测的分类和实际的分类),然后看看他们是否一致,是就返回true,不是就返回false,这样得到一个boolean数组。tf.cast将boolean数组转成int数组,最后求平均值,得到分类的准确率(怎么样,是不是很巧妙)
(2)实际训练
有了训练模型和测试模型以后,我们就可以开始进行实际的训练了
	sess = tf.InteractiveSession()      # 建立交互式会话
	tf.initialize_all_variables().run() # 所有变量初始化
	for i in range(1000):
    			batch_xs, batch_ys = mnist.train.next_batch(100)    # 获得一批100个数据
    			train.run({x: batch_xs, y: batch_ys})   # 给训练模型提供输入和输出
	print(sess.run(accuracy,feed_dict={x:mnist.test.images,y:mnist.test.labels}))
可以看到,在模型搭建完以后,我们只要为模型提供输入和输出,模型就能够自己进行训练和测试了。中间的求导,求梯度,反向传播等等繁杂的事情,tensorflow都会帮你自动完成。
(3)实际代码:
test.py代码为:
"""A very simple MNIST classifier.
See extensive documentation at
http://tensorflow.org/tutorials/mnist/beginners/index.md
"""
from __future__ import absolute_import
from __future__ import division
from __future__ import print_function

# Import data
from tensorflow.examples.tutorials.mnist import input_data

import tensorflow as tf

flags = tf.app.flags
FLAGS = flags.FLAGS
flags.DEFINE_string('data_dir', '/tmp/data/', 'Directory for storing data') # 把数据放在/tmp/data文件夹中

mnist = input_data.read_data_sets(FLAGS.data_dir, one_hot=True)   # 读取数据集


# 建立抽象模型
x = tf.placeholder(tf.float32, [None, 784]) # 占位符
y = tf.placeholder(tf.float32, [None, 10])
W = tf.Variable(tf.zeros([784, 10]))
b = tf.Variable(tf.zeros([10]))
a = tf.nn.softmax(tf.matmul(x, W) + b)

# 定义损失函数和训练方法
cross_entropy = tf.reduce_mean(-tf.reduce_sum(y * tf.log(a), reduction_indices=[1]))  # 损失函数为交叉熵
optimizer = tf.train.GradientDescentOptimizer(0.5) # 梯度下降法,学习速率为0.5
train = optimizer.minimize(cross_entropy) # 训练目标:最小化损失函数

# Test trained model
correct_prediction = tf.equal(tf.argmax(a, 1), tf.argmax(y, 1))
accuracy = tf.reduce_mean(tf.cast(correct_prediction, tf.float32))

# Train
sess = tf.InteractiveSession()      # 建立交互式会话
tf.initialize_all_variables().run()
for i in range(1000):
    		batch_xs, batch_ys = mnist.train.next_batch(100)
    		train.run({x: batch_xs, y: batch_ys})
print(sess.run(accuracy,feed_dict={x:mnist.test.images,y:mnist.test.labels}))
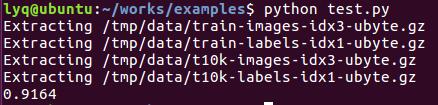
运行结果为:


 659
659

 被折叠的 条评论
为什么被折叠?
被折叠的 条评论
为什么被折叠?
 到【灌水乐园】发言


