


目标:在本文中你将学到怎么样使用opencv的pyrUp和pyrDown函数,对图像进行向上采样和向下采样。
参考:http://docs.opencv.org/2.4/doc/tutorials/imgproc/pyramids/pyramids.html#pyramids
参考:http://www.opencv.org.cn/opencvdoc/2.3.2/html/doc/tutorials/imgproc/pyramids/pyramids.html#pyramids
pyrUp
Upsamples an image and then blurs it.
-
C++: void pyrUp(InputArray src, OutputArray dst, const Size& dstsize=Size(), int borderType=BORDER_DEFAULT )
-
Python: cv2.pyrUp(src[, dst[, dstsize[, borderType]]]) → dst
-
C: cvPyrUp(const CvArr* src, CvArr* dst, int filter=CV_GAUSSIAN_5x5 )
-
Parameters: - src – input image.
- dst – output image. It has the specified size and the same type as src .
- dstsize – size of the output image.
- borderType – Pixel extrapolation method (only BORDER_DEFAULT supported). SeeborderInterpolate for details.
By default, size of the output image is computed as Size(src.cols*2, (src.rows*2), but in any case, the following conditions should be satisfied:

The function performs the upsampling step of the Gaussian pyramid construction, though it can actually be used to construct the Laplacian pyramid. First, it upsamples the source image by injecting even zero rows and columns and then convolves the result with the same kernel as in pyrDown() multiplied by 4.
Note
- (Python) An example of Laplacian Pyramid construction and merging can be found at opencv_source_code/samples/python2/lappyr.py
pyrDown
Blurs an image and downsamples it.
-
C++: void pyrDown(InputArray src, OutputArray dst, const Size& dstsize=Size(), int borderType=BORDER_DEFAULT )
-
Python: cv2.pyrDown(src[, dst[, dstsize[, borderType]]]) → dst
-
C: void cvPyrDown(const CvArr* src, CvArr* dst, int filter=CV_GAUSSIAN_5x5 )
-
Parameters: - src – input image.
- dst – output image; it has the specified size and the same type as src.
- dstsize – size of the output image.
- borderType – Pixel extrapolation method (BORDER_CONSTANT don’t supported). SeeborderInterpolate for details.
By default, size of the output image is computed as Size((src.cols+1)/2, (src.rows+1)/2), but in any case, the following conditions should be satisfied:

The function performs the downsampling step of the Gaussian pyramid construction. First, it convolves the source image with the kernel:
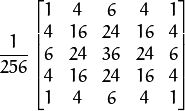
Then, it downsamples the image by rejecting even rows and columns.
原理
- 当我们需要将图像转换到另一个尺寸的时候, 有两种可能:
- 放大 图像
- 缩小 图像。
- 尽管OpenCV 几何变换 部分提供了一个真正意义上的图像缩放函数(resize, 在以后的教程中会学到),不过在本篇我们首先学习一下使用 图像金字塔 来做图像缩放, 图像金字塔是视觉运用中广泛采用的一项技术。
图像金字塔
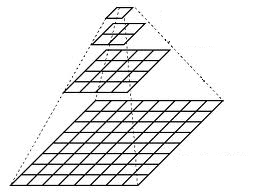
- 一个图像金字塔是一系列图像的集合 - 所有图像来源于同一张原始图像 - 通过梯次向下采样获得,直到达到某个终止条件才停止采样。
- 有两种类型的图像金字塔常常出现在文献和应用中:
- 高斯金字塔(Gaussian pyramid): 用来向下采样
- 拉普拉斯金字塔(Laplacian pyramid): 用来从金字塔低层图像重建上层未采样图像
高斯金字塔
-
想想金字塔为一层一层的图像,层级越高,图像越小。
-
每一层都按从下到上的次序编号, 层级
 (表示为
(表示为  尺寸小于层级
  (
( ))。
))。 -
为了获取层级为
的金字塔图像,我们采用如下方法:-
将
与高斯内核卷积: -
将所有偶数行和列去除。
-
-
显而易见,结果图像只有原图的四分之一。通过对输入图像
 (原始图像) 不停迭代以上步骤就会得到整个金字塔。
 -
以上过程描述了对图像的向下采样,如果将图像变大呢?:
- 首先,将图像在每个方向扩大为原来的两倍,新增的行和列以0填充(
 )
) - 使用先前同样的内核(乘以4)与放大后的图像卷积,获得 “新增像素” 的近似值。
- 首先,将图像在每个方向扩大为原来的两倍,新增的行和列以0填充(
-
这两个步骤(向下和向上采样) 分别通过OpenCV函数 pyrUp 和 pyrDown 实现, 我们将会在下面的示例中演示如何使用这两个函数。
Note
我们向下采样缩小图像的时候, 我们实际上 丢失 了一些信息。
源码
解释
-
让我们来回顾一下本程序的总体流程:
-
装载图像(此处路径由程序设定,用户无需将图像路径当作参数输入)
-
创建两个Mat实例, 一个用来储存操作结果(dst), 另一个用来存储零时结果(tmp)。
-
创建窗口显示结果
-
执行无限循环,等待用户输入。
如果用户按 ESC 键程序退出。 此外,它还提供两个选项:
-
向上采样 (按 ‘u’)
函数 pyrUp 接受了3个参数:
- tmp: 当前图像, 初始化为原图像 src 。
- dst: 目的图像( 显示图像,为输入图像的两倍)
- Size( tmp.cols*2, tmp.rows*2 ) : 目的图像大小, 既然我们是向上采样, pyrUp 期待一个两倍于输入图像( tmp )的大小。
-
向下采样(按 ‘d’)
类似于 pyrUp, 函数 pyrDown 也接受了3个参数:
- tmp: 当前图像, 初始化为原图像 src 。
- dst: 目的图像( 显示图像,为输入图像的一半)
- Size( tmp.cols/2, tmp.rows/2 ) :目的图像大小, 既然我们是向下采样, pyrDown 期待一个一半于输入图像( tmp)的大小。
-
注意输入图像的大小(在两个方向)必须是2的冥,否则,将会显示错误。
-
最后,将输入图像 tmp 更新为当前显示图像, 这样后续操作将作用于更新后的图像。
-
-
结果
 , 因此向下采样不会产生错误(
 )。 原图像如下所示:


 470
470

 被折叠的 条评论
为什么被折叠?
被折叠的 条评论
为什么被折叠?
 到【灌水乐园】发言


