


本文翻译整理自:AVFoundation Programming Guide(Updated: 2015-06-30
https://developer.apple.com/library/archive/documentation/AudioVideo/Conceptual/AVFoundationPG/Articles/00_Introduction.html#//apple_ref/doc/uid/TP40010188
文章目录
一、关于 AVFoundation
AVFoundation 是可用于播放和创建基于时间的视听媒体的几个框架之一。
它提供了一个 Objective-C 接口,可用于详细处理基于时间的视听数据。
例如,您可以使用它来检查、创建、编辑或重新编码媒体文件。
您还可以从设备获取输入流并在实时捕获和播放过程中操纵视频。
图 I-1 iOS 上的 AVFoundation stack
显示了 iOS 上的架构。
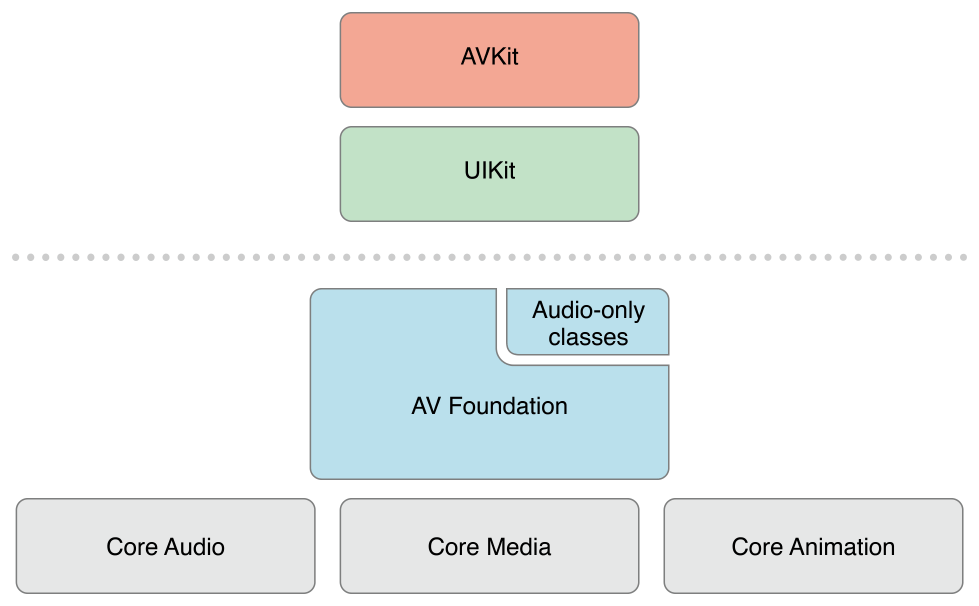
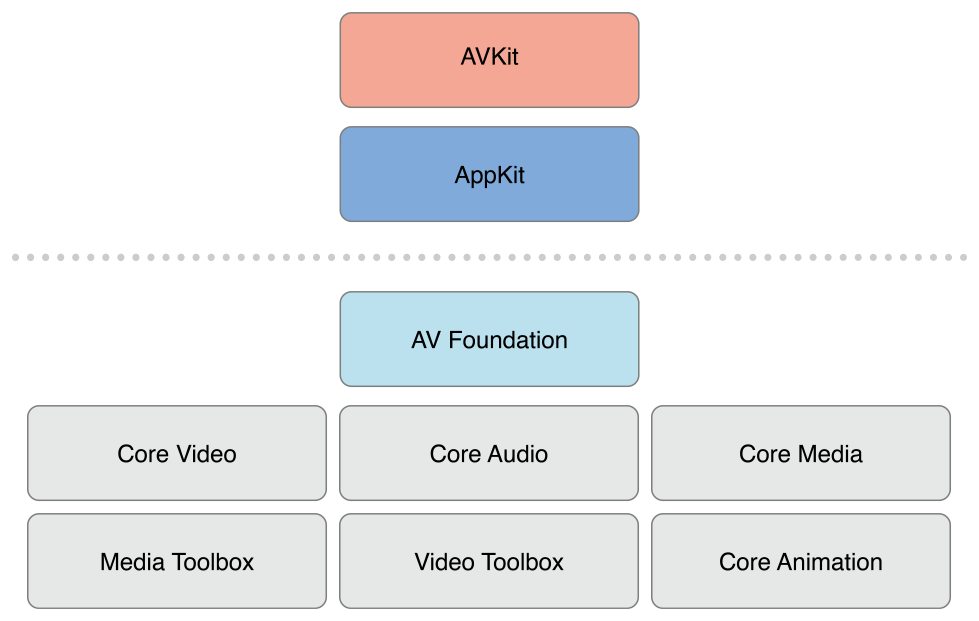
图 I-2 OS X 上的 AVFoundation stack
显示了 OS X 上相应的媒体架构。
您通常应该使用可用的最高级别的抽象来执行您想要的任务。
- 如果您只是想播放电影,请使用 AVKit 框架。
- 在 iOS 上,当您只需要对格式进行最少的控制来录制视频时,请使用 UIKit 框架 (
UIImagePickerController)。
但是请注意,您在 AV Foundation 中使用的某些原始数据结构(包括与时间相关的数据结构和用于携带和描述媒体数据的不透明对象)是在 Core Media 框架中声明的。
1、概览
AVFoundation 框架有两个方面 — 与视频相关的 API 和仅与音频相关的 API。
较旧的音频相关类 提供了处理音频的简单方法。
- 要播放声音文件,您可以使用
AVAudioPlayer。 - 要录制音频,您可以使用
AVAudioRecorder。
您还可以使用AVAudioSession,来配置应用程序的音频行为;这在 音频会话编程指南 中有描述。
使用 AVFoundation 呈现和使用媒体
AV Foundation 框架用来表示媒体的主要类是AVAsset。
框架的设计很大程度上受此表示法指导。
了解其结构将有助于您理解框架的工作原理。
AVAsset实例是一个或多个媒体数据(音频和视频轨道)集合的聚合表示。
它提供有关整个集合的信息,例如其标题、持续时间、自然呈现大小等。
AVAsset不依赖于特定的数据格式。
AVAsset 是用于从 URL 上的媒体创建资产实例(请参阅 使用 Assets )和创建新作品(请参阅 编辑)的其他类的超类。
资产中的每一部分媒体数据都属于统一类型,称为 轨道(track)。
在典型的简单情况下,一个轨道代表音频组件,另一个轨道代表视频组件;然而,在复杂的组合中,可能会有多个重叠的音频和视频轨道。
资产也可能有元数据。
AV Foundation 中的一个重要概念是,初始化资产或轨道并不一定意味着它已准备好使用。
甚至计算项目的持续时间也可能需要一些时间(例如,MP3 文件可能不包含摘要信息)。
在计算值时,您无需阻塞当前线程,而是通过使用 block 定义的回调异步请求值并获取答案。
Playback
AVFoundation 允许您以复杂的方式管理资产的播放。
为了支持这一点,它将资产的呈现状态与资产本身分开。
例如,这允许您同时播放以不同分辨率渲染的同一资产的两个不同片段。
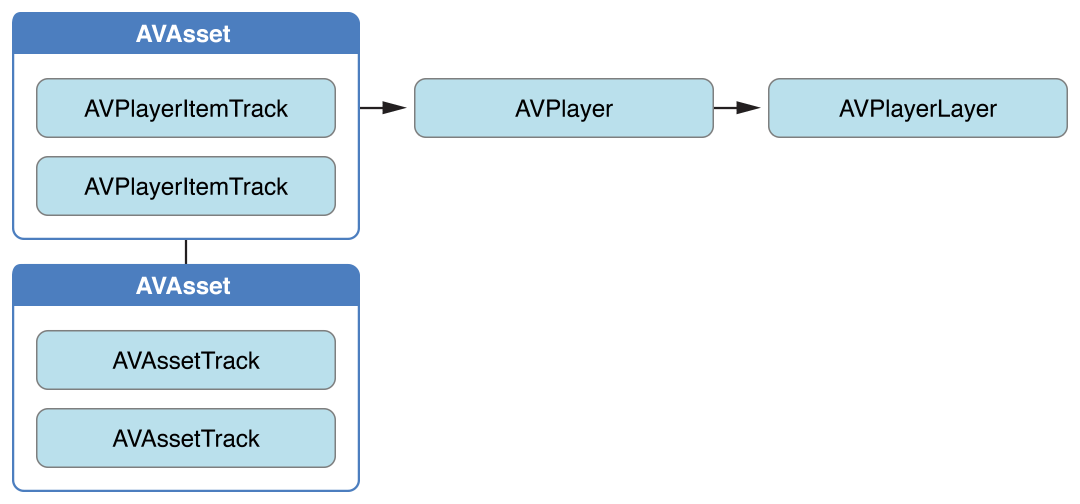
资产的呈现状态由播放器项目对象管理;资产内每个轨道的呈现状态由**播放器项目轨道对象管理。
使用播放器项目和播放器项目轨道,您可以设置播放器呈现项目视觉部分的大小,设置播放期间要应用的音频混合参数和视频合成设置,或在播放期间禁用资产的组件。
您可以使用播放器对象播放播放器项目*,*并将播放器的输出定向到核心动画层。
您可以使用 播放器队列 按顺序安排播放器项目集合的播放。
相关章节: Playback
读取、写入和重新编码资产
AVFoundation 允许你以多种方式创建资产的新表示。
你可以简单地重新编码现有资产,或者 — 在 iOS 4.1 及更高版本中 — 你可以对资产的内容执行操作并将结果保存为新资产。
您可以使用导出会话将现有资产重新编码为由少数常用预设之一定义的格式。
如果您需要对转换进行更多控制,在 iOS 4.1 及更高版本中,您可以同时使用资产读取器和资产写入器对象将资产从一种表示形式转换为另一种表示形式。
例如,使用这些对象,您可以选择要在输出文件中表示的轨道,指定您自己的输出格式,或在转换过程中修改资产。
为了生成波形的视觉表示,您可以使用 Assets 读取器来读取资产的音轨。
相关章节: 使用Assets
缩略图
要创建视频演示的缩略图,您需要使用要生成缩略图的资产初始化一个AVAssetImageGenerator实例。
AVAssetImageGenerator使用默认启用的视频轨道 来生成图像。
相关章节: 使用Assets
編輯
AVFoundation 使用合成从现有媒体片段(通常是一个或多个视频和音频轨道)创建新资产。
您可以使用可变合成来添加和删除轨道,并调整其时间顺序。
您还可以设置音频轨道的相对音量和渐变;并设置视频轨道的不透明度和不透明度渐变。
合成是保存在内存中的媒体片段的集合。
当您使用导出会话导出合成时,它会被折叠到一个文件中。
您还可以使用 Assets 写入器从媒体(例如样本缓冲区或静止图像)创建资产。
相关章节: 编辑
静态和视频媒体捕获
摄像头和麦克风的录制输入,由 capture session 管理。
捕获会话协调从输入设备到输出(例如电影文件)的数据流。
您可以为单个会话配置多个输入和输出,即使会话正在运行。
您可以向会话发送消息以启动和停止数据流。
此外,您可以使用 *预览层(preview layer ) *的实例向用户显示摄像机正在录制的内容。
相关章节: 静态和视频媒体捕获
使用 AVFoundation 进行并发编程
AVFoundation 的回调(blocks, key-value observers 和 通知的调用)不保证在任何特定线程或队列上进行。
相反,AVFoundation 会在执行其内部任务的线程或队列上调用这些处理程序。
对于通知和线程,有两条一般准则:
- UI 相关的通知发生在主线程上。
- 需要您创建和/或指定队列的类或方法将返回该队列上的通知。
除了这两个准则之外(并且存在例外,这些例外在参考文档中注明),您不应假设在任何特定线程上都会返回通知。
如果您正在编写多线程应用程序,则可以使用NSThread的 isMainThread方法,或[[NSThread currentThread] isEqual:<#A stored thread reference#>]来测试,调用线程是否是您希望在其上执行工作的线程。
您可以使用 performSelectorOnMainThread:withObject:waitUntilDone: 和 performSelector:onThread:withObject:waitUntilDone:modes: 等方法,将消息重定向到适当的线程。
您还可以使用dispatch_async“反弹”到适当队列上的块,可以是 UI 任务的主队列,也可以是用于并发操作的队列。
有关并发操作的更多信息,请参阅 并发编程指南 ;
有关块的更多信息,请参阅 块编程主题 。
AVCam-iOS:使用 AVFoundation 捕获图像和影片 示例代码被视为所有 AVFoundation 功能的主要示例,可以作为 AVFoundation 线程和队列使用示例的参考。
2、先决条件
AVFoundation 是一个高级 Cocoa 框架。
要有效使用它,您必须具备:
- 对 Cocoa 基本开发工具和技术有深入的了解
- 对积木的基本了解
- 对键值编码和键值观察的基本理解
- 对于播放,需要对核心动画有基本的了解(请参阅 核心动画编程指南 ;对于基本播放,请参阅 AVKit 框架参考 )。
3、也可以看看
有几个 AVFoundation 示例,其中两个对于理解和实现相机捕获功能至关重要:
- AVCam-iOS:使用 AVFoundation 捕捉图像和影片 是实现任何使用相机功能的程序的规范示例代码。
它是一个完整的示例,有详尽的文档,涵盖了展示最佳实践的大部分功能。 - AVCamManual:扩展 AVCam 以使用手动捕获 API 是 AVCam 的配套应用程序。
它使用手动相机控件实现相机功能。
它也是一个完整的示例,有据可查,应该被视为创建利用手动控件的相机应用程序的典型示例。 - RosyWriter 是一个示例,它演示了实时帧处理,特别是如何将滤镜应用于视频内容。
这是开发人员的常见要求,此示例涵盖了该功能。 - AVLocationPlayer:使用 AVFoundation 元数据读取 API 演示了使用元数据 API。
二、使用 Assets
资产可以来自文件,也可以来自用户 iPod 库或照片库中的媒体。
创建 Asset 对象时,您可能想要检索的该项目的所有信息并非立即可用。
一旦您拥有电影资产,您就可以从中提取静态图像、将其转码为另一种格式或修剪内容。
1、创建 Asset 对象
要创建资产来表示可以使用 URL 识别的任何资源,请使用AVURLAsset。
最简单的情况是从文件创建资产:
NSURL *url = <#A URL that identifies an audiovisual asset such as a movie file#>;
AVURLAsset *anAsset = [[AVURLAsset alloc] initWithURL:url options:nil];
初始化资产的选项
AVURLAsset 初始化方法 将选项字典作为其第二个参数。
字典中使用的唯一键是AVURLAssetPreferPreciseDurationAndTimingKey。
相应的值是一个布尔值(包含在对象中NSValue),表示资产是否应准备好指示精确的持续时间并提供按时间精确的随机访问。
获取资产的准确时长可能需要大量的处理开销。
使用近似时长通常是一种更便宜的操作,并且足以进行播放。
因此:
- 如果您只打算播放资产,则要么传递
nil而不是字典,要么传递包含AVURLAssetPreferPreciseDurationAndTimingKey键 和 相应值NO(包含在NSValue对象中)的字典。 - 如果要将资产添加到合成 (
AVMutableComposition),通常需要精确的随机访问。
传递一个包含AVURLAssetPreferPreciseDurationAndTimingKey键 和相应YES值的字典(包含在NSValue对象中 - 回想一下,NSNumber继承自NSValue):
NSURL *url = <#A URL that identifies an audiovisual asset such as a movie file#>;
NSDictionary *options = @{ AVURLAssetPreferPreciseDurationAndTimingKey : @YES };
AVURLAsset *anAssetToUseInAComposition = [[AVURLAsset alloc] initWithURL:url options:options];
访问用户资产
要访问 iPod 库或照片应用程序管理的资产,您需要获取所需资产的 URL。
- 要访问 iPod 库,您需要创建一个
MPMediaQuery实例来查找所需的项目,然后使用MPMediaItemPropertyAssetURL获取其 URL 。
有关媒体库的更多信息,请参阅 多媒体编程指南 。 - 要访问照片应用程序管理的资产,您可以使用
ALAssetsLibrary。
以下示例显示如何获取资产来代表“已保存的照片相册”中的第一个视频。
ALAssetsLibrary *library = [[ALAssetsLibrary alloc] init];

// Enumerate just the photos and videos group by using ALAssetsGroupSavedPhotos.
[library enumerateGroupsWithTypes:ALAssetsGroupSavedPhotos usingBlock:^(ALAssetsGroup *group, BOOL *stop) {

// Within the group enumeration block, filter to enumerate just videos.
[group setAssetsFilter:[ALAssetsFilter allVideos]];

// For this example, we're only interested in the first item.
[group enumerateAssetsAtIndexes:[NSIndexSet indexSetWithIndex:0]
                        options:0
                     usingBlock:^(ALAsset *alAsset, NSUInteger index, BOOL *innerStop) {

                         // The end of the enumeration is signaled by asset == nil.
                         if (alAsset) {
                             ALAssetRepresentation *representation = [alAsset defaultRepresentation];
                             NSURL *url = [representation url];
                             AVAsset *avAsset = [AVURLAsset URLAssetWithURL:url options:nil];
                             // Do something interesting with the AV asset.
                         }
                     }];
                 }
                 failureBlock: ^(NSError *error) {
                     // Typically you should handle an error more gracefully than this.
                     NSLog(@"No groups");
                 }];
2、准备资产以供使用
初始化资产(或曲目)并不一定意味着您可能想要检索的该项目的所有信息都立即可用。
甚至计算项目的持续时间也可能需要一些时间(例如,MP3 文件可能不包含摘要信息)。
您不应该在计算值时阻塞当前线程,而应该使用协议AVAsynchronousKeyValueLoading 来请求值,然后通过使用块定义的完成处理程序来获得答案。
(AVAsset和AVAssetTrack遵守AVAsynchronousKeyValueLoading协议。)
您可以使用 statusOfValueForKey:error: 测试属性的值是否已加载。
首次加载资产时,其大多数或所有属性的值都是AVKeyValueStatusUnknown。
要加载一个或多个属性的值,请调用loadValuesAsynchronouslyForKeys:completionHandler:。
在完成处理程序中,您可以根据属性的状态采取适当的操作。
您应该始终做好加载无法成功完成的准备,无论是由于某些原因(例如基于网络的 URL 无法访问)导致加载失败,还是因为加载被取消。
NSURL *url = <#A URL that identifies an audiovisual asset such as a movie file#>;
AVURLAsset *anAsset = [[AVURLAsset alloc] initWithURL:url options:nil];
NSArray *keys = @[@"duration"];

[asset loadValuesAsynchronouslyForKeys:keys completionHandler:^() {

    NSError *error = nil;
    AVKeyValueStatus tracksStatus = [asset statusOfValueForKey:@"duration" error:&error];
    switch (tracksStatus) {
        case AVKeyValueStatusLoaded:
            [self updateUserInterfaceForDuration];
            break;
        case AVKeyValueStatusFailed:
            [self reportError:error forAsset:asset];
            break;
        case AVKeyValueStatusCancelled:
            // Do whatever is appropriate for cancelation.
            break;
   }
}];
如果您要准备播放资产,则应加载 tracks 属性。
有关播放资产的更多信息,请参阅 播放。
3、从视频中获取静态图像
要从资产中获取静态图像(例如缩略图)以供播放,您可以使用AVAssetImageGenerator对象。
您可以使用 Assets 初始化图像生成器。
但是,即使资产在初始化时不具有视觉轨道,初始化也可能成功,因此如有必要,您应该使用 tracksWithMediaCharacteristic: 测试资产是否有任何具有视觉特征的轨道。
AVAsset anAsset = <#Get an asset#>;
if ([[anAsset tracksWithMediaType:AVMediaTypeVideo] count] > 0) {
    AVAssetImageGenerator *imageGenerator =
        [AVAssetImageGenerator assetImageGeneratorWithAsset:anAsset];
    // Implementation continues...
}
您可以配置图像生成器的多个方面,例如,您可以分别使用maximumSize和apertureMode 指定其生成的图像的最大尺寸 和光圈模式。
然后,您可以在给定时间生成单个图像或一系列图像。
您必须确保在图像生成器生成所有图像之前保持对图像生成器的强引用。
生成单幅图像
您用copyCGImageAtTime:actualTime:error:来在特定时间 生成单幅图像。
AVFoundation 可能无法在您请求的准确时间生成图像,因此您可以将指向 CMTime 的指针作为第二个参数传递,该指针在返回时包含实际生成图像的时间。
AVAsset *myAsset = <#An asset#>];
AVAssetImageGenerator *imageGenerator = [[AVAssetImageGenerator alloc] initWithAsset:myAsset];

Float64 durationSeconds = CMTimeGetSeconds([myAsset duration]);
CMTime midpoint = CMTimeMakeWithSeconds(durationSeconds/2.0, 600);
NSError *error;
CMTime actualTime;

CGImageRef halfWayImage = [imageGenerator copyCGImageAtTime:midpoint actualTime:&actualTime error:&error];

if (halfWayImage != NULL) {

    NSString *actualTimeString = (NSString *)CMTimeCopyDescription(NULL, actualTime);
    NSString *requestedTimeString = (NSString *)CMTimeCopyDescription(NULL, midpoint);
    NSLog(@"Got halfWayImage: Asked for %@, got %@", requestedTimeString, actualTimeString);

    // Do something interesting with the image.
    CGImageRelease(halfWayImage);
}
生成图像序列
要生成一系列图像,请向图像生成器发送一条generateCGImagesAsynchronouslyForTimes:completionHandler:消息。
第一个参数是一个对象数组NSValue,每个对象都包含一个CMTime结构,指定要为其生成图像的资产时间。
第二个参数是一个块,用作生成的每个图像调用的回调。
块参数提供了一个结果常量,告诉您图像是否已成功创建或操作是否已取消,以及(视情况而定):
- 图片
- 您请求图片的时间和图片实际生成的时间
- 描述生成失败原因的错误对象
在执行该块时,请检查结果常量以确定图像是否已创建。
此外,请确保在图像生成器完成创建图像之前保持对图像生成器的强引用。
AVAsset *myAsset = <#An asset#>];
// Assume: @property (strong) AVAssetImageGenerator *imageGenerator;
self.imageGenerator = [AVAssetImageGenerator assetImageGeneratorWithAsset:myAsset];

Float64 durationSeconds = CMTimeGetSeconds([myAsset duration]);
CMTime firstThird = CMTimeMakeWithSeconds(durationSeconds/3.0, 600);
CMTime secondThird = CMTimeMakeWithSeconds(durationSeconds*2.0/3.0, 600);
CMTime end = CMTimeMakeWithSeconds(durationSeconds, 600);
NSArray *times = @[NSValue valueWithCMTime:kCMTimeZero],
                  [NSValue valueWithCMTime:firstThird], [NSValue valueWithCMTime:secondThird],
                  [NSValue valueWithCMTime:end]];

[imageGenerator generateCGImagesAsynchronouslyForTimes:times
                completionHandler:^(CMTime requestedTime, CGImageRef image, CMTime actualTime,
                                    AVAssetImageGeneratorResult result, NSError *error) {

                NSString *requestedTimeString = (NSString *)
                    CFBridgingRelease(CMTimeCopyDescription(NULL, requestedTime));
                NSString *actualTimeString = (NSString *)
                    CFBridgingRelease(CMTimeCopyDescription(NULL, actualTime));
                NSLog(@"Requested: %@; actual %@", requestedTimeString, actualTimeString);

                if (result == AVAssetImageGeneratorSucceeded) {
                    // Do something interesting with the image.
                }

                if (result == AVAssetImageGeneratorFailed) {
                    NSLog(@"Failed with error: %@", [error localizedDescription]);
                }
                if (result == AVAssetImageGeneratorCancelled) {
                    NSLog(@"Canceled");
                }
  }];
您可以通过向图像生成器发送cancelAllCGImageGeneration消息,来取消图像序列的生成。
4、修剪和转码电影
您可以使用AVAssetExportSession对象将电影从一种格式转码为另一种格式,并修剪电影。工作流程如图1-1所示。
导出会话是一个控制器对象,用于管理资产的异步导出。
您可以使用要导出的资产和导出预设的名称来初始化会话,该预设指示要应用的导出选项(请参阅allExportPresets)。
然后,您可以配置导出会话以指定输出 URL 和文件类型,以及可选的其他设置,例如元数据以及是否应针对网络使用优化输出。
图 1-1 导出会话工作流程

您可以使用 exportPresetsCompatibleWithAsset:,检查是否可以 使用给定的预设 导出给定的资产,如下例所示:
AVAsset *anAsset = <#Get an asset#>;
NSArray *compatiblePresets = [AVAssetExportSession exportPresetsCompatibleWithAsset:anAsset];
if ([compatiblePresets containsObject:AVAssetExportPresetLowQuality]) {
    AVAssetExportSession *exportSession = [[AVAssetExportSession alloc]
        initWithAsset:anAsset presetName:AVAssetExportPresetLowQuality];
    // Implementation continues.
}
您可以通过提供输出 URL(该 URL 必须是文件 URL)来完成会话的配置,AVAssetExportSession可以从 URL 的路径扩展名推断出输出文件类型;
但是,通常情况下,您可以使用 outputFileType 直接设置。
您还可以指定其他属性,例如时间范围、输出文件长度的限制、是否应针对网络使用优化导出的文件以及视频合成。
以下示例说明了如何使用timeRange 属性来修剪影片:
exportSession.outputURL = <#A file URL#>;
exportSession.outputFileType = AVFileTypeQuickTimeMovie;

CMTime start = CMTimeMakeWithSeconds(1.0, 600);
CMTime duration = CMTimeMakeWithSeconds(3.0, 600);
CMTimeRange range = CMTimeRangeMake(start, duration);
exportSession.timeRange = range;
要创建新文件,请调用exportAsynchronouslyWithCompletionHandler:。
导出操作完成时,将调用 完成处理程序 block ;
在处理程序的实现中,您应该检查会话的 status值 以确定导出是成功、失败还是被取消:
[exportSession exportAsynchronouslyWithCompletionHandler:^{

        switch ([exportSession status]) {
            case AVAssetExportSessionStatusFailed:
                NSLog(@"Export failed: %@", [[exportSession error] localizedDescription]);
                break;
            case AVAssetExportSessionStatusCancelled:
                NSLog(@"Export canceled");
                break;
            default:
                break;
        }
    }];
您可以通过向会话发送cancelExport消息 来取消导出。
如果您尝试覆盖现有文件或在应用程序沙盒之外写入文件,则导出将失败。
如果出现以下情况,导出也可能会失败:
- 有来电
- 您的应用程序正在后台,另一个应用程序开始播放
在这些情况下,您通常应该通知用户导出失败,然后允许用户重新启动导出。
三、Playback
要控制资产的播放,您可以使用AVPlayer对象。
在播放期间,您可以使用AVPlayerItem实例 来管理整个资产的呈现状态,并使用AVPlayerItemTrack对象 来管理单个轨道的呈现状态。
要显示视频,您可以使用AVPlayerLayer对象。
1、播放资产
播放器是一个控制器对象,可用于管理资源的播放,例如开始和停止播放以及定位到特定时间。
您可以使用AVPlayer的实例来播放单个资源。
您可以使用AVQueuePlayer对象 按顺序播放多个项目(AVQueuePlayer是AVPlayer的子类)。
在 OS X 上,您可以选择使用 AVKit 框架的 AVPlayerView类在视图中播放内容。
播放器为您提供有关播放状态的信息,因此,如果需要,您可以将用户界面与播放器的状态同步。
您通常将播放器的输出定向到专门的核心动画层(AVPlayerLayer或AVSynchronizedLayer的实例)。
要了解有关图层的更多信息,请参阅 核心动画编程指南 。
多个播放器层: 您可以从单个AVPlayer实例创建多个AVPlayerLayer对象,但只有最近创建的层才会在屏幕上显示任何视频内容。
尽管您最终想要播放资产,但您不会直接将资产提供给AVPlayer对象。
相反,您提供的是 AVPlayerItem 的实例。
播放器项目管理与其关联的资产的呈现状态。
播放器项目包含播放器项目轨道(AVPlayerItemTrack 的实例),它们与资产中的轨道相对应。
各种对象之间的关系如图2-1所示。
图 2-1 播放资产
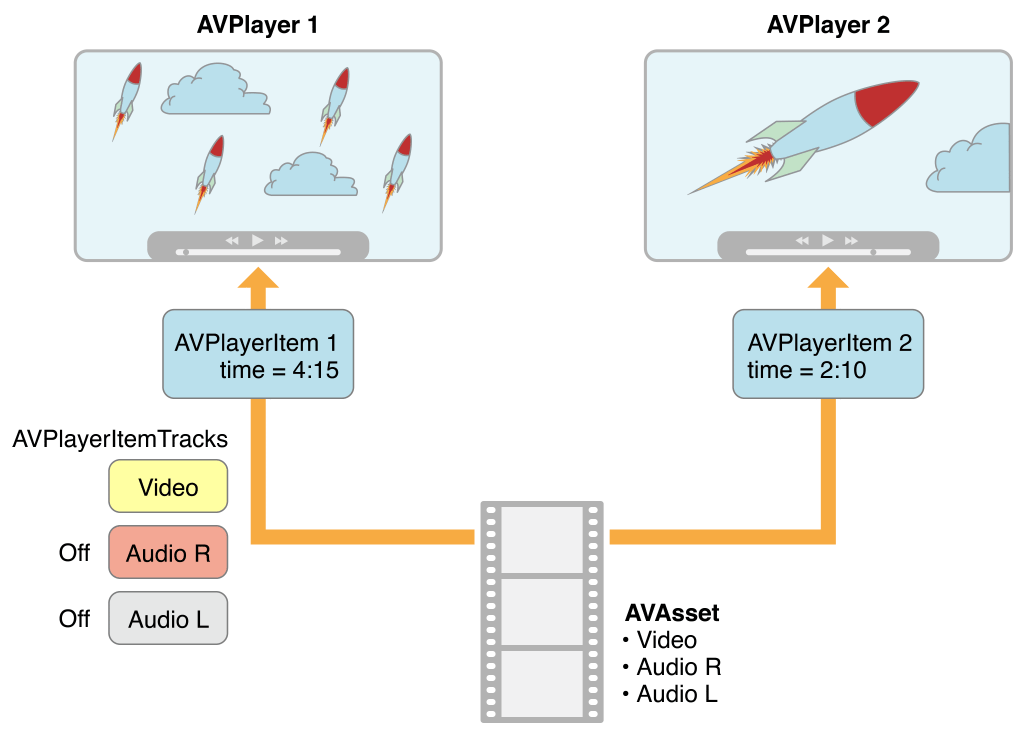
这种抽象意味着您可以同时使用不同的播放器播放给定的资产,但每个播放器以不同的方式渲染。
图 2-2显示了一种可能性,两个不同的播放器使用不同的设置播放同一资产。
例如,使用项目轨道,您可以在播放期间禁用特定轨道(例如,您可能不想播放声音组件)。
图 2-2 以不同方式播放同一素材
您可以使用现有资产初始化播放器项目,也可以直接从 URL 初始化播放器项目,以便可以在特定位置播放资源(AVPlayerItem将为该资源创建和配置资产)。
但是,与 AVAsset 一样,简单地初始化播放器项目并不一定意味着它可以立即播放。
您可以观察(使用键值观察)项目的 status 属性来确定它是否以及何时可以播放。
2、处理不同类型的资产
配置资产播放的方式可能取决于您要播放的资产类型。
广义上讲,主要有两种类型:基于文件的资产(您可以随机访问这些资产,例如来自本地文件、相机胶卷或媒体库)和基于流的资产(HTTP 实时流格式)。
加载并播放基于文件的资产。 播放基于文件的资产有几个步骤:
- 使用
AVURLAsset创建资产。 AVPlayerItem创建使用该资产的实例。- 将该项目与
AVPlayer的一个实例关联起来。 - 等到项目的
status属性表明它已准备好播放(通常使用键值观察在状态改变时接收通知)。
这种方法在 “将所有内容整合在一起:使用 AVPlayerLayer 播放视频文件”中有说明。
创建并准备 HTTP 直播流以供播放。
AVPlayerItem使用 URL初始化实例。(您不能直接创建AVAsset实例来表示 HTTP 直播流中的媒体。)
NSURL *url = [NSURL URLWithString:@"<#Live stream URL#>]";

// You may find a test stream at <http://devimages.apple.com/iphone/samples/bipbop/bipbopall.m3u8>.
self.playerItem = [AVPlayerItem playerItemWithURL:url];

[playerItem addObserver:self forKeyPath:@"status" options:0 context:&ItemStatusContext];

self.player = [AVPlayer playerWithPlayerItem:playerItem];
当您将播放器项目与播放器关联时,播放器项目便开始准备播放。
当播放器项目准备播放时,播放器项目会创建AVAsset和AVAssetTrack实例,您可以使用它们来检查直播流的内容。
要获取流媒体项目的时长,您可以观察 播放器项目上的 duration 属性。
当项目准备好播放时,此属性会更新为流媒体的正确值。
注意: 在播放器项目上 使用duration 属性需要 iOS 4.3 或更高版本。
与所有 iOS 版本兼容的方法是观察播放器项目的 status 属性。
当状态变为时AVPlayerItemStatusReadyToPlay,可以使用以下代码行获取持续时间:
[[[[[playerItem tracks] objectAtIndex:0] assetTrack] asset] duration];
如果您只是想播放直播,您可以采取快捷方式并直接使用 URL 创建播放器,使用以下代码:
self.player = [AVPlayer playerWithURL:<#Live stream URL#>];
[player addObserver:self forKeyPath:@"status" options:0 context:&PlayerStatusContext];
与资产和项目一样,初始化播放器并不意味着播放器已准备好播放。
您应该观察播放器的 status 属性,该属性会在AVPlayerStatusReadyToPlay播放器准备好播放时发生变化。
您还可以观察 currentItem 属性以访问为流创建的播放器项目。
如果您不知道自己的 URL 类型 ,请按照以下步骤操作:
- 尝试
AVURLAsset使用 URL 初始化,然后加载tracks密钥。
如果曲目加载成功,则您为资产创建播放器项目。 - 如果1失败,则
AVPlayerItem直接从URL创建一个。
观察播放器的status属性来确定其是否可以播放。
如果任一路线成功,您最终都会得到一个可与玩家关联的玩家物品。
3、播放项目
要开始播放,您需要向播放器发送一条play消息。
- (IBAction)play:sender {
    [player play];
}
除了简单的播放之外,您还可以管理播放的各个方面,例如播放速率和播放头的位置。
您还可以监视播放器的播放状态;例如,如果您想要将用户界面与资产的呈现状态同步,此功能非常有用 - 请参阅 监视播放。
更改播放速率
您可以通过设置播放器的属性来改变播放的速率rate。
aPlayer.rate = 0.5;
aPlayer.rate = 2.0;
值 1.0 表示“以当前项目的自然速率播放”。
将速率设置为 0.0 与暂停播放相同 - 您也可以使用 pause。
支持反向播放的项目可以使用 rate 属性和负数来设置反向播放速率。
您可以使用 playerItem 属性:canPlayReverse(支持速率值为 -1.0)、canPlaySlowReverse(支持速率介于 0.0 和 -1.0 之间) 和canPlayFastReverse(支持速率值小于 -1.0) 来确定支持的反向播放类型。
寻找 —— 重新定位播放头
要将播放头移动到特定时间,通常使用seekToTime:,如下:
CMTime fiveSecondsIn = CMTimeMake(5, 1);
[player seekToTime:fiveSecondsIn];
但是, seekToTime:方法更注重性能 而非精度。
如果您需要精确移动播放头,请使用seekToTime:toleranceBefore:toleranceAfter:,如下:
CMTime fiveSecondsIn = CMTimeMake(5, 1);
[player seekToTime:fiveSecondsIn toleranceBefore:kCMTimeZero toleranceAfter:kCMTimeZero];
使用零容差可能需要框架解码大量数据。
例如,仅当您编写需要精确控制的复杂媒体编辑应用程序时才应使用零容差。
播放后,播放器的头部将设置为项目的末尾,并且进一步调用 均play无效。
要将播放头重新定位到项目的开头,您可以注册以接收来自项目的 AVPlayerItemDidPlayToEndTimeNotification通知。
在通知的回调方法中,您可以使用 kCMTimeZero参数 进行调用seekToTime:。
// Register with the notification center after creating the player item.
    [[NSNotificationCenter defaultCenter]
        addObserver:self
        selector:@selector(playerItemDidReachEnd:)
        name:AVPlayerItemDidPlayToEndTimeNotification
        object:<#The player item#>];

- (void)playerItemDidReachEnd:(NSNotification *)notification {
    [player seekToTime:kCMTimeZero];
}
4、播放多个项目
您可以使用AVQueuePlayer对象 按顺序播放多个项目。
AVQueuePlayer是AVPlayer的子类。
您可以使用播放器项目数组初始化队列播放器。
NSArray *items = <#An array of player items#>;
AVQueuePlayer *queuePlayer = [[AVQueuePlayer alloc] initWithItems:items];
然后,您可以使用 play 来播放队列,就像AVPlayer对象一样。
队列播放器依次播放每个项目。
如果您想跳到下一个项目,请向队列播放器发送一条advanceToNextItem消息。
您可以使用 insertItem:afterItem:、removeItem:和 removeAllItems 来修改队列。
添加新项目时,通常应使用 canInsertItem:afterItem: 检查是否可以将其插入队列。
您将 nil作为第二个参数传递以测试是否可以将新项目附加到队列。
AVPlayerItem *anItem = <#Get a player item#>;
if ([queuePlayer canInsertItem:anItem afterItem:nil]) {
    [queuePlayer insertItem:anItem afterItem:nil];
}
5、监控播放
您可以监控播放器的呈现状态和正在播放的播放器项目的多个方面。
这对于不受您直接控制的状态变化特别有用。
例如:
- 如果用户使用多任务切换到不同的应用程序,播放器的
rate属性将下降为0.0。 - 如果您正在播放远程媒体,则播放器项目的
loadedTimeRanges和seekableTimeRanges属性将随着更多数据的出现而改变。
这些属性告诉您播放器项目时间线的哪些部分可用。 - 随着为 HTTP 直播流创建播放器项目,播放器的
currentItem属性会发生变化。 - 播放 HTTP 实时流时,播放器项目的
tracks属性可能会发生变化。
如果流为内容提供不同的编码,则可能会发生这种情况;如果播放器切换到不同的编码,则曲目会发生变化。 - 如果播放由于某种原因失败,播放器或播放器项目的
status属性可能会发生变化。
您可以使用键值观察来监视这些属性值的变化。
重要提示: 您应该在 主线程上注册 KVO 更改通知,并取消注册 KVO 更改通知。
这样可以避免在另一个线程上进行更改时收到部分通知的可能性。
即使更改操作是在另一个线程上进行的,AV Foundation 也会在主线程上调用observeValueForKeyPath:ofObject:change:context:。
响应状态变化
当播放器或播放器项目的状态发生变化时,它会发出键值观察更改通知。
如果对象由于某种原因(例如,如果媒体服务被重置)无法播放,则状态会更改为AVPlayerStatusFailed或AVPlayerItemStatusFailed(视情况而定)。
在这种情况下,对象的 error 属性值会更改为错误对象,描述对象无法再播放的原因。
AV Foundation 没有指定通知在哪个线程上发送。
如果要更新用户界面,必须确保在主线程上调用任何相关代码。
此示例使用dispatch_async在主线程上执行代码。
- (void)observeValueForKeyPath:(NSString *)keyPath ofObject:(id)object
                        change:(NSDictionary *)change context:(void *)context {

    if (context == <#Player status context#>) {
        AVPlayer *thePlayer = (AVPlayer *)object;
        if ([thePlayer status] == AVPlayerStatusFailed) {
            NSError *error = [<#The AVPlayer object#> error];
            // Respond to error: for example, display an alert sheet.
            return;
        }
        // Deal with other status change if appropriate.
    }
    // Deal with other change notifications if appropriate.
    [super observeValueForKeyPath:keyPath ofObject:object
           change:change context:context];
    return;
}
跟踪视觉显示的准备情况
您可以观察 AVPlayerLayer对象的 readyForDisplay 属性,以便在图层具有用户可见内容时收到通知。
具体来说,只有当有东西可供用户查看并执行转换时,您才可以将播放器图层插入图层树中。
追踪时间
要跟踪 AVPlayer对象中 播放头位置的变化,可以使用addPeriodicTimeObserverForInterval:queue:usingBlock:或addBoundaryTimeObserverForTimes:queue:usingBlock:。
您可以这样做,例如,使用有关已用时间或剩余时间的信息更新用户界面,或者执行其他一些用户界面同步。
- 使用
addPeriodicTimeObserverForInterval:queue:usingBlock:,如果时间跳跃以及播放开始或停止时,将按照您指定的间隔调用您提供的块。 - 使用
addBoundaryTimeObserverForTimes:queue:usingBlock:,您可以传递NSValue对象中 包含的CMTime结构数组。
每当遍历这些时间时,都会调用您提供的块。
这两种方法都会返回一个用作观察者的不透明对象。
只要您希望播放器调用时间观察块,就必须保持对返回对象的强引用。
您还必须平衡这些方法的每次调用与对的相应调用removeTimeObserver:。
对于这两种方法,AV Foundation 都不保证在经过每个间隔或边界时调用您的块。
如果之前调用的块的执行尚未完成,AV Foundation 不会调用块。
因此,您必须确保您在块中执行的工作不会给系统带来过大的负担。
// Assume a property: @property (strong) id playerObserver;

Float64 durationSeconds = CMTimeGetSeconds([<#An asset#> duration]);
CMTime firstThird = CMTimeMakeWithSeconds(durationSeconds/3.0, 1);
CMTime secondThird = CMTimeMakeWithSeconds(durationSeconds*2.0/3.0, 1);
NSArray *times = @[[NSValue valueWithCMTime:firstThird], [NSValue valueWithCMTime:secondThird]];

self.playerObserver = [<#A player#> addBoundaryTimeObserverForTimes:times queue:NULL usingBlock:^{

    NSString *timeDescription = (NSString *)
        CFBridgingRelease(CMTimeCopyDescription(NULL, [self.player currentTime]));
    NSLog(@"Passed a boundary at %@", timeDescription);
}];
到达条目末尾
您可以注册以便在播放器项目播放完毕时,接收AVPlayerItemDidPlayToEndTimeNotification 通知。
[[NSNotificationCenter defaultCenter] addObserver:<#The observer, typically self#>
                                         selector:@selector(<#The selector name#>)
                                             name:AVPlayerItemDidPlayToEndTimeNotification
                                           object:<#A player item#>];
6、综合起来:使用 AVPlayerLayer 播放视频文件
此简短的代码示例说明了如何使用AVPlayer对象播放视频文件。
它展示了如何:
- 配置视图以使用
AVPlayerLayer层 - 创建
AVPlayer对象 - 为基于文件的资产创建一个
AVPlayerItem对象,并使用键值观察来观察其状态 - 通过启用按钮来响应项目准备播放
- 播放该项目,然后将播放器的头部恢复到开头
注意: 为了专注于最相关的代码,此示例省略了完整应用程序的几个方面,例如内存管理和取消注册为观察者(用于键值观察或通知中心)。
要使用 AV Foundation,您需要具有足够的 Cocoa 经验,以便能够推断出缺失的部分。
有关播放的概念介绍,请跳至播放资产。
玩家视图
要播放资产的视觉组件,您需要一个包含AVPlayerLayer层的视图,AVPlayer对象的输出 可以定向到该层。
您可以创建一个简单的 UIView子类来适应这一点:
#import <UIKit/UIKit.h>
#import <AVFoundation/AVFoundation.h>

@interface PlayerView : UIView
@property (nonatomic) AVPlayer *player;
@end

@implementation PlayerView
+ (Class)layerClass {
    return [AVPlayerLayer class];
}
- (AVPlayer*)player {
    return [(AVPlayerLayer *)[self layer] player];
}
- (void)setPlayer:(AVPlayer *)player {
    [(AVPlayerLayer *)[self layer] setPlayer:player];
}
@end
一个简单的视图控制器
假设您有一个简单的视图控制器,声明如下:
@class PlayerView;
@interface PlayerViewController : UIViewController

@property (nonatomic) AVPlayer *player;
@property (nonatomic) AVPlayerItem *playerItem;
@property (nonatomic, weak) IBOutlet PlayerView *playerView;
@property (nonatomic, weak) IBOutlet UIButton *playButton;
- (IBAction)loadAssetFromFile:sender;
- (IBAction)play:sender;
- (void)syncUI;
@end
syncUI方法将按钮的状态与播放器的状态同步:
- (void)syncUI {
    if ((self.player.currentItem != nil) &&
        ([self.player.currentItem status] == AVPlayerItemStatusReadyToPlay)) {
        self.playButton.enabled = YES;
    }
    else {
        self.playButton.enabled = NO;
    }
}
您可以在视图控制器的 viewDidLoad方法中调用syncUI,以确保首次显示视图时具有一致的用户界面。
- (void)viewDidLoad {
    [super viewDidLoad];
    [self syncUI];
}
其他属性和方法在其余章节中描述。
创建Asset
您可以使用 AVURLAsset 从 URL 创建 创建Asset。(以下示例假设您的项目包含合适的视频资源。)
- (IBAction)loadAssetFromFile:sender {

    NSURL *fileURL = [[NSBundle mainBundle]
        URLForResource:<#@"VideoFileName"#> withExtension:<#@"extension"#>];

    AVURLAsset *asset = [AVURLAsset URLAssetWithURL:fileURL options:nil];
    NSString *tracksKey = @"tracks";

    [asset loadValuesAsynchronouslyForKeys:@[tracksKey] completionHandler:
     ^{
         // The completion block goes here.
     }];
}
在完成块中,您为资产创建一个AVPlayerItem实例,并将其设置为播放器视图的播放器。
与创建资产一样,仅仅创建播放器项目并不意味着它已准备好使用。
要确定它何时可以播放,您可以观察项目的 status 属性。
您应该在将播放器项目实例与播放器本身关联之前配置此观察。
当您将播放器项目与播放器关联时,您会触发播放器项目的播放准备。
// Define this constant for the key-value observation context.
static const NSString *ItemStatusContext;

// Completion handler block.
         dispatch_async(dispatch_get_main_queue(),
            ^{
                NSError *error;
                AVKeyValueStatus status = [asset statusOfValueForKey:tracksKey error:&error];

                if (status == AVKeyValueStatusLoaded) {
                    self.playerItem = [AVPlayerItem playerItemWithAsset:asset];
                     // ensure that this is done before the playerItem is associated with the player
                    [self.playerItem addObserver:self forKeyPath:@"status"
                                options:NSKeyValueObservingOptionInitial context:&ItemStatusContext];
                    [[NSNotificationCenter defaultCenter] addObserver:self
                                                              selector:@selector(playerItemDidReachEnd:)
                                                                  name:AVPlayerItemDidPlayToEndTimeNotification
                                                                object:self.playerItem];
                    self.player = [AVPlayer playerWithPlayerItem:self.playerItem];
                    [self.playerView setPlayer:self.player];
                }
                else {
                    // You should deal with the error appropriately.
                    NSLog(@"The asset's tracks were not loaded:\n%@", [error localizedDescription]);
                }
            });
响应播放器项目的状态变化
当播放器项目的状态发生变化时,视图控制器会收到一个键值观察更改通知。
AV Foundation 未指定通知发送到哪个线程。
如果要更新用户界面,则必须确保在主线程上调用任何相关代码。
此示例使用dispatch_async 在主线程上 排队消息 以同步用户界面。
- (void)observeValueForKeyPath:(NSString *)keyPath ofObject:(id)object
                        change:(NSDictionary *)change context:(void *)context {

    if (context == &ItemStatusContext) {
        dispatch_async(dispatch_get_main_queue(),
                       ^{
                           [self syncUI];
                       });
        return;
    }
    [super observeValueForKeyPath:keyPath ofObject:object
           change:change context:context];
    return;
}
播放项目
播放该物品涉及向玩家发送play消息。
- (IBAction)play:sender {
    [player play];
}
该项目仅播放一次。
播放后,播放器的头部将设置为项目的末尾,并且进一步调用 play方法将不起作用。
要将播放头重新定位到项目的开头,您可以注册 AVPlayerItemDidPlayToEndTimeNotification从该项目接收。
在通知的回调方法中,使用kCMTimeZero参数调用seekToTime:。
// Register with the notification center after creating the player item.
    [[NSNotificationCenter defaultCenter]
        addObserver:self
        selector:@selector(playerItemDidReachEnd:)
        name:AVPlayerItemDidPlayToEndTimeNotification
        object:[self.player currentItem]];

- (void)playerItemDidReachEnd:(NSNotification *)notification {
    [self.player seekToTime:kCMTimeZero];
}
四、編輯
AVFoundation 框架提供了一组功能丰富的类,以方便编辑视听资产。
AVFoundation 编辑 API 的核心是合成。
合成只是来自一个或多个不同媒体资产的轨道的集合。
AVMutableComposition 类提供了一个用于插入和删除轨道以及管理其时间顺序的接口。
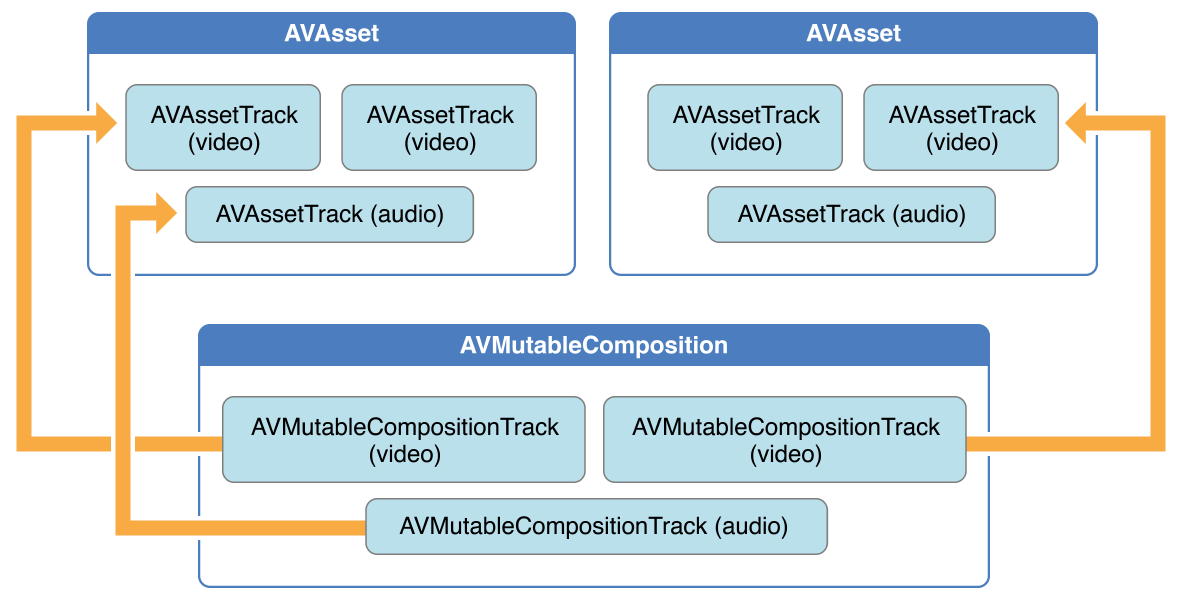
图 3-1显示了如何将新合成从现有资产的组合中拼凑在一起以形成新资产。
如果您想要做的只是将多个资产按顺序合并到一个文件中,那么这就是您需要的所有细节。
如果您想对合成中的轨道执行任何自定义音频或视频处理,则需要分别合并音频混合或视频合成。
图 3-1 AVMutableComposition 将资源组合在一起
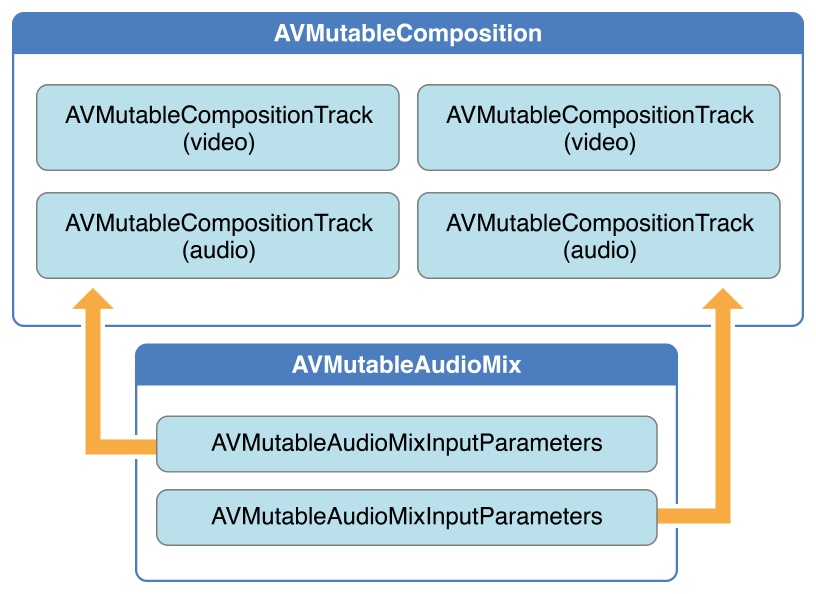
使用AVMutableAudioMix类,您可以对合成中的音轨执行自定义音频处理,如图3-2所示。
目前,您可以为音轨指定最大音量或设置音量斜坡。
图3-2 AVMutableAudioMix进行音频混合
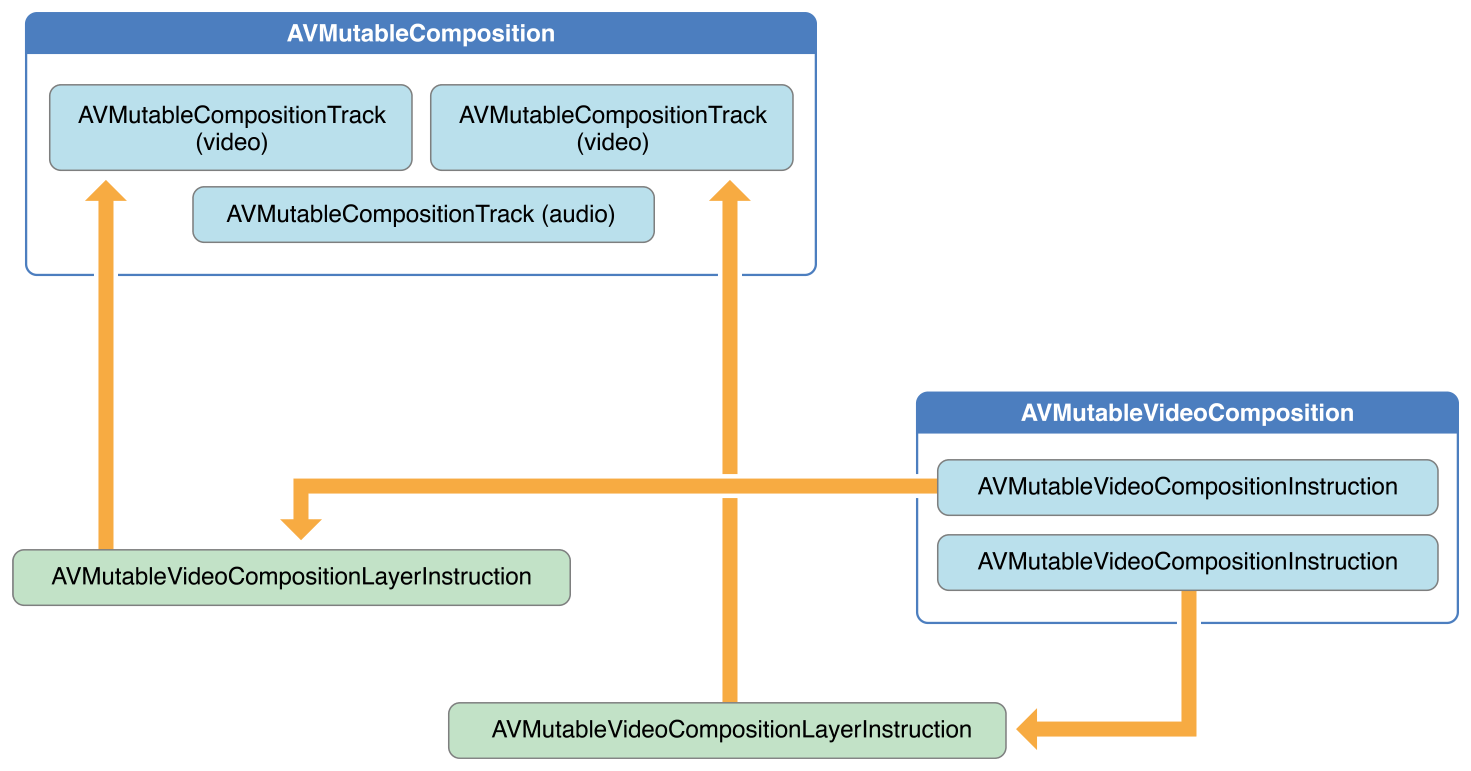
你可以使用 AVMutableVideoComposition 类直接处理合成中的视频轨道以进行编辑,如图 3-3 所示。
使用单个视频合成,你可以指定输出视频所需的渲染大小和比例以及帧持续时间。
通过视频合成的指令(由AVMutableVideoCompositionInstruction类表示),你可以修改视频的背景颜色并应用图层指令。
这些图层指令(由AVMutableVideoCompositionLayerInstruction类表示)可用于将变换、变换渐变、不透明度和不透明度渐变 应用到合成中的视频轨道。
视频合成类还使你能够使用animationTool属性 将核心动画框架中的效果引入到视频中。
图 3-3 AVMutableVideoComposition
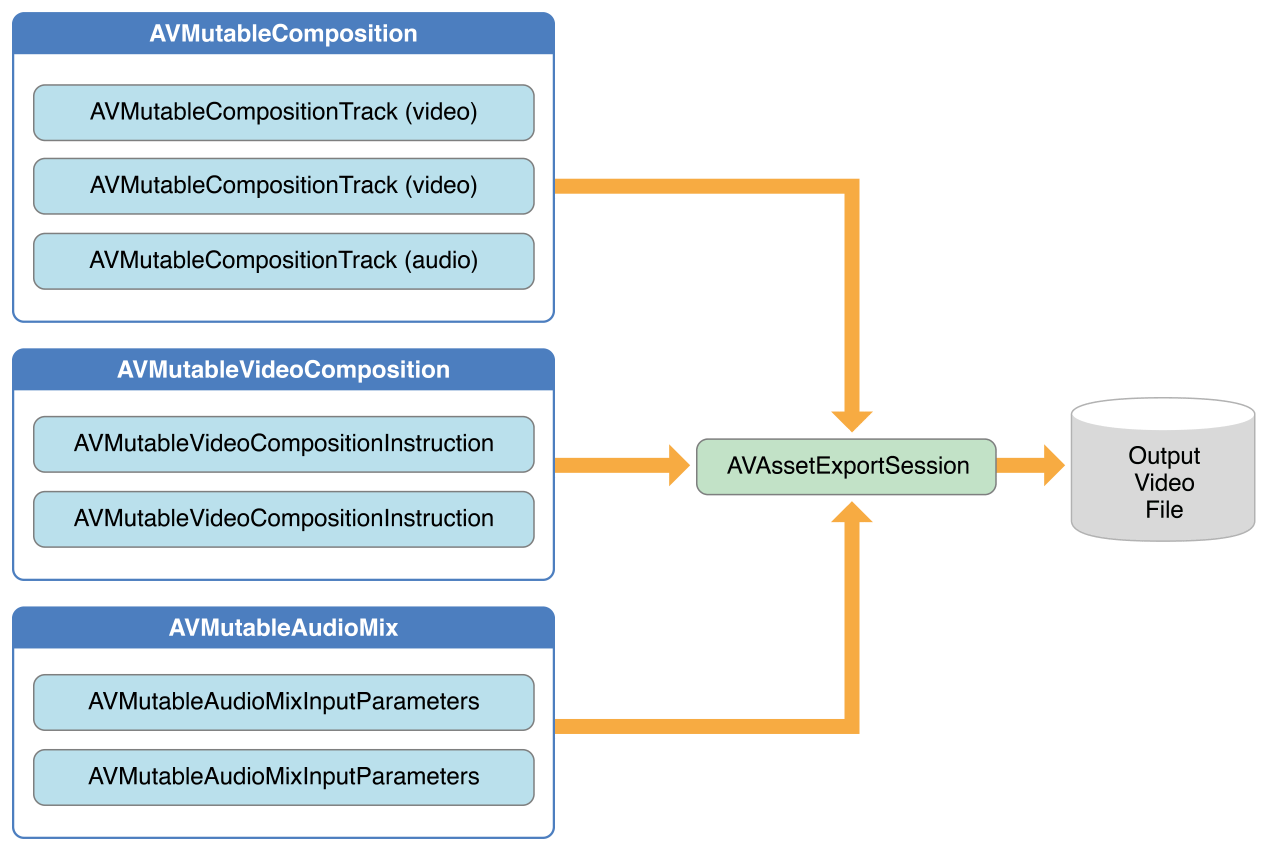
要将您的作品与音频混合和视频作品结合起来,请使用一个AVAssetExportSession对象,如图3-4 所示。
您可以使用您的作品初始化导出会话,然后将您的音频混合和视频作品分别分配给 audioMix和videoComposition属性。
图 3-4 使用 AVAssetExportSession 将媒体元素组合成输出文件
1、创建一个合成
要创建自己的合成,请使用AVMutableComposition类。
要将媒体数据添加到合成中,您必须添加一个或多个合成轨道,这些轨道由 AVMutableCompositionTrack 类表示。
最简单的情况是创建一个包含 一个视频轨道 和 一个音频轨道的可变合成:
AVMutableComposition *mutableComposition = [AVMutableComposition composition];

// Create the video composition track.
AVMutableCompositionTrack *mutableCompositionVideoTrack = [mutableComposition addMutableTrackWithMediaType:AVMediaTypeVideo preferredTrackID:kCMPersistentTrackID_Invalid];

// Create the audio composition track.
AVMutableCompositionTrack *mutableCompositionAudioTrack = [mutableComposition addMutableTrackWithMediaType:AVMediaTypeAudio preferredTrackID:kCMPersistentTrackID_Invalid];
初始化合成轨道的选项
向合成中添加新轨道时,您必须提供媒体类型和轨道 ID。
虽然音频和视频是最常用的媒体类型,但您也可以指定其他媒体类型,例如AVMediaTypeSubtitle或AVMediaTypeText。
与某些视听数据关联的每个轨道都有一个唯一标识符,称为轨道 ID。
如果您指定kCMPersistentTrackID_Invalid为首选轨道 ID,则系统会自动为您生成一个唯一标识符并将其与该轨道关联。
2、将视听数据添加到作品中
一旦您拥有包含一个或多个轨道的合成,您就可以开始将媒体数据添加到相应的轨道。
要将媒体数据添加到合成轨道,您需要访问AVAsset媒体数据所在的对象。
您可以使用可变合成轨道接口将具有相同底层媒体类型的多个轨道放在同一轨道上。
以下示例说明如何按顺序将两个不同的视频资产轨道添加到同一合成轨道:
// You can retrieve AVAssets from a number of places, like the camera roll for example.
AVAsset *videoAsset = <#AVAsset with at least one video track#>;

AVAsset *anotherVideoAsset = <#another AVAsset with at least one video track#>;

// Get the first video track from each asset.
AVAssetTrack *videoAssetTrack = [[videoAsset tracksWithMediaType:AVMediaTypeVideo] objectAtIndex:0];

AVAssetTrack *anotherVideoAssetTrack = [[anotherVideoAsset tracksWithMediaType:AVMediaTypeVideo] objectAtIndex:0];

// Add them both to the composition.
[mutableCompositionVideoTrack insertTimeRange:CMTimeRangeMake(kCMTimeZero,videoAssetTrack.timeRange.duration) ofTrack:videoAssetTrack atTime:kCMTimeZero error:nil];

[mutableCompositionVideoTrack insertTimeRange:CMTimeRangeMake(kCMTimeZero,anotherVideoAssetTrack.timeRange.duration) ofTrack:anotherVideoAssetTrack atTime:videoAssetTrack.timeRange.duration error:nil];
检索兼容的合成轨道
如果可能,您应该为每种媒体类型只设置一个合成轨道。
这种兼容资产轨道的统一可最大程度地减少资源使用量。
当按顺序呈现媒体数据时,您应该将任何相同类型的媒体数据放在同一个合成轨道上。
您可以查询可变合成,以查明是否有任何合成轨道与您想要的资产轨道兼容:
AVMutableCompositionTrack *compatibleCompositionTrack = [mutableComposition mutableTrackCompatibleWithTrack:<#the AVAssetTrack you want to insert#>];
if (compatibleCompositionTrack) {
    // Implementation continues.
}
注意: 将多个视频片段放在同一个合成轨道上可能会导致视频片段之间转换时播放时丢帧,尤其是在嵌入式设备上。
为视频片段选择合成轨道的数量完全取决于您的应用的设计及其目标平台。
3、生成音量斜坡
单个AVMutableAudioMix对象 可以单独对合成中的所有音轨执行自定义音频处理。
您可以使用audioMix类方法创建音频混合,并使用AVMutableAudioMixInputParameters类的实例将音频混合与合成中的特定音轨相关联。
音频混合可用于改变音轨的音量。
以下示例显示如何在特定音轨上设置音量渐变,以在合成持续时间内缓慢淡出音频:
AVMutableAudioMix *mutableAudioMix = [AVMutableAudioMix audioMix];
// Create the audio mix input parameters object.
AVMutableAudioMixInputParameters *mixParameters = [AVMutableAudioMixInputParameters audioMixInputParametersWithTrack:mutableCompositionAudioTrack];
// Set the volume ramp to slowly fade the audio out over the duration of the composition.
[mixParameters setVolumeRampFromStartVolume:1.f toEndVolume:0.f timeRange:CMTimeRangeMake(kCMTimeZero, mutableComposition.duration)];
// Attach the input parameters to the audio mix.
mutableAudioMix.inputParameters = @[mixParameters];
4、执行自定义视频处理
与音频混合一样,您只需要一个AVMutableVideoComposition对象即可对合成的视频轨道执行所有自定义视频处理。
使用视频合成,您可以直接为合成的视频轨道设置适当的渲染大小、比例和帧速率。
有关为这些属性设置适当值的详细示例,请参阅 设置渲染大小和帧持续时间。
改变构图的背景颜色
所有视频合成还必须具有一个包含至少一个视频合成指令的 AVVideoCompositionInstruction对象数组。
您可以使用AVMutableVideoCompositionInstruction类来创建自己的视频合成指令。
使用视频合成指令,您可以修改合成的背景颜色、指定是否需要后期处理或应用图层指令。
以下示例说明如何创建视频合成指令,将整个合成的背景颜色更改为红色。
AVMutableVideoCompositionInstruction *mutableVideoCompositionInstruction = [AVMutableVideoCompositionInstruction videoCompositionInstruction];
mutableVideoCompositionInstruction.timeRange = CMTimeRangeMake(kCMTimeZero, mutableComposition.duration);

mutableVideoCompositionInstruction.backgroundColor = [[UIColor redColor] CGColor];
应用不透明度渐变
视频合成指令还可用于应用视频合成层指令。
AVMutableVideoCompositionLayerInstruction 对象可以将变换、变换渐变、不透明度和不透明度渐变应用于合成中的某个视频轨道。
视频合成指令 layerInstructions 数组中的层指令顺序 决定了源轨道中的视频帧在该合成指令的持续时间内应如何分层和合成。
以下代码片段显示了如何设置不透明度渐变以在过渡到第二个视频之前缓慢淡出合成中的第一个视频:
AVAsset *firstVideoAssetTrack = <#AVAssetTrack representing the first video segment played in the composition#>;
AVAsset *secondVideoAssetTrack = <#AVAssetTrack representing the second video segment played in the composition#>;

// Create the first video composition instruction.
AVMutableVideoCompositionInstruction *firstVideoCompositionInstruction = [AVMutableVideoCompositionInstruction videoCompositionInstruction];

// Set its time range to span the duration of the first video track.
firstVideoCompositionInstruction.timeRange = CMTimeRangeMake(kCMTimeZero, firstVideoAssetTrack.timeRange.duration);

// Create the layer instruction and associate it with the composition video track.
AVMutableVideoCompositionLayerInstruction *firstVideoLayerInstruction = [AVMutableVideoCompositionLayerInstruction videoCompositionLayerInstructionWithAssetTrack:mutableCompositionVideoTrack];

// Create the opacity ramp to fade out the first video track over its entire duration.
[firstVideoLayerInstruction setOpacityRampFromStartOpacity:1.f toEndOpacity:0.f timeRange:CMTimeRangeMake(kCMTimeZero, firstVideoAssetTrack.timeRange.duration)];

// Create the second video composition instruction so that the second video track isn't transparent.
AVMutableVideoCompositionInstruction *secondVideoCompositionInstruction = [AVMutableVideoCompositionInstruction videoCompositionInstruction];

// Set its time range to span the duration of the second video track.
secondVideoCompositionInstruction.timeRange = CMTimeRangeMake(firstVideoAssetTrack.timeRange.duration, CMTimeAdd(firstVideoAssetTrack.timeRange.duration, secondVideoAssetTrack.timeRange.duration));

// Create the second layer instruction and associate it with the composition video track.
AVMutableVideoCompositionLayerInstruction *secondVideoLayerInstruction = [AVMutableVideoCompositionLayerInstruction videoCompositionLayerInstructionWithAssetTrack:mutableCompositionVideoTrack];

// Attach the first layer instruction to the first video composition instruction.
firstVideoCompositionInstruction.layerInstructions = @[firstVideoLayerInstruction];

// Attach the second layer instruction to the second video composition instruction.
secondVideoCompositionInstruction.layerInstructions = @[secondVideoLayerInstruction];

// Attach both of the video composition instructions to the video composition.
AVMutableVideoComposition *mutableVideoComposition = [AVMutableVideoComposition videoComposition];
mutableVideoComposition.instructions = @[firstVideoCompositionInstruction, secondVideoCompositionInstruction];
整合核心动画效果
视频合成可以通过该属性将 Core Animation 的 animationTool功能添加到您的合成中。
通过此动画工具,您可以完成诸如为视频添加水印、添加标题或动画叠加层等任务。
Core Animation 可以以两种不同的方式与视频合成一起使用:您可以将 Core Animation 图层添加为其自己的单独合成轨道,也可以将 Core Animation 效果(使用 Core Animation 图层)直接渲染到合成中的视频帧中。
以下代码通过在视频中心添加水印来显示后一种选项:
CALayer *watermarkLayer = <#CALayer representing your desired watermark image#>;
CALayer *parentLayer = [CALayer layer];
CALayer *videoLayer = [CALayer layer];
parentLayer.frame = CGRectMake(0, 0, mutableVideoComposition.renderSize.width, mutableVideoComposition.renderSize.height);
videoLayer.frame = CGRectMake(0, 0, mutableVideoComposition.renderSize.width, mutableVideoComposition.renderSize.height);
[parentLayer addSublayer:videoLayer];
watermarkLayer.position = CGPointMake(mutableVideoComposition.renderSize.width/2, mutableVideoComposition.renderSize.height/4);
[parentLayer addSublayer:watermarkLayer];
mutableVideoComposition.animationTool = [AVVideoCompositionCoreAnimationTool videoCompositionCoreAnimationToolWithPostProcessingAsVideoLayer:videoLayer inLayer:parentLayer];
5、整合:组合多个资产并将结果保存到相机胶卷
此简短的代码示例说明了如何组合两个视频资产轨道和一个音频资产轨道来创建单个视频文件。
它展示了如何:
- 创建
AVMutableComposition对象,并添加多个AVMutableCompositionTrack对象 - 将
AVAssetTrack对象的时间范围添加 到兼容的合成轨道 - 检查
preferredTransform视频资产轨道的属性 以确定视频的方向 - 使用
AVMutableVideoCompositionLayerInstruction对象 将变换应用于合成中的视频轨道 - 为视频合成的
renderSize和frameDuration属性 设置适当的值 - 导出视频文件时,将合成与视频合成结合使用
- 将视频文件保存到相机胶卷
注意: 为了专注于最相关的代码,此示例省略了完整应用的几个方面,例如内存管理和错误处理。
要使用 AVFoundation,您需要具有足够的 Cocoa 经验来推断缺失的部分。
创建构图
要将来自不同资产的轨道拼凑在一起,可以使用AVMutableComposition对象。
创建合成并添加一个音频轨道和一个视频轨道。
AVMutableComposition *mutableComposition = [AVMutableComposition composition];
AVMutableCompositionTrack *videoCompositionTrack = [mutableComposition addMutableTrackWithMediaType:AVMediaTypeVideo preferredTrackID:kCMPersistentTrackID_Invalid];

AVMutableCompositionTrack *audioCompositionTrack = [mutableComposition addMutableTrackWithMediaType:AVMediaTypeAudio preferredTrackID:kCMPersistentTrackID_Invalid];
添加资产
空的合成对您毫无用处。
将两个视频资源轨道和音频资源轨道添加到合成中。
AVAssetTrack *firstVideoAssetTrack = [[firstVideoAsset tracksWithMediaType:AVMediaTypeVideo] objectAtIndex:0];

AVAssetTrack *secondVideoAssetTrack = [[secondVideoAsset tracksWithMediaType:AVMediaTypeVideo] objectAtIndex:0];

[videoCompositionTrack insertTimeRange:CMTimeRangeMake(kCMTimeZero, firstVideoAssetTrack.timeRange.duration) ofTrack:firstVideoAssetTrack atTime:kCMTimeZero error:nil];

[videoCompositionTrack insertTimeRange:CMTimeRangeMake(kCMTimeZero, secondVideoAssetTrack.timeRange.duration) ofTrack:secondVideoAssetTrack atTime:firstVideoAssetTrack.timeRange.duration error:nil];

[audioCompositionTrack insertTimeRange:CMTimeRangeMake(kCMTimeZero, CMTimeAdd(firstVideoAssetTrack.timeRange.duration, secondVideoAssetTrack.timeRange.duration)) ofTrack:[[audioAsset tracksWithMediaType:AVMediaTypeAudio] objectAtIndex:0] atTime:kCMTimeZero error:nil];
注意: 这假设您有两个资产,每个资产至少包含一个视频轨道,第三个资产至少包含一个音轨。
视频可以从相机胶卷中检索,音轨可以从音乐库或视频本身中检索。
检查视频方向
将视频和音频轨道添加到合成中后,您需要确保两个视频轨道的方向正确。
默认情况下,所有视频轨道都假定为横向模式。
如果您的视频轨道是在纵向模式下拍摄的,则导出时视频的方向将不正确。
同样,如果您尝试将纵向模式下拍摄的视频与横向模式下拍摄的视频相结合,则导出会话将无法完成。
BOOL isFirstVideoPortrait = NO;
CGAffineTransform firstTransform = firstVideoAssetTrack.preferredTransform;

// Check the first video track's preferred transform to determine if it was recorded in portrait mode.
if (firstTransform.a == 0 && firstTransform.d == 0 && (firstTransform.b == 1.0 || firstTransform.b == -1.0) && (firstTransform.c == 1.0 || firstTransform.c == -1.0)) {
    isFirstVideoPortrait = YES;
}
BOOL isSecondVideoPortrait = NO;
CGAffineTransform secondTransform = secondVideoAssetTrack.preferredTransform;

// Check the second video track's preferred transform to determine if it was recorded in portrait mode.
if (secondTransform.a == 0 && secondTransform.d == 0 && (secondTransform.b == 1.0 || secondTransform.b == -1.0) && (secondTransform.c == 1.0 || secondTransform.c == -1.0)) {
    isSecondVideoPortrait = YES;
}

if ((isFirstVideoAssetPortrait && !isSecondVideoAssetPortrait) || (!isFirstVideoAssetPortrait && isSecondVideoAssetPortrait)) {
    UIAlertView *incompatibleVideoOrientationAlert = [[UIAlertView alloc] initWithTitle:@"Error!" message:@"Cannot combine a video shot in portrait mode with a video shot in landscape mode." delegate:self cancelButtonTitle:@"Dismiss" otherButtonTitles:nil];
    [incompatibleVideoOrientationAlert show];
    return;
}
应用视频合成层说明
一旦您知道视频片段具有兼容的方向,您就可以将必要的图层指令应用于每个视频片段,并将这些图层指令添加到视频合成中。
AVMutableVideoCompositionInstruction *firstVideoCompositionInstruction = [AVMutableVideoCompositionInstruction videoCompositionInstruction];

// Set the time range of the first instruction to span the duration of the first video track.
firstVideoCompositionInstruction.timeRange = CMTimeRangeMake(kCMTimeZero, firstVideoAssetTrack.timeRange.duration);
AVMutableVideoCompositionInstruction * secondVideoCompositionInstruction = [AVMutableVideoCompositionInstruction videoCompositionInstruction];

// Set the time range of the second instruction to span the duration of the second video track.
secondVideoCompositionInstruction.timeRange = CMTimeRangeMake(firstVideoAssetTrack.timeRange.duration, CMTimeAdd(firstVideoAssetTrack.timeRange.duration, secondVideoAssetTrack.timeRange.duration));
AVMutableVideoCompositionLayerInstruction *firstVideoLayerInstruction = [AVMutableVideoCompositionLayerInstruction videoCompositionLayerInstructionWithAssetTrack:videoCompositionTrack];

// Set the transform of the first layer instruction to the preferred transform of the first video track.
[firstVideoLayerInstruction setTransform:firstTransform atTime:kCMTimeZero];
AVMutableVideoCompositionLayerInstruction *secondVideoLayerInstruction = [AVMutableVideoCompositionLayerInstruction videoCompositionLayerInstructionWithAssetTrack:videoCompositionTrack];

// Set the transform of the second layer instruction to the preferred transform of the second video track.
[secondVideoLayerInstruction setTransform:secondTransform atTime:firstVideoAssetTrack.timeRange.duration];
firstVideoCompositionInstruction.layerInstructions = @[firstVideoLayerInstruction];
secondVideoCompositionInstruction.layerInstructions = @[secondVideoLayerInstruction];
AVMutableVideoComposition *mutableVideoComposition = [AVMutableVideoComposition videoComposition];
mutableVideoComposition.instructions = @[firstVideoCompositionInstruction, secondVideoCompositionInstruction];
所有AVAssetTrack对象都具有一个 包含该资源轨道方向信息的 preferredTransform属性。
只要资源轨道显示在屏幕上,就会应用此变换。
在前面的代码中,图层指令的变换设置为资源轨道的变换,这样,一旦您调整其渲染大小,新合成中的视频就会正确显示。
设置渲染大小和帧持续时间
要完成视频方向修复,您必须相应地调整 renderSize属性。
您还应该为 frameDuration 属性选择一个合适的值,例如 1/30 秒(或每秒 30 帧)。
默认情况下, renderScale 属性设置为1.0,这适合此合成。
CGSize naturalSizeFirst, naturalSizeSecond;
// If the first video asset was shot in portrait mode, then so was the second one if we made it here.
if (isFirstVideoAssetPortrait) {
// Invert the width and height for the video tracks to ensure that they display properly.
    naturalSizeFirst = CGSizeMake(firstVideoAssetTrack.naturalSize.height, firstVideoAssetTrack.naturalSize.width);
    naturalSizeSecond = CGSizeMake(secondVideoAssetTrack.naturalSize.height, secondVideoAssetTrack.naturalSize.width);
}
else {
// If the videos weren't shot in portrait mode, we can just use their natural sizes.
    naturalSizeFirst = firstVideoAssetTrack.naturalSize;
    naturalSizeSecond = secondVideoAssetTrack.naturalSize;
}
float renderWidth, renderHeight;
// Set the renderWidth and renderHeight to the max of the two videos widths and heights.
if (naturalSizeFirst.width > naturalSizeSecond.width) {
    renderWidth = naturalSizeFirst.width;
}
else {
    renderWidth = naturalSizeSecond.width;
}
if (naturalSizeFirst.height > naturalSizeSecond.height) {
    renderHeight = naturalSizeFirst.height;
}
else {
    renderHeight = naturalSizeSecond.height;
}
mutableVideoComposition.renderSize = CGSizeMake(renderWidth, renderHeight);
// Set the frame duration to an appropriate value (i.e. 30 frames per second for video).
mutableVideoComposition.frameDuration = CMTimeMake(1,30);
导出构图并将其保存到相机胶卷
此过程的最后一步是将整个合成导出为单个视频文件,并将该视频保存到相机胶卷中。
您可以使用AVAssetExportSession对象创建新的视频文件,并将输出文件的所需 URL 传递给它。
然后,您可以使用ALAssetsLibrary类将生成的视频文件保存到相机胶卷中。
// Create a static date formatter so we only have to initialize it once.
static NSDateFormatter *kDateFormatter;
if (!kDateFormatter) {
    kDateFormatter = [[NSDateFormatter alloc] init];
    kDateFormatter.dateStyle = NSDateFormatterMediumStyle;
    kDateFormatter.timeStyle = NSDateFormatterShortStyle;
}

// Create the export session with the composition and set the preset to the highest quality.
AVAssetExportSession *exporter = [[AVAssetExportSession alloc] initWithAsset:mutableComposition presetName:AVAssetExportPresetHighestQuality];

// Set the desired output URL for the file created by the export process.
exporter.outputURL = [[[[NSFileManager defaultManager] URLForDirectory:NSDocumentDirectory inDomain:NSUserDomainMask appropriateForURL:nil create:@YES error:nil] URLByAppendingPathComponent:[kDateFormatter stringFromDate:[NSDate date]]] URLByAppendingPathExtension:CFBridgingRelease(UTTypeCopyPreferredTagWithClass((CFStringRef)AVFileTypeQuickTimeMovie, kUTTagClassFilenameExtension))];

// Set the output file type to be a QuickTime movie.
exporter.outputFileType = AVFileTypeQuickTimeMovie;
exporter.shouldOptimizeForNetworkUse = YES;
exporter.videoComposition = mutableVideoComposition;

// Asynchronously export the composition to a video file and save this file to the camera roll once export completes.
[exporter exportAsynchronouslyWithCompletionHandler:^{
    dispatch_async(dispatch_get_main_queue(), ^{
        if (exporter.status == AVAssetExportSessionStatusCompleted) {
            ALAssetsLibrary *assetsLibrary = [[ALAssetsLibrary alloc] init];
            if ([assetsLibrary videoAtPathIsCompatibleWithSavedPhotosAlbum:exporter.outputURL]) {
                [assetsLibrary writeVideoAtPathToSavedPhotosAlbum:exporter.outputURL completionBlock:NULL];
            }
        }
    });
}];
五、静态和视频媒体捕获
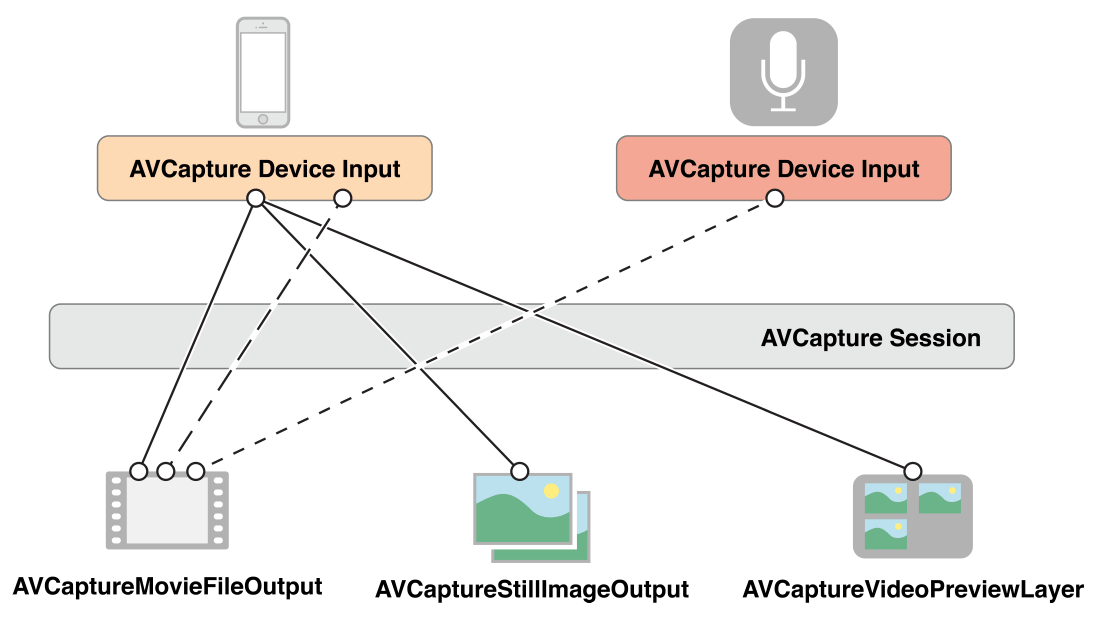
要管理来自相机或麦克风等设备的捕获,您需要组装对象来表示输入和输出,并使用 AVCaptureSession 实例来协调它们之间的数据流。
您至少需要:
- 表示输入设备的
AVCaptureDevice实例,例如摄像头或麦克风 - 用于配置输入设备端口的具体子类 的
AVCaptureInput实例 - 用于管理电影文件或静态图像输出的具体子类 的
AVCaptureOutput实例 - 协调从输入到输出的数据流 的
AVCaptureSession实例
为了向用户显示摄像机正在录制内容的预览,您可以使用AVCaptureVideoPreviewLayer(CALayer的子类) 的实例。
您可以配置多个输入和输出,由单个会话协调,如图4-1所示
图 4-1 单个会话可以配置多个输入和输出
对于许多应用程序来说,这就是您所需要的详细信息。
但是,对于某些操作(例如,如果您想要监控音频通道中的功率水平),您需要考虑如何表示输入设备的各个端口以及这些端口如何连接到输出。
捕获会话中捕获输入和捕获输出之间的连接由AVCaptureConnection对象表示。
捕获输入(AVCaptureInput的实例)有一个或多个输入端口(AVCaptureInputPort的实例)。
捕获输出(AVCaptureOutput的实例)可以接受来自一个或多个源的数据(例如,一个AVCaptureMovieFileOutput对象同时接受视频和音频数据)。
当您将输入或输出添加到会话时,会话会在所有兼容的捕获输入端口和捕获输出之间建立连接,如图4-2所示。
捕获输入和捕获输出之间的连接由AVCaptureConnection对象表示。
图 4-2 AVCaptureConnection 表示输入和输出之间的连接
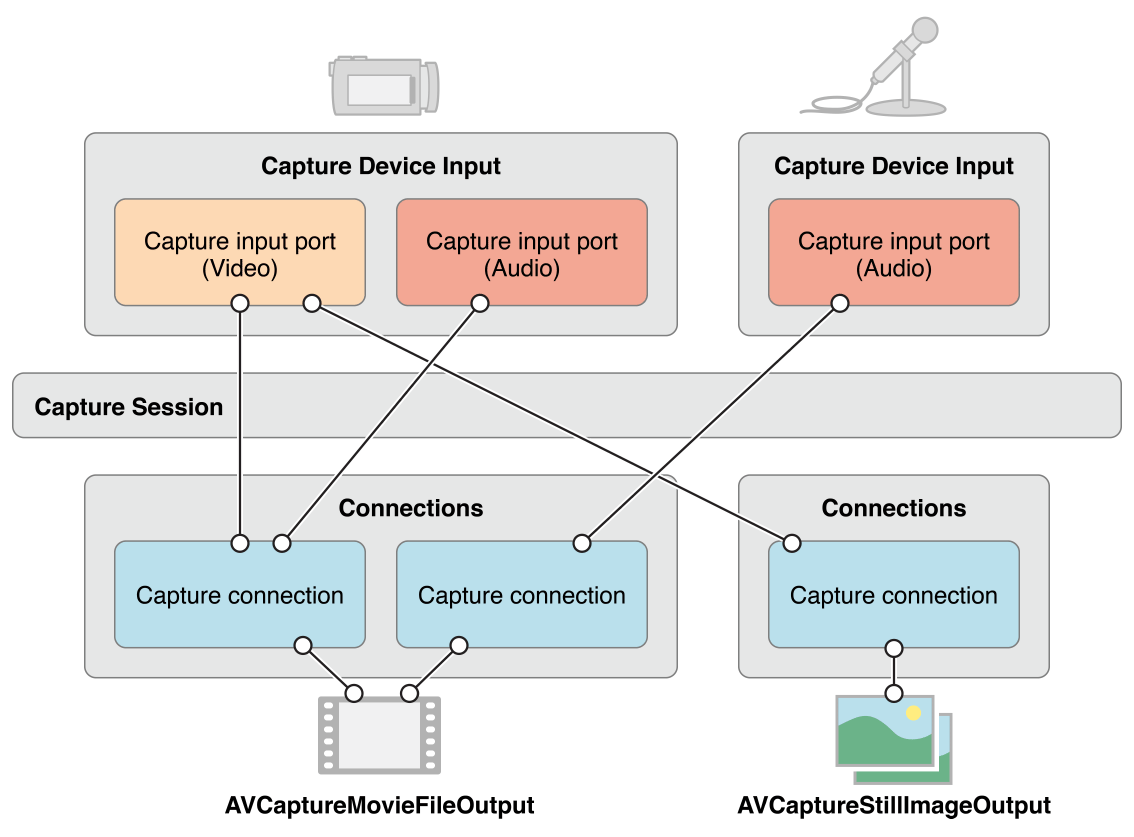
您可以使用捕获连接来启用或禁用来自给定输入或给定输出的数据流。
您还可以使用连接来监控音频通道中的平均和峰值功率水平。
注意: 媒体捕获不支持 iOS 设备上的前置和后置摄像头同时捕获。
1、使用捕获会话来协调数据流
AVCaptureSession对象是您用来管理数据捕获的中央协调对象。
您可以使用实例来协调从 AV 输入设备到输出的数据流。
您将所需的捕获设备和输出添加到会话,然后通过向会话发送startRunning消息 来启动数据流,并通过发送stopRunning消息 来停止数据流。
AVCaptureSession *session = [[AVCaptureSession alloc] init];

// Add inputs and outputs.
[session startRunning];
配置会话
您可以在会话中使用预设来指定所需的图像质量和分辨率。
预设是一个常量,用于标识多种可能配置之一;在某些情况下,实际配置是特定于设备的:
| 象征 | 解决 | 评论 |
|---|---|---|
AVCaptureSessionPresetHigh | 高的 | 最高录音质量。 这因设备而异。 |
AVCaptureSessionPresetMedium | 中等的 | 适合Wi-Fi共享。 实际值可能会改变。 |
AVCaptureSessionPresetLow | 低的 | 适合3G共享。 实际值可能会改变。 |
AVCaptureSessionPreset640x480 | 640x480 | VGA。 |
AVCaptureSessionPreset1280x720 | 1280x720 | 720p 高清。 |
AVCaptureSessionPresetPhoto | 照片 | 全照片分辨率。 这不支持视频输出。 |
如果要设置特定于媒体帧大小的配置,则应在设置之前检查它是否受支持,如下所示:
if ([session canSetSessionPreset:AVCaptureSessionPreset1280x720]) {
    session.sessionPreset = AVCaptureSessionPreset1280x720;
}
else {
    // Handle the failure.
}
如果您需要以比预设更精细的级别调整会话参数,或者想要更改正在运行的会话,则可以使用 beginConfiguration和 commitConfiguration方法包围更改。
beginConfiguration和commitConfiguration方法可确保设备更改以组的形式发生,从而最大限度地减少可见性或状态不一致。
调用beginConfiguration后,您可以添加或删除输出、更改sessionPreset属性 或配置单个捕获输入或输出属性。
在调用commitConfiguration之前不会真正进行任何更改,此时它们将一起应用。
[session beginConfiguration];

// Remove an existing capture device.
// Add a new capture device.
// Reset the preset.
[session commitConfiguration];
监控捕获会话状态
捕获会话会发布通知,您可以观察这些通知以接收通知,例如,当会话开始或停止运行时,或者当会话中断时。
您可以注册以在发生运行时错误时 接收AVCaptureSessionRuntimeErrorNotification通知。
您还可以查询会话的 running 属性以了解会话是否正在运行,查询其 interrupted 属性以了解会话是否中断。
此外,running和interrupted 属性都符合键值观察标准,并且通知会发布在主线程上。
2、AVCaptureDevice 对象代表输入设备
AVCaptureDevice 对象抽象了 向 AVCaptureSession 对象提供输入数据(例如音频或视频)的物理捕获设备。
每个输入设备都有一个对象,例如两个视频输入(一个用于前置摄像头,一个用于后置摄像头)和一个音频输入用于麦克风。
您可以使用 AVCaptureDevice 的类方法devices和devicesWithMediaType: 找出当前可用的捕获设备。
并且,如有必要,您可以找出 iPhone、iPad 或 iPod 提供的功能(请参阅 设备捕获设置)。
但是,可用设备列表可能会发生变化。
当前输入设备可能变得不可用(如果它们被另一个应用程序使用),并且新的输入设备可能变得可用(如果它们被另一个应用程序放弃)。
您应该注册接收AVCaptureDeviceWasConnectedNotification和AVCaptureDeviceWasDisconnectedNotification 通知,以便在可用设备列表发生变化时收到警报。
您可以使用捕获输入将输入设备添加到捕获会话(请参阅 使用捕获输入将捕获设备添加到会话)。
设备特性
您可以询问设备的不同特性。
您还可以分别使用 hasMediaType: 和 supportsAVCaptureSessionPreset: 来测试它是否提供特定的媒体类型或支持给定的捕获会话预设。
为了向用户提供信息,您可以找出捕获设备的位置(它是在被测试设备的正面还是背面)及其本地化名称。
如果您想显示捕获设备列表以允许用户选择一个,这可能会很有用。
图 4-3显示了后置(AVCaptureDevicePositionBack)和前置(AVCaptureDevicePositionFront)摄像头的位置。
注意: 媒体捕获不支持 iOS 设备上的前置和后置摄像头同时捕获。
图4-3 iOS设备前置和后置摄像头位置

以下代码示例遍历所有可用设备并在设备上记录它们的名称(对于视频设备,则记录它们的位置)。
NSArray *devices = [AVCaptureDevice devices];

for (AVCaptureDevice *device in devices) {

    NSLog(@"Device name: %@", [device localizedName]);

    if ([device hasMediaType:AVMediaTypeVideo]) {

        if ([device position] == AVCaptureDevicePositionBack) {
            NSLog(@"Device position : back");
        }
        else {
            NSLog(@"Device position : front");
        }
    }
}
此外,您还可以找出设备的型号ID及其唯一ID。
设备捕获设置
不同的设备具有不同的功能;例如,有些设备可能支持不同的焦点或闪光模式;有些设备可能支持对兴趣点的聚焦。
以下代码片段显示了如何查找具有手电筒模式并支持给定捕获会话预设的视频输入设备:
NSArray *devices = [AVCaptureDevice devicesWithMediaType:AVMediaTypeVideo];
NSMutableArray *torchDevices = [[NSMutableArray alloc] init];

for (AVCaptureDevice *device in devices) {
    [if ([device hasTorch] &&
         [device supportsAVCaptureSessionPreset:AVCaptureSessionPreset640x480]) {
        [torchDevices addObject:device];
    }
}
如果您找到多个符合条件的设备,您可以让用户选择要使用哪一个。
要向用户显示设备描述,您可以使用 localizedName 属性。
您可以以类似的方式使用各种不同的功能。
有一些常量可以指定特定模式,您可以询问设备是否支持特定模式。
在某些情况下,您可以观察属性,以便在功能发生变化时收到通知。
在所有情况下,您都应在更改特定功能的模式之前锁定设备,如配置设备中所述。
注意: 对焦兴趣点和曝光兴趣点是互相排斥的,对焦模式和曝光模式也是互相排斥的。
对焦模式
共有三种对焦模式:
AVCaptureFocusModeLocked:焦点位置固定。
当您想允许用户构图场景然后锁定焦点时,这很有用。AVCaptureFocusModeAutoFocus:相机进行单次扫描对焦然后恢复锁定。
这适用于您想要选择特定项目作为焦点然后保持对该项目关注的情况,即使它不是场景的中心。AVCaptureFocusModeContinuousAutoFocus:相机根据需要连续自动对焦。
使用 isFocusModeSupported:方法来确定设备是否支持给定的焦点模式,然后使用 focusMode 属性设置该模式。
此外,设备可能支持兴趣焦点。
您可以使用 focusPointOfInterestSupported 测试是否支持。
如果支持,则使用 focusPointOfInterest 设置焦点。
您传递一个CGPoint,其中{0,0}表示图片区域的左上角,{1,1}表示横向模式下的右下角,右侧有 主页按钮 —— 即使设备处于纵向模式,这也适用。
您可以使用 adjustingFocus 属性来确定设备当前是否处于聚焦状态。
您可以使用键值观察来观察该属性,以便在设备开始和停止聚焦时收到通知。
如果您更改了焦点模式设置,则可以按如下方式将其恢复为默认配置:
if ([currentDevice isFocusModeSupported:AVCaptureFocusModeContinuousAutoFocus]) {
    CGPoint autofocusPoint = CGPointMake(0.5f, 0.5f);
    [currentDevice setFocusPointOfInterest:autofocusPoint];
    [currentDevice setFocusMode:AVCaptureFocusModeContinuousAutoFocus];
}
曝光模式
有两种曝光模式:
- AVCaptureExposureModeContinuousAutoExposure:设备根据需要自动调整曝光水平。
AVCaptureExposureModeLocked:曝光等级固定为当前等级。
使用 isExposureModeSupported: 方法来确定设备是否支持给定的曝光模式,然后使用 exposureMode 属性设置该模式。
此外,设备可能支持曝光兴趣点。
您可以使用 exposurePointOfInterestSupported 测试是否支持。
如果支持,则使用 exposurePointOfInterest 设置曝光点。
您传递一个CGPoint,其中{0,0}表示图片区域的左上角,{1,1}表示横向模式下的右下角,右侧有 主页按钮 —— 即使设备处于纵向模式,这也适用。
您可以使用 adjustingExposure 属性来确定设备当前是否正在更改其曝光设置。
您可以使用键值观察来观察该属性,以便在设备开始和停止更改其曝光设置时收到通知。
如果更改曝光设置,可以按如下方式将其恢复为默认配置:
if ([currentDevice isExposureModeSupported:AVCaptureExposureModeContinuousAutoExposure]) {
    CGPoint exposurePoint = CGPointMake(0.5f, 0.5f);
    [currentDevice setExposurePointOfInterest:exposurePoint];
    [currentDevice setExposureMode:AVCaptureExposureModeContinuousAutoExposure];
}
闪光模式
共有三种闪光模式:
AVCaptureFlashModeOff:闪光灯永不闪光。AVCaptureFlashModeOn:闪光灯始终闪光。AVCaptureFlashModeAuto:闪光灯将根据环境光条件闪光。
使用hasFlash来确定设备是否具有闪光灯。
如果该方法返回YES,则使用 isFlashModeSupported: 方法来传递所需的模式,以确定设备是否支持给定的闪光灯模式,然后使用 flashMode 属性来设置模式。
手电筒模式
在手电筒模式下,闪光灯会持续以低功率启用,以照亮视频拍摄。
手电筒模式有三种:
AVCaptureTorchModeOff:手电筒始终处于关闭状态。AVCaptureTorchModeOn:手电筒一直亮着。AVCaptureTorchModeAuto:手电筒根据需要自动打开和关闭。
使用hasTorch来确定设备是否有闪光灯。
使用 isTorchModeSupported: 方法来判断设备是否支持给定的闪光灯模式,然后使用 torchMode 属性来设置该模式。
对于带有手电筒的设备,仅当设备与正在运行的捕获会话相关联时,手电筒才会打开。
视频稳定
影院级视频稳定功能适用于视频操作连接,具体取决于特定设备硬件。
即便如此,并非所有源格式和视频分辨率都受支持。
启用影院级视频稳定功能还可能会给视频捕获管道带来额外的延迟。
要检测何时使用视频稳定功能,请使用 videoStabilizationEnabled 属性。
如果摄像头支持视频稳定功能,则 enablesVideoStabilizationWhenAvailable 属性允许应用程序自动启用视频稳定功能。
由于上述限制,默认情况下自动稳定功能处于停用状态。
白平衡
有两种白平衡模式:
AVCaptureWhiteBalanceModeLocked:白平衡模式固定。AVCaptureWhiteBalanceModeContinuousAutoWhiteBalance:相机根据需要连续调整白平衡。
使用 isWhiteBalanceModeSupported: 方法来确定设备是否支持给定的白平衡模式,然后使用 whiteBalanceMode 属性设置该模式。
您可以使用 adjustingWhiteBalance 属性来确定设备当前是否正在更改其白平衡设置。
您可以使用键值观察来观察该属性,以便在设备开始和停止更改其白平衡设置时收到通知。
设置设备方向
您可以在 AVCaptureConnection 上设置所需的方向,以指定连接的 AVCaptureOutput(AVCaptureMovieFileOutput、AVCaptureStillImageOutput和AVCaptureVideoDataOutput)中图像的方向。
使用 AVCaptureConnectionsupportsVideoOrientation 属性来确定设备是否支持更改视频的方向,并使用 videoOrientation 属性指定您希望图像在输出端口中的方向。
示例 4-1显示了如何将 AVCaptureConnection 的方向设置为AVCaptureVideoOrientationLandscapeLeft:
示例 4-1 设置捕获连接的方向
AVCaptureConnection *captureConnection = <#A capture connection#>;
if ([captureConnection isVideoOrientationSupported])
{
    AVCaptureVideoOrientation orientation = AVCaptureVideoOrientationLandscapeLeft;
    [captureConnection setVideoOrientation:orientation];
}
配置设备
要在设备上设置捕获属性,您必须首先使用 lockForConfiguration: 获取设备上的锁定。
这样可以避免进行与其他应用程序中的设置不兼容的更改。
以下代码片段说明了如何通过首先确定是否支持该模式,然后尝试锁定设备以进行重新配置来更改设备上的焦点模式。
仅当获得锁定后才会更改焦点模式,之后会立即释放锁定。
if ([device isFocusModeSupported:AVCaptureFocusModeLocked]) {
    NSError *error = nil;
    if ([device lockForConfiguration:&error]) {
        device.focusMode = AVCaptureFocusModeLocked;
        [device unlockForConfiguration];
    }
    else {
        // Respond to the failure as appropriate.
仅当您需要可设置的设备属性保持不变时,才应保持设备锁定。
不必要地保持设备锁定可能会降低共享该设备的其他应用程序的捕获质量。
在设备之间切换
有时您可能希望允许用户在输入设备之间切换 - 例如,从使用前置摄像头切换到后置摄像头。
为避免暂停或卡顿,您可以在会话运行时重新配置会话,但您应使用beginConfiguration和commitConfiguration括住配置更改:
AVCaptureSession *session = <#A capture session#>;
[session beginConfiguration];

[session removeInput:frontFacingCameraDeviceInput];
[session addInput:backFacingCameraDeviceInput];

[session commitConfiguration];
当最外层commitConfiguration被调用时,所有更改都会一起进行。
这确保了平稳过渡。
3、使用捕获输入将捕获设备添加到会话
要将捕获设备添加到捕获会话,请使用AVCaptureDeviceInput(抽象类AVCaptureInput的具体子类)的实例。
捕获设备输入管理设备的端口。
NSError *error;
AVCaptureDeviceInput *input =
        [AVCaptureDeviceInput deviceInputWithDevice:device error:&error];
if (!input) {
    // Handle the error appropriately.
}
使用 addInput: 向会话添加输入。
如果合适,可以使用 canAddInput: 检查捕获输入是否与现有会话兼容。
AVCaptureSession *captureSession = <#Get a capture session#>;
AVCaptureDeviceInput *captureDeviceInput = <#Get a capture device input#>;
if ([captureSession canAddInput:captureDeviceInput]) {
    [captureSession addInput:captureDeviceInput];
}
else {
    // Handle the failure.
}
有关如何重新配置正在运行的会话的更多详细信息,请参阅 配置会话。
AVCaptureInput提供一个或多个媒体数据流。
例如,输入设备可以同时提供音频和视频数据。
输入提供的每个媒体流都由一个 AVCaptureInputPort 对象表示。
捕获会话使用AVCaptureConnection对象 来定义一组AVCaptureInputPort对象 与 单个AVCaptureOutput之间的映射。
4、使用捕获输出获取会话的输出
要从捕获会话中获取输出,请添加一个或多个输出。
输出是 AVCaptureOutput 具体子类的实例。
您可以使用:
AVCaptureMovieFileOutput: 输出到影片文件AVCaptureVideoDataOutput: 例如,如果你想处理捕获的视频中的帧,以创建你自己的自定义视图层AVCaptureAudioDataOutput: 如果你想处理正在捕获的音频数据AVCaptureStillImageOutput: 如果你想捕捉带有元数据的静态图像
使用 addOutput: 向捕获会话添加输出。
使用 canAddOutput: 检查捕获输出是否与现有会话兼容。
在会话运行时,可以根据需要添加和删除输出。
AVCaptureSession *captureSession = <#Get a capture session#>;
AVCaptureMovieFileOutput *movieOutput = <#Create and configure a movie output#>;
if ([captureSession canAddOutput:movieOutput]) {
    [captureSession addOutput:movieOutput];
}
else {
    // Handle the failure.
}
保存为影片文件
您可以使用AVCaptureMovieFileOutput对象将电影数据保存到文件中。
(AVCaptureMovieFileOutput是 AVCaptureFileOutput的具体子类,它定义了许多基本行为。)您可以配置电影文件输出的各个方面,例如录制的最大持续时间或其最大文件大小。
如果剩余的磁盘空间少于给定量,您还可以禁止录制。
AVCaptureMovieFileOutput *aMovieFileOutput = [[AVCaptureMovieFileOutput alloc] init];
CMTime maxDuration = <#Create a CMTime to represent the maximum duration#>;
aMovieFileOutput.maxRecordedDuration = maxDuration;
aMovieFileOutput.minFreeDiskSpaceLimit = <#An appropriate minimum given the quality of the movie format and the duration#>;
输出的分辨率和比特率取决于捕获会话的sessionPreset。
视频编码通常为 H.264,音频编码通常为 AAC。
实际值因设备而异。
开始录音
使用 startRecordingToOutputFileURL:recordingDelegate: 开始录制 QuickTime 影片。
您需要提供基于文件的 URL 和委托。
URL 不得标识现有文件,因为影片文件输出不会覆盖现有资源。
您还必须具有写入指定位置的权限。
委托必须符合AVCaptureFileOutputRecordingDelegate协议,并且必须实现captureOutput:didFinishRecordingToOutputFileAtURL:fromConnections:error:方法。
AVCaptureMovieFileOutput *aMovieFileOutput = <#Get a movie file output#>;
NSURL *fileURL = <#A file URL that identifies the output location#>;
[aMovieFileOutput startRecordingToOutputFileURL:fileURL recordingDelegate:<#The delegate#>];
在 captureOutput:didFinishRecordingToOutputFileAtURL:fromConnections:error: 的实现中,委托可能会将生成的影片写入相机胶卷相册。
它还应检查可能发生的任何错误。
确保文件已成功写入
要确定文件是否保存成功,在实施 captureOutput:didFinishRecordingToOutputFileAtURL:fromConnections:error: 过程中不仅要检查错误,还要检查错误的用户信息字典中AVErrorRecordingSuccessfullyFinishedKey的值:
- (void)captureOutput:(AVCaptureFileOutput *)captureOutput
        didFinishRecordingToOutputFileAtURL:(NSURL *)outputFileURL
        fromConnections:(NSArray *)connections
        error:(NSError *)error {

    BOOL recordedSuccessfully = YES;
    if ([error code] != noErr) {
        // A problem occurred: Find out if the recording was successful.
        id value = [[error userInfo] objectForKey:AVErrorRecordingSuccessfullyFinishedKey];
        if (value) {
            recordedSuccessfully = [value boolValue];
        }
    }
    // Continue as appropriate...
您应该检查错误的用户信息字典中的 AVErrorRecordingSuccessfullyFinishedKey 键值,因为即使出现错误,文件也可能已成功保存。
错误可能表示已达到您的某个录制限制 — 例如 AVErrorMaximumFileSizeReached 或AVErrorMaximumDurationReached。
录制可能停止的其他原因包括:
- 磁盘已满 ——
AVErrorDiskFull - 录音设备已断开 ——
AVErrorDeviceWasDisconnected - 会话被中断(例如接到电话)——
AVErrorSessionWasInterrupted
向文件添加元数据
您可以随时设置电影文件的元数据,即使在录制过程中也是如此。
这对于录制开始时无法获取信息的情况非常有用,例如位置信息。
文件输出的元数据由AVMetadataItem对象数组表示;
您可以使用其可变子类的实例,AVMutableMetadataItem,来创建您自己的元数据。
AVCaptureMovieFileOutput *aMovieFileOutput = <#Get a movie file output#>;
NSArray *existingMetadataArray = aMovieFileOutput.metadata;
NSMutableArray *newMetadataArray = nil;
if (existingMetadataArray) {
    newMetadataArray = [existingMetadataArray mutableCopy];
}
else {
    newMetadataArray = [[NSMutableArray alloc] init];
}

AVMutableMetadataItem *item = [[AVMutableMetadataItem alloc] init];
item.keySpace = AVMetadataKeySpaceCommon;
item.key = AVMetadataCommonKeyLocation;

CLLocation *location - <#The location to set#>;
item.value = [NSString stringWithFormat:@"%+08.4lf%+09.4lf/"
    location.coordinate.latitude, location.coordinate.longitude];

[newMetadataArray addObject:item];

aMovieFileOutput.metadata = newMetadataArray;
处理视频帧
AVCaptureVideoDataOutput 对象使用委托来销售视频帧。
您可以使用 setSampleBufferDelegate:queue: 设置委托。
除了设置委托之外,您还可以指定一个串行队列,委托方法将在该队列上调用。
您必须使用串行队列来确保以正确的顺序将帧传递给委托。
您可以使用队列来修改交付和处理视频帧的优先级。
有关示例实现,请参阅 SquareCam。
帧在委托方法 captureOutput:didOutputSampleBuffer:fromConnection: 中呈现,为不透明类型CMSampleBufferRef 的实例(请参阅 媒体表示)。
默认情况下,缓冲区以相机最有效的格式发射。
您可以使用videoSettings属性指定自定义输出格式。
视频设置属性是一个字典;目前,唯一支持的键是kCVPixelBufferPixelFormatTypeKey。
availableVideoCVPixelFormatTypes 属性返回推荐的像素格式, availableVideoCodecTypes 属性返回支持的值。
Core Graphics 和 OpenGL 都适用于以下BGRA格式:
AVCaptureVideoDataOutput *videoDataOutput = [AVCaptureVideoDataOutput new];
NSDictionary *newSettings =
                @{ (NSString *)kCVPixelBufferPixelFormatTypeKey : @(kCVPixelFormatType_32BGRA) };
videoDataOutput.videoSettings = newSettings;

// discard if the data output queue is blocked (as we process the still image
[videoDataOutput setAlwaysDiscardsLateVideoFrames:YES];)

// create a serial dispatch queue used for the sample buffer delegate as well as when a still image is captured
// a serial dispatch queue must be used to guarantee that video frames will be delivered in order
// see the header doc for setSampleBufferDelegate:queue: for more information
videoDataOutputQueue = dispatch_queue_create("VideoDataOutputQueue", DISPATCH_QUEUE_SERIAL);
[videoDataOutput setSampleBufferDelegate:self queue:videoDataOutputQueue];

AVCaptureSession *captureSession = <#The Capture Session#>;

if ( [captureSession canAddOutput:videoDataOutput] )
     [captureSession addOutput:videoDataOutput];
处理视频的性能注意事项
您应该将会话输出设置为应用程序的最低实际分辨率。
将输出设置为高于必要分辨率会浪费处理周期,并且不必要地消耗电量。
您必须确保您的captureOutput:didOutputSampleBuffer:fromConnection:实现 能够在分配给帧的时间内处理样本缓冲区。
如果花费的时间太长并且您保留了视频帧,AV Foundation 将停止传送帧,不仅传送给您的委托,还会传送给其他输出(例如预览层)。
您可以使用捕获视频数据输出的 minFrameDuration 属性来确保您有足够的时间来处理帧 - 但代价是帧速率低于其他情况。
您还可以确保将 alwaysDiscardsLateVideoFrames 属性设置为YES(默认值)。
这可确保任何延迟的视频帧都会被丢弃,而不是交给您进行处理。
或者,如果您正在录制并且输出帧稍晚并不重要并且您希望获得所有帧,则可以将属性值设置为NO。
这并不意味着不会丢弃帧(即,仍可能会丢弃帧),而是它们可能不会那么早或那么高效地丢弃。
拍摄静态图像
如果您想要捕获带有元数据的静态图像,则可以使用AVCaptureStillImageOutput输出。
图像的分辨率取决于会话的预设以及设备。
像素和编码格式
不同的设备支持不同的图像格式。
您可以分别使用 availableImageDataCVPixelFormatTypes 和 availableImageDataCodecTypes 来找出设备支持的像素和编解码器类型。
每个方法都会返回特定设备支持的值的数组。
您可以设置outputSettings字典来指定所需的图像格式,例如:
AVCaptureStillImageOutput *stillImageOutput = [[AVCaptureStillImageOutput alloc] init];
NSDictionary *outputSettings = @{ AVVideoCodecKey : AVVideoCodecJPEG};
[stillImageOutput setOutputSettings:outputSettings];
如果您想要捕获 JPEG 图像,通常不应指定自己的压缩格式。
相反,您应该让静态图像输出为您进行压缩,因为它的压缩是硬件加速的。
如果您需要图像的数据表示,您可以使用 jpegStillImageNSDataRepresentation: 来获取NSData对象而无需重新压缩数据,即使您修改了图像的元数据。
捕获图像
当您想要捕获图像时,您会向输出发送一条captureStillImageAsynchronouslyFromConnection:completionHandler: 消息。
第一个参数是您要用于捕获的连接。
您需要查找其输入端口正在收集视频的连接:
AVCaptureConnection *videoConnection = nil;
for (AVCaptureConnection *connection in stillImageOutput.connections) {
    for (AVCaptureInputPort *port in [connection inputPorts]) {
        if ([[port mediaType] isEqual:AVMediaTypeVideo] ) {
            videoConnection = connection;
            break;
        }
    }
    if (videoConnection) { break; }
}
的第二个参数captureStillImageAsynchronouslyFromConnection:completionHandler:是一个块,它接受两个参数:一个包含图像数据的不透明类型和一个错误。
样本缓冲区本身可能包含元数据(例如 EXIF 字典)作为附件。
您可以根据需要修改附件,但请注意像素和编码格式CMSampleBuffer中讨论的 JPEG 图像的优化。
[stillImageOutput captureStillImageAsynchronouslyFromConnection:videoConnection completionHandler:
    ^(CMSampleBufferRef imageSampleBuffer, NSError *error) {
        CFDictionaryRef exifAttachments =
            CMGetAttachment(imageSampleBuffer, kCGImagePropertyExifDictionary, NULL);
        if (exifAttachments) {
            // Do something with the attachments.
        }
        // Continue as appropriate.
    }];
5、向用户显示正在录制的内容
您可以为用户提供摄像机(使用预览层)或麦克风(通过监控音频通道)正在录制内容的预览。
视频预览
您可以使用AVCaptureVideoPreviewLayer对象 向用户提供正在记录内容的预览。
AVCaptureVideoPreviewLayer是CALayer的子类(请参阅 核心动画编程指南 。
您不需要任何输出来显示预览。
使用 AVCaptureVideoDataOutput类 可以使客户端应用程序能够在视频像素呈现给用户之前访问它们。
与捕获输出不同,视频预览层会保持对与其关联的会话的强引用。
这是为了确保在层尝试显示视频时不会释放会话。
这反映在初始化预览层的方式中:
AVCaptureSession *captureSession = <#Get a capture session#>;
CALayer *viewLayer = <#Get a layer from the view in which you want to present the preview#>;

AVCaptureVideoPreviewLayer *captureVideoPreviewLayer = [[AVCaptureVideoPreviewLayer alloc] initWithSession:captureSession];
[viewLayer addSublayer:captureVideoPreviewLayer];
通常,预览层的行为与CALayer渲染树中的任何其他对象一样(请参阅 核心动画编程指南 )。
您可以像处理任何层一样缩放图像并执行变换、旋转等操作。
一个区别是,您可能需要设置层的 orientation 属性来指定它应如何旋转来自摄像头的图像。
此外,您可以通过查询属性来测试设备是否支持视频镜像supportsVideoMirroring。
您可以根据需要设置videoMirrored属性,但当automaticallyAdjustsVideoMirroring属性设置为YES(默认值)时,镜像值会根据会话的配置自动设置。
视频重力模式
预览层支持三种重力模式,您可以使用以下方式设置videoGravity:
AVLayerVideoGravityResizeAspect:这将保留宽高比,但在视频未填满可用屏幕区域的地方留下黑条。AVLayerVideoGravityResizeAspectFill:这将保留纵横比,但会填充可用的屏幕区域,并在必要时裁剪视频。AVLayerVideoGravityResize:这只是拉伸视频以填充可用的屏幕区域,即使这样做会扭曲图像。
在预览中使用“点击聚焦”
结合预览层实现点击对焦功能时需要小心谨慎。
您必须考虑预览层的方向和重力,以及预览可能被镜像的可能性。
请参阅示例代码项目 AVCam-iOS:使用 AVFoundation 捕获图像和影片, 了解此功能的实现。
显示音频级别
要监控捕获连接中音频通道的平均和峰值功率水平,您可以使用AVCaptureAudioChannel对象。
音频水平不是键值可观察的,因此您必须按照更新用户界面的频率轮询更新的水平(例如,每秒 10 次)。
AVCaptureAudioDataOutput *audioDataOutput = <#Get the audio data output#>;
NSArray *connections = audioDataOutput.connections;
if ([connections count] > 0) {
    // There should be only one connection to an AVCaptureAudioDataOutput.
    AVCaptureConnection *connection = [connections objectAtIndex:0];

    NSArray *audioChannels = connection.audioChannels;

    for (AVCaptureAudioChannel *channel in audioChannels) {
        float avg = channel.averagePowerLevel;
        float peak = channel.peakHoldLevel;
        // Update the level meter user interface.
    }
}
6、总结:将视频帧捕获为 UIImage 对象
此简短的代码示例说明了如何捕获视频并将获取的帧转换为UIImage对象。
它向您展示了如何:
- 创建一个
AVCaptureSession对象来协调从 AV 输入设备到输出的数据流 - 找到
AVCaptureDevice所需输入类型的对象 AVCaptureDeviceInput为设备创建对象- 创建一个
AVCaptureVideoDataOutput对象来生成视频帧 - 为对象实现一个
AVCaptureVideoDataOutput代理 来处理视频帧 - 实现一个函数,将代理接收到的 CMSampleBuffer 转换为
UIImage对象
注意: 为了专注于最相关的代码,此示例省略了完整应用程序的几个方面,包括内存管理。
要使用 AV Foundation,您需要具有足够的 Cocoa 经验,才能推断出缺失的部分。
创建并配置捕获会话
使用AVCaptureSession对象来协调从 AV 输入设备到输出的数据流。
创建一个会话,并将其配置为生成中等分辨率的视频帧。
AVCaptureSession *session = [[AVCaptureSession alloc] init];
session.sessionPreset = AVCaptureSessionPresetMedium;
创建并配置设备和设备输入
捕获设备由AVCaptureDevice对象表示;该类提供方法来检索所需输入类型的对象。
设备有一个或多个端口,使用AVCaptureInput对象进行配置。
通常,您会在其默认配置中使用捕获输入。
查找视频捕获设备,然后使用该设备创建设备输入并将其添加到会话中。
如果找不到合适的设备,则 deviceInputWithDevice:error:方法将通过引用返回错误。
AVCaptureDevice *device =
        [AVCaptureDevice defaultDeviceWithMediaType:AVMediaTypeVideo];

NSError *error = nil;
AVCaptureDeviceInput *input =
        [AVCaptureDeviceInput deviceInputWithDevice:device error:&error];

if (!input) {
    // Handle the error appropriately.
}

[session addInput:input];
创建并配置视频数据输出
您可以使用AVCaptureVideoDataOutput对象来处理正在捕获的视频中的未压缩帧。
您通常会配置输出的几个方面。
例如,对于视频,您可以使用videoSettings属性指定像素格式,并通过设置minFrameDuration属性来限制帧速率。
创建并配置视频数据的输出并将其添加到会话中;通过将minFrameDuration属性设置为 1/15 秒将帧速率限制为 15 fps:
AVCaptureVideoDataOutput *output = [[AVCaptureVideoDataOutput alloc] init];
[session addOutput:output];
output.videoSettings =
                @{ (NSString *)kCVPixelBufferPixelFormatTypeKey : @(kCVPixelFormatType_32BGRA) };
output.minFrameDuration = CMTimeMake(1, 15);
数据输出对象使用委托来提供视频帧。
委托必须采用AVCaptureVideoDataOutputSampleBufferDelegate协议。
设置数据输出的委托时,还必须提供一个应在其上调用回调的队列。
dispatch_queue_t queue = dispatch_queue_create("MyQueue", NULL);
[output setSampleBufferDelegate:self queue:queue];
dispatch_release(queue);
您可以使用队列来修改传送和处理视频帧的优先级。
实现示例缓冲区委托方法
在委托类中,实现在写入样本缓冲区时调用的方法 (captureOutput:didOutputSampleBuffer:fromConnection:)。
视频数据输出对象以 CMSampleBuffer不透明类型提供帧,因此您需要从CMSampleBuffer不透明类型转换为UIImage对象。
此操作的函数显示在 将 CMSampleBuffer 转换为 UIImage 对象 中。
- (void)captureOutput:(AVCaptureOutput *)captureOutput
         didOutputSampleBuffer:(CMSampleBufferRef)sampleBuffer
         fromConnection:(AVCaptureConnection *)connection {

    UIImage *image = imageFromSampleBuffer(sampleBuffer);
    // Add your code here that uses the image.
}
请记住,委托方法是在您在 setSampleBufferDelegate:queue: 中指定的队列上调用的;如果您想更新用户界面,则必须在主线程上调用任何相关代码。
开始和停止录制
配置捕获会话后,您应该确保相机根据用户的偏好具有录制权限。
NSString *mediaType = AVMediaTypeVideo;

[AVCaptureDevice requestAccessForMediaType:mediaType completionHandler:^(BOOL granted) {
    if (granted)
    {
        //Granted access to mediaType
        [self setDeviceAuthorized:YES];
    }
    else
    {
        //Not granted access to mediaType
        dispatch_async(dispatch_get_main_queue(), ^{
        [[[UIAlertView alloc] initWithTitle:@"AVCam!"
                                    message:@"AVCam doesn't have permission to use Camera, please change privacy settings"
                                   delegate:self
                          cancelButtonTitle:@"OK"
                          otherButtonTitles:nil] show];
                [self setDeviceAuthorized:NO];
        });
    }
}];
如果已配置摄像头会话并且用户已批准访问摄像头(如果需要,还有麦克风),则发送消息startRunning以开始录制。
重要提示: startRunning方法是一个阻塞调用,可能需要一些时间,因此您应该在串行队列上执行会话设置,以便主队列不会被阻塞(这会使 UI 保持响应)。
请参阅 AVCam-iOS:使用 AVFoundation 捕获图像和影片 ,了解规范的实现示例。
[session startRunning];
要停止录音,请向会话发送一条stopRunning消息。
7、高帧率视频捕捉
iOS 7.0 在特定硬件上引入了高帧率视频捕获支持(也称为“SloMo”视频)。
完整的 AVFoundation 框架支持高帧率内容。
您可以使用AVCaptureDeviceFormat类来确定设备的捕获功能。
此类具有返回支持的媒体类型、帧速率、视野、最大缩放系数、是否支持视频稳定等的方法。
- Capture 支持全 720p(1280 x 720 像素)分辨率,每秒 60 帧(fps),包括视频稳定和可丢弃 P 帧(H264 编码电影的一项功能,即使在速度较慢和较旧的硬件上也能流畅播放电影。)
- 播放功能增强了对慢速和快速播放的音频支持,从而可以在较慢或较快的速度下保留音频的时间音调。
- 编辑完全支持可变组合中的缩放编辑。
- 在支持 60 fps 影片时,导出提供两种选项。
可变帧速率(慢动作或快动作)可以保留,或者将影片转换为任意较慢的帧速率(例如每秒 30 帧)。
SloPoke 示例代码演示了 AVFoundation 对快速视频捕获的支持、确定硬件是否支持高帧率视频捕获、使用各种速率和时间间隔算法进行播放以及编辑(包括为合成部分设置时间尺度)。
Playback
AVPlayer 的实例 通过设置setRate:方法值 自动管理大部分播放速度。
该值用作播放速度的乘数。
值为 1.0 时播放正常,值为 0.5 时播放速度减半,值为 5.0 时播放速度比正常速度快五倍,依此类推。
AVPlayerItem对象支持audioTimePitchAlgorithm 属性。
此属性允许您使用Time Pitch Algorithm Settings常量指定当影片以各种帧速率播放时音频的播放方式。
下表列出了支持的时间音调算法、质量、算法是否使音频捕捉到特定的帧速率以及每个算法支持的帧速率范围。
| 时间间距算法 | 质量 | 捕捉到特定的帧速率 | 费率范围 |
|---|---|---|---|
AVAudioTimePitchAlgorithmLowQualityZeroLatency | 低质量,适合快进、快退或低质量语音。 | YES | 0.5、0.666667、0.8、1.0、1.25、1.5、2.0 比率。 |
AVAudioTimePitchAlgorithmTimeDomain | 质量适中,计算成本较低,适合语音。 | NO | 0.5–2x 利率。 |
AVAudioTimePitchAlgorithmSpectral | 质量最高、计算成本最高,但保留了原始物品的音高。 | NO | 1/32–32 比率。 |
AVAudioTimePitchAlgorithmVarispeed | 高质量播放,无需音调校正。 | NO | 1/32–32 比率。 |
編輯
编辑时,您可以使用 AVMutableComposition 类来构建时间编辑。
- 使用
composition类方法创建一个新AVMutableComposition实例。 - 使用
insertTimeRange:ofAsset:atTime:error:方法插入您的视频资产。 - 使用
scaleTimeRange:toDuration:方法,设置合成部分的时间刻度。
导出
导出 60 fps 视频使用该类AVAssetExportSession导出资产。
可以使用两种技术导出内容:
- 使用
AVAssetExportPresetPassthrough预设可避免重新编码影片。
它会重新定时媒体,并将媒体部分标记为 60 fps、减慢速度或加快速度。 - 使用恒定帧速率导出可实现最大播放兼容性。
将视频合成的frameDuration属性设置为 30 fps。
您还可以通过设置导出会话的audioTimePitchAlgorithm属性来指定时间间隔。
记录
您可以使用AVCaptureMovieFileOutput类捕获高帧率视频,该类自动支持高帧率录制。
它将自动选择正确的 H264 音高级别和比特率。
要进行自定义录制,您必须使用AVAssetWriter类,这需要一些额外的设置。
assetWriterInput.expectsMediaDataInRealTime=YES;
此设置确保捕获可以跟上传入数据的步伐。
六、导出
要读取和写入视听资产,您必须使用 AVFoundation 框架提供的导出 API。
AVAssetExportSession 类提供了一个用于简单导出需求的接口,例如修改文件格式或修剪资产的长度(请参阅 修剪和转码影片)。
如需更深入的导出需求,请使用AVAssetReader和AVAssetWriter类。
当您想要对资产的内容执行操作时,请使用AVAssetReader。
例如,您可以读取资产的音轨以生成波形的视觉表示。
要从媒体(例如样本缓冲区或静态图像)生成资产,请使用AVAssetWriter对象。
注意: 资产读取器和写入器类不适用于实时处理。
事实上,资产读取器甚至不能用于从 HTTP 实时流等实时源读取数据。
但是,如果您将资产写入器与实时数据源(例如AVCaptureOutput对象)一起使用,请将expectsMediaDataInRealTime资产写入器的输入属性 设置为YES。
对于非实时数据源,将此属性设置为YES将导致您的文件无法正确交错。
1、读取资产
每个AVAssetReader对象 一次只能与一个资产相关联,但该资产可能包含多个轨道。
因此,您必须在开始读取之前,将AVAssetReaderOutput类的具体子类分配给资产读取器,以便配置媒体数据的读取方式。
有三个AVAssetReaderOutput基类的具体子类可用于满足您的资产读取需求:AVAssetReaderTrackOutput、AVAssetReaderAudioMixOutput和AVAssetReaderVideoCompositionOutput。
创建资产读取器
初始化对象所需的 AVAssetReader只是您想要读取的资产。
NSError *outError;
AVAsset *someAsset = <#AVAsset that you want to read#>;
AVAssetReader *assetReader = [AVAssetReader assetReaderWithAsset:someAsset error:&outError];
BOOL success = (assetReader != nil);
注意: 请务必检查返回给您的资产读取器是否为非nil,以确保资产读取器已成功初始化。
否则,错误参数(在上例中是outError)将包含相关的错误信息。
设置资产读取器输出
创建资产读取器后,请设置至少一个输出以接收正在读取的媒体数据。
设置输出时,请务必将alwaysCopiesSampleData属性设置为NO。
这样,您就可以获得性能改进的好处。
在本章中的所有示例中,此属性都可以且应该设置为NO。
如果您只想从一个或多个轨道读取媒体数据并可能将该数据转换为不同的格式,请使用AVAssetReaderTrackOutput类,对要从资产中读取的每个AVAssetTrack对象使用单个轨道输出对象。
要使用 Assets 读取器将音轨解压缩为线性 PCM,请按如下方式设置轨道输出:
AVAsset *localAsset = assetReader.asset;
// Get the audio track to read.
AVAssetTrack *audioTrack = [[localAsset tracksWithMediaType:AVMediaTypeAudio] objectAtIndex:0];

// Decompression settings for Linear PCM
NSDictionary *decompressionAudioSettings = @{ AVFormatIDKey : [NSNumber numberWithUnsignedInt:kAudioFormatLinearPCM] };

// Create the output with the audio track and decompression settings.
AVAssetReaderOutput *trackOutput = [AVAssetReaderTrackOutput assetReaderTrackOutputWithTrack:audioTrack outputSettings:decompressionAudioSettings];

// Add the output to the reader if possible.
if ([assetReader canAddOutput:trackOutput])
    [assetReader addOutput:trackOutput];
注意: 要从特定资产轨道读取其存储格式的媒体数据,请传递nil给outputSettings参数。
您可以使用AVAssetReaderAudioMixOutput和AVAssetReaderVideoCompositionOutput类分别读取已使用AVAudioMix对象 或AVVideoComposition对象 混合或合成的媒体数据。
通常,当您的资产读取器从AVComposition对象读取时,会使用这些输出。
使用单个音频混合输出,您可以从资产中读取已使用AVAudioMix对象混合在一起的多个音轨。
要指定音轨的混合方式,请在初始化后将混合分配给 AVAssetReaderAudioMixOutput对象。
以下代码显示如何使用 Assets 中的所有音轨创建音频混合输出,将音轨解压缩为线性 PCM,并将音频混合对象分配给输出。
有关如何配置音频混合的详细信息,请参阅 编辑。
AVAudioMix *audioMix = <#An AVAudioMix that specifies how the audio tracks from the AVAsset are mixed#>;
// Assumes that assetReader was initialized with an AVComposition object.
AVComposition *composition = (AVComposition *)assetReader.asset;
// Get the audio tracks to read.
NSArray *audioTracks = [composition tracksWithMediaType:AVMediaTypeAudio];
// Get the decompression settings for Linear PCM.
NSDictionary *decompressionAudioSettings = @{ AVFormatIDKey : [NSNumber numberWithUnsignedInt:kAudioFormatLinearPCM] };
// Create the audio mix output with the audio tracks and decompression setttings.
AVAssetReaderOutput *audioMixOutput = [AVAssetReaderAudioMixOutput assetReaderAudioMixOutputWithAudioTracks:audioTracks audioSettings:decompressionAudioSettings];
// Associate the audio mix used to mix the audio tracks being read with the output.
audioMixOutput.audioMix = audioMix;
// Add the output to the reader if possible.
if ([assetReader canAddOutput:audioMixOutput])
    [assetReader addOutput:audioMixOutput];
注意: 传递nil给 audioSettings 参数会告诉资产读取器以方便的未压缩格式返回样本。
AVAssetReaderVideoCompositionOutput 类也是如此。
视频合成输出的行为方式大致相同:您可以从使用AVVideoComposition对象合成在一起的资产中读取多个视频轨道。
要从多个合成视频轨道读取媒体数据并将其解压缩为 ARGB,请按如下方式设置输出:
AVVideoComposition *videoComposition = <#An AVVideoComposition that specifies how the video tracks from the AVAsset are composited#>;

// Assumes assetReader was initialized with an AVComposition.
AVComposition *composition = (AVComposition *)assetReader.asset;

// Get the video tracks to read.
NSArray *videoTracks = [composition tracksWithMediaType:AVMediaTypeVideo];

// Decompression settings for ARGB.
NSDictionary *decompressionVideoSettings = @{ (id)kCVPixelBufferPixelFormatTypeKey : [NSNumber numberWithUnsignedInt:kCVPixelFormatType_32ARGB], (id)kCVPixelBufferIOSurfacePropertiesKey : [NSDictionary dictionary] };

// Create the video composition output with the video tracks and decompression setttings.
AVAssetReaderOutput *videoCompositionOutput = [AVAssetReaderVideoCompositionOutput assetReaderVideoCompositionOutputWithVideoTracks:videoTracks videoSettings:decompressionVideoSettings];

// Associate the video composition used to composite the video tracks being read with the output.
videoCompositionOutput.videoComposition = videoComposition;

// Add the output to the reader if possible.
if ([assetReader canAddOutput:videoCompositionOutput])
    [assetReader addOutput:videoCompositionOutput];
读取资产的媒体数据
要在设置所有所需的输出后开始读取,请在资产读取器上调用startReading方法。
接下来,使用copyNextSampleBuffer方法从每个输出单独检索媒体数据。
要启动具有单个输出的资产读取器并读取其所有媒体样本,请执行以下操作:
// Start the asset reader up.
[self.assetReader startReading];
BOOL done = NO;
while (!done)
{
  // Copy the next sample buffer from the reader output.
  CMSampleBufferRef sampleBuffer = [self.assetReaderOutput copyNextSampleBuffer];
  if (sampleBuffer)
  {
    // Do something with sampleBuffer here.
    CFRelease(sampleBuffer);
    sampleBuffer = NULL;
  }
  else
  {
    // Find out why the asset reader output couldn't copy another sample buffer.
    if (self.assetReader.status == AVAssetReaderStatusFailed)
    {
      NSError *failureError = self.assetReader.error;
      // Handle the error here.
    }
    else
    {
      // The asset reader output has read all of its samples.
      done = YES;
    }
  }
}
2、编写资产
AVAssetWriter类 用于将来自多个来源的媒体数据 写入指定文件格式的单个文件。
您无需将资产写入器对象与特定资产关联,但您必须对要创建的每个输出文件使用单独的资产写入器。
由于资产写入器可以从多个来源写入媒体数据,因此您必须为要写入输出文件的每个单独轨道创建一个 AVAssetWriterInput对象。
每个AVAssetWriterInput对象都希望以CMSampleBufferRef对象的形式 接收数据,但如果您想将CVPixelBufferRef对象附加到资产写入器输入,请使用AVAssetWriterInputPixelBufferAdaptor类。
创建 Asset Writer
要创建资产写入器,请指定输出文件的 URL 和所需的文件类型。
以下代码显示如何初始化资产写入器以创建 QuickTime 影片:
NSError *outError;
NSURL *outputURL = <#NSURL object representing the URL where you want to save the video#>;
AVAssetWriter *assetWriter = [AVAssetWriter assetWriterWithURL:outputURL
                                                      fileType:AVFileTypeQuickTimeMovie
                                                         error:&outError];
BOOL success = (assetWriter != nil);
设置资产写入器输入
为了让您的资产写入器能够写入媒体数据,您必须设置至少一个资产写入器输入。
例如,如果您的媒体数据源已经 以CMSampleBufferRef对象形式出售媒体样本,则只需使用AVAssetWriterInput类即可。
要设置将音频媒体数据压缩为 128 kbps AAC 的资产写入器输入并将其连接到您的资产写入器,请执行以下操作:
// Configure the channel layout as stereo.
AudioChannelLayout stereoChannelLayout = {
    .mChannelLayoutTag = kAudioChannelLayoutTag_Stereo,
    .mChannelBitmap = 0,
    .mNumberChannelDescriptions = 0
};

// Convert the channel layout object to an NSData object.
NSData *channelLayoutAsData = [NSData dataWithBytes:&stereoChannelLayout length:offsetof(AudioChannelLayout, mChannelDescriptions)];

// Get the compression settings for 128 kbps AAC.
NSDictionary *compressionAudioSettings = @{
    AVFormatIDKey         : [NSNumber numberWithUnsignedInt:kAudioFormatMPEG4AAC],
    AVEncoderBitRateKey   : [NSNumber numberWithInteger:128000],
    AVSampleRateKey       : [NSNumber numberWithInteger:44100],
    AVChannelLayoutKey    : channelLayoutAsData,
    AVNumberOfChannelsKey : [NSNumber numberWithUnsignedInteger:2]
};

// Create the asset writer input with the compression settings and specify the media type as audio.
AVAssetWriterInput *assetWriterInput = [AVAssetWriterInput assetWriterInputWithMediaType:AVMediaTypeAudio outputSettings:compressionAudioSettings];
// Add the input to the writer if possible.
if ([assetWriter canAddInput:assetWriterInput])
    [assetWriter addInput:assetWriterInput];
注意: 如果您希望媒体数据 以存储时的格式写入,请在 outputSettings参数传入nil。
仅当资产写入器使用fileType初始化AVFileTypeQuickTimeMovie时,才传入nil。
您的资产写入器输入可以选择性地包含一些元数据,或者分别使用 metadata 和 transform 属性为特定轨道指定不同的变换。
对于数据源是视频轨道的资产写入器输入,您可以通过执行以下操作在输出文件中维护视频的原始变换:
AVAsset *videoAsset = <#AVAsset with at least one video track#>;
AVAssetTrack *videoAssetTrack = [[videoAsset tracksWithMediaType:AVMediaTypeVideo] objectAtIndex:0];
assetWriterInput.transform = videoAssetTrack.preferredTransform;
注意: 在开始使用 Assets 编写器进行写入之前, 请设置metadata和transform 属性以使其生效。
将媒体数据写入输出文件时,有时您可能需要分配像素缓冲区。
为此,请使用AVAssetWriterInputPixelBufferAdaptor类。
为了获得最高效率,请使用像素缓冲区适配器提供的像素缓冲区池,而不是添加使用单独池分配的像素缓冲区。
以下代码创建一个在 RGB 域中工作的像素缓冲区对象,该对象将使用CGImage对象来创建其像素缓冲区。
NSDictionary *pixelBufferAttributes = @{
     kCVPixelBufferCGImageCompatibilityKey : [NSNumber numberWithBool:YES],
     kCVPixelBufferCGBitmapContextCompatibilityKey : [NSNumber numberWithBool:YES],
     kCVPixelBufferPixelFormatTypeKey : [NSNumber numberWithInt:kCVPixelFormatType_32ARGB]
};
AVAssetWriterInputPixelBufferAdaptor *inputPixelBufferAdaptor = [AVAssetWriterInputPixelBufferAdaptor assetWriterInputPixelBufferAdaptorWithAssetWriterInput:self.assetWriterInput sourcePixelBufferAttributes:pixelBufferAttributes];
注意: 所有AVAssetWriterInputPixelBufferAdaptor对象 必须连接到单个资产写入器输入。
该资产写入器输入必须接受 AVMediaTypeVideo 类型的媒体数据。
写入媒体数据
配置完资产写入器所需的所有输入后,您就可以开始写入媒体数据了。
与资产读取器一样,通过调用 startWriting 方法启动写入过程。
然后,您需要通过调用startSessionAtSourceTime:方法启动示例写入会话。
资产写入器完成的所有写入都必须在其中一个会话内进行,每个会话的时间范围定义了源中包含的媒体数据的时间范围。
例如,如果您的源是提供从AVAsset对象读取的媒体数据的资产读取器,并且您不想包含资产前半部分的媒体数据,则可以执行以下操作:
CMTime halfAssetDuration = CMTimeMultiplyByFloat64(self.asset.duration, 0.5);
[self.assetWriter startSessionAtSourceTime:halfAssetDuration];
//Implementation continues.
通常,要结束写入会话,您必须调用 endSessionAtSourceTime:方法。
但是,如果您的写入会话一直到文件末尾,则只需调用 finishWriting方法即可结束写入会话。
要使用单个输入启动资产写入器并写入其所有媒体数据,请执行以下操作:
// Prepare the asset writer for writing.
[self.assetWriter startWriting];
// Start a sample-writing session.
[self.assetWriter startSessionAtSourceTime:kCMTimeZero];
// Specify the block to execute when the asset writer is ready for media data and the queue to call it on.
[self.assetWriterInput requestMediaDataWhenReadyOnQueue:myInputSerialQueue usingBlock:^{
     while ([self.assetWriterInput isReadyForMoreMediaData])
     {
          // Get the next sample buffer.
          CMSampleBufferRef nextSampleBuffer = [self copyNextSampleBufferToWrite];
          if (nextSampleBuffer)
          {
               // If it exists, append the next sample buffer to the output file.
               [self.assetWriterInput appendSampleBuffer:nextSampleBuffer];
               CFRelease(nextSampleBuffer);
               nextSampleBuffer = nil;
          }
          else
          {
               // Assume that lack of a next sample buffer means the sample buffer source is out of samples and mark the input as finished.
               [self.assetWriterInput markAsFinished];
               break;
          }
     }
}];
上述代码中的copyNextSampleBufferToWrite方法只是一个存根。
此存根的位置是您需要插入一些逻辑以返回,表示要写入的媒体数据的CMSampleBufferRef 对象的位置。
样本缓冲区的一个可能来源是资产读取器输出。
3、重新编码资产
您可以同时使用 Assets 读取器和资产写入器对象将资产从一种表示形式转换为另一种表示形式。
使用这些对象,您可以比使用AVAssetExportSession对象更好地控制转换。
例如,您可以选择要在输出文件中表示的轨道,指定自己的输出格式,或在转换过程中修改资产。
此过程的第一步只是根据需要设置资产读取器输出和资产写入器输入。
在资产读取器和写入器完全配置后,您可以分别通过调用startReading和startWriting方法来启动它们。
以下代码片段显示如何使用单个资产写入器输入来写入由单个资产读取器输出提供的媒体数据:
NSString *serializationQueueDescription = [NSString stringWithFormat:@"%@ serialization queue", self];

// Create a serialization queue for reading and writing.
dispatch_queue_t serializationQueue = dispatch_queue_create([serializationQueueDescription UTF8String], NULL);

// Specify the block to execute when the asset writer is ready for media data and the queue to call it on.
[self.assetWriterInput requestMediaDataWhenReadyOnQueue:serializationQueue usingBlock:^{
     while ([self.assetWriterInput isReadyForMoreMediaData])
     {
          // Get the asset reader output's next sample buffer.
          CMSampleBufferRef sampleBuffer = [self.assetReaderOutput copyNextSampleBuffer];
          if (sampleBuffer != NULL)
          {
               // If it exists, append this sample buffer to the output file.
               BOOL success = [self.assetWriterInput appendSampleBuffer:sampleBuffer];
               CFRelease(sampleBuffer);
               sampleBuffer = NULL;
               // Check for errors that may have occurred when appending the new sample buffer.
               if (!success && self.assetWriter.status == AVAssetWriterStatusFailed)
               {
                    NSError *failureError = self.assetWriter.error;
                    //Handle the error.
               }
          }
          else
          {
               // If the next sample buffer doesn't exist, find out why the asset reader output couldn't vend another one.
               if (self.assetReader.status == AVAssetReaderStatusFailed)
               {
                    NSError *failureError = self.assetReader.error;
                    //Handle the error here.
               }
               else
               {
                    // The asset reader output must have vended all of its samples. Mark the input as finished.
                    [self.assetWriterInput markAsFinished];
                    break;
               }
          }
     }
}];
4、综合起来:使用 Assets 读取器 和 写入器 串联对资产进行重新编码
此简短的代码示例说明了如何使用 Assets 读取器和写入器将资产的第一个视频和音频轨道重新编码到新文件中。
它显示了如何:
- 使用序列化队列来处理读写视听数据的异步特性
- 初始化资产读取器并配置两个资产读取器输出,一个用于音频,一个用于视频
- 初始化资产写入器并配置两个资产写入器输入,一个用于音频,一个用于视频
- 使用 Assets 读取器通过两种不同的输出/输入组合异步向资产写入器提供媒体数据
- 使用调度组来通知重新编码过程的完成
- 允许用户在重新编码过程开始后取消它
注意: 为了专注于最相关的代码,此示例省略了完整应用程序的几个方面。
要使用 AVFoundation,您需要具有足够的 Cocoa 经验,才能推断出缺失的部分。
处理初始设置
在创建资产读取器和写入器并配置其输出和输入之前,您需要进行一些初始设置。
此设置的第一部分涉及创建三个单独的序列化队列以协调读取和写入过程。
NSString *serializationQueueDescription = [NSString stringWithFormat:@"%@ serialization queue", self];

// Create the main serialization queue.
self.mainSerializationQueue = dispatch_queue_create([serializationQueueDescription UTF8String], NULL);
NSString *rwAudioSerializationQueueDescription = [NSString stringWithFormat:@"%@ rw audio serialization queue", self];

// Create the serialization queue to use for reading and writing the audio data.
self.rwAudioSerializationQueue = dispatch_queue_create([rwAudioSerializationQueueDescription UTF8String], NULL);
NSString *rwVideoSerializationQueueDescription = [NSString stringWithFormat:@"%@ rw video serialization queue", self];

// Create the serialization queue to use for reading and writing the video data.
self.rwVideoSerializationQueue = dispatch_queue_create([rwVideoSerializationQueueDescription UTF8String], NULL);
主序列化队列用于协调资产读取器和写入器的启动和停止(可能由于取消),另外两个序列化队列用于序列化每个输出/输入组合的读取和写入,并可能取消。
现在您有了一些序列化队列,请加载资产的轨道并开始重新编码过程。
self.asset = <#AVAsset that you want to reencode#>;
self.cancelled = NO;
self.outputURL = <#NSURL representing desired output URL for file generated by asset writer#>;
// Asynchronously load the tracks of the asset you want to read.
[self.asset loadValuesAsynchronouslyForKeys:@[@"tracks"] completionHandler:^{
     // Once the tracks have finished loading, dispatch the work to the main serialization queue.
     dispatch_async(self.mainSerializationQueue, ^{
          // Due to asynchronous nature, check to see if user has already cancelled.
          if (self.cancelled)
               return;
          BOOL success = YES;
          NSError *localError = nil;
          // Check for success of loading the assets tracks.
          success = ([self.asset statusOfValueForKey:@"tracks" error:&localError] == AVKeyValueStatusLoaded);
          if (success)
          {
               // If the tracks loaded successfully, make sure that no file exists at the output path for the asset writer.
               NSFileManager *fm = [NSFileManager defaultManager];
               NSString *localOutputPath = [self.outputURL path];
               if ([fm fileExistsAtPath:localOutputPath])
                    success = [fm removeItemAtPath:localOutputPath error:&localError];
          }
          if (success)
               success = [self setupAssetReaderAndAssetWriter:&localError];
          if (success)
               success = [self startAssetReaderAndWriter:&localError];
          if (!success)
               [self readingAndWritingDidFinishSuccessfully:success withError:localError];
     });
}];
当轨道加载过程完成时,无论成功与否,其余工作都会被分派到主序列化队列,以确保所有这些工作都经过序列化,并可能被取消。
现在剩下的就是实现取消过程和上一个代码示例末尾的三个自定义方法。
初始化资源读取器和写入器
自定义setupAssetReaderAndAssetWriter:方法初始化读取器和写入器,并配置两个输出/输入组合,一个用于音频轨道,一个用于视频轨道。
在此示例中,使用 Assets 读取器将音频解压缩为线性 PCM,然后使用 Assets 写入器将其压缩回 128 kbps AAC。
使用 Assets 读取器将视频解压缩为 YUV,然后使用 Assets 写入器将其压缩为 H.264。
- (BOOL)setupAssetReaderAndAssetWriter:(NSError **)outError
{
     // Create and initialize the asset reader.
     self.assetReader = [[AVAssetReader alloc] initWithAsset:self.asset error:outError];
     BOOL success = (self.assetReader != nil);
     if (success)
     {
          // If the asset reader was successfully initialized, do the same for the asset writer.
          self.assetWriter = [[AVAssetWriter alloc] initWithURL:self.outputURL fileType:AVFileTypeQuickTimeMovie error:outError];
          success = (self.assetWriter != nil);
     }

     if (success)
     {
          // If the reader and writer were successfully initialized, grab the audio and video asset tracks that will be used.
          AVAssetTrack *assetAudioTrack = nil, *assetVideoTrack = nil;
          NSArray *audioTracks = [self.asset tracksWithMediaType:AVMediaTypeAudio];
          if ([audioTracks count] > 0)
               assetAudioTrack = [audioTracks objectAtIndex:0];
          NSArray *videoTracks = [self.asset tracksWithMediaType:AVMediaTypeVideo];
          if ([videoTracks count] > 0)
               assetVideoTrack = [videoTracks objectAtIndex:0];

          if (assetAudioTrack)
          {
               // If there is an audio track to read, set the decompression settings to Linear PCM and create the asset reader output.
               NSDictionary *decompressionAudioSettings = @{ AVFormatIDKey : [NSNumber numberWithUnsignedInt:kAudioFormatLinearPCM] };
               self.assetReaderAudioOutput = [AVAssetReaderTrackOutput assetReaderTrackOutputWithTrack:assetAudioTrack outputSettings:decompressionAudioSettings];
               [self.assetReader addOutput:self.assetReaderAudioOutput];
               // Then, set the compression settings to 128kbps AAC and create the asset writer input.
               AudioChannelLayout stereoChannelLayout = {
                    .mChannelLayoutTag = kAudioChannelLayoutTag_Stereo,
                    .mChannelBitmap = 0,
                    .mNumberChannelDescriptions = 0
               };
               NSData *channelLayoutAsData = [NSData dataWithBytes:&stereoChannelLayout length:offsetof(AudioChannelLayout, mChannelDescriptions)];
               NSDictionary *compressionAudioSettings = @{
                    AVFormatIDKey         : [NSNumber numberWithUnsignedInt:kAudioFormatMPEG4AAC],
                    AVEncoderBitRateKey   : [NSNumber numberWithInteger:128000],
                    AVSampleRateKey       : [NSNumber numberWithInteger:44100],
                    AVChannelLayoutKey    : channelLayoutAsData,
                    AVNumberOfChannelsKey : [NSNumber numberWithUnsignedInteger:2]
               };
               self.assetWriterAudioInput = [AVAssetWriterInput assetWriterInputWithMediaType:[assetAudioTrack mediaType] outputSettings:compressionAudioSettings];
               [self.assetWriter addInput:self.assetWriterAudioInput];
          }

          if (assetVideoTrack)
          {
               // If there is a video track to read, set the decompression settings for YUV and create the asset reader output.
               NSDictionary *decompressionVideoSettings = @{
                    (id)kCVPixelBufferPixelFormatTypeKey     : [NSNumber numberWithUnsignedInt:kCVPixelFormatType_422YpCbCr8],
                    (id)kCVPixelBufferIOSurfacePropertiesKey : [NSDictionary dictionary]
               };
               self.assetReaderVideoOutput = [AVAssetReaderTrackOutput assetReaderTrackOutputWithTrack:assetVideoTrack outputSettings:decompressionVideoSettings];
               [self.assetReader addOutput:self.assetReaderVideoOutput];
               CMFormatDescriptionRef formatDescription = NULL;
               // Grab the video format descriptions from the video track and grab the first one if it exists.
               NSArray *videoFormatDescriptions = [assetVideoTrack formatDescriptions];
               if ([videoFormatDescriptions count] > 0)
                    formatDescription = (__bridge CMFormatDescriptionRef)[formatDescriptions objectAtIndex:0];
               CGSize trackDimensions = {
                    .width = 0.0,
                    .height = 0.0,
               };
               // If the video track had a format description, grab the track dimensions from there. Otherwise, grab them direcly from the track itself.
               if (formatDescription)
                    trackDimensions = CMVideoFormatDescriptionGetPresentationDimensions(formatDescription, false, false);
               else
                    trackDimensions = [assetVideoTrack naturalSize];
               NSDictionary *compressionSettings = nil;
               // If the video track had a format description, attempt to grab the clean aperture settings and pixel aspect ratio used by the video.
               if (formatDescription)
               {
                    NSDictionary *cleanAperture = nil;
                    NSDictionary *pixelAspectRatio = nil;
                    CFDictionaryRef cleanApertureFromCMFormatDescription = CMFormatDescriptionGetExtension(formatDescription, kCMFormatDescriptionExtension_CleanAperture);
                    if (cleanApertureFromCMFormatDescription)
                    {
                         cleanAperture = @{
                              AVVideoCleanApertureWidthKey            : (id)CFDictionaryGetValue(cleanApertureFromCMFormatDescription, kCMFormatDescriptionKey_CleanApertureWidth),
                              AVVideoCleanApertureHeightKey           : (id)CFDictionaryGetValue(cleanApertureFromCMFormatDescription, kCMFormatDescriptionKey_CleanApertureHeight),
                              AVVideoCleanApertureHorizontalOffsetKey : (id)CFDictionaryGetValue(cleanApertureFromCMFormatDescription, kCMFormatDescriptionKey_CleanApertureHorizontalOffset),
                              AVVideoCleanApertureVerticalOffsetKey   : (id)CFDictionaryGetValue(cleanApertureFromCMFormatDescription, kCMFormatDescriptionKey_CleanApertureVerticalOffset)
                         };
                    }
                    CFDictionaryRef pixelAspectRatioFromCMFormatDescription = CMFormatDescriptionGetExtension(formatDescription, kCMFormatDescriptionExtension_PixelAspectRatio);
                    if (pixelAspectRatioFromCMFormatDescription)
                    {
                         pixelAspectRatio = @{
                              AVVideoPixelAspectRatioHorizontalSpacingKey : (id)CFDictionaryGetValue(pixelAspectRatioFromCMFormatDescription, kCMFormatDescriptionKey_PixelAspectRatioHorizontalSpacing),
                              AVVideoPixelAspectRatioVerticalSpacingKey   : (id)CFDictionaryGetValue(pixelAspectRatioFromCMFormatDescription, kCMFormatDescriptionKey_PixelAspectRatioVerticalSpacing)
                         };
                    }
                    // Add whichever settings we could grab from the format description to the compression settings dictionary.
                    if (cleanAperture || pixelAspectRatio)
                    {
                         NSMutableDictionary *mutableCompressionSettings = [NSMutableDictionary dictionary];
                         if (cleanAperture)
                              [mutableCompressionSettings setObject:cleanAperture forKey:AVVideoCleanApertureKey];
                         if (pixelAspectRatio)
                              [mutableCompressionSettings setObject:pixelAspectRatio forKey:AVVideoPixelAspectRatioKey];
                         compressionSettings = mutableCompressionSettings;
                    }
               }
               // Create the video settings dictionary for H.264.
               NSMutableDictionary *videoSettings = (NSMutableDictionary *) @{
                    AVVideoCodecKey  : AVVideoCodecH264,
                    AVVideoWidthKey  : [NSNumber numberWithDouble:trackDimensions.width],
                    AVVideoHeightKey : [NSNumber numberWithDouble:trackDimensions.height]
               };
               // Put the compression settings into the video settings dictionary if we were able to grab them.
               if (compressionSettings)
                    [videoSettings setObject:compressionSettings forKey:AVVideoCompressionPropertiesKey];
               // Create the asset writer input and add it to the asset writer.
               self.assetWriterVideoInput = [AVAssetWriterInput assetWriterInputWithMediaType:[videoTrack mediaType] outputSettings:videoSettings];
               [self.assetWriter addInput:self.assetWriterVideoInput];
          }
     }
     return success;
}
重新编码资产
如果资产读取器和写入器已成功初始化和配置,则将调用处理初始设置中描述的startAssetReaderAndWriter:方法。
此方法是资产实际读取和写入的地方。
- (BOOL)startAssetReaderAndWriter:(NSError **)outError
{
     BOOL success = YES;
     // Attempt to start the asset reader.
     success = [self.assetReader startReading];
     if (!success)
          *outError = [self.assetReader error];
     if (success)
     {
          // If the reader started successfully, attempt to start the asset writer.
          success = [self.assetWriter startWriting];
          if (!success)
               *outError = [self.assetWriter error];
     }

     if (success)
     {
          // If the asset reader and writer both started successfully, create the dispatch group where the reencoding will take place and start a sample-writing session.
          self.dispatchGroup = dispatch_group_create();
          [self.assetWriter startSessionAtSourceTime:kCMTimeZero];
          self.audioFinished = NO;
          self.videoFinished = NO;

          if (self.assetWriterAudioInput)
          {
               // If there is audio to reencode, enter the dispatch group before beginning the work.
               dispatch_group_enter(self.dispatchGroup);
               // Specify the block to execute when the asset writer is ready for audio media data, and specify the queue to call it on.
               [self.assetWriterAudioInput requestMediaDataWhenReadyOnQueue:self.rwAudioSerializationQueue usingBlock:^{
                    // Because the block is called asynchronously, check to see whether its task is complete.
                    if (self.audioFinished)
                         return;
                    BOOL completedOrFailed = NO;
                    // If the task isn't complete yet, make sure that the input is actually ready for more media data.
                    while ([self.assetWriterAudioInput isReadyForMoreMediaData] && !completedOrFailed)
                    {
                         // Get the next audio sample buffer, and append it to the output file.
                         CMSampleBufferRef sampleBuffer = [self.assetReaderAudioOutput copyNextSampleBuffer];
                         if (sampleBuffer != NULL)
                         {
                              BOOL success = [self.assetWriterAudioInput appendSampleBuffer:sampleBuffer];
                              CFRelease(sampleBuffer);
                              sampleBuffer = NULL;
                              completedOrFailed = !success;
                         }
                         else
                         {
                              completedOrFailed = YES;
                         }
                    }
                    if (completedOrFailed)
                    {
                         // Mark the input as finished, but only if we haven't already done so, and then leave the dispatch group (since the audio work has finished).
                         BOOL oldFinished = self.audioFinished;
                         self.audioFinished = YES;
                         if (oldFinished == NO)
                         {
                              [self.assetWriterAudioInput markAsFinished];
                         }
                         dispatch_group_leave(self.dispatchGroup);
                    }
               }];
          }

          if (self.assetWriterVideoInput)
          {
               // If we had video to reencode, enter the dispatch group before beginning the work.
               dispatch_group_enter(self.dispatchGroup);
               // Specify the block to execute when the asset writer is ready for video media data, and specify the queue to call it on.
               [self.assetWriterVideoInput requestMediaDataWhenReadyOnQueue:self.rwVideoSerializationQueue usingBlock:^{
                    // Because the block is called asynchronously, check to see whether its task is complete.
                    if (self.videoFinished)
                         return;
                    BOOL completedOrFailed = NO;
                    // If the task isn't complete yet, make sure that the input is actually ready for more media data.
                    while ([self.assetWriterVideoInput isReadyForMoreMediaData] && !completedOrFailed)
                    {
                         // Get the next video sample buffer, and append it to the output file.
                         CMSampleBufferRef sampleBuffer = [self.assetReaderVideoOutput copyNextSampleBuffer];
                         if (sampleBuffer != NULL)
                         {
                              BOOL success = [self.assetWriterVideoInput appendSampleBuffer:sampleBuffer];
                              CFRelease(sampleBuffer);
                              sampleBuffer = NULL;
                              completedOrFailed = !success;
                         }
                         else
                         {
                              completedOrFailed = YES;
                         }
                    }
                    if (completedOrFailed)
                    {
                         // Mark the input as finished, but only if we haven't already done so, and then leave the dispatch group (since the video work has finished).
                         BOOL oldFinished = self.videoFinished;
                         self.videoFinished = YES;
                         if (oldFinished == NO)
                         {
                              [self.assetWriterVideoInput markAsFinished];
                         }
                         dispatch_group_leave(self.dispatchGroup);
                    }
               }];
          }
          // Set up the notification that the dispatch group will send when the audio and video work have both finished.
          dispatch_group_notify(self.dispatchGroup, self.mainSerializationQueue, ^{
               BOOL finalSuccess = YES;
               NSError *finalError = nil;
               // Check to see if the work has finished due to cancellation.
               if (self.cancelled)
               {
                    // If so, cancel the reader and writer.
                    [self.assetReader cancelReading];
                    [self.assetWriter cancelWriting];
               }
               else
               {
                    // If cancellation didn't occur, first make sure that the asset reader didn't fail.
                    if ([self.assetReader status] == AVAssetReaderStatusFailed)
                    {
                         finalSuccess = NO;
                         finalError = [self.assetReader error];
                    }
                    // If the asset reader didn't fail, attempt to stop the asset writer and check for any errors.
                    if (finalSuccess)
                    {
                         finalSuccess = [self.assetWriter finishWriting];
                         if (!finalSuccess)
                              finalError = [self.assetWriter error];
                    }
               }
               // Call the method to handle completion, and pass in the appropriate parameters to indicate whether reencoding was successful.
               [self readingAndWritingDidFinishSuccessfully:finalSuccess withError:finalError];
          });
     }
     // Return success here to indicate whether the asset reader and writer were started successfully.
     return success;
}
在重新编码期间,音频和视频轨道在单独的序列化队列中异步处理,以提高流程的整体性能,但两个队列都包含在同一个调度组中。
通过将每个轨道的工作放在同一个调度组中,该组可以在所有工作完成后发送通知,并确定重新编码过程是否成功。
处理完成
为了处理读取和写入过程的完成,将调用 readingAndWritingDidFinishSuccessfully: 方法 — 并使用参数指示重新编码是否成功完成。
如果该过程未成功完成,则资产读取器和写入器都将被取消,并且任何与 UI 相关的任务都将分派到主队列。
- (void)readingAndWritingDidFinishSuccessfully:(BOOL)success withError:(NSError *)error
{
     if (!success)
     {
          // If the reencoding process failed, we need to cancel the asset reader and writer.
          [self.assetReader cancelReading];
          [self.assetWriter cancelWriting];
          dispatch_async(dispatch_get_main_queue(), ^{
               // Handle any UI tasks here related to failure.
          });
     }
     else
     {
          // Reencoding was successful, reset booleans.
          self.cancelled = NO;
          self.videoFinished = NO;
          self.audioFinished = NO;
          dispatch_async(dispatch_get_main_queue(), ^{
               // Handle any UI tasks here related to success.
          });
     }
}
处理取消
使用多个序列化队列,您可以让应用的用户轻松取消重新编码过程。
在主序列化队列上,消息会异步发送到每个资产重新编码序列化队列以取消其读取和写入。
当这两个序列化队列完成取消时,调度组会向 cancelled 属性设置为 YES 的主序列化队列发送通知。
您可以将以下代码示例中的cancel方法与 UI 上的按钮关联起来。
- (void)cancel
{
     // Handle cancellation asynchronously, but serialize it with the main queue.
     dispatch_async(self.mainSerializationQueue, ^{
          // If we had audio data to reencode, we need to cancel the audio work.
          if (self.assetWriterAudioInput)
          {
               // Handle cancellation asynchronously again, but this time serialize it with the audio queue.
               dispatch_async(self.rwAudioSerializationQueue, ^{
                    // Update the Boolean property indicating the task is complete and mark the input as finished if it hasn't already been marked as such.
                    BOOL oldFinished = self.audioFinished;
                    self.audioFinished = YES;
                    if (oldFinished == NO)
                    {
                         [self.assetWriterAudioInput markAsFinished];
                    }
                    // Leave the dispatch group since the audio work is finished now.
                    dispatch_group_leave(self.dispatchGroup);
               });
          }

          if (self.assetWriterVideoInput)
          {
               // Handle cancellation asynchronously again, but this time serialize it with the video queue.
               dispatch_async(self.rwVideoSerializationQueue, ^{
                    // Update the Boolean property indicating the task is complete and mark the input as finished if it hasn't already been marked as such.
                    BOOL oldFinished = self.videoFinished;
                    self.videoFinished = YES;
                    if (oldFinished == NO)
                    {
                         [self.assetWriterVideoInput markAsFinished];
                    }
                    // Leave the dispatch group, since the video work is finished now.
                    dispatch_group_leave(self.dispatchGroup);
               });
          }
          // Set the cancelled Boolean property to YES to cancel any work on the main queue as well.
          self.cancelled = YES;
     });
}
5、资产输出设置助手
AVOutputSettingsAssistant 类 有助于为资产读取器或写入器创建输出设置字典。
这使得设置变得更加简单,尤其是对于具有许多特定预设的高帧率 H264 电影。
示例 5-1显示了使用输出设置助手使用设置助手的示例。
示例 5-1 AVOutputSettingsAssistant 示例
AVOutputSettingsAssistant *outputSettingsAssistant = [AVOutputSettingsAssistant outputSettingsAssistantWithPreset:<some preset>];
CMFormatDescriptionRef audioFormat = [self getAudioFormat];

if (audioFormat != NULL)
    [outputSettingsAssistant setSourceAudioFormat:(CMAudioFormatDescriptionRef)audioFormat];

CMFormatDescriptionRef videoFormat = [self getVideoFormat];

if (videoFormat != NULL)
    [outputSettingsAssistant setSourceVideoFormat:(CMVideoFormatDescriptionRef)videoFormat];

CMTime assetMinVideoFrameDuration = [self getMinFrameDuration];
CMTime averageFrameDuration = [self getAvgFrameDuration]

[outputSettingsAssistant setSourceVideoAverageFrameDuration:averageFrameDuration];
[outputSettingsAssistant setSourceVideoMinFrameDuration:assetMinVideoFrameDuration];

AVAssetWriter *assetWriter = [AVAssetWriter assetWriterWithURL:<some URL> fileType:[outputSettingsAssistant outputFileType] error:NULL];
AVAssetWriterInput *audioInput = [AVAssetWriterInput assetWriterInputWithMediaType:AVMediaTypeAudio outputSettings:[outputSettingsAssistant audioSettings] sourceFormatHint:audioFormat];
AVAssetWriterInput *videoInput = [AVAssetWriterInput assetWriterInputWithMediaType:AVMediaTypeVideo outputSettings:[outputSettingsAssistant videoSettings] sourceFormatHint:videoFormat];
七、时间和媒体表现
基于时间的视听数据(例如电影文件或视频流)在 AV Foundation 框架中用 AVAsset 表示。
其结构决定了框架的大部分工作。
AV Foundation 用于表示时间和媒体(例如样本缓冲区)的几个低级数据结构来自 Core Media 框架。
1、资产代表
AVAsset是 AV Foundation 框架中的核心类。
它提供与格式无关的基于时间的视听数据抽象,例如电影文件或视频流。
主要关系如图6-1所示。
在许多情况下,您会使用它的某个子类:在创建新资产时使用合成子类(请参阅 编辑),并使用AVURLAsset从给定 URL 处的媒体创建新资产实例(包括来自 MPMedia 框架或资产库框架的资产 - 请参阅 使用 Assets )。
图 6-1 AVAsset 提供了基于时间的视听数据的抽象
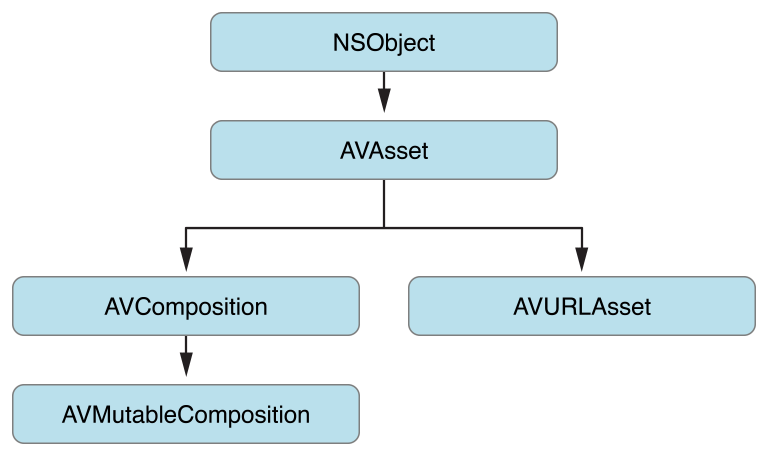
资产包含一组旨在一起呈现或处理的轨道,每个轨道都属于统一的媒体类型,包括(但不限于)音频、视频、文本、隐藏式字幕和字幕。
Asset 对象提供有关整个资源的信息(例如其持续时间或标题)以及呈现提示(例如其自然大小)。
资产还可以包含元数据,由 AVMetadataItem 实例表示。
轨道由 AVAssetTrack 的一个实例表示,如图6-2所示。
在典型的简单情况下,一个轨道表示音频组件,另一个轨道表示视频组件;在复杂的组合中,可能会有多个重叠的音频和视频轨道。
图 6-2 AVAssetTrack
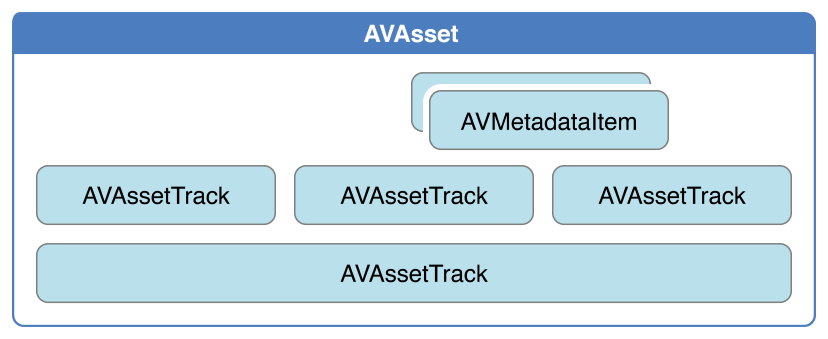
轨道具有许多属性,例如其类型(视频或音频)、视觉和/或听觉特征(视情况而定)、元数据和时间线(以其父资产表示)。
轨道还具有格式描述数组。
该数组包含CMFormatDescription对象(请参阅 CMFormatDescriptionRef),每个对象都描述轨道引用的媒体样本的格式。
包含统一媒体(例如,所有媒体都使用相同设置进行编码)的轨道将提供计数为 1 的数组。
轨道本身可以分为多个段,由 AVAssetTrackSegment 实例表示。
段是从源到资产轨道时间线的时间映射。
2、时间表示
AV Foundation 中的时间由来自 Core Media 框架的原始结构表示。
CMTime 表示时间长度
CMTime是一个 C 结构,它将时间表示为有理数,具有分子(一个int64_t值)和分母(一个int32_t时间刻度)。
从概念上讲,时间刻度指定分子中每个单位所占秒的分数。
因此,如果时间刻度为 4,则每个单位代表四分之一秒;如果时间刻度为 10,则每个单位代表十分之一秒,依此类推。
您经常使用 600 的时间刻度,因为这是几种常用帧速率的倍数:电影为 24 fps,NTSC(用于北美和日本的电视)为 30 fps,PAL(用于欧洲的电视)为 25 fps。
使用 600 的时间刻度,您可以精确表示这些系统中的任意数量的帧。
除了简单的时间值之外,CMTime结构还可以表示非数字值:+无穷大、-无穷大和不确定。
它还可以指示时间是否在某个时间点被舍入,并且它维护一个纪元数。
使用 CMTime
您可以使用CMTimeMake或相关函数之一,例如CMTimeMakeWithSeconds(允许您使用浮点值创建时间并指定首选时间尺度),来创建时间。
有多个函数可用于基于时间的算术和比较时间,如下例所示:
CMTime time1 = CMTimeMake(200, 2); // 200 half-seconds
CMTime time2 = CMTimeMake(400, 4); // 400 quarter-seconds

// time1 and time2 both represent 100 seconds, but using different timescales.
if (CMTimeCompare(time1, time2) == 0) {
    NSLog(@"time1 and time2 are the same");
}

Float64 float64Seconds = 200.0 / 3;
CMTime time3 = CMTimeMakeWithSeconds(float64Seconds , 3); // 66.66... third-seconds
time3 = CMTimeMultiply(time3, 3);
// time3 now represents 200 seconds; next subtract time1 (100 seconds).
time3 = CMTimeSubtract(time3, time1);
CMTimeShow(time3);

if (CMTIME_COMPARE_INLINE(time2, ==, time3)) {
    NSLog(@"time2 and time3 are the same");
}
有关所有可用函数的列表,请参阅 CMTime 参考 。
CMTime 的特殊值
Core Media 为特殊值提供常量:kCMTimeZero、kCMTimeInvalid、kCMTimePositiveInfinity 和 kCMTimeNegativeInfinity。
CMTime 结构可以有很多方式,例如,表示无效时间。
要测试 CMTime有效或为非数字值,应使用适当的宏,例如 CMTIME_IS_INVALID、 CMTIME_IS_POSITIVE_INFINITY 或 CMTIME_IS_INDEFINITE。
CMTime myTime = <#Get a CMTime#>;
if (CMTIME_IS_INVALID(myTime)) {
    // Perhaps treat this as an error; display a suitable alert to the user.
}
您不应该将任意CMTime结构的值 与kCMTimeInvalid进行比较。
将 CMTime 表示为对象
如果您需要 在注释或 Core Foundation 容器中使用CMTime结构,则可以分别使用CMTimeCopyAsDictionary 和 CMTimeMakeFromDictionary函数将CMTime结构转换为CFDictionary不透明类型(请参阅CFDictionaryRef) 。
您还可以使用 CMTimeCopyDescription 函数,获取CMTime结构的字符串表示形式。
Epochs
CMTime结构的纪元(epoch)编号通常设置为 0,但您可以使用它来区分不相关的时间线。
例如,可以使用演示循环在每个周期中递增纪元,以区分循环 0 中的时间N 和 循环 1 中的时间N。
CMTimeRange 表示时间范围
CMTimeRange 是一个 C 结构,具有开始时间和持续时间,均以CMTime结构表示。
时间范围不包括开始时间加上持续时间的时间。
您可以使用 CMTimeRangeMake 或 CMTimeRangeFromTimeToTime 创建时间范围。
CMTime epochs 的值存在限制:
CMTimeRange结构 不能跨越不同的时代。CMTime表示的 时间戳的结构中的纪元 可能为非零,但您只能对起始字段具有相同纪元的范围执行范围操作(例如CMTimeRangeGetUnion)。- 表示持续时间的结构中的纪元
CMTime应始终为 0,并且该值必须是非负的。
使用时间范围
Core Media 提供了可用于判断某个时间范围是否包含给定时间或其他时间范围、判断两个时间范围是否相等以及计算时间范围的并集与交集的函数,例如CMTimeRangeContainsTime、CMTimeRangeEqual、CMTimeRangeContainsTimeRange和CMTimeRangeGetUnion。
假设时间范围不包括开始时间加上持续时间,则以下表达式始终计算为假:
CMTimeRangeContainsTime(range, CMTimeRangeGetEnd(range))
有关所有可用函数的列表,请参阅 CMTimeRange 参考 。
CMTimeRange 的特殊值
Core Media 分别为零长度范围和无效范围提供了常量 kCMTimeRangeZero和kCMTimeRangeInvalid。
虽然结构可能无效、为零或不确定(如果其中一个CMTime结构不确定)的方式有很多。
如果需要测试 CMTimeRange 结构是有效、为零还是不确定,则应使用适当的宏:CMTIMERANGE_IS_VALID、CMTIMERANGE_IS_INVALID、CMTIMERANGE_IS_EMPTY 或 CMTIMERANGE_IS_EMPTY。
CMTimeRange myTimeRange = <#Get a CMTimeRange#>;
if (CMTIMERANGE_IS_EMPTY(myTimeRange)) {
    // The time range is zero.
}
您不应该将任意CMTimeRange结构的值 与kCMTimeRangeInvalid进行比较。
将 CMTimeRange 结构表示为对象
如果您需要在注释或 Core Foundation 容器中使用CMTimeRange结构,则可以分别使用CMTimeRangeCopyAsDictionary 和 CMTimeRangeMakeFromDictionary,将CMTimeRange结构 和 CFDictionary不透明类型互相转换(请参阅CFDictionaryRef) 。
您还可以使用 CMTimeRangeCopyDescription 函数获取CMTime结构的字符串表示形式。
3、媒体代表
在 AV Foundation 中,视频数据及其相关元数据由来自 Core Media 框架的不透明对象表示。
Core Media 使用 CMSampleBuffer 表示视频数据(请参阅 CMSampleBufferRef)。
CMSampleBuffer是 Core Foundation 样式的不透明类型;实例包含视频数据帧的样本缓冲区作为 Core Video 像素缓冲区(请参阅 CVPixelBufferRef )。
您可以使用 CMSampleBufferGetImageBuffer 从样本缓冲区访问像素缓冲区:
CVPixelBufferRef pixelBuffer = CMSampleBufferGetImageBuffer(<#A CMSampleBuffer#>);
您可以从像素缓冲区访问实际的视频数据。
有关示例,请参阅 将 CMSampleBuffer 转换为 UIImage 对象。
除了视频数据之外,您还可以检索视频帧的许多其他方面:
- 时间信息
您可以分别使用CMSampleBufferGetPresentationTimeStamp和CMSampleBufferGetDecodeTimeStamp获得原始演示时间和解码时间的准确时间戳。 - 格式信息
格式信息封装在 CMFormatDescription 对象中(请参阅CMFormatDescriptionRef)。
从格式描述中,您可以分别使用CMVideoFormatDescriptionGetCodecType和CMVideoFormatDescriptionGetDimensions获取像素类型和视频尺寸 等信息。 - 元数据
元数据以附件形式存储在字典中。
您可以使用CMGetAttachment以下方式检索字典:
CMSampleBufferRef sampleBuffer = <#Get a sample buffer#>;
CFDictionaryRef metadataDictionary =
    CMGetAttachment(sampleBuffer, CFSTR("MetadataDictionary", NULL);
if (metadataDictionary) {
    // Do something with the metadata.
}
4、将 CMSampleBuffer 转换为 UIImage 对象
以下代码显示了如何转换CMSampleBuffer为UIImage对象。
在使用它之前,您应该仔细考虑您的要求。
执行转换是一项相对昂贵的操作。
例如,根据每秒拍摄的视频数据帧创建静态图像是合适的。
您不应将此用作实时操纵来自捕获设备的每一帧视频的手段。
// Create a UIImage from sample buffer data
- (UIImage *) imageFromSampleBuffer:(CMSampleBufferRef) sampleBuffer
{
    // Get a CMSampleBuffer's Core Video image buffer for the media data
    CVImageBufferRef imageBuffer = CMSampleBufferGetImageBuffer(sampleBuffer);
    // Lock the base address of the pixel buffer
    CVPixelBufferLockBaseAddress(imageBuffer, 0);

    // Get the number of bytes per row for the pixel buffer
    void *baseAddress = CVPixelBufferGetBaseAddress(imageBuffer);

    // Get the number of bytes per row for the pixel buffer
    size_t bytesPerRow = CVPixelBufferGetBytesPerRow(imageBuffer);
    // Get the pixel buffer width and height
    size_t width = CVPixelBufferGetWidth(imageBuffer);
    size_t height = CVPixelBufferGetHeight(imageBuffer);

    // Create a device-dependent RGB color space
    CGColorSpaceRef colorSpace = CGColorSpaceCreateDeviceRGB();

    // Create a bitmap graphics context with the sample buffer data
    CGContextRef context = CGBitmapContextCreate(baseAddress, width, height, 8,
      bytesPerRow, colorSpace, kCGBitmapByteOrder32Little | kCGImageAlphaPremultipliedFirst);
    // Create a Quartz image from the pixel data in the bitmap graphics context
    CGImageRef quartzImage = CGBitmapContextCreateImage(context);
    // Unlock the pixel buffer
    CVPixelBufferUnlockBaseAddress(imageBuffer,0);

    // Free up the context and color space
    CGContextRelease(context);
    CGColorSpaceRelease(colorSpace);

    // Create an image object from the Quartz image
    UIImage *image = [UIImage imageWithCGImage:quartzImage];

    // Release the Quartz image
    CGImageRelease(quartzImage);

    return (image);
}
2024-06-07(五)


 1236
1236

 被折叠的 条评论
为什么被折叠?
被折叠的 条评论
为什么被折叠?
 到【灌水乐园】发言


