


人脸识别(六)
人脸识别的进化,可以识别年龄性别了
4.1 前言
将大牛Satya关于人脸识别中年龄和性别识别的代码学习实现了一遍,感觉其中有些坑,原作者博客中并未说明,所以我来填一些坑。
博客当中的python代码和C++代码我都跑了一遍,python代码是没问题的,完全可以运行,也能达到预定目标。C++代码中存在很多问题,报错非常多。我通过中文英文两种方式搜索了许多答案,发现基本都是放水,没太大参考价值。我将python代码和C++代码对比了一下,发现两者相似度极大,基本照搬,而C++调用神经网络模型和Python还是有所不同的,出现那么多错误也是理所应当。待我日后学习了C++调用神经网络模型后再回来填这个坑吧。
- Satya的博客地址:https://www.learnopencv.com/age-gender-classification-using-opencv-deep-learning-c-python/
- Satya的github即源代码地址:https://github.com/spmallick/learnopencv/blob/master/AgeGender/AgeGender.py
4.2 相关配置
项目文件目录如下:

- Backups: 代码文件的备份;
- Photo: 用于人脸识别的图片文件夹;
- age_deploy.prototxt: 年龄判别网络的配置文件,下载地址;
- age_net.caffemodel: 年龄判别网络的模型文件,下载地址1,下载地址2;
- AgeGender.py: 项目代码;
- FileofTensorflow.md: 关于Tensorflow中各种文件的辨析,见博客Files of TensorFlow;
- gender_deploy.prototxt: 性别判别网络的配置文件,下载地址;
- gender_net.caffemodel: 性别判别网络的模型文件,下载地址1,下载地址2;
- opencv_face_detector.pbtxt: 人脸识别网络的配置文件,下载地址;
- opencv_face_detector_uint8.pb: 人脸识别网络的模型文件,下载地址;
- process.png&Process1.png&README.md: 写博客时用的一些文件;
4.3 代码详解
想说的话都在注释里了,就算小白应该也是可以看懂的。
 # -*- coding: utf-8 -*-
 # @Author   作者 : BogeyDa!!
 # @FileName 文件名 : AgeGender.py
 # @Software 创建文件的IDE : PyCharm
 # @Blog     博客地址 : https://blog.csdn.net/lrglgy
 # @Time     创建时间 : 2019-04-25 21:38
#
 # @reference  参考: 博客 https://www.learnopencv.com/age-gender-classification-using-opencv-deep-learning-c-python/
 #              代码 https://github.com/spmallick/learnopencv/blob/master/AgeGender/AgeGender.py
 # @Log      代码说明:通过识别人脸判断性别年龄,代码运行通过

 # Import required modules
import cv2 as cv
import math
import time
import argparse

# detect the face
def getFaceBox(net, frame, conf_threshold=0.7):
    # 将视频的一帧拷贝至frameOpencvDnn
    frameOpencvDnn = frame.copy()
    # 图片窗口的高度
    frameHeight = frameOpencvDnn.shape[0]
    # 图片窗口的宽度
    frameWidth = frameOpencvDnn.shape[1]
    # 对加载入dnn的图片进行预处理,转换为blob格式
    # frameOpencvDnn:导入图片;  1.0:缩放比例为1即不进行缩放;  (300,300):神经网络尺寸(即神经元个数与参数个数)
    # [104,117,123]:mean subtraction value(即图片的R,G,B通道要分别减去这三个值)
    # True:OpenCV通常假设图片通道为BGR,而mean value为RGB,通过设置True将图片的R和B交换,默认情况会执行该交换
    # False:不进行裁剪操作,默认不进行裁剪操作
    # 参考:[Deep learning: How OpenCV’s blobFromImage works](https://www.pyimagesearch.com/2017/11/06/deep-learning-opencvs-blobfromimage-works/)
    blob = cv.dnn.blobFromImage(frameOpencvDnn, 1.0, (300, 300), [104, 117, 123], True, False)

    # 载入网络的输入数据(图片)
    net.setInput(blob)
    # 将神经网络前向传输后的结果赋值给detections
    detections = net.forward()
    # 储存脸部图片的坐标值
    bboxes = []
    # 获得面部图片的可信度confidence,坐标(x1,y1)(x2,y2),框出面部
    for i in range(detections.shape[2]):
        confidence = detections[0, 0, i, 2]
        if confidence > conf_threshold:
            x1 = int(detections[0, 0, i, 3] * frameWidth)
            y1 = int(detections[0, 0, i, 4] * frameHeight)
            x2 = int(detections[0, 0, i, 5] * frameWidth)
            y2 = int(detections[0, 0, i, 6] * frameHeight)
            print("x1:",x1,"x2:",x2)
            print("y1:",y1,"y2:",y2)
            bboxes.append([x1, y1, x2, y2])
            # 原图,点坐标,点坐标,划线对应的RGB颜色,线条粗细,线条类型
            # 注意:rectangle中的坐标是对角线坐标,可能是左上-右下,也可能是右上-左下,这里是右上-左下
            # 参考:[Drawing Functions](https://docs.opencv.org/2.4/modules/core/doc/drawing_functions.html#cv2.rectangle)
            cv.rectangle(frameOpencvDnn, (x1, y1), (x2, y2), (0, 255, 0), int(round(frameHeight / 150)), 1)
        return frameOpencvDnn, bboxes

# argparse 是 Python 内置的一个用于命令项选项与参数解析的模块,其实就是在终端中显示帮助信息及指定参数输入方式,解析传递终端参数
# 详细使用见:[Python 超好用標準函式庫 argparse](https://medium.com/@dboyliao/python-超好用標準函式庫-argparse-4eab2e9dcc69)
parser = argparse.ArgumentParser(description='Use this script to run age and gender recognition using OpenCV.')
parser.add_argument('--input',
                    help='Path to input image or video file. Skip this argument to capture frames from a camera.')

args = parser.parse_args()

# 定义面部识别使用的模型及其相关配置文件
# 参考:proto + pbtxt-- [TensorFlow 简单 pb (pbtxt) 文件读写](https://www.jianshu.com/p/3de6ffc490a9)
#                   -- [一文看懂Protocol Buffer](https://zhuanlan.zhihu.com/p/36554982)
#      proto + pb   -- [TensorFlow 到底有几种模型格式?](https://cloud.tencent.com/developer/article/1009979)
# 个人总结:[Files of TensorFlow](https://blog.csdn.net/lrglgy/article/details/89484078)
faceProto = "opencv_face_detector.pbtxt"
faceModel = "opencv_face_detector_uint8.pb"

ageProto = "age_deploy.prototxt"
ageModel = "age_net.caffemodel"

genderProto = "gender_deploy.prototxt"
genderModel = "gender_net.caffemodel"


MODEL_MEAN_VALUES = (78.4263377603, 87.7689143744, 114.895847746)
# 年龄列表[0-2],[4-6],[8-12].....
ageList = ['(0-2)', '(4-6)', '(8-12)', '(15-20)', '(25-32)', '(38-43)', '(48-53)', '(60-100)']
# 性别列表
genderList = ['Male', 'Female']

# Load network
# 加载面部识别,年龄判别,性别判别的网络
ageNet = cv.dnn.readNet(ageModel, ageProto)
genderNet = cv.dnn.readNet(genderModel, genderProto)
faceNet = cv.dnn.readNet(faceModel, faceProto)

# Open a video file or an image file or a camera stream
# 当终端输入参数非空,打开对应图片,若为空,则打开摄像头
cap = cv.VideoCapture(args.input if args.input else 0)
padding = 20
# 以1ms的频率刷新图像,无按键时一直执行循环,按键后跳出循环
while cv.waitKey(1) < 0:
    # Read frame
    t = time.time()
    # 读取视频帧序列
    hasFrame, frame = cap.read()
    if not hasFrame:
        cv.waitKey()
        break

    # 将经过面部识别的图片传给framFace,面部有关坐标传给bboxes
    frameFace, bboxes = getFaceBox(faceNet, frame)
    if not bboxes:
        print("No face Detected, Checking next frame")
        continue

    # 遍历面部坐标
    for bbox in bboxes:
        # print(bbox)
        # 选择一个包含面部图像的最小区域并赋给face
        face = frame[max(0, bbox[1] - padding):min(bbox[3] + padding, frame.shape[0] - 1),
                        max(0, bbox[0] - padding):min(bbox[2] + padding, frame.shape[1] - 1)]

        # 将获取到的面部图像进行预处理:缩放,神经网路尺寸,mean subtraction value,是否交换R通道与B通道
        blob = cv.dnn.blobFromImage(face, 1.0, (227, 227), MODEL_MEAN_VALUES, swapRB=False)
        genderNet.setInput(blob)
        genderPreds = genderNet.forward()
        # 返回概率最大值对应的坐标,同时在性别列表中选出对应的性别赋给gender
        gender = genderList[genderPreds[0].argmax()]
        # print("Gender Output : {}".format(genderPreds))
        print("Gender : {}, conf = {:.3f}".format(gender, genderPreds[0].max()))

        ageNet.setInput(blob)
        agePreds = ageNet.forward()
        age = ageList[agePreds[0].argmax()]
        print("Age Output : {}".format(agePreds))
        print("Age : {}, conf = {:.3f}".format(age, agePreds[0].max()))

        label = "{},{}".format(gender, age)
        # 照片/添加的文字/左上角坐标/字体/字体大小/颜色/字体粗细
        cv.putText(frameFace, label, (bbox[0], bbox[1] - 10), cv.FONT_HERSHEY_SIMPLEX, 0.8, (0, 255, 255),
                               2, cv.LINE_AA)
        cv.imshow("Age Gender Demo", frameFace)
        # cv.imwrite("age-gender-out-{}".format(args.input),frameFace)
    print("time : {:.3f}".format(time.time() - t))
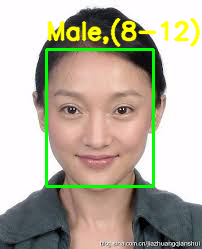
4.4 结果展示
在IDE里点击运行后会打开摄像头,识别人脸并标出年龄:

也可以在终端运行,定位到项目文件目录,输入命令(base) localhost:age_gender 用户名$ python AgeGender.py --input 本地图片路径,如果不输入本地路径则打开本地摄像头,结果如下(好像有点不准,?):


 915
915

 被折叠的 条评论
为什么被折叠?
被折叠的 条评论
为什么被折叠?
 到【灌水乐园】发言


