


一、监控概述
1、监控的目的?
报告系统运行状况:吞吐量 反应时间 使用率
提前发现问题:性能调整、系统瓶颈
2、监控的资源类别
公开数据:Web FTP SSH 数据库 TCP/UDP
私有数据:CPU 内存 磁盘 网卡 用户 进程
3、系统监控命令
ps 				//ps -aux 进程信息
uptime			//cpu平均负载 1 5 15分钟信息
free			//内存和交换分区信息
swapon -s		//交换分区信息
df -h			//磁盘信息
ifconfig		//网卡信息
netstat  ss		//ss -atnup 端口信息
ping			//网络连通信息
traceroute		//跟踪路由 traceroute 192.168.4.2
iostat			//yum -y install sysstat 磁盘IO
sar				//sar 1 (每隔1秒钟) 1 (取1次cpu信息)
4、自动化监控系统
Cacti 绘图能力强
Nagios 报警快速,插件多,绘图差
Zabbix 绘图能力强,监控机制多,分布式监控
5、监控拓扑
1)监控服务器
监控服务器通过SNMP或Agent采集数据
数据可以写入MySQL,Oracle等数据量
服务器使用LNMP实现web前端的管理
2)被监控主机
被监控主机需要安装Agent
常见的网络设备一般支持SNMP
二、LNMP环境准备
1、安装前准备
监控服务器
设置主机名:zabbixserver
设置IP地址:192.168.2.5
关闭防火墙、SElinux
监控客户端
主机web1:192.168.2.100
主机web2:192.168.2.200
关闭防火墙,SElinux
#sed -i /^SELINUX/s/enforcing/permissive /etc/selinux/config //关闭SElinux
#yum -y install vim psmisc net-tools bash-completion //安装软件包
2、部署LNMP,安装nginx及依赖包
[root@zabbixserver ~]# yum -y install gcc make pcre-devel openssl-devel	//安装源码依赖包
[root@zabbixserver ~]# tar -xf /lnmp_soft.tar.gz
[root@zabbixserver ~]# cd lnmp_soft/
[root@zabbixserver ~]# tar -xf nginx-1.17.6.tar.gz
[root@zabbixserver ~]# cd nginx-1.17.6/
[root@zabbixserver ~]# ./configure --with-http_ssl_module //编译
[root@zabbixserver ~]# make && make install	//配置 安装
[root@zabbixserver ~]# yum -y install php php-fpm php-mysql mariadb mariadb-server mariadb-devel
3、修改nginx配置
[root@zabbixserver ~]# vim /usr/local/nginx/conf/nginx.conf
//配置动态界面和php缓存
        fastcgi_buffers 8 16k;
        fastcgi_buffer_size 32k;
        fastcgi_connect_timeout 300;
        fastcgi_send_timeout 300;
        fastcgi_read_timeout 300;
        location ~ \.php$ {
            root           html;
            fastcgi_pass   127.0.0.1:9000;
            fastcgi_index  index.php;
        #    fastcgi_param  SCRIPT_FILENAME  /scripts$fastcgi_script_name;
            include        fastcgi.conf;
        }
4、启动服务、设置开机自启动
[root@zabbixserver ~]# /usr/local/nginx/sbin/nginx	//启动服务
[root@zabbixserver ~]# systemctl restart php-fpm mariadb
[root@zabbixserver ~]# systemctl enable php-fpm mariadb
[root@zabbixserver ~]# vim /usr/lib/systemd/system/nginx.service //nginx开机自启
[Unit]
Description=nginx service
After=network.target

[Service]
Type=forking
PIDFile=/usr/local/nginx/logs/nginx.pid
ExecStart=/usr/local/nginx/sbin/nginx
ExecReload=/usr/local/nginx/sbin/nginx -s reload
ExecStop=/usr/local/nginx/sbin/nginx -s quit
PrivateTmp=true

[Install]
WantedBy=multi-user.target
[root@zabbixserver ~]# systemctl enable nginx
5、测试界面
[root@zabbixserver ~]# vim /usr/local/nginx/html/test.php	//创建test.php测试界面
<?php
$i=33;
echo $i;
?>
[root@zabbixserver ~]# curl 192.168.2.5/test.php			//访问,验证结果为33
三、安装Zabbix
搭建思路
1、安装zabbix
2、初始化数据库,授权导库
3、安装php依赖,修改php配置文件,启动服务
4、被管理主机安装zabbix,配置Server服务端
1、安装软件
[root@zabbixserver ~]# cd lnmp_soft/
[root@zabbixserver ~]# tar -xf zabbix-3.4.4.tar.gz
[root@zabbixserver ~]# cd zabbix-3.4.4/
[root@zabbixserver ~]# yum -y install curl-devel net-snmp-devel libevent-devel
[root@zabbixserver ~]# which mysql_config
[root@zabbixserver ~]# ./configure --enable-server --enable-proxy --enable-agent --with-net-snmp --with-libcurl --with-mysql=/usr/bin/mysql_config
[root@zabbixserver ~]# make install
[root@zabbixserver ~]# ls /usr/local/etc/
zabbix_agentd.conf    zabbix_proxy.conf.d   zabbix_agentd.conf.d  zabbix_server.conf
zabbix_proxy.conf     zabbix_server.conf.d
[root@zabbixserver ~]# ls /usr/local/bin/
zabbix_get  zabbix_sender
[root@zabbixserver ~]# ls /usr/local/sbin/
zabbix_agentd  zabbix_proxy  zabbix_server
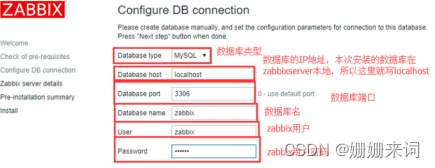
2、初始化准备
[root@zabbixserver ~]# mysql
MariaDB [(none)]> create database zabbix character set utf8;
MariaDB [(none)]> grant all on zabbix.* to zabbix@'localhost' identified by 'zabbix';
[root@zabbixserver ~]# cd lnmp_soft/zabbix-3.4.4/database/mysql/
[root@zabbixserver ~]# mysql -uzabbix -pzabbix zabbix < schema.sql
[root@zabbixserver ~]# mysql -uzabbix -pzabbix zabbix < images.sql
[root@zabbixserver ~]# mysql -uzabbix -pzabbix zabbix < data.sql
[root@zabbixserver ~]# cd lnmp_soft/zabbix-3.4.4/frontends/php/
[root@zabbixserver ~]# cp -a * /usr/local/nginx/html/
[root@zabbixserver ~]# chmod -R 777 /usr/local/nginx/html/*
3、安装依赖软件
[root@zabbixserver ~]# yum -y install php-gd php-xml php-ldap php-bcmath php-mbstring
4、修改PHP配置文件
[root@zabbixserver ~]# vim /etc/php.ini
date.timezone = Asia/Shanghai
max_execution_time = 300
post_max_size = 32M
max_input_time = 300
[root@zabbixserver ~]# systemctl restart php-fpm
5、启动服务
[root@zabbixserver ~]# vim /usr/local/etc/zabbix_server.conf
DBHost=localhost
DBName=zabbix
DBUser=zabbix
DBPassword=zabbix
LogFile=/tmp/zabbix_server.log
[root@zabbixserver ~]# useradd zabbix
[root@zabbixserver ~]# zabbix_server
[root@zabbixserver ~]# ss -atnup | grep :10051
6、开机自启
[root@zabbixserver ~]# echo zabbix_server >> /etc/rc.local
[root@zabbixserver ~]# echo zabbix_agentd >> /etc/rc.local
[root@zabbixserver ~]# chmod +x /etc/rc.local
7、被监控主机配置,安装软件
[root@web1 ~]# yum -y install gcc make pcre-devel autoconf
[root@web1 ~]# tar -xf zabbix-3.4.4.tar.gz
[root@web1 ~]# cd zabbix-3.4.4/
[root@web1 zabbix-3.4.4] ./configure --enable-agent
[root@web1 zabbix-3.4.4] make install
[root@web1 zabbix-3.4.4] ls /usr/local/etc/
[root@web1 zabbix-3.4.4] ls /usr/local/bin/
[root@web1 zabbix-3.4.4] ls /usr/local/sbin/
8、修改配置文件
[root@web1 zabbix-3.4.4] vim /usr/local/etc/zabbix_agentd.conf
Server=127.0.0.1,192.168.2.5		//允许访问服务地址列表
ServerActive=192.168.2.5:10051		//监控服务器ip地址
9、启动服务
[root@web1 zabbix-3.4.4] useradd zabbix
[root@web1 zabbix-3.4.4] zabbix_agentd
[root@web1 zabbix-3.4.4] ss -atnup | grep 10050
10、开机自启
[root@web1 zabbix-3.4.4] echo zabbix_agentd >> /etc/rc.local
[root@web1 zabbix-3.4.4] chmod +x /etc/rc.local
四、基础监控
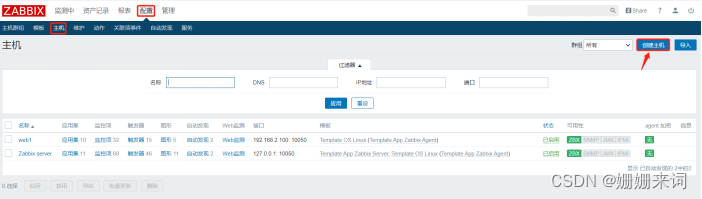
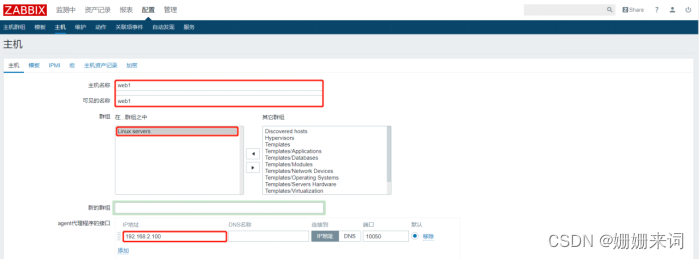
1、创建主机【配置>主机>创建主机】
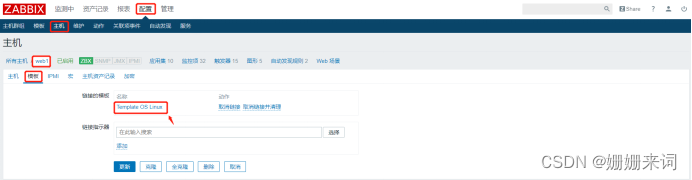
2、选择模板【配置>主机>web1>模板】
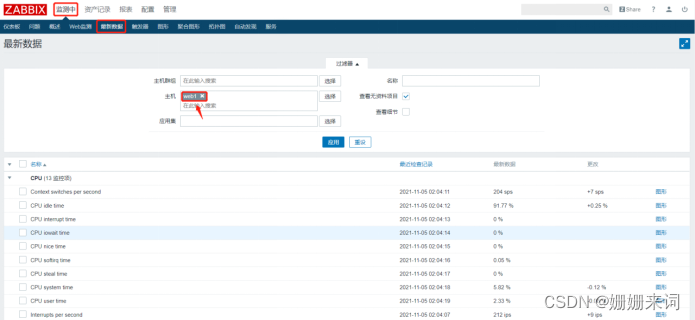
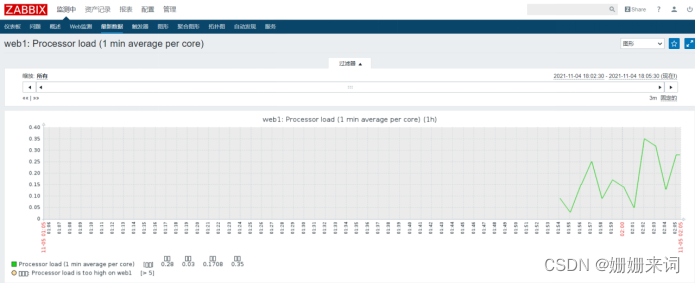
3、查看web1的最新数据【检测中>最新数据>主机】
五、自定义监控
1、自定义key,被监控端修改Agent配置文件
[root@web1 ~]# vim /usr/local/etc/zabbix_agentd.conf
UnsafeUserParameters=1
Include=/usr/local/etc/zabbix_agentd.conf.d/
2、创建定义key
[root@web1 ~]# cd /usr/local/etc/zabbix_agentd.conf.d/
[root@web1 zabbix_agentd.conf.d]# Include=/usr/local/etc/zabbix_agentd.conf.d/
UserParameter=count.line.passwd,sed -n '$=' /etc/passwd
3、重启Agentd
[root@web1 zabbix_agentd.conf.d]# killall zabbix_agentd
[root@web1 zabbix_agentd.conf.d]# abbix_agentd
4、测试定义的key是否生效
[root@web1 zabbix_agentd.conf.d]# zabbix_get -s 127.0.0.1 -k count.line.passwd
[root@web1 zabbix_agentd.conf.d]# useradd tom
[root@web1 zabbix_agentd.conf.d]# useradd lisi ...
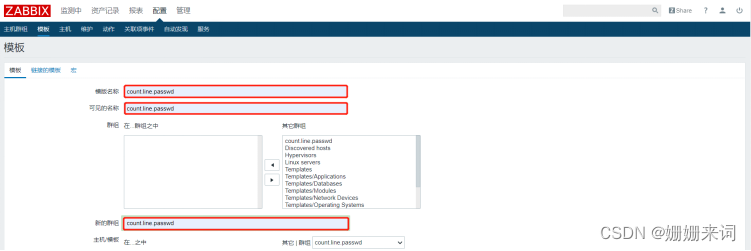
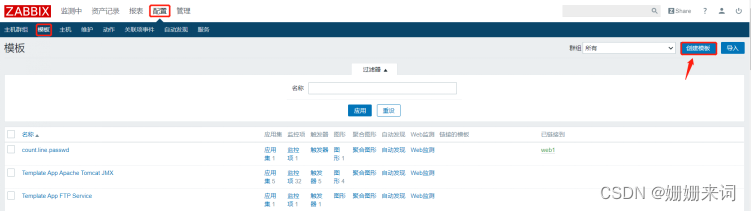
5、登录监控服务器Web管理界面,创建监控模板【配置>模板】
6、创建应用【配置>主机>应用集】

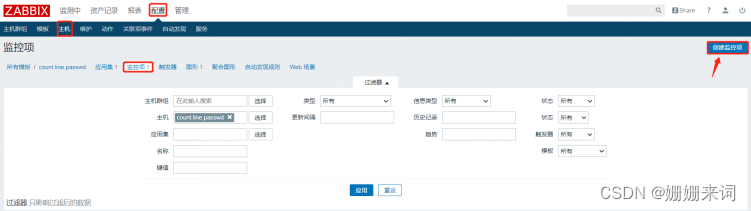
7、创建监控项目【配置>主机>监控项】


 191
191


 被折叠的 条评论
为什么被折叠?
被折叠的 条评论
为什么被折叠?
 到【灌水乐园】发言


