


集成了人脸识别系统的视频播放器
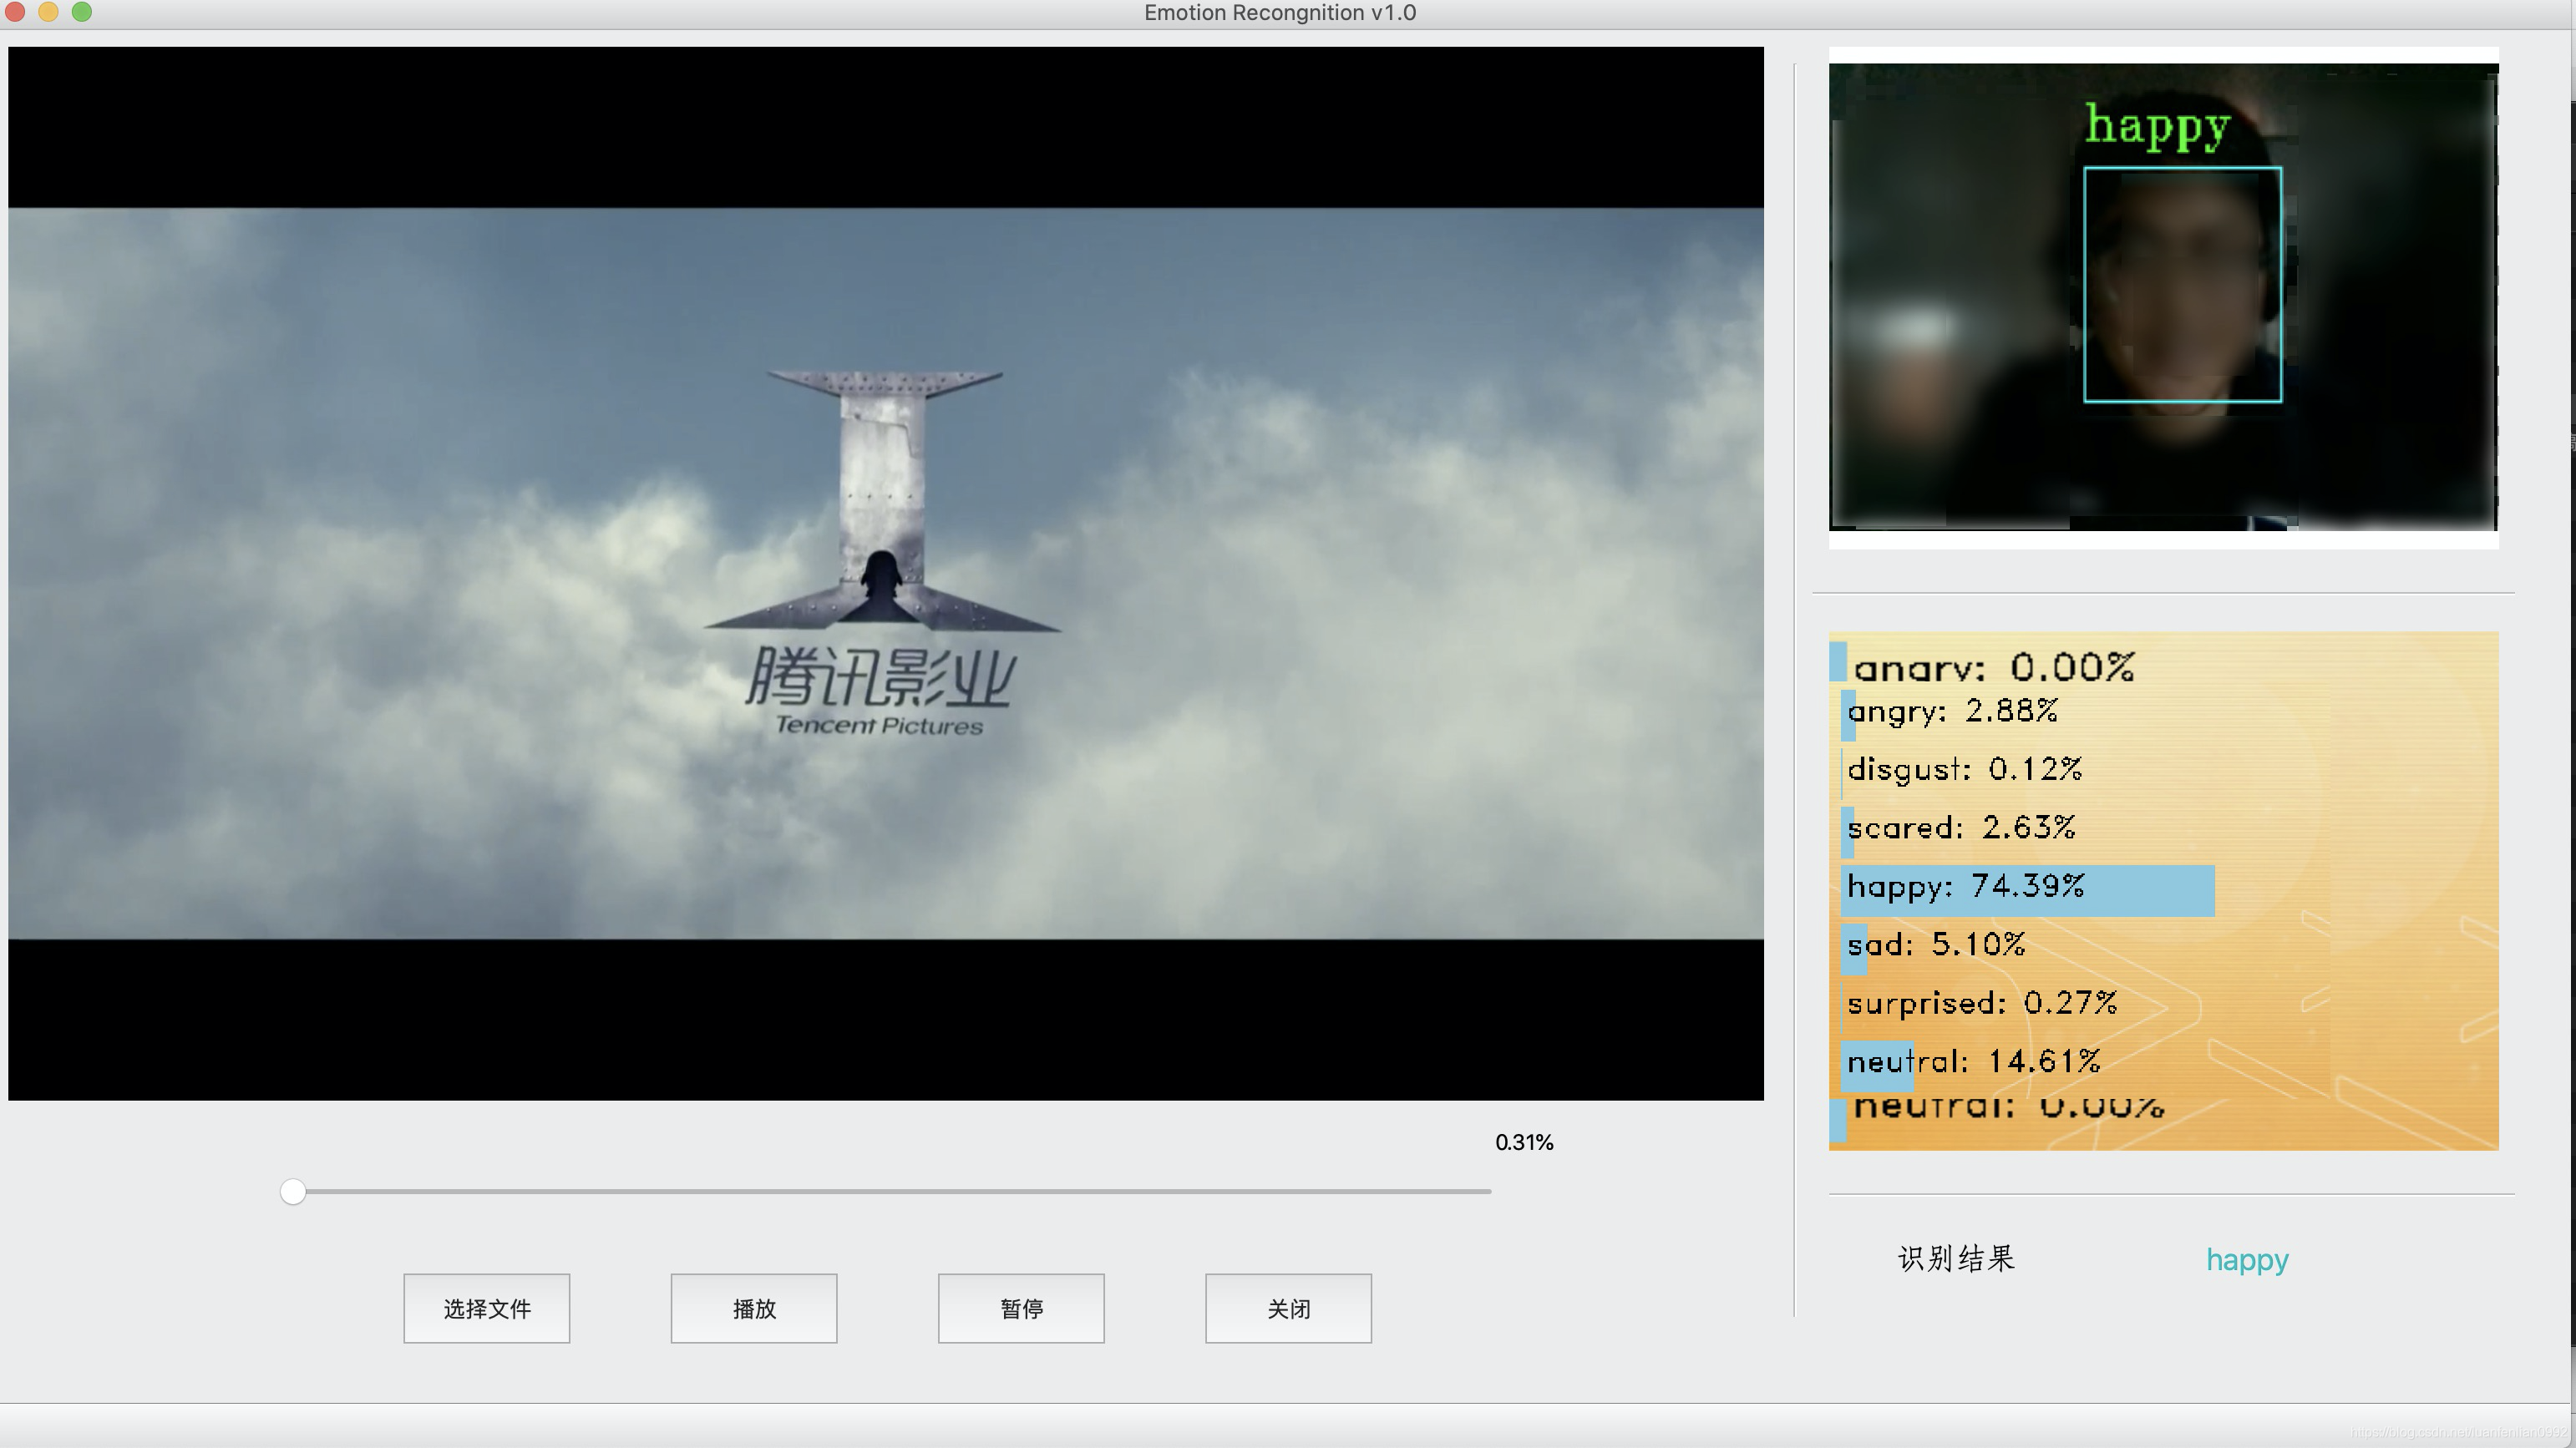
整个界面分为视频播放区域(左侧)跟人脸识别区域(右侧),整体界面是由PyQt5搭建,视频播放的时候摄像头打开并识别观看者的表情,并将表情记录在后台的log文件中。
该项目建议不要使用vs code打开,因为我在vs code环境中打开一直闪退,别的ide均正常。
完整代码参加github:https://github.com/Barrnett/Emotion-Recongnition.
一、视频播放器部分
该部分使用的是PyQt5中的QtMultimedia库来处理视频的,之前也用过opencv来处理视频,但是播放的视频没有音频,从代码上分析原因是在用opencv时是将视频帧提取出来然后转换成opencv格式的帧,但是音频却没有处理,故没有声音。
以下分别是界面上“选择文件”,“播放”,“暂停”按钮对应的响应函数。
#选择文件路径
    def button_openfile(self):
        self.pushButton_play.setEnabled(False)
        self.pushButton_pause.setEnabled(True)
        self.pushButton_close.setEnabled(True)
        self.player.setMedia(QMediaContent(QFileDialog.getOpenFileUrl()[0]))  # 选取视频文件
        self.player.play()  # 播放视频

#播放视频
    def button_play(self):
        self.pushButton_play.setEnabled(False)
        self.pushButton_pause.setEnabled(True)
        self.pushButton_close.setEnabled(False)
        self.player.setVideoOutput(self.wgt_video)
        self.player.play()
        if self.player.duration() > 0:  # 开始播放后才允许打开摄像头
            self.button_open_camera_click()

#暂停播放且停止录像
    def button_pause(self):
        self.pushButton_play.setEnabled(True)
        self.pushButton_pause.setEnabled(False)
        self.pushButton_close.setEnabled(True)
        if self.player.duration() > 0:  # 开始播放后才允许暂停
            self.timer_camera.stop()
            self.cap.release()  # 停止摄像
            self.player.pause()
二、人脸表情识别系统
该部分主要借鉴与https://blog.csdn.net/qq_32892383/article/details/91347164这个博客。具体原理可以参见该博文,本文只做简要说明。
该系统程序由Keras, OpenCv的库实现,训练测试集采用fer2013表情库。如图系统可通过摄像头获取实时画面并识别其中的人脸表情,这里使用的是已有的模型——如今CNN的主流框架之mini_XCEPTION。
对数据集进行处理,采用如下代码载入和进行图片预处理:
import pandas as pd
import cv2
import numpy as np

dataset_path = 'fer2013/fer2013/fer2013.csv' # 文件保存位置
image_size=(48,48) # 图片大小

# 载入数据
def load_fer2013():
        data = pd.read_csv(dataset_path)
        pixels = data['pixels'].tolist()
        width, height = 48, 48
        faces = []
        for pixel_sequence in pixels:
            face = [int(pixel) for pixel in pixel_sequence.split(' ')]
            face = np.asarray(face).reshape(width, height)
            face = cv2.resize(face.astype('uint8'),image_size)
            faces.append(face.astype('float32'))
        faces = np.asarray(faces)
        faces = np.expand_dims(faces, -1)
        emotions = pd.get_dummies(data['emotion']).as_matrix()
        return faces, emotions

# 将数据归一化
def preprocess_input(x, v2=True):
    x = x.astype('float32')
    x = x / 255.0
    if v2:
        x = x - 0.5
        x = x * 2.0
    return x
载入数据后将数据集划分为训练集和测试集,在程序中调用上面的函数代码如下:
from load_and_process import load_fer2013
from load_and_process import preprocess_input
from sklearn.model_selection import train_test_split

# 载入数据集
faces, emotions = load_fer2013()
faces = preprocess_input(faces)
num_samples, num_classes = emotions.shape

# 划分训练、测试集
xtrain, xtest,ytrain,ytest = train_test_split(faces, emotions,test_size=0.2,shuffle=True)
mini_XCEPTION的模型实现代码如下:
def mini_XCEPTION(input_shape, num_classes, l2_regularization=0.01):
    regularization = l2(l2_regularization)

    # base
    img_input = Input(input_shape)
    x = Conv2D(8, (3, 3), strides=(1, 1), kernel_regularizer=regularization,
                                            use_bias=False)(img_input)
    x = BatchNormalization()(x)
    x = Activation('relu')(x)
    x = Conv2D(8, (3, 3), strides=(1, 1), kernel_regularizer=regularization,
                                            use_bias=False)(x)
    x = BatchNormalization()(x)
    x = Activation('relu')(x)

    # module 1
    residual = Conv2D(16, (1, 1), strides=(2, 2),
                      padding='same', use_bias=False)(x)
    residual = BatchNormalization()(residual)

    x = SeparableConv2D(16, (3, 3), padding='same',
                        kernel_regularizer=regularization,
                        use_bias=False)(x)
    x = BatchNormalization()(x)
    x = Activation('relu')(x)
    x = SeparableConv2D(16, (3, 3), padding='same',
                        kernel_regularizer=regularization,
                        use_bias=False)(x)
    x = BatchNormalization()(x)

    x = MaxPooling2D((3, 3), strides=(2, 2), padding='same')(x)
    x = layers.add([x, residual])

    # module 2
    residual = Conv2D(32, (1, 1), strides=(2, 2),
                      padding='same', use_bias=False)(x)
    residual = BatchNormalization()(residual)

    x = SeparableConv2D(32, (3, 3), padding='same',
                        kernel_regularizer=regularization,
                        use_bias=False)(x)
    x = BatchNormalization()(x)
    x = Activation('relu')(x)
    x = SeparableConv2D(32, (3, 3), padding='same',
                        kernel_regularizer=regularization,
                        use_bias=False)(x)
    x = BatchNormalization()(x)

    x = MaxPooling2D((3, 3), strides=(2, 2), padding='same')(x)
    x = layers.add([x, residual])

    # module 3
    residual = Conv2D(64, (1, 1), strides=(2, 2),
                      padding='same', use_bias=False)(x)
    residual = BatchNormalization()(residual)

    x = SeparableConv2D(64, (3, 3), padding='same',
                        kernel_regularizer=regularization,
                        use_bias=False)(x)
    x = BatchNormalization()(x)
    x = Activation('relu')(x)
    x = SeparableConv2D(64, (3, 3), padding='same',
                        kernel_regularizer=regularization,
                        use_bias=False)(x)
    x = BatchNormalization()(x)

    x = MaxPooling2D((3, 3), strides=(2, 2), padding='same')(x)
    x = layers.add([x, residual])

    # module 4
    residual = Conv2D(128, (1, 1), strides=(2, 2),
                      padding='same', use_bias=False)(x)
    residual = BatchNormalization()(residual)

    x = SeparableConv2D(128, (3, 3), padding='same',
                        kernel_regularizer=regularization,
                        use_bias=False)(x)
    x = BatchNormalization()(x)
    x = Activation('relu')(x)
    x = SeparableConv2D(128, (3, 3), padding='same',
                        kernel_regularizer=regularization,
                        use_bias=False)(x)
    x = BatchNormalization()(x)

    x = MaxPooling2D((3, 3), strides=(2, 2), padding='same')(x)
    x = layers.add([x, residual])

    x = Conv2D(num_classes, (3, 3),
            #kernel_regularizer=regularization,
            padding='same')(x)
    x = GlobalAveragePooling2D()(x)
    output = Activation('softmax',name='predictions')(x)

    model = Model(img_input, output)
    return model
数据增强的批量训练:
"""
Description: 训练人脸表情识别程序
"""

from keras.callbacks import CSVLogger, ModelCheckpoint, EarlyStopping
from keras.callbacks import ReduceLROnPlateau
from keras.preprocessing.image import ImageDataGenerator
from load_and_process import load_fer2013
from load_and_process import preprocess_input
from models.cnn import mini_XCEPTION
from sklearn.model_selection import train_test_split

# 参数
batch_size = 32
num_epochs = 10000
input_shape = (48, 48, 1)
validation_split = .2
verbose = 1
num_classes = 7
patience = 50
base_path = 'models/'

# 构建模型
model = mini_XCEPTION(input_shape, num_classes)
model.compile(optimizer='adam', # 优化器采用adam
              loss='categorical_crossentropy', # 多分类的对数损失函数
              metrics=['accuracy'])
model.summary()

# 定义回调函数 Callbacks 用于训练过程
log_file_path = base_path + '_emotion_training.log'
csv_logger = CSVLogger(log_file_path, append=False)
early_stop = EarlyStopping('val_loss', patience=patience)
reduce_lr = ReduceLROnPlateau('val_loss', factor=0.1,
                              patience=int(patience/4),
                              verbose=1)
# 模型位置及命名
trained_models_path = base_path + '_mini_XCEPTION'
model_names = trained_models_path + '.{epoch:02d}-{val_acc:.2f}.hdf5'

# 定义模型权重位置、命名等
model_checkpoint = ModelCheckpoint(model_names,
                                   'val_loss', verbose=1,
                                    save_best_only=True)
callbacks = [model_checkpoint, csv_logger, early_stop, reduce_lr]

# 载入数据集
faces, emotions = load_fer2013()
faces = preprocess_input(faces)
num_samples, num_classes = emotions.shape

# 划分训练、测试集
xtrain, xtest,ytrain,ytest = train_test_split(faces, emotions,test_size=0.2,shuffle=True)

# 图片产生器,在批量中对数据进行增强,扩充数据集大小
data_generator = ImageDataGenerator(
                        featurewise_center=False,
                        featurewise_std_normalization=False,
                        rotation_range=10,
                        width_shift_range=0.1,
                        height_shift_range=0.1,
                        zoom_range=.1,
                        horizontal_flip=True)

# 利用数据增强进行训练
model.fit_generator(data_generator.flow(xtrain, ytrain, batch_size),
                        steps_per_epoch=len(xtrain) / batch_size,
                        epochs=num_epochs,
                        verbose=1, callbacks=callbacks,
                        validation_data=(xtest,ytest))
以上代码中设置了训练时的结果输出,在训练结束后会将训练的模型保存为hdf5文件到自己指定的文件夹下,由于数据量大模型的训练时间会比较长,建议使用GPU加速。
三、后台日志收集
为了分析人们在观看视频时各个时间段的表情信息,这里将人脸表情实时的保存在后台的log文件中,log文件生成生成地址就是程序的所在位置。
生成的日志格式如下图所示:数字表示生成的时间:年-月-日_时/分/秒。
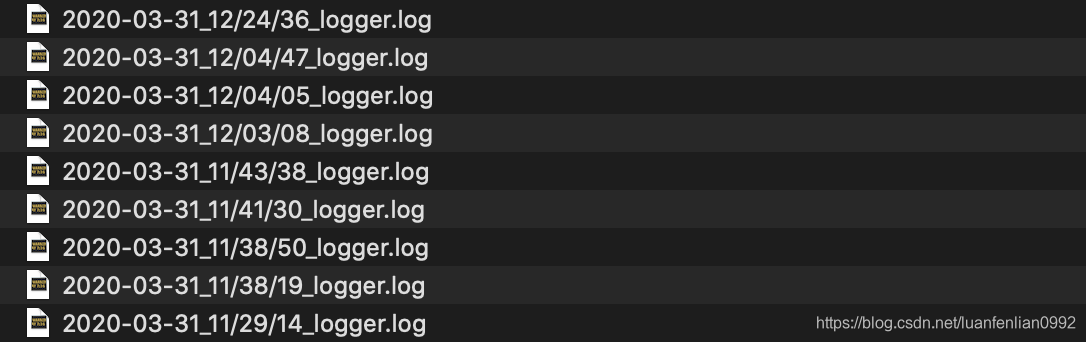
里面的1.22%表示视频进度,后面表示各个表情的置信度。

# 配置日志文件和日志级别
        currentTime = time.strftime("%Y-%m-%d_%H:%M:%S", time.localtime())
        logging.basicConfig(filename=currentTime + '_logger.log', level=logging.INFO)

		self.logFile = '[' + self.timePlay + ']' + str(self.emotion_model.preds)
        logging.info(self.logFile)


 1066
1066

 被折叠的 条评论
为什么被折叠?
被折叠的 条评论
为什么被折叠?
 到【灌水乐园】发言


