


1.density工具类开发中常用到的
package com.example.test_android;
import android.content.Context;

public class DensityUtil {

    /**
     * 根据手机的分辨率从 dp 的单位 转成为 px(像素)
     */
    public static int dip2px(Context context, float dpValue) {
        final float scale = context.getResources().getDisplayMetrics().density;
        return (int) (dpValue * scale + 0.5f);
    }

    /**
     * 根据手机的分辨率从 px(像素) 的单位 转成为 dp
     */
    public static int px2dip(Context context, float pxValue) {
        final float scale = context.getResources().getDisplayMetrics().density;
        return (int) (pxValue / scale + 0.5f);
    }
}
xml里头设置高度跟代码里的高度设置可以用以上工具类进行转换。java代码中的单位是px,xml中的一般是dp。
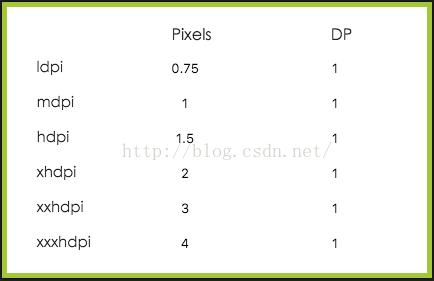
2.分辨率换算的规则,在此贴出一张图片。
3.对于density的理解
float scale = getResources().getDisplayMetrics().density;
		//这个得到的不应该叫做密度,应该是密度的一个比例。不是真实的屏幕密度,而是相对于某个值的屏幕密度。
		//也可以说是相对密度
		/**
		 * The logical density of the display. This is a scaling factor for the
		 * Density Independent Pixel unit, where one DIP is one pixel on an
		 * approximately 160 dpi screen (for example a 240x320, 1.5"x2" screen),
		 * providing the baseline of the system's display. Thus on a 160dpi
		 * screen this density value will be 1; on a 120 dpi screen it would be
		 * .75; etc.
		 *
		 * This value does not exactly follow the real screen size (as given by
		 * xdpi and ydpi, but rather is used to scale the size of the overall UI
		 * in steps based on gross changes in the display dpi. For example, a
		 * 240x320 screen will have a density of 1 even if its width is
		 * 1.8", 1.3", etc. However, if the screen resolution is increased to
		 * 320x480 but the screen size remained 1.5"x2" then the density would
		 * be increased (probably to 1.5).
		 */

		/**
		 * 显示器的逻辑密度,这是【独立的像素密度单位(首先明白dip是个单位)】的一个缩放因子,
		 * 在屏幕密度大约为160dpi的屏幕上,一个dip等于一个px,这个提供了系统显示器的一个基线(这句我实在翻译不了)。
		 * 例如:屏幕为240*320的手机屏幕,其尺寸为 1.5"*2"  也就是1.5英寸乘2英寸的屏幕
		 * 它的dpi(屏幕像素密度,也就是每英寸的像素数,dpi是dot per inch的缩写)大约就为160dpi,
		 * 所以在这个手机上dp和px的长度(可以说是长度,最起码从你的视觉感官上来说是这样的)是相等的。
		 * 因此在一个屏幕密度为160dpi的手机屏幕上density的值为1,而在120dpi的手机上为0.75等等
		 * (这里有一句话没翻译,实在读不通顺,不过通过下面的举例应该能看懂)
		 * 例如:一个240*320的屏幕尽管他的屏幕尺寸为1.8"*1.3",(我算了下这个的dpi大约为180dpi多点)
		 * 但是它的density还是1(也就是说取了近似值)
		 * 然而,如果屏幕分辨率增加到320*480 但是屏幕尺寸仍然保持1.5"*2" 的时候(和最开始的例子比较)
		 * 这个手机的density将会增加(可能会增加到1.5)
		 */
4.计算公式及资源标识
DisplayMetrics metric = new DisplayMetrics();
      getWindowManager().getDefaultDisplay().getMetrics(metric);

      int width = metric.widthPixels;  // 宽度(PX)
      int height = metric.heightPixels;  // 高度(PX)

      float density = metric.density;  // 密度(0.75 / 1.0 / 1.5 / 3)
      int densityDpi = metric.densityDpi;  // 密度DPI(120 / 160 / 240/ 320 / 480)
用资源标识符为每幅图像资源提供多个尺寸。Android SDK中定义了4中屏幕分辨率(或叫做屏幕密度),根据计算公式计算的密度DPI分别对应不同的资源标识符。如下所示:
》低分辨率(ldpi):120 dpi
尺寸是mdpi的75%
》中分辨率(mdpi):160 dpi
原始的图片尺寸
》高分辨率(hdpi):240 dpi
尺寸是mdpi的150%
》超高分辨率(xhdpi):320 dpi
尺寸是mdpi的200%
》超级高(xxhdpi):480 dpi
尺寸是mdpi的300%
需要注意的是,在一个低密度的小屏手机上,仅靠上面的代码是不能获取正确的尺寸的。
比如说,一部240×320像素的低密度手机,如果运行上述代码,获取到的屏幕尺寸是320×427。
因此,研究之后发现,若没有设定多分辨率支持的话,
Android系统会将240×320的低密度(120)尺寸转换为中等密度(160)对应的尺寸,
这样的话就大大影响了程序的编码。
所以,需要在工程的AndroidManifest.xml文件中,加入supports-screens节点,如下:
android:smallScreens=”true”
android:normalScreens=”true”
android:largeScreens=”true”
android:resizeable=”true”
android:anyDensity=”true” />
这样当前的Android程序就支持了多种分辨率,那么就可以得到正确的物理尺寸了。
density = dpi/160
px = dip * density


 492
492


 被折叠的 条评论
为什么被折叠?
被折叠的 条评论
为什么被折叠?
 到【灌水乐园】发言


