QML Shape实现任意圆角Rectangle矩形

前言

QML中有时候需要实现一些特殊定制化页面,比如不同的圆角矩形,如果直接用Rectangle控件定义radius圆角属性,会将四个角统一设置成一样的圆角,但是如果仅仅只想实现两个圆角效果,另外两个直角,或者圆角的弧度不同,这时候就不能直接用现有的Rectangle去做了,有两种方法, 一种是直接用Canvas进行绘制,一种是通过Shape组件来实现。
两种方法均可,区别是前者稍微复杂一点,代码量会多一些,后者相对简单点,而且便于封装,多处使用。

本文主要使用Shape来封装一个任意圆角的矩形,方便满足不同需求实现。

先看效果:
在这里插入图片描述
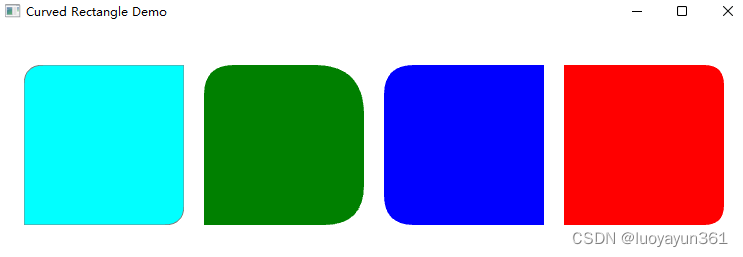
其中第一张是带边框效果,其他几个的圆角大小也是不同的。

正文

话不多说,为了方便在不同的地方使用,直接封装成自定义控件,提供相应的属性便于设置。

上代码:

import QtQuick 2.13
import QtQuick.Controls 2.13
import QtQuick.Shapes 1.13

Shape {
    id: shape
    property var cornersRadius
    property color color
    property color borderColor:"transparent"
    property int borderWidth: 1
    layer.enabled: true
    layer.samples: 4
    layer.smooth: true


    ShapePath {
        startX: 0
        startY: cornersRadius[0]
        fillColor: color
        strokeColor: borderColor
        strokeWidth: borderWidth
        PathQuad { x: cornersRadius[0]; y: 0; controlX: 0; controlY: 0 }
        PathLine { x: shape.width - cornersRadius[1]; y: 0 }
        PathQuad { x: shape.width; y: cornersRadius[1]; controlX: shape.width; controlY: 0 }
        PathLine { x: shape.width; y: shape.height - cornersRadius[2] }
        PathQuad { x: shape.width - cornersRadius[2]; y: shape.height; controlX: shape.width; controlY: shape.height }
        PathLine { x: cornersRadius[3]; y: shape.height }
        PathQuad { x: 0; y: shape.height - cornersRadius[3]; controlX: 0; controlY: shape.height }
        PathLine { x: 0; y: cornersRadius[0] }
    }
}

test代码

import QtQuick 2.13
import QtQuick.Window 2.13

Window {
    width: 740
    height: 480
    visible: true
    title: qsTr("Curved Rectangle Demo")


    Row{
        spacing: 20
        anchors.centerIn: parent

        CurvedRectangle{
            width: 160
            height: 160
            color: "cyan"
            cornersRadius: [20,0,20,0]
            borderWidth:1
            borderColor:"grey"
        }
        CurvedRectangle{
            width: 160
            height: 160
            color: "green"
            cornersRadius: [30,50,40,0]

        }
        CurvedRectangle{
            width: 160
            height: 160
            color: "blue"
            cornersRadius: [30,0,0,30]
        }
        CurvedRectangle{
            width: 160
            height: 160
            color: "red"
            cornersRadius: [0,20,20,0]
        }
    }
}

直接通过cornersRadius属性,指定四个角的圆角大小。若要使用边框,可以设置borderColor和borderWidth, 不设置就默认没有边框。

代码不复杂,不做过多解释,仅此分享。

Enjoy~

### 如何在 QML Rectangle 中设置部分圆角 为了实现仅对 `Rectangle` 部分角落应用圆角效果,有几种方法可供选择: #### 方法一:使用多个 `Rectangle` 组合 可以通过组合多个 `Rectangle` 来模拟部分圆角效果。具体做法是在主 `Rectangle` 上覆盖其他具有特定位置和大小的小 `Rectangle` 或者 `RoundedRectangle` 控件[^3]。 ```qml import QtQuick 2.15 import QtQuick.Controls 2.15 Item { width: 200; height: 100 // 主矩形 Rectangle { color: "#f0f0f0" radius: 0 anchors.fill: parent // 左上角圆角 Rectangle { width: 40; height: 40 radius: 20 color: "white" anchors.top: parent.top anchors.left: parent.left } // 右上角圆角 Rectangle { width: 40; height: 40 radius: 20 color: "white" anchors.top: parent.top anchors.right: parent.right } } } ``` 此方式适合于只需要顶部或底部某几个角为圆角的情况。 #### 方法二:利用 `BorderImage` 另一种解决方案是采用 `BorderImage` 加载预先制作好的图像资源文件,其中已经包含了所需样式的圆角边缘[^4]。 ```qml import QtQuick 2.15 import QtQuick.Controls 2.15 import QtGraphicalEffects 1.15 Rectangle { id: containerRect width: 200 height: 50 BorderImage { source: "images/custom_rounded_corners.png" // 替换为实际路径 anchors.fill: parent } Text { text: qsTr("Custom Button") anchors.centerIn: parent font.pixelSize: 18 } } ``` 这种方法适用于希望快速实现自定义外观而不必编写大量代码的情形。 #### 方法三:借助 `Shape` 组件 对于更复杂的场景,则推荐使用 `Shape` 组件来构建更加灵活的矢量图形结构。这种方式不仅能够精确控制各个顶点的位置以及曲线形态,还支持动态修改参数以适应不同的布局需求[^1]。 ```qml import QtQuick 2.15 import QtQuick.Shapes 1.15 Shape { width: 200 height: 100 ShapePath { startX: 20; startY: 0 PathArc { x: 0; y: 20 radiusX: 20; radiusY: 20 } PathLine { x: 0; y: height - 20 } PathArc { x: 20; y: height radiusX: 20; radiusY: 20 } PathLine { x: width - 20; y: height } PathArc { x: width; y: height - 20 radiusX: 20; radiusY: 20 } PathLine { x: width; y: 20 } PathArc { x: width - 20; y: 0 radiusX: 20; radiusY: 20 } PathLine { x: 20; y: 0 } } } ``` 上述三种方案各有优劣,在实际项目开发过程中可以根据具体情况选取最合适的一种。
评论
添加红包

请填写红包祝福语或标题

红包个数最小为10个

红包金额最低5元

当前余额3.43前往充值 >
需支付:10.00
成就一亿技术人!
领取后你会自动成为博主和红包主的粉丝 规则
hope_wisdom
发出的红包

打赏作者

luoyayun361

你的鼓励将是我创作的最大动力

¥1 ¥2 ¥4 ¥6 ¥10 ¥20
扫码支付:¥1
获取中
扫码支付

您的余额不足,请更换扫码支付或充值

打赏作者

实付
使用余额支付
点击重新获取
扫码支付
钱包余额 0

抵扣说明:

1.余额是钱包充值的虚拟货币,按照1:1的比例进行支付金额的抵扣。
2.余额无法直接购买下载,可以购买VIP、付费专栏及课程。

余额充值