


目录
一、centos8.3安装ansible
安装epel源
sudo dnf install https://dl.fedoraproject.org/pub/epel/epel-release-latest-8.noarch.rpm -y
安装ansible:
yum install ansible
二、安装后的基本配置
1.主要配置文件
[root@localhost ansible]# pwd
/etc/ansible
[root@localhost ansible]# ll
总用量 24
-rw-r--r--. 1 root root 19983 7月  26 19:49 ansible.cfg
-rw-r--r--. 1 root root  1100 7月  26 19:41 hosts
drwxr-xr-x. 2 root root     6 6月  23 07:33 roles
2.修改ansible.cfg,打开日志

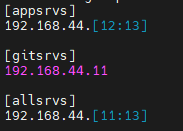
3.准备三台虚拟机,配置ansible的hosts文件,可分组,可连续ip
4.测试ansible的ping,看ansible是否可连接成功配置的机器
ansible all -m ping
这样会让确认连接,但只能确认一个主机,摒弃
ansible all -m ping -k
这样会要求输密码,前提是所有虚拟机密码相同,摒弃
密钥方式免密登录:
ssh-keygen
ssh-copy-id 192.168.44.11
ssh-copy-id 192.168.44.12
ssh-copy-id 192.168.44.13
机器关系的使用:
ansible 192.168.226.101 -m ping # 单独机器的ping
ansible 192.168.226.101,192.168.226.102 -m ping # 多个机器的ping
ansible all -m ping # 全部机器
ansible web -m ping # 单个的组
ansible web,db -m ping # 多个组的并集
ansible ‘web:&db’ -m ping # 多个组的交集 必须是单引号 双引号不行
ansible ‘web:!db’ -m ping # 多个组的差集,在前面但是不在后面
查看主机列表:
[root@localhost ansible]# ansible all --list
  hosts (3):
    192.168.44.12
    192.168.44.13
    192.168.44.11
[root@localhost ansible]# ansible appsrvs --list
  hosts (2):
    192.168.44.12
    192.168.44.13
查看模块帮助:
ansible-doc 模块名
ansible-doc setup
三、常用模块的使用
1.command–默认的默认模块
ansible 机器组名 [-m command] -a shell命令
ansible all -m command -a 'creates=/etc/centos-release chdir=/etc cat centos-release'
常用参数:
chdir参数:执行命令前切换到此目录
creates参数:当指定的文件存在时,就不执行对应命令
removes参数:当指定的文件不存在时,就不执行对应命令
command弊端,很多符号不支持,$,*,| 等都不支持
[root@localhost ansibleLearning]# ansible all -m command -a 'chdir=/etc ls -l|grep config'
192.168.44.12 | FAILED | rc=2 >>
ls:无效选项 -- |
Try 'ls --help' for more information.non-zero return code
192.168.44.13 | FAILED | rc=2 >>
ls:无效选项 -- |
Try 'ls --help' for more information.non-zero return code
192.168.44.11 | FAILED | rc=2 >>
ls:无效选项 -- |
Try 'ls --help' for more information.non-zero return code
2.shell模块(command 加强版)
ansible 机器组名 -m shell -a shell命令
ansible all -m shell -a 'creates=/etc/centos-release chdir=/etc cat centos-release'
[root@localhost ansibleLearning]# ansible all -m shell -a 'chdir=/etc ls -l|grep config'
192.168.44.13 | CHANGED | rc=0 >>
drwxr-xr-x.  2 root root        6 8月   4 2017 chkconfig.d
-rw-r--r--.  1 root root      767 8月   4 2017 netconfig
drwxr-xr-x.  6 root root     4096 7月   6 13:51 sysconfig
192.168.44.12 | CHANGED | rc=0 >>
drwxr-xr-x.  2 root root        6 8月   4 2017 chkconfig.d
-rw-r--r--.  1 root root      767 8月   4 2017 netconfig
drwxr-xr-x.  6 root root     4096 7月   7 20:13 sysconfig
192.168.44.11 | CHANGED | rc=0 >>
drwxr-xr-x.  2 root root        6 8月   4 2017 chkconfig.d
-rw-r--r--.  1 root root      767 8月   4 2017 netconfig
drwxr-xr-x.  6 root root     4096 7月   6 13:45 sysconfig
3.修改默认模块
vi /etc/ansible/ansible.cfg

4.script模块
在远程机器执行本地脚本
ansible all -m script -a '/root/ansibleLearning/script.sh'
5.copy模块
复制ansible主机文件到目标主机
# 直接赋值
ansible all -m copy -a "src=/root/ansible/script.sh dest=/root/fromAnsible.txt"
# 指定信息
ansible all -m copy -a "src=/root/ansible/script.sh dest=/root/fromAnsible.txt owner=root mode=660 backup=yes"
指定内容创建文件
ansible all -m copy -a "content='123456523423' dest=/root/tmp.txt"
6.fetch模块
复制目标主机文件到ansible主机,会创建…/ip/目标主机源路径 的路径
[root@localhost ansible]# ansible all -m fetch -a "src=/etc/sysconfig/network-scripts/ifcfg-ens33 dest=/root/temp"
[root@localhost ansible]# tree /root/temp/
/root/temp/
├── 192.168.44.11
│   └── etc
│       └── sysconfig
│           └── network-scripts
│               └── ifcfg-ens33
├── 192.168.44.12
│   └── etc
│       └── sysconfig
│           └── network-scripts
│               └── ifcfg-ens33
└── 192.168.44.13
    └── etc
        └── sysconfig
            └── network-scripts
                └── ifcfg-ens33

12 directories, 3 files
7.file模块
1、修改文件属性, ansible all -m file -a “path=/root/test.sh owner=test group=test mode=0644”
2、生成链接文件:ansible all -m file -a “src=/root/test.sh dest=/root/testlink.sh owner=root group=root state=link”
3、创建空文件:ansible all -m file -a “path=/root/touch.sh state=touch mode=0644”
4、创建空目录: ansible all -m file -a “path=/root/directory state=directory mode=0644”
5、删除目录或文件,强制执行:ansible all -m file -a “path=/root/directory state=absent force=yes”
8.unarchive模块
1)打包压缩测试:
[root@localhost ansible]# tar -zcvf  ./temp.tar.gz *
hello.yml
script.sh
2)拷贝并解压,src为ansible主机的位置
[root@localhost ansible]# ansible all -m unarchive -a 'src=/root/ansible/temp.tar.gz dest=/root/ansible/'
[root@localhost ansible]# ansible all -a 'ls -l /root/ansible'
192.168.44.12 | CHANGED | rc=0 >>
总用量 8
-rw------- 1 root root 148 7月  26 2021 hello.yml
-rw-r--r-- 1 root root  39 7月  26 2021 script.sh
192.168.44.11 | CHANGED | rc=0 >>
总用量 8
-rw------- 1 root root 148 7月  26 2021 hello.yml
-rw-r--r-- 1 root root  39 7月  26 2021 script.sh
192.168.44.13 | CHANGED | rc=0 >>
总用量 8
-rw------- 1 root root 148 7月  26 2021 hello.yml
-rw-r--r-- 1 root root  39 7月  26 2021 script.sh
3)只解压,src 为远程主机的位置
为远程机器创建用户
ansible all -a 'useradd paas && chpasswd paas paas'
copy压缩包并指定用户
ansible all -m copy -a 'src=/root/ansible/temp.tar.gz dest=/root/ansible/ owner=paas'
[root@localhost ansible]# ansible all -a 'ls /root/ansible/'
192.168.44.11 | CHANGED | rc=0 >>
temp.tar.gz
192.168.44.12 | CHANGED | rc=0 >>
temp.tar.gz
192.168.44.13 | CHANGED | rc=0 >>
temp.tar.gz
创建远程目录
[root@localhost ansible]# ansible all -a 'mkdir -p /root/ansible/tempdir'
解压:
[root@localhost ansible]# ansible all -m unarchive -a 'src=/root/ansible/temp.tar.gz dest=/root/ansible/tempdir copy=no mode=700'

[root@localhost ansible]# ansible all -a 'ls -l /root/ansible/tempdir'                                                     192.168.44.12 | CHANGED | rc=0 >>
总用量 8
-rwx------ 1 root root 148 7月  26 2021 hello.yml
-rwx------ 1 root root  39 7月  26 2021 script.sh
192.168.44.11 | CHANGED | rc=0 >>
总用量 8
-rwx------ 1 root root 148 7月  26 2021 hello.yml
-rwx------ 1 root root  39 7月  26 2021 script.sh
192.168.44.13 | CHANGED | rc=0 >>
总用量 8
-rwx------ 1 root root 148 7月  26 2021 hello.yml
-rwx------ 1 root root  39 7月  26 2021 script.sh
9.archive模块
将远程主机的目录下的东西打包在远程主机上
ansible all -m archive -a 'path=/etc/sysconfig/ dest=/root/ansible/sysconfig.tar.gz format=gz owner=root mode=755'

[root@localhost ansible]# ansible all -a 'ls -l /root/ansible'
192.168.44.12 | CHANGED | rc=0 >>
总用量 56
-rwxr-xr-x 1 root root 51299 7月  25 21:57 sysconfig.tar.gz
192.168.44.11 | CHANGED | rc=0 >>
总用量 56
-rwxr-xr-x 1 root root 50022 7月  25 21:57 sysconfig.tar.gz
192.168.44.13 | CHANGED | rc=0 >>
总用量 56
-rwxr-xr-x 1 root root 50022 7月  25 21:57 sysconfig.tar.gz
10.hostname模块
修改主机名
ansible all -m hostname -a "name=centos75"
11.cron模块–计划任务
创建计划任务并执行
ansible all -m cron -a 'hour=2 minute=20 weekday=1-5 name="first task" job=/root/ansible-cron.sh'
查看计划任务
[root@localhost ~]# ansible all -a 'crontab -l'
……
192.168.44.12 | CHANGED | rc=0 >>
#Ansible: first task
20 2 * * 1-5 /root/ansible-cron.sh
[root@localhost ~]# ansible all -a 'cat /var/spool/cron/root'
……
192.168.44.13 | CHANGED | rc=0 >>
#Ansible: first task
20 2 * * 1-5 /root/ansible-cron.sh
禁用计划任务
ansible all -m cron -a 'hour=2 minute=20 weekday=1-5 name="first task" job=/root/ansible-cron.sh disabled=yes'
启用计划任务
ansible all -m cron -a 'hour=2 minute=20 weekday=1-5 name="first task" job=/root/ansible-cron.sh disabled=no'
删除计划任务
ansible all -m cron -a 'name="first task" state=absent'
12.yum模块–centos系列
安装
ansible all -m yum -a 'name=httpd'
卸载
ansible all -m yum -a 'name=httpd state=remvoed'
13.service模块
启动服务并设置开机自启
ansible all -m service -a "name=httpd state=started"
查看服务启动状态与自启动状态
[root@localhost ~]# ansible all -a 'systemctl list-unit-files | grep httpd'
192.168.44.11 | CHANGED | rc=0 >>
httpd.service                                 enabled
192.168.44.13 | CHANGED | rc=0 >>
httpd.service                                 enabled
192.168.44.12 | CHANGED | rc=0 >>
httpd.service                                 enabled
[root@localhost ~]# ansible all -a 'netstat -antp | grep httpd'
192.168.44.11 | CHANGED | rc=0 >>
tcp6       0      0 :::80                   :::*                    LISTEN      4999/httpd
192.168.44.12 | CHANGED | rc=0 >>
tcp6       0      0 :::80                   :::*                    LISTEN      4525/httpd
192.168.44.13 | CHANGED | rc=0 >>
tcp6       0      0 :::80                   :::*                    LISTEN      4341/httpd
停止服务
ansible all -m service -a "name=httpd state=stopped enabled=no"
14.user与group模块
创建组
ansible all -m user -a 'name=anaible comment="ansible user" uid=2048 home=/home/ansibleAnsible group=ansible'
创建用户
ansible all -m user -a 'name=anaible comment="ansible user" uid=2048 home=/home/ansibleAnsible group=ansible shell=/sbin/nologin create_home=no non_unique=yes groups=root,daemon'
删除用户与组
# remove=yes 删除家目录与邮箱
ansible all -m user -a 'name=ansible state=absent remove=yes'
ansible all -m group -a 'name=ansible state=absent'
15.lineinfile模块(按行操作)
替换最后匹配的一行(ansible版本2.9.23)
ansible all -m lineinfile -a 'path=/etc/selinux/config regexp="^SELINUX=" line="SELINUX=enforcing"'
删除所有匹配的行
# 删除注释
ansible all -m lineinfile -a 'path=/root/test.txt state=absent regexp="^#"'
16.replace模块(按字符操作)
替换正则内容为replace指定字符串
ansible all -m replace -a 'path=/root/test.txt regexp="^aaa=([a-z]).*?$" replace="aaa=after replace"'
正则使用:\1
[root@localhost ~]# ansible all -a 'cat /root/test.txt'
192.168.44.11 | CHANGED | rc=0 >>
aaa=after replace
bbbb=bbbb
aaa=after replace
ccc=ccc
aaa=after replace
[root@localhost ~]# ansible 192.168.44.11 -m replace -a 'path=/root/test.txt regexp="^aaa=(.*)" replace="\1"'
192.168.44.11 | CHANGED => {
    "ansible_facts": {
        "discovered_interpreter_python": "/usr/bin/python"
    },
    "changed": true,
    "msg": "3 replacements made"
}
[root@localhost ~]# ansible all -a 'cat /root/test.txt'
192.168.44.11 | CHANGED | rc=0 >>
after replace
bbbb=bbbb
after replace
ccc=ccc
after replace
17.setup 模块
收集系统信息
# 查看全量信息
[root@localhost ~]# ansible 192.168.44.11 -m setup
# 查看指定信息(支持通配符)
[root@localhost ~]# ansible 192.168.44.11 -m setup -a 'filter="ansible_python_version"'
192.168.44.11 | SUCCESS => {
    "ansible_facts": {
        "ansible_python_version": "2.7.5",
        "discovered_interpreter_python": "/usr/bin/python"
    },
    "changed": false
}


 4280
4280


 被折叠的 条评论
为什么被折叠?
被折叠的 条评论
为什么被折叠?
 到【灌水乐园】发言


