


讲完了anchor机制,接下来我们讲RPN(region proposal network)区域候选网络,它的作用是为了得到候选框。
先看以下内容:
faster rcnn结构及代码讲解
原理解释
Feature Map进入RPN后,先经过一次33的卷积,同样,特征图大小依然是6040,数量512,这样做的目的应该是进一步集中特征信息,接着看到两个全卷积,即kernel_size=1*1,p=0,stride=1;
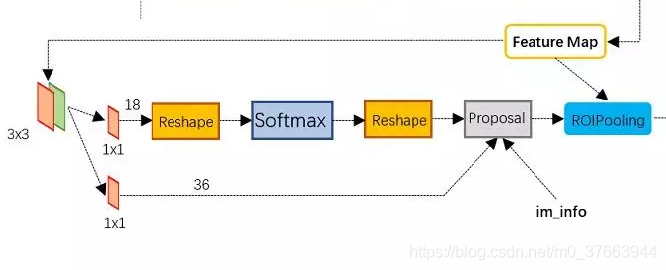
如上图中标识:
① rpn_cls:60*40*512-d ⊕ 1*1*512*18 ==> 60*40*9*2
逐像素对其9个Anchor box进行二分类
② rpn_bbox:60*40*512-d ⊕ 1*1*512*36==>60*40*9*4
逐像素得到其9个Anchor box四个坐标信息(其实是偏移量,后面介绍)
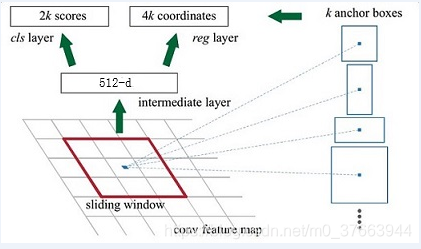
如下图所示:
代码解析
这段代码基本上就是第一张图,代码注意看注释:
def _region_proposal(self, net_conv, is_training, initializer):
    rpn = slim.conv2d(net_conv, cfg.RPN_CHANNELS, [3, 3], trainable=is_training, weights_initializer=initializer,
                        scope="rpn_conv/3x3")#cfg.RPN_CHANNELS = 512, 3*3卷积处理,cfg.RPN_CHANNELS = 512,output shape=(1, 60, 40, 512)
    self._act_summaries.append(rpn)#可视化保存
    rpn_cls_score = slim.conv2d(rpn, self._num_anchors*2, [1, 1], trainable=is_training,weights_initializer=initializer,
                   padding='VALID', activation_fn=None, scope='rpn_cls_score')
    #1*1卷积处理,分类,是否为前景,self._num_anchors=9,ouput shape=(1, 60, 40, 18)
    rpn_cls_score_reshape = _reshape_layer(self, rpn_cls_score, 2, 'rpn_cls_score_reshape')#后面需要进行softmax和argmax
    # change it so that the score has 2 as its channel size
    #shape=(1, 540, 40, 2),540=9*60
    #该函数后面有详细讲解
    rpn_cls_prob_reshape = _softmax_layer(self, rpn_cls_score_reshape, "rpn_cls_prob_reshape")
    #(1, 540, 40, 2)
    #该函数后面有详细讲解
    rpn_cls_pred = tf.argmax(tf.reshape(rpn_cls_score_reshape, [-1, 2]), axis=1, name="rpn_cls_pred")
    #tf.reshape=>shape=(21600, 2)  output shape=(21600,)
    rpn_cls_prob = self._reshape_layer(rpn_cls_prob_reshape, self._num_anchors * 2, "rpn_cls_prob")
    #shape=(1, 60, 40, 18)
    #该函数后面有详细讲解
    rpn_bbox_pred = slim.conv2d(rpn, self._num_anchors * 4, [1, 1], trainable=is_training,
                                weights_initializer=initializer,
                                padding='VALID', activation_fn=None, scope='rpn_bbox_pred')
    # shape=(1, 60, 40, 36), 注意这里预测的不是 left, bottom, right, top而是anchor与真实框之间的误差值。
    if is_training:
      rois, roi_scores = self._proposal_layer(rpn_cls_prob, rpn_bbox_pred, "rois")
      #输出roi shape=(1*60*40*9,5)以及roi_scores shape=(1*60*40*9,1)
      #该函数后面有详细讲解
      rpn_labels = self._anchor_target_layer(rpn_cls_score, "anchor")
      #rpn_cls_score 在这个函数,只提取了它的H,W
      # Try to have a deterministic order for the computing graph, for reproducibility
      #这个函数主要生成标签
      #该函数后面有详细讲解
      with tf.control_dependencies([rpn_labels]):
        rois, _ = self._proposal_target_layer(rois, roi_scores, "rpn_rois")
        #该函数后面有详细讲解
    else:
      if cfg.TEST.MODE == 'nms':
        rois, _ = self._proposal_layer(rpn_cls_prob, rpn_bbox_pred, "rois")
      elif cfg.TEST.MODE == 'top':
        rois, _ = self._proposal_top_layer(rpn_cls_prob, rpn_bbox_pred, "rois")
      else:
        raise NotImplementedError

    self._predictions["rpn_cls_score"] = rpn_cls_score
    self._predictions["rpn_cls_score_reshape"] = rpn_cls_score_reshape
    self._predictions["rpn_cls_prob"] = rpn_cls_prob
    self._predictions["rpn_cls_pred"] = rpn_cls_pred
    self._predictions["rpn_bbox_pred"] = rpn_bbox_pred
    self._predictions["rois"] = rois

    return rois
以上代码得到了6个后续主要所需值:
1.rpn_cls_score:分类分数,shape=(1, 60, 40, 2*9)
2.rpn_cls_score_reshape:分类分数,shape=(1, 540, 40, 2)
3.rpn_cls_prob:分类分概率,shape=(1, 60, 40, 18)
4.rpn_cls_pred:分类预测,shape=(21600, 2)
5.rpn_bbox_pred:shape=(1, 60, 40, 36),输出框,输出形式为[
Δ
x
\Delta x
Δx,
Δ
y
\Delta y
Δy,
Δ
w
\Delta w
Δw,
Δ
h
\Delta h
Δh],为误差值。误差值的计算方式:
anchor box: 中心点位置坐标
x
a
x_a
xa,
y
a
y_a
ya和宽高
w
a
w_a
wa,
h
a
h_a
ha
ground truth(真实框):标定的框也对应一个中心点位置坐标
x
∗
x^*
x∗,
y
∗
y^*
y∗和宽高
w
∗
w^*
w∗,
h
∗
h^*
h∗
所以,偏移量:
Δ
x
=
(
x
∗
−
x
a
)
/
h
a
\Delta x=(x^*-x_a)/h_a
Δx=(x∗−xa)/ha ,
Δ
y
=
(
y
∗
−
y
a
)
/
h
a
\Delta y=(y^*-y_a)/h_a
Δy=(y∗−ya)/ha
Δ
w
=
l
o
g
(
w
∗
/
w
a
)
\Delta w=log(w^*/w_a)
Δw=log(w∗/wa),
Δ
h
=
l
o
g
(
h
∗
/
h
a
)
\Delta h=log(h^*/h_a)
Δh=log(h∗/ha)
6.rois:
深入代码解析
同时,这段代码有5个函数需要深入了解以下:
1._reshape_layer:改变输入层的shape
2._softmax_layer:进行softmax
3._proposal_layer:提取ROI
4._anchor_target_layer:打标签
5._proposal_target_layer:打标签
前两篇博客,将在本篇博客进行讲解,后三个点链接
1._reshape_layer
  def _reshape_layer(self, bottom, num_dim, name):
    input_shape = tf.shape(bottom)
    with tf.variable_scope(name) as scope:
      # change the channel to the caffe format
      #之所以怎么做,是想把第3维度和第1维放在一起好做做个处理
      to_caffe = tf.transpose(bottom, [0, 3, 1, 2])

      # then force it to have channel 2
      #注意看tf.concat里面,num_dim为输入值,-1自己算
      reshaped = tf.reshape(to_caffe,
                            tf.concat(axis=0, values=[[1, num_dim, -1], [input_shape[2]]]))

      # then swap the channel back
      to_tf = tf.transpose(reshaped, [0, 2, 3, 1])
      return to_tf
      #以下我们举个栗子:shape的前后变化(1, 60, 40, num_dim*9)=>(1, 60*9, 40, num_dim)
2._softmax_layer
  def _softmax_layer(self, bottom, name):
    if name.startswith('rpn_cls_prob_reshape'):
    #rpn_cls_prob_reshape层进入if语句,因为需要变形,再softmax
      input_shape = tf.shape(bottom)
      bottom_reshaped = tf.reshape(bottom, [-1, input_shape[-1]])
      #(1, 540, 40, 2)=>(1*540*40, 2)
      reshaped_score = tf.nn.softmax(bottom_reshaped, name=name)
      return tf.reshape(reshaped_score, input_shape)
    return tf.nn.softmax(bottom, name=name)
其实就是简单的softmax语句其中有一个if语句
3._proposal_layer
主要进行了box的修正(通过我们预测的误差值),nms的筛选和超出原图的裁剪。详细见:
https://blog.csdn.net/m0_37663944/article/details/103728902
4._anchor_target_layer
主要根据真实框与anchor的iou值进行了筛选,打标签(分类0,1,然后得出回归预测的误差值等)。这一部分得出的值是用来训练的,训练RPN(也就是得到roi的网络)
https://blog.csdn.net/m0_37663944/article/details/103735094
5._proposal_target_layer
https://blog.csdn.net/m0_37663944/article/details/103737373
这个函数主要根据_proposal_layer函数得到的roi与真实框得到iou,进行筛选,打标签(分类0,1,然后得出回归预测的误差值),和上面的_anchor_target_layer有以下不同:
1.它是用来训练最终的分类回归的,不在本篇博客的图中。
参考文献:
https://www.cnblogs.com/wangyong/p/8513563.html
https://blog.csdn.net/qq_41576083/article/details/82966489


 428
428


 被折叠的 条评论
为什么被折叠?
被折叠的 条评论
为什么被折叠?
 到【灌水乐园】发言


