


 本文详细介绍在RTX3090上搭建Scene-Graph-Benchmark.pytorch环境的过程,包括配置Pytorch、解决安装Apex的问题、数据集准备及训练Fasterrcnn的方法。
GitHub地址:https://github.com/KaihuaTang/Scene-Graph-Benchmark.pytorch
我的配置
| GPU | Driver | CUDA | Pytorch |
|---|---|---|---|
| 3090 | 460.32.03 | 11.1 | conda install pytorch==1.7.1 torchvision==0.8.2 torchaudio==0.7.2 cudatoolkit=11.0 |
环境配置踩坑记录
-
首先记得配置下清华源
conda config --add channels https://mirrors.tuna.tsinghua.edu.cn/anaconda/cloud/msys2/ conda config --add channels https://mirrors.tuna.tsinghua.edu.cn/anaconda/cloud/conda-forge/ conda config --add channels https://mirrors.tuna.tsinghua.edu.cn/anaconda/pkgs/free/ conda config --add channels https://mirrors.tuna.tsinghua.edu.cn/anaconda/pkgs/main/ conda config --add channels https://mirrors.tuna.tsinghua.edu.cn/anaconda/cloud/peterjc123/ conda config --add channels https://mirrors.tuna.tsinghua.edu.cn/anaconda/cloud/pytorch/ conda config --set show_channel_urls yes -
创建虚拟环境时的python版本不要太高,我选择的是3.7
conda create --name scene_graph_benchmark python=3.7 -
由于服务器的
CUDA版本为11.1,所以我最先安装的pytorch版本是 1.8,正好对应cudatoolkit=11.1,但是训练时会报错:RuntimeError: radix_sort: failed on 1st step: cudaErrorInvalidDevice: invalid device ordinal怀疑是pytorch版本太高的bug,换成低版本1.7试试(删除原环境,重新建环境安装,不要在原环境覆盖安装)
conda install pytorch==1.7.1 torchvision==0.8.2 torchaudio==0.7.2 cudatoolkit=11.0 -
装好
pytorch1.7+cuda11.0后,安装apex时就会报错RuntimeError: Cuda extensions are being compiled with a version of Cuda that does not match the version used to compile Pytorch binaries. Pytorch binaries were compiled with Cuda 11.0.意思是conda 虚拟环境中的 pytorch 是基于 cuda 11.0 编译的,而GPU对应的 cuda 是 11.1,版本号匹配不上。
解决方法:更改安装指令(参考:apex安装、解决ModuleNotFoundError: No module named ‘amp_C‘报错)
cd apex
python setup.py install
成功安装
apex,但是接着在训练时就会报错ModuleNotFoundError: No module named 'amp_C'找到报错的文件:
anaconda3/envs/.../lib/python3.7/site-packages/apex-0.1-py3.7.egg/apex/transformer/pipeline_parallel/utils.py
注释掉报错的这一行即可
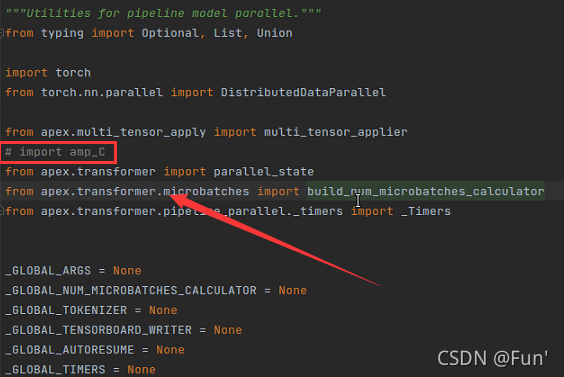
接着会有 warning,不过代码能跑了Warning: multi_tensor_applier fused unscale kernel is unavailable, possibly because apex was installed without --cuda_ext --cpp_ext. Using Python fallback. Original ImportError was: ModuleNotFoundError("No module named 'amp_C'")知乎上还有个方法,但是试了没用,先记录下:记一次在 RTX 3090 上安装 APEX
-
git clone遇到的问题首先使用
git clone时提示没安装git,服务器普通用户下使用conda install git安装,避免使用sudo apt install装好后使用时遇到报错
fatal: unable to access 'https://github.com/NVIDIA/apex.git/': HTTP/2 stream 1 was not closed cleanly before end of the underlying stream解决方法(参考:git在push错误HTTP/2 stream 0 was not closed cleanly)
git config --global http.version HTTP/1.1
其他安装过程一致,完成环境配置
准备数据集
- 下载VG数据集 part1 (9 Gb) part2 (5 Gb),图片都解压到
datasets/vg/VG_100K目录下,共 108249 张图片ls -l | grep "^-" | wc -l统计当前目录下文件的个数(不包括目录) - 下载 VG-SGG-with-attri.h5 ,放在
datasets/vg/VG-SGG-with-attri.h5
下载 faster rcnn 预训练模型
作者提供了 pretrained Faster R-CNN ,并建议解压到/home/username/checkpoints/pretrained_faster_rcnn目录下
解压后的文件夹里有这些文件:
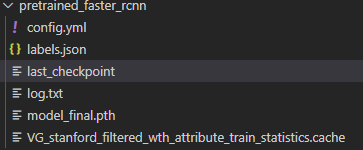
注意:这个last_checkpoint里/home/kaihua/checkpoints/pretrained_faster_rcnn/model_final.pth是作者的路径,一定要修改为你自己的路径(或者直接删了这个文件也行),不然后续训练或者测试时就会报错:
No such file or directory: '/home/kaihua/checkpoints/pretrained_faster_rcnn/model_final.pth'
如果需要自己训练faster rcnn:(更换数据集的话)
CUDA_VISIBLE_DEVICES=0,1,2,3 python -m torch.distributed.launch --master_port 10001 --nproc_per_node=4 tools/detector_pretrain_net.py --config-file "configs/e2e_relation_detector_X_101_32_8_FPN_1x.yaml" SOLVER.IMS_PER_BATCH 8 TEST.IMS_PER_BATCH 8 DTYPE "float16" SOLVER.MAX_ITER 50000 SOLVER.STEPS "(30000, 45000)" SOLVER.VAL_PERIOD 2000 SOLVER.CHECKPOINT_PERIOD 2000 MODEL.RELATION_ON False OUTPUT_DIR /home/kaihua/checkpoints/pretrained_faster_rcnn SOLVER.PRE_VAL False
逐一注释下:
CUDA_VISIBLE_DEVICES=0,1,2,3 	# GPUs的序号
python -m torch.distributed.launch --master_port 10001
--nproc_per_node=4 				# 使用GPU的数量
tools/detector_pretrain_net.py
--config-file "configs/e2e_relation_detector_X_101_32_8_FPN_1x.yaml" # 配置文件,可以在里面修改参数
SOLVER.IMS_PER_BATCH 8 			# 训练时的 batch size
TEST.IMS_PER_BATCH 8 			# 测试时的 batch size
DTYPE "float16" 				# 启用APEX支持的自动混合精度
SOLVER.MAX_ITER 50000 			# 最大 iteration 次数
SOLVER.STEPS "(30000, 45000)" 	# 可以用来降低学习率
SOLVER.VAL_PERIOD 2000 			# 每 2000 次 iteration 进行一次 validation
SOLVER.CHECKPOINT_PERIOD 2000 	# 每 2000 次 iteration 保存一次权重
MODEL.RELATION_ON False 		# 是否打开 relationship head (在单独的Faster R-CNN预训练阶段,关闭)
OUTPUT_DIR /home/username/checkpoints/pretrained_faster_rcnn # 保存节点和日志的目录
SOLVER.PRE_VAL False			# 是否在训练之前进行 validation
SGG训练&测试
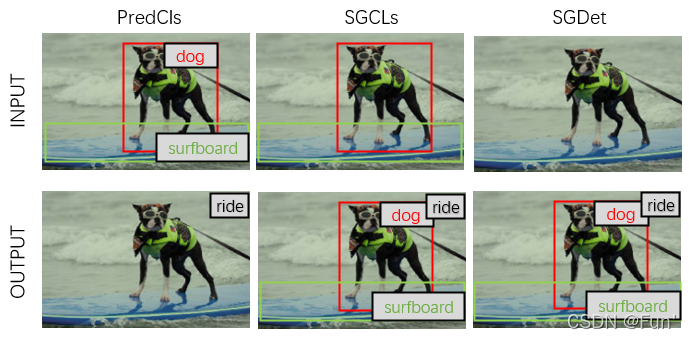
根据 SGG 的三种设定:
- Predicate Classification(PredCls):给定 GT bboxes 和 labels,求场景图(只预测谓词)
- Scene Graph Classification(SGCLs):给定没有 labels 的 GT bboxes,求场景图(需要预测物体类别和谓词)
- Scene Graph Detection(SGDet):只给图片,从零开始求场景图
画了个很直观的图:
按照 readme 里的来,应该不会出啥错,需要注意的是路径的问题:
- 训练时:
MODEL.PRETRAINED_DETECTOR_CKPT填写 预训练Faster R-CNN模型 的路径 - 测试时:
MODEL.PRETRAINED_DETECTOR_CKPT填写 训练SGG时 的OUTPUT_DIR路径- 在训练SGG的
OUTPUT_DIR路径里,有一个config.yml文件,里面有MODEL.PRETRAINED_DETECTOR_CKPT这个路径,保存的就是 faster rcnn 的路径
- 在训练SGG的
- 若是直接下载作者提供的 SGG 模型用于测试,请务必修改
last_chechpoint:改为当前 SGG 权重路径config.yml:里面的MODEL.PRETRAINED_DETECTOR_CKPT改为你自己的 faster rcnn 权重路径
SGDet on Custom Images & Visualization
若出现检测结果混乱的情况,例如:
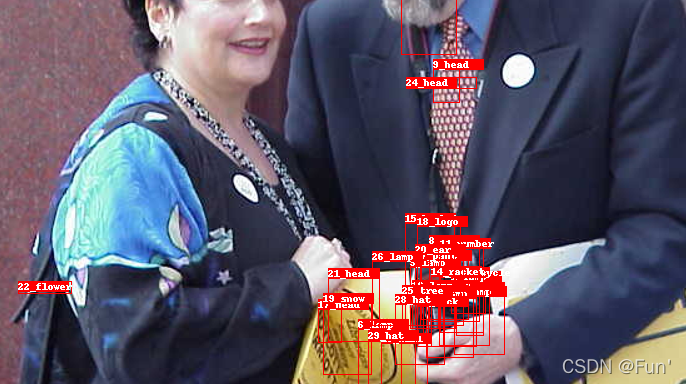
参考:https://github.com/KaihuaTang/Scene-Graph-Benchmark.pytorch/issues/116
解决方法同上一步,检查 last_chechpoint 和 config.yml 这两个文件里的相关路径,改为自己的路径
Training on custom dataset
参考:
https://github.com/KaihuaTang/Scene-Graph-Benchmark.pytorch/issues/82
https://github.com/danfeiX/scene-graph-TF-release/tree/master/data_tools
-
将你要用的数据集转换为VG数据集格式,参考:https://visualgenome.org/api/v0/api_readme
对于SGG而言,需要的文件有:
image_data.json,objects.json,relationships.json. -
然后参照 data_tools 的步骤生成 kaihuaTang 这个仓库中需要的文件,下面主要讲下这一步
Convert VisualGenome to desired format
- 新建环境,克隆仓库,安装 requirement
注意scipy版本安装1.2.1的,不然会报错ImportError: cannot import name imreadconda create -n sence-graph python=2.7 source activate scene-graph git clone https://github.com/danfeiX/scene-graph-TF-release.git pip install -r requirements.txt pip install scipy==1.2.1 - 下载 VG 原始数据,包括:
-
把所有 json 文件放到
data_tools/VG/目录下,把图像放到data_tools/VG/images目录下 -
运行
./create_imdb.sh,创建图像数据库imdb_1024.h5。图像的长边尺寸调整为 1024 像素,短边相应地缩放。您还可以通过编辑脚本的大小参数来创建更小尺寸的图像数据库。 -
运行
./create_roidb.sh,创建一个 scene graph 的数据库文件VG-SGG.h5,以及它的原始信息VG-SGG-dits.json。默认情况下,脚本从上一步中创建的imdb_1024.h5文件中读取图像的尺寸。如果您的 imdb 文件的大小与 512 和 1024 不同,则必须将大小添加到
vg_to_roidb.py脚本中的img_long_sizes列表变量中
这样就得到了
-
image database:
imdb_1024.h5 -
scene graph database:
VG-SGG.h5 -
scene graph database metadata file:
VG-SGG-dicts.json
kaihua中用到的数据集相关的文件:
-
vg 数据集的原图像
-
上一步生成
VG-SGG.h5→VG-SGG-with-attri.h5 -
上一步生成
VG-SGG-dicts.json→VG-SGG-dicts-with-attri.json -
图像原始信息
image_data.json
未完待续…


 2429
2429

 被折叠的 条评论
为什么被折叠?
被折叠的 条评论
为什么被折叠?
 到【灌水乐园】发言


