


本文主要基于网上已有的代码以及官方给定示例代码进行修改。如有不妥请指出,谢谢啦。
一、思路分析
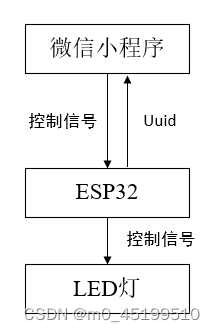
1.1 整体思路
据我了解,微信小程序只能通过低功耗蓝牙(BLE)进行控制。
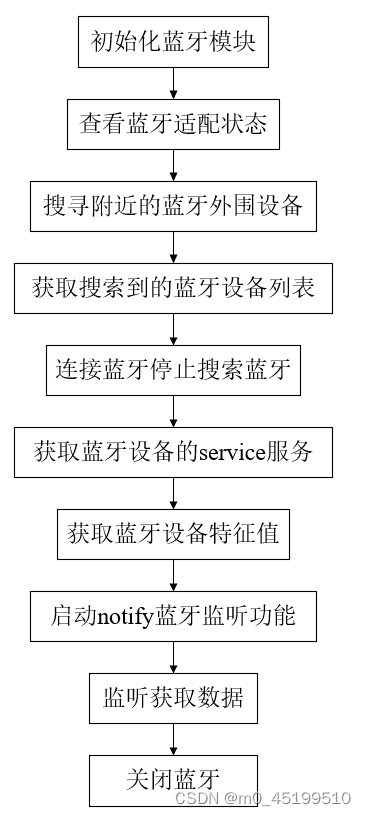
1.2 微信小程序思路
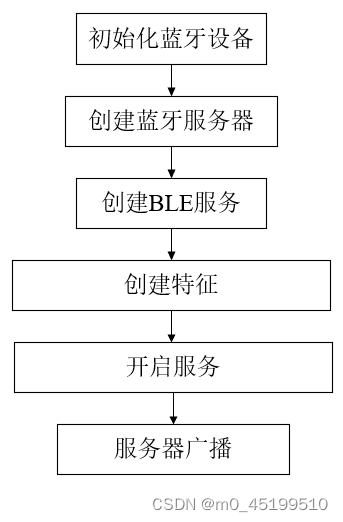
1.3 ESP32端思路
BLE蓝牙部分设置流程(通过该程序就能让esp32广播蓝牙,同时手机也可搜索到蓝牙设备):
//
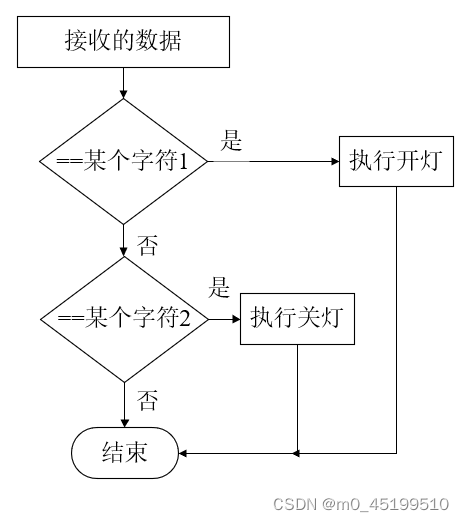
获取蓝牙接收的数据与处理(主要用到 if 语句,用于判断接收的数据是控制LED灯开还是LED灯关):
二、 控制代码
2.1 微信小程序端代码
全局变量
App({
  onLaunch() {
    // 展示本地存储能力

  },
  globalData: {
    appdid : null,
    appsid : null,
    appcid : null
  }
})
蓝牙搜索与连接界面
<wxs module="utils">
module.exports.max = function(n1, n2) {
  return Math.max(n1, n2)
}
module.exports.len = function(arr) {
  arr = arr || []
  return arr.length
}
</wxs>
<button bindtap="openBluetoothAdapter">开始扫描</button>
<button bindtap="stopBluetoothDevicesDiscovery">停止扫描</button>
<button bindtap="closeBluetoothAdapter">结束流程</button>

<view class="devices_summary">已发现 {{devices.length}} 个外围设备:</view>
<scroll-view class="device_list" scroll-y scroll-with-animation>
  <view wx:for="{{devices}}" wx:key="index"
   data-device-id="{{item.deviceId}}"
   data-name="{{item.name || item.localName}}"
   bindtap="createBLEConnection"
   class="device_item"
   hover-class="device_item_hover">
    <view style="font-size: 16px; color: #333;">{{item.name}}</view>
    <view style="font-size: 10px">信号强度: {{item.RSSI}}dBm ({{utils.max(0, item.RSSI + 100)}}%)</view>
    <view style="font-size: 10px">UUID: {{item.deviceId}}</view>
    <view style="font-size: 10px">Service数量: {{utils.len(item.advertisServiceUUIDs)}}</view>
  </view>
</scroll-view>

<view class="connected_info" wx:if="{{connected}}">
  <view>
    <text>已连接到 {{name}}</text>
    <view class="operation">
    <button wx:if="{{canWrite}}" size="mini" bindtap="writeBLECharacteristicValue">写数据</button>
    <button size="mini" bindtap="closeBLEConnection">断开连接</button>
    </view>
  </view>
  <view wx:for="{{chs}}" wx:key="index" style="font-size: 12px; margin-top: 10px;">
    <view>特性UUID: {{item.uuid}}</view>
    <view>特性值: {{item.value}}</view>
  </view>
</view>
//index.js
var app = getApp()

function dsc(ddID,ssID,ccID){
  app.globalData.appdid = ddID
  app.globalData.appsid = ssID
  app.globalData.appcid = ccID
  console.log("kai关灯"+app.globalData.appcid)
}

function inArray(arr, key, val) {
  for (let i = 0; i < arr.length; i++) {
    if (arr[i][key] === val) {
      return i;
    }
  }
  return -1;
}

// ArrayBuffer转16进度字符串示例
function ab2hex(buffer) {
  var hexArr = Array.prototype.map.call(
    new Uint8Array(buffer),
    function (bit) {
      return ('00' + bit.toString(16)).slice(-2)
    }
  )
  return hexArr.join('');
}

Page({
  data: {
    devices: [],
    connected: false,
    chs: [],
  },
  openBluetoothAdapter() {
    wx.openBluetoothAdapter({
      success: (res) => {
        console.log('openBluetoothAdapter success', res)
        this.startBluetoothDevicesDiscovery()
      },
      fail: (res) => {
        if (res.errCode === 10001) {
          wx.onBluetoothAdapterStateChange(function (res) {
            console.log('onBluetoothAdapterStateChange', res)
            if (res.available) {
              this.startBluetoothDevicesDiscovery()
            }
          })
        }
      }
    })
  },
  getBluetoothAdapterState() {
    wx.getBluetoothAdapterState({
      success: (res) => {
        console.log('getBluetoothAdapterState', res)
        if (res.discovering) {
          this.onBluetoothDeviceFound()
        } else if (res.available) {
          this.startBluetoothDevicesDiscovery()
        }
      }
    })
  },
  startBluetoothDevicesDiscovery() {
    if (this._discoveryStarted) {
      return
    }
    this._discoveryStarted = true
    wx.startBluetoothDevicesDiscovery({
      allowDuplicatesKey: true,
      success: (res) => {
        console.log('startBluetoothDevicesDiscovery success', res)
        this.onBluetoothDeviceFound()
      },
    })
  },
  stopBluetoothDevicesDiscovery() {
    wx.stopBluetoothDevicesDiscovery()
  },
  onBluetoothDeviceFound() {
    wx.onBluetoothDeviceFound((res) => {
      res.devices.forEach(device => {
        if (!device.name && !device.localName) {
          return
        }
        const foundDevices = this.data.devices
        const idx = inArray(foundDevices, 'deviceId', device.deviceId)
        const data = {}
        if (idx === -1) {
          data[`devices[${foundDevices.length}]`] = device
        } else {
          data[`devices[${idx}]`] = device
        }
        this.setData(data)
      })
    })
  },
  createBLEConnection(e) {
    const ds = e.currentTarget.dataset
    const deviceId = ds.deviceId
    const name = ds.name
    wx.createBLEConnection({
      deviceId,
      success: (res) => {
        this.setData({
          connected: true,
          name,
          deviceId,
        })
        this.getBLEDeviceServices(deviceId)
      }
    })
    wx.navigateTo({
      url:'/pages/conpage/conpage',
      success: (res) => {
        console.log('跳转')
      }
    })
    this.stopBluetoothDevicesDiscovery()
  },
  closeBLEConnection() {
    wx.closeBLEConnection({
      deviceId: this.data.deviceId
    })
    this.setData({
      connected: false,
      chs: [],
      canWrite: false,
    })
  },
  getBLEDeviceServices(deviceId) {
    wx.getBLEDeviceServices({
      deviceId,
      success: (res) => {
        for (let i = 0; i < res.services.length; i++) {
          if (res.services[i].isPrimary) {
            this.getBLEDeviceCharacteristics(deviceId, res.services[i].uuid)
            return
          }
        }
      }
    })
  },
  getBLEDeviceCharacteristics(deviceId, serviceId) {
    wx.getBLEDeviceCharacteristics({
      deviceId,
      serviceId,
      success: (res) => {
        console.log('getBLEDeviceCharacteristics success', res.characteristics)
        for (let i = 0; i < res.characteristics.length; i++) {
          let item = res.characteristics[i]
          if (item.properties.read) {
            wx.readBLECharacteristicValue({
              deviceId,
              serviceId,
              characteristicId: item.uuid,
            })
          }
          if (item.properties.write) {
            this.setData({
              canWrite: true
            })
            dsc(deviceId,serviceId,item.uuid)
            this._deviceId = deviceId
            this._serviceId = serviceId
            this._characteristicId = item.uuid
            //this.writeBLECharacteristicValue()
          }
          if (item.properties.notify || item.properties.indicate) {
            wx.notifyBLECharacteristicValueChange({
              deviceId,
              serviceId,
              characteristicId: item.uuid,
              state: true,
            })
          }
        }
      },
      fail(res) {
        console.error('getBLEDeviceCharacteristics', res)
      }
    })
    // 操作之前先监听,保证第一时间获取数据
    wx.onBLECharacteristicValueChange((characteristic) => {
      const idx = inArray(this.data.chs, 'uuid', characteristic.characteristicId)
      const data = {}
      if (idx === -1) {
        data[`chs[${this.data.chs.length}]`] = {
          uuid: characteristic.characteristicId,
          value: ab2hex(characteristic.value)
        }
      } else {
        data[`chs[${idx}]`] = {
          uuid: characteristic.characteristicId,
          value: ab2hex(characteristic.value)
        }
      }
      // data[`chs[${this.data.chs.length}]`] = {
      //   uuid: characteristic.characteristicId,
      //   value: ab2hex(characteristic.value)
      // }
      this.setData(data)
    })
  },
/*
  ledon: function(e){
    console.log("开灯")
    this.writeBLECharacteristicValue(0x61)
    },

  ledoff: function(e){
    console.log("关灯")
    this.writeBLECharacteristicValue(0x62)
  },

  writeBLECharacteristicValue(leddata) {
    // 向蓝牙设备发送一个0x00的16进制数据
    let buffer = new ArrayBuffer(1)
    let dataView = new DataView(buffer)
    dataView.setUint8(0, leddata)
    wx.writeBLECharacteristicValue({
      deviceId: appdid,
      serviceId: appsid,
      characteristicId: appcid,
      value: buffer,
    })
  },
*/
  closeBluetoothAdapter() {
    wx.closeBluetoothAdapter()
    this._discoveryStarted = false
  }
})
LED灯开关控制界面
<!--pages/conpage/conpage.wxml-->
<text>LED控制界面</text>
<button bindtap="ledon">开灯</button>
<button bindtap="ledoff">关灯</button>
// pages/conpage/conpage.js
var app = getApp()

Page({
  /**
   * 页面的初始数据
   */
  data: {

  },

  ledon: function(e){
    console.log("开灯")
    this.writeBLECharacteristicValue(0x61)
    },

  ledoff: function(e){
    console.log("关灯")
    this.writeBLECharacteristicValue(0x62)
  },

  writeBLECharacteristicValue(leddata) {
    // 向蓝牙设备发送一个0x00的16进制数据
    let buffer = new ArrayBuffer(1)
    let dataView = new DataView(buffer)
    dataView.setUint8(0, leddata)
    wx.writeBLECharacteristicValue({
      deviceId: app.globalData.appdid,
      serviceId: app.globalData.appsid,
      characteristicId: app.globalData.appcid,
      value: buffer,
    })
  }
})
2.2 ESP32端代码(基于Arduino)
#include <Arduino.h>
#include <BLEDevice.h>
#include <BLEServer.h>
#include <BLEUtils.h>
#include <BLE2902.h>

#define Led 2

uint8_t txValue = 0;                         //后面需要发送的值
BLEServer *pServer = NULL;                   //BLEServer指针 pServer
BLECharacteristic *pTxCharacteristic = NULL; //BLECharacteristic指针 pTxCharacteristic
bool deviceConnected = false;                //本次连接状态
bool oldDeviceConnected = false;             //上次连接状态d
// See the following for generating UUIDs: https://www.uuidgenerator.net/
#define SERVICE_UUID "12a59900-17cc-11ec-9621-0242ac130002" // UART service UUID
#define CHARACTERISTIC_UUID_RX "12a59e0a-17cc-11ec-9621-0242ac130002"
#define CHARACTERISTIC_UUID_TX "12a5a148-17cc-11ec-9621-0242ac130002"

class MyServerCallbacks : public BLEServerCallbacks
{
    void onConnect(BLEServer *pServer)
    {
        deviceConnected = true;
    };

    void onDisconnect(BLEServer *pServer)
    {
        deviceConnected = false;
    }
};

class MyCallbacks : public BLECharacteristicCallbacks
{
    void onWrite(BLECharacteristic *pCharacteristic)
    {
        std::string rxValue = pCharacteristic->getValue(); //接收信息

        if (rxValue.length() > 0)
        { //向串口输出收到的值
            Serial.print("RX: ");
            for (int i = 0; i < rxValue.length(); i++)
                Serial.print(rxValue[i]);
            Serial.println();
            if (rxValue[0]=='a')
              digitalWrite(Led, HIGH);
            else
              digitalWrite(Led, LOW);
        }
    }
};

void setup()
{
    Serial.begin(115200);

    // 创建一个 BLE 设备
    BLEDevice::init("ESP32BLE");//在这里面是ble的名称

    // 创建一个 BLE 服务
    pServer = BLEDevice::createServer();
    pServer->setCallbacks(new MyServerCallbacks()); //设置回调
    BLEService *pService = pServer->createService(SERVICE_UUID);

    // 创建一个 BLE 特征
    pTxCharacteristic = pService->createCharacteristic(CHARACTERISTIC_UUID_TX, BLECharacteristic::PROPERTY_NOTIFY);
    pTxCharacteristic->addDescriptor(new BLE2902());
    BLECharacteristic *pRxCharacteristic = pService->createCharacteristic(CHARACTERISTIC_UUID_RX, BLECharacteristic::PROPERTY_WRITE);
    pRxCharacteristic->setCallbacks(new MyCallbacks()); //设置回调

    pService->start();                  // 开始服务
    pServer->getAdvertising()->start(); // 开始广播
    Serial.println(" 等待一个客户端连接,且发送通知... ");
    pinMode(Led, OUTPUT);
}

void loop()
{
    // deviceConnected 已连接
    if (deviceConnected)
    {
        pTxCharacteristic->setValue(&txValue, 1); // 设置要发送的值为1
        pTxCharacteristic->notify();              // 广播
        txValue++;                                // 指针数值自加1
        delay(2000);                              // 如果有太多包要发送,蓝牙会堵塞
    }

    // disconnecting  断开连接
    if (!deviceConnected && oldDeviceConnected)
    {
        delay(500);                  // 留时间给蓝牙缓冲
        pServer->startAdvertising(); // 重新广播
        Serial.println(" 开始广播 ");
        oldDeviceConnected = deviceConnected;
    }

    // connecting  正在连接
    if (deviceConnected && !oldDeviceConnected)
    {
        // do stuff here on connecting
        oldDeviceConnected = deviceConnected;
    }
}
测试结果
小程序初始界面

点击开始扫描之后,获取到周围的蓝牙设备

点击所对应的设备之后,就会跳转到灯的控制界面。在此界面可以控制开灯或者关灯

开灯的结果图:

关灯的结果图

展望
能够通过蓝牙控制灯的亮灭,于是我们可以拓展出更多的功能,比如遥控车,实现遥控车前进后退,左转右转等等。


 527
527

 被折叠的 条评论
为什么被折叠?
被折叠的 条评论
为什么被折叠?
 到【灌水乐园】发言


