


目录
VIM文本编辑器
vi 旧版本, vim 升级版,会对文件的位置、类型等做出语法的高亮显示。如果系统安装的是最小版本,可能只有 vi 命令。vim 文件路径(注意:如果路径中没有文件, vim 会自动创建一个空文件)vim 常见的 3 种模式:命令模式,编辑模式,底行命令模式。
命令模式
使用 vim 打开文件后,默认进入的就是命令模式,在此模式下,从键盘输入的字符,会变成带有特殊功能的字符键。在其他模式下,按 esc 键可以返回命令模式。

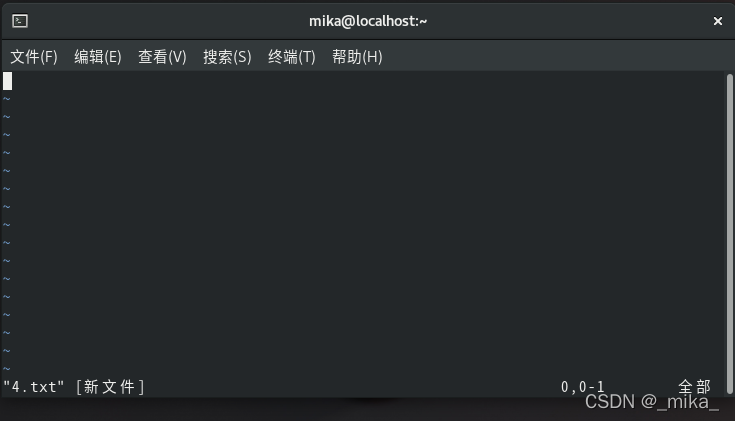
//没有4.txt的时候会重新创建一个文件

[root@localhost ~]# vim 4.txt
[root@localhost ~]# ll
总用量 28
-rw-r--r--. 1 root root  110 3月   1 11:23 123
-rw-r--r--. 1 root root  697 3月   3 11:41 1.txt
-rw-r--r--. 1 root root    0 3月   8 10:17 4.txt
-rw-r--r--. 1 root root   21 3月   1 11:30 6.txt
drwxr-xr-x. 3 root root   70 3月   3 11:42 A
-rw-------. 1 root root 2793 2月  24 12:13 anaconda-ks.cfg
drwxr-xr-x. 3 root root   15 3月   1 10:53 C
drwxr-xr-x. 2 root root    6 3月   1 11:17 E
-rw-r--r--. 1 root root  105 3月   1 11:27 e.gzip
drwxr-xr-x. 3 root root   15 3月   1 11:24 F
-rw-r--r--. 1 root root  131 3月   1 11:26 f.bz2
-rw-------. 1 root root 2057 2月  24 12:13 original-ks.cfg
drwxr-xr-x. 3 root root   39 3月   3 10:46 student

//查看已经存在的文件

[root@localhost ~]# vim 123
[root@localhost ~]#
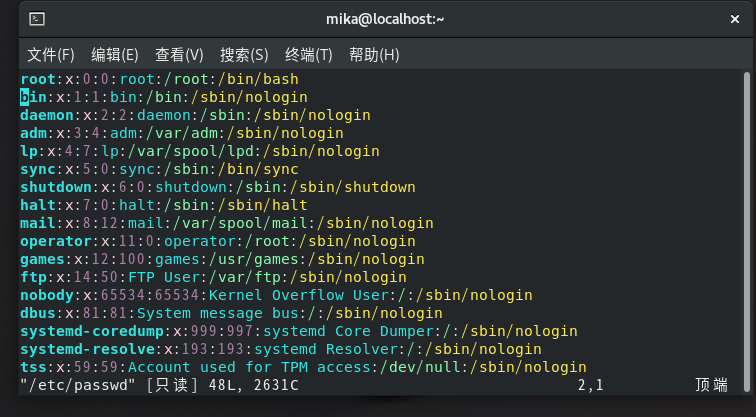
//使用文本编辑器编辑passwd 显示权限为只读

[root@localhost ~]# vim /etc/passwd


//将passwd文件赋值到根目录

[root@localhost ~]# cp -r /etc/passwd /root
[root@localhost ~]# ll
总用量 32
-rw-r--r--. 1 root root  111 3月   8 10:18 123
-rw-r--r--. 1 root root  697 3月   3 11:41 1.txt
-rw-r--r--. 1 root root    0 3月   8 10:17 4.txt
-rw-r--r--. 1 root root   21 3月   1 11:30 6.txt
drwxr-xr-x. 3 root root   70 3月   3 11:42 A
-rw-------. 1 root root 2793 2月  24 12:13 anaconda-ks.cfg
drwxr-xr-x. 3 root root   15 3月   1 10:53 C
drwxr-xr-x. 2 root root    6 3月   1 11:17 E
-rw-r--r--. 1 root root  105 3月   1 11:27 e.gzip
drwxr-xr-x. 3 root root   15 3月   1 11:24 F
-rw-r--r--. 1 root root  131 3月   1 11:26 f.bz2
-rw-------. 1 root root 2057 2月  24 12:13 original-ks.cfg
-rw-r--r--. 1 root root 2631 3月   8 10:21 passwd
drwxr-xr-x. 3 root root   39 3月   3 10:46 student

//使用文本编辑器进行编辑

[root@localhost ~]# vim passwd

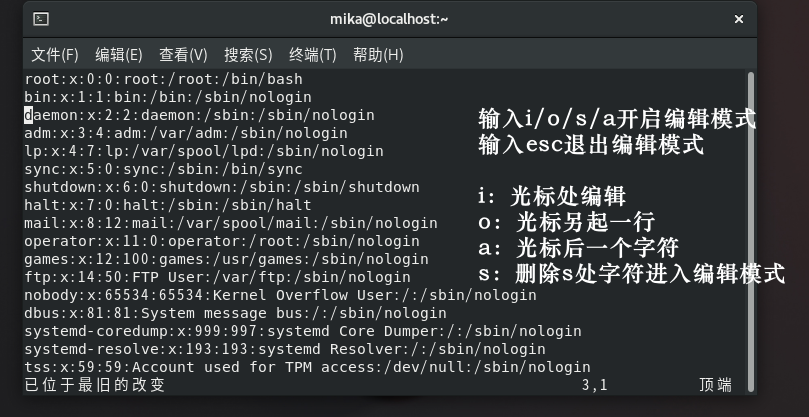
编辑模式
在命令模式下,按 i/o/a/s 中任一键可以进入编辑模式,在编辑模式下,下方会有“INSERT”提示,即可进行文档内容的编辑。

执行命令模式
:w保存
:q退出
:wq保存退出
:wq!彻底保存退出
练习

创建文件3.txt 写入mika 保存退出
注意退出后用cat命令查看一下 判断写入是否成功

[root@localhost ~]# vim 3.txt
[root@localhost ~]# cat 3.txt
mika


[root@localhost ~]#
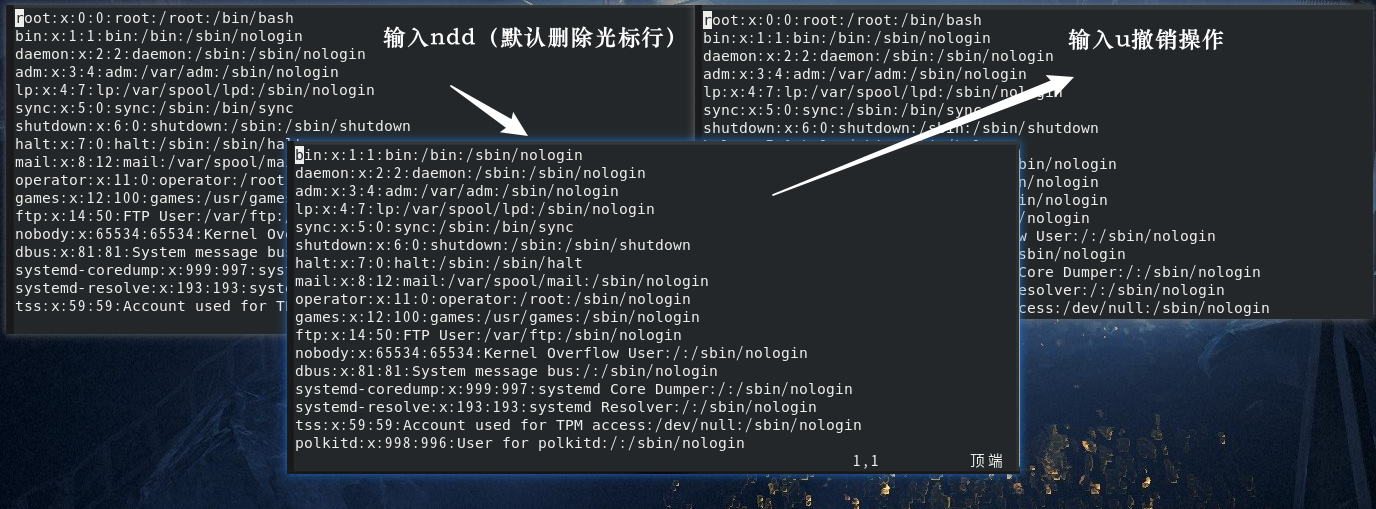
底行命令模式特殊应用
查找关键字:
:/关键字 n向下查找 N向上查找 关键字高亮显示(取消显示只需要找一个不存在的关键字)
替换:
%s/替换的字段/替换后的字段/g
%s为替换的范围 1,4代表第一行到第四行 %代表第一行到最后一行
s表示替换操作
/g 如果没有g那么只会替换掉每一行匹配的第一个对象

设置命令
:set number 显示行号
:set nonumber 取消行号
:set list 显示特殊字符


ln 链接
ln 目标文件 链接文件(硬链接)
ln -s 目标文件 链接文件 (软链接)
ls -il 查看文件索引
//软链接 硬链接的使用

[root@localhost ~]# ll
总用量 36

-rw-r--r--. 1 root root  697 3月   3 11:41 1.txt

//硬链接(起别名 重新做一个标识) 可以看见1.txt前面的使用人数从0变成了1

[root@localhost ~]# ln 1.txt test.txt
[root@localhost ~]# ll
总用量 40

-rw-r--r--. 2 root root  697 3月   3 11:41 1.txt
-rw-r--r--. 2 root root  697 3月   3 11:41 test.txt

//软链接 相当于链接到里面进行操作 会创建一个新的文件指向原来的

[root@localhost ~]# ln -s 1.txt test2.txt
[root@localhost ~]# ll
总用量 40

-rw-r--r--. 2 root root  697 3月   3 11:41 1.txt
lrwxrwxrwx. 1 root root    5 3月   8 11:25 test2.txt -> 1.txt
-rw-r--r--. 2 root root  697 3月   3 11:41 test.txt
//软链接硬链接的区别验证

//查看文件内容(1.txt test.txt test2.txt)会发现都相同

[root@localhost ~]# cat 1.txt
asound.conf
autofs.conf
……(省略)
xattr.conf
yum.conf

[root@localhost ~]# cat test.txt
asound.conf
autofs.conf
……(省略)
xattr.conf
yum.conf

[root@localhost ~]# cat test2.txt
asound.conf
autofs.conf
……(省略)
xattr.conf
yum.conf
[root@localhost ~]#
//删除源数据查看发生的变化

[root@localhost ~]# rm 1.txt
rm:是否删除普通文件 '1.txt'?y
[root@localhost ~]# ll
总用量 36

lrwxrwxrwx. 1 root root    5 3月   8 11:25 test2.txt -> 1.txt
-rw-r--r--. 1 root root  697 3月   3 11:41 test.txt

//这里的变化代码看不出来 我丢一张截图

[root@localhost ~]# cat test.txt
asound.conf
autofs.conf
……

//硬链接仍然可以查看
//重新创建1.txt 发现硬链接恢复正常
(二稿吐槽:这个是软链接吧?)

[root@localhost ~]# vim 1.txt
[root@localhost ~]# cat 1.txt

mika

[root@localhost ~]# ll
总用量 40
-rw-r--r--. 1 root root    7 3月   8 11:34 1.txt
lrwxrwxrwx. 1 root root    5 3月   8 11:25 test2.txt -> 1.txt
-rw-r--r--. 1 root root  697 3月   3 11:41 test.txt
我是みか,祝你开心。
- 一稿:2022/03/08
- 二稿:2022/06/15


 432
432

 被折叠的 条评论
为什么被折叠?
被折叠的 条评论
为什么被折叠?
 到【灌水乐园】发言


