


目录
扩展:程序更新后,怎样自动运行呢?
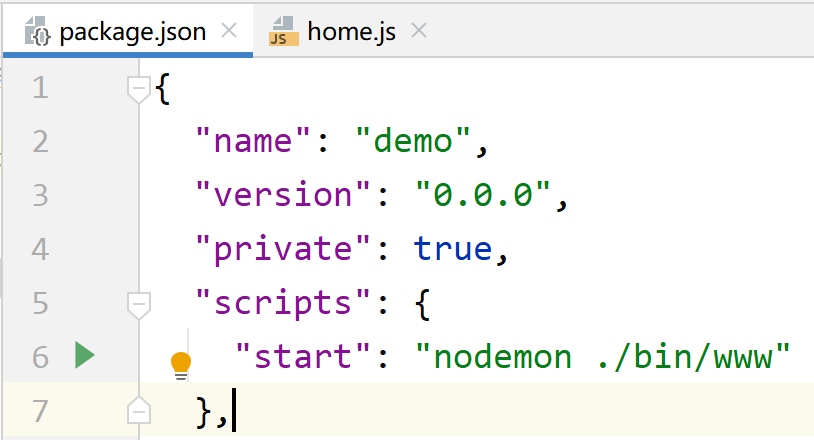
1、安装模块:npm install nodemon
2、设置node程序的启动命令:
更改前:

 改用nodemon启动程序:

 初识Ajax
1、传统网站中存在的问题
(1)页面加载时间长:在传统的网站中,用户只能通过浏览器刷新页面从服务器获取数据。如果网速慢,获取数据的时间会很长。当页面加载数据时,用户也不能在该页面进行其他的操作,只能等待网页加载完成。
(2)表单提交的问题:在用户提交表单的时候,如果用户在表单中填写的内容有一项不符合要求,网页就会重新跳转回表单页面。由于页面发生了跳转,刚刚用户填写的信息都消失了,所以用户需要重新填写所有的表单信息。尤其是在用户填写的信息比较多时,每次提交失败都要全部重新填写,用户体验非常不好。
(3)页面无法局部更新:在传统的网站中,当页面发生跳转时,需要重新加载整个页面。其实,一个网站中大部分网页的公共部分(如头部、底部和侧边栏)都是一样的,没必要重新加载。传统的网页无法局部更新,每个页面都要把公共部分加载一遍,延长了用户的等待时间。
2、Ajax入门
Ajax:Asynchronous JavaScript And XML,异步JavaScript和XML技术。
描述:不是一门新的语言或技术,是由JavaScript、XML、DOM、CSS等多种已有技术组合而成的一种浏览器端技术。
功能:用于实现与服务器进行异步交互的功能。
3、异步处理和同步处理
(1)同步处理:客户端向服务器端发送请求,然后等待服务器端响应后再进行后续的操作
(2)异步处理:客户端向服务器端发送请求后不等待服务器端的响应,继续进行后续操作;当服务器端响应后,客户端会调用相应的回调函数进行处理。
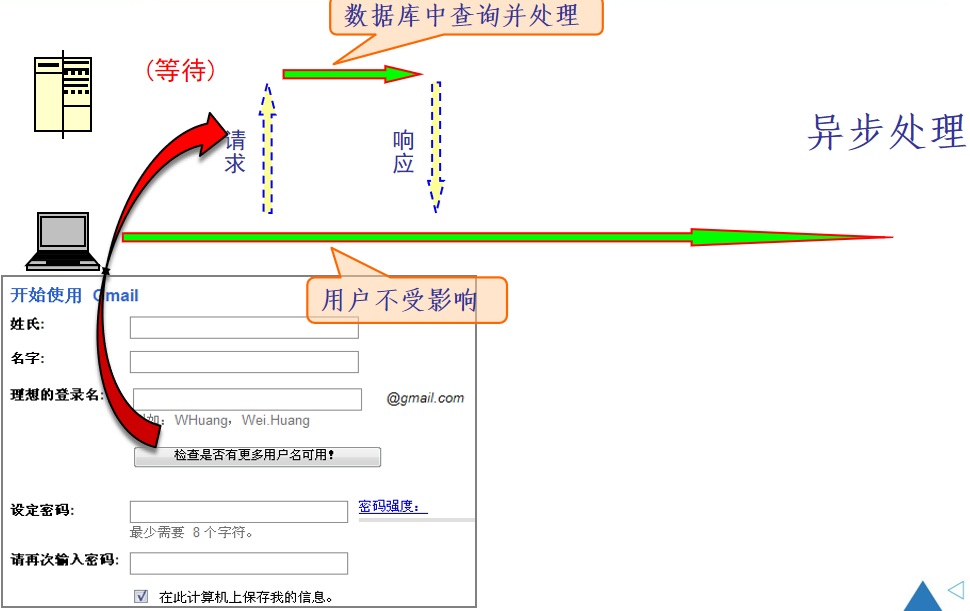
以gmail为例,当需要检测用户名时,是要 判断数据库里面有没有此用户名的记录, 所以必须在数据库服务器中查找,但是只 有应用服务器才可以在数据库中查找,这 时候页面不可以刷新,这就是典型的AJAX。
4、Ajax技术的核心:XMLHttpRequest对象
由于XMLHttpRequest不是w3c的标准,可以采用多种方法创建XMLHttpRequest对象。在使用XMLHttpRequest对象发生请求和处理之前,必须首先使用JavaScript获得XMLHttpRequest对象
(1)获取方法:需要判断浏览器的类型
let xmlhttpRequest;
function createXMLHttpRequest() {
    if (window.ActiveXObject) {//判断浏览器是否是早期的IE浏览器
        xmlhttpRequest = new ActiveXObject("Microsoft.XMLHTTP");
    }
    else if (window.XMLHttpRequest) {//表示符合w3c标准的浏览器
        xmlhttpRequest = new XMLHttpRequest();
    }
}
(2)XMLHttpRequest对象的方法

(3)XMLHttpRequest对象的属性

| 属性 | 描述 |
| Onreadystatechange | 当请求-响应的状态发生改变时,执行的回调函数 |
| readyState | 表示请求-响应的状态: 0 = 未初始化(uninitialized) 1 = 正在加载(loading) 2 = 加载完毕(loaded) 3 = 交互(interactive) 4 = 完成(complete) |
| responseText | 服务器返回的数据(字符串) |
| responseXML | 从服务器进程返回的DOM兼容的文档数据对象 |
| status | 从服务器返回的数字代码(404(未找到)或200(就绪)) |
| statusText | 伴随状态码返回的字符串信息 |
5、Ajax实现get请求
实例:
(1)打开WebStorm,新建一个Express项目;
(2)装nodemon模块 :npm install nodemon ;更改启动程序方式(使用npm start启动程序):
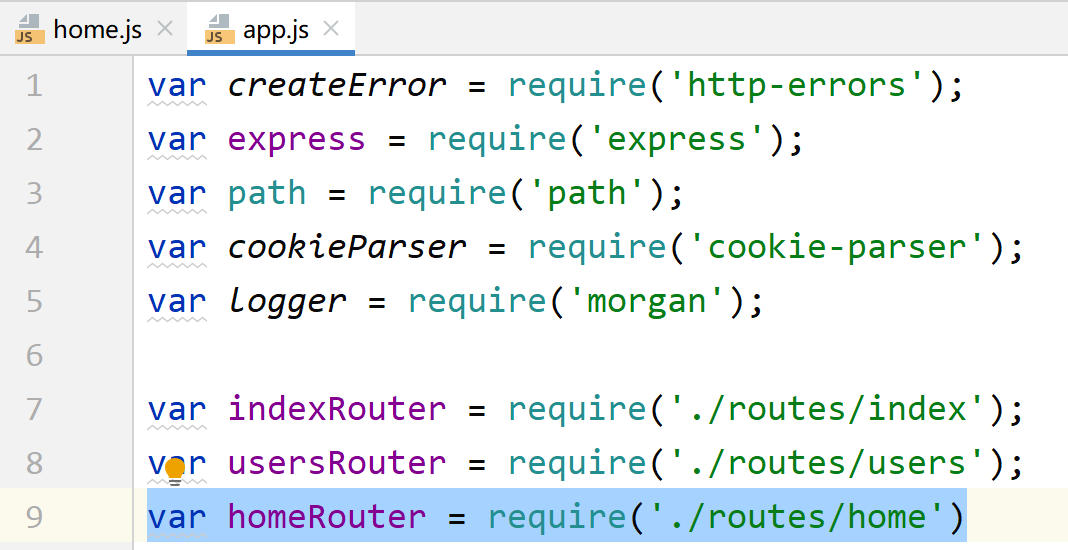
(3)routes文件夹中新建路由文件home.js
var express = require('express')
var router = express.Router();
/*
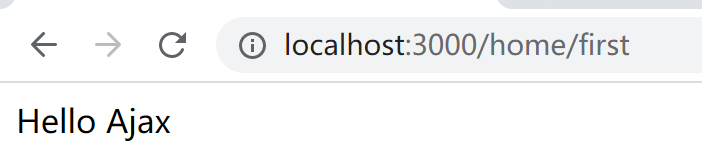
http://localhost:3000/home/first
*/
router.get('/first',(req,res)=>{
res.send('Hello Ajax')
})
module.exports = router;(4)在当前项目的核心文件app.js中引入路由文件:
使用路由文件(设置二级路由):

若使用Postman测试接口:选择GET请求方式,输入地址,单击Send:

(5)获取服务端的响应:打开VScode,新建一个.html文件
创建xhr对象,并使用open()方法配置xhr对象
<body>
   <script>
       var xhr = new XMLHttpRequest();
       console.log("请求前的状态码:",xhr.readyState)
       xhr.open('get','http://localhost:3000/home/first')
       console.log("请求后的状态码:",xhr.readyState)
   </script>
</body>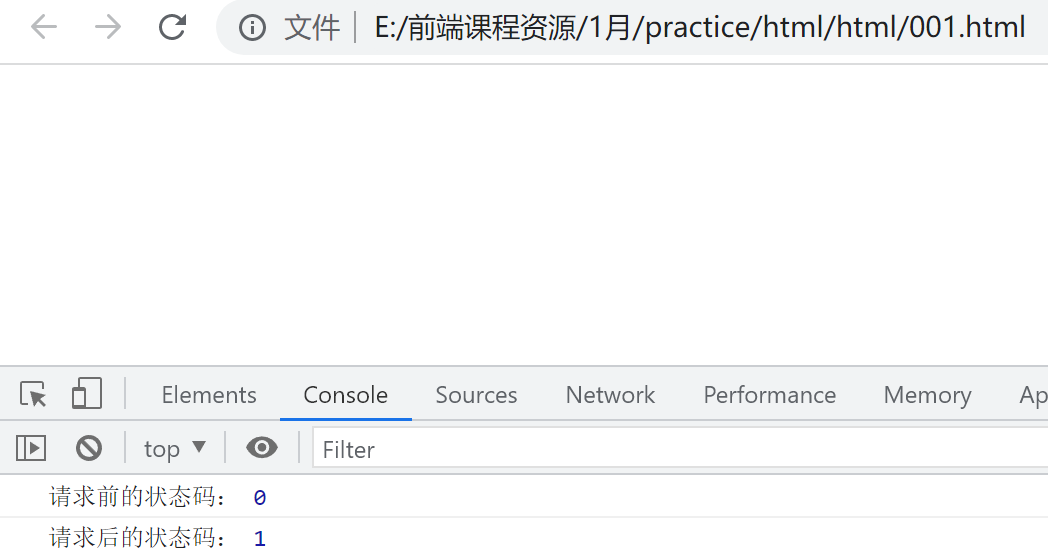
监听onload事件,并使用send()方法发送请求
<body>
<script>
var xhr = new XMLHttpRequest();
console.log("请求前的状态码:",xhr.readyState)
xhr.open('get','http://localhost:3000/home/first')
console.log("请求后的状态码:",xhr.readyState)
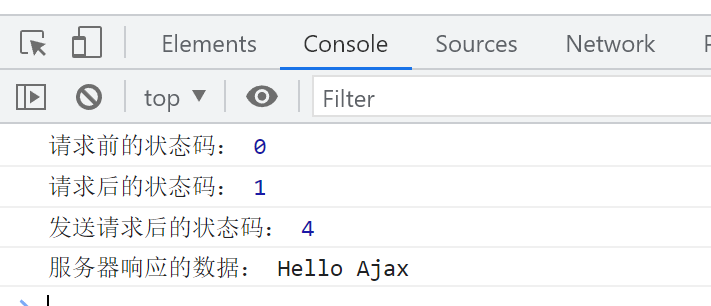
xhr.onload = function(){
console.log("发送请求后的状态码:",xhr.readyState)// 获取Ajax状态码4
console.log("服务器响应的数据:",xhr.responseText)// 输出“Hello, Ajax”
}
xhr.send();//向服务器端发送请求
</script>
</body>6、Express项目中解决跨域问题:采用cors方式
(1)引入cors模块:npm install cors
(2)在app.js文件中配置cors
导入cors模块
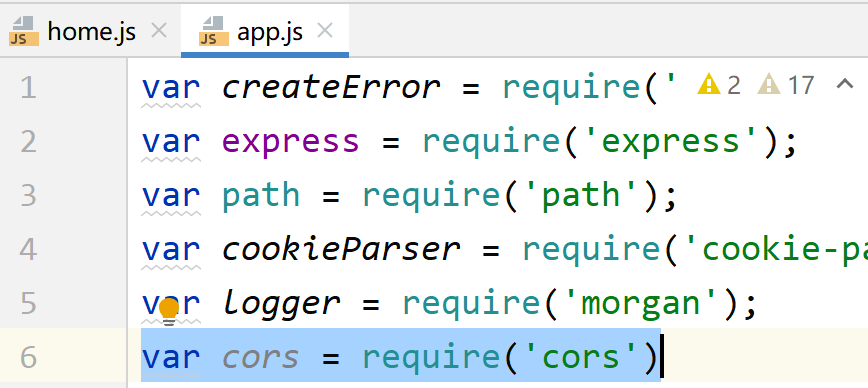
使用express.use()中间件应用cors模块

(3)重新启动项目:
将onload事件修改为onreadystatechange事件
<body>
    <h2 id="pt"></h2>
   <script>
       var xhr = new XMLHttpRequest();
       console.log("请求前的状态码:",xhr.readyState)
       xhr.open('get','http://localhost:3000/home/first')
       console.log("请求后的状态码:",xhr.readyState)

       xhr.onload = function(){
           console.log("发送请求后的状态码:",xhr.readyState)// 获取Ajax状态码4
           console.log("服务器响应的数据:",xhr.responseText)// 输出“Hello, Ajax”
       }

       xhr.onreadystatechange = function(){
           if(xhr.readyState === 4 && xhr.status === 200){
               document.getElementById('pt').innerHTML = xhr.responseText
           }
       }

       xhr.send();//向服务器端发送请求


   </script>
</body>
实例2:用户登录
(1)前端页面代码:新建login.html文件:
<!DOCTYPE html>
<html lang="en">
<head>
<meta charset="UTF-8">
<meta http-equiv="X-UA-Compatible" content="IE=edge">
<meta name="viewport" content="width=device-width, initial-scale=1.0">
<title>登录</title>
</head>
<body style="text-align: center;">
<div>
<label>用户名:
<input type="text" id="username">
<span id="name_info"></span>
</label>
<br><br>
<label>密 码:
<input type="password" id="userpwd">
<span id="pwd_info"></span>
</label>
<br><br>
<button id="btn_login">登录</button>
<br><br>
<h2 id="info"></h2>
</div>
<script>
let btn = document.getElementById('btn_login');
btn.onclick = function(){
//获取用户输入的信息
let name = document.getElementById('username').value
let pwd = document.getElementById('userpwd').value
//创建ajax的核心对象
let xhr = new XMLHttpRequest()
//拼接参数
let params = "username="+name+"&userpwd="+pwd
//建立和服务器的连接
xhr.open('get','http://localhost:3000/login/check?'+params)
//定义状态改变时的回调函数
xhr.onreadystatechange = function(){
if(xhr.readyState === 4 && xhr.status === 200){
if(xhr.responseText === '101'){
document.getElementById('name_info').innerHTML = '用户名错误'
}else if(xhr.responseText === '102'){
document.getElementById('pwd_info').innerHTML = '密码错误'
}else{
document.getElementById('info').innerHTML = '合法用户'
}
}
}
//向服务器发送请求
xhr.send();
}
</script>
</body>
</html>(2)在服务器端创建路由文件:在 routes文件下新建login.js文件:
const express = require('express');
const router = express.Router();


/*
   http://localhost:3000/login/check
*/
router.get('/check',(req, res) => {
    //获取客户端的get请求参数:req.query
    console.log(req.query)
    let uname = req.query.username
    let upwd = req.query.userpwd

    //对用户信息进行判断
    if (uname !== 'abc'){
        res.send({
            code: 101,
            msg: '用户名错误'
        })
    }else if (upwd !== '123456'){
        res.send({
            code: 102,
            msg: '密码错误'
        })
    }else{
        res.send({
            code: 1000,
            msg: '合法用户'
        })
    }
})
(3)在app.js里面把路由写进去


(4)npm start 启动服务器


 106
106


 被折叠的 条评论
为什么被折叠?
被折叠的 条评论
为什么被折叠?
 到【灌水乐园】发言


