


环境:windows 11
快速开始
运行以下命令,直接新建一个包含 tensorflow (gpu) 以及其他常用库的新环境。
# 采用下方「方法二」创建一个包含 tensorflow 与常用包的环境
conda create -n tensorflow-38 python=3.8.13 matplotlib scikit-learn ipykernel pandas seaborn tensorflow-gpu -c conda-forge -c anaconda
conda activate tensorflow-38
pip install opencv-python
1-1. 「方法一」半自动安装
- 先安装 cudnn 和 cudatoolkit 包,再安装 tensorflow 包
conda create -n tensorflow-38-1 python=3.8.13
conda activate tensorflow-38-1

# 会自动安装 cudatoolkit
conda install -c conda-forge cudnn
pip install tensorflow
1-2. 「方法二」全自动安装
- 缺点是版本相对 pypi 稍低
- 如:目前 pypi 版本为 2.8,conda 的版本为 2.6
conda install tensorflow-gpu和pip install tensorflow-gpu安装的内容是不同的
conda create -n tensorflow-38-2 python=3.8.13
conda activate tensorflow-38-2

# 会自动安装 cudnn 和 cudatoolkit 包
# Windows 系统使用 anaconda chennel
conda install tensorflow-gpu -c anaconda
# Linux 系统使用 conda-forge chennel
# conda-forge chennel 版本较新,但目前不支持 Windows
conda install tensorflow-gpu -c conda-forge
2. 验证
import tensorflow as tf
# 查看 tensorflow 版本
print(tf.__version__)
# 判断是否使用 GPU 构建
print(tf.test.is_built_with_cuda())
# 查看GPU列表
print(tf.config.list_physical_devices('GPU'))
# 查看驱动名称
if tf.test.gpu_device_name():
    print('Default GPU Device: {}'.format(tf.test.gpu_device_name()))
else:
    print("Please install GPU version of TF")
3. 附
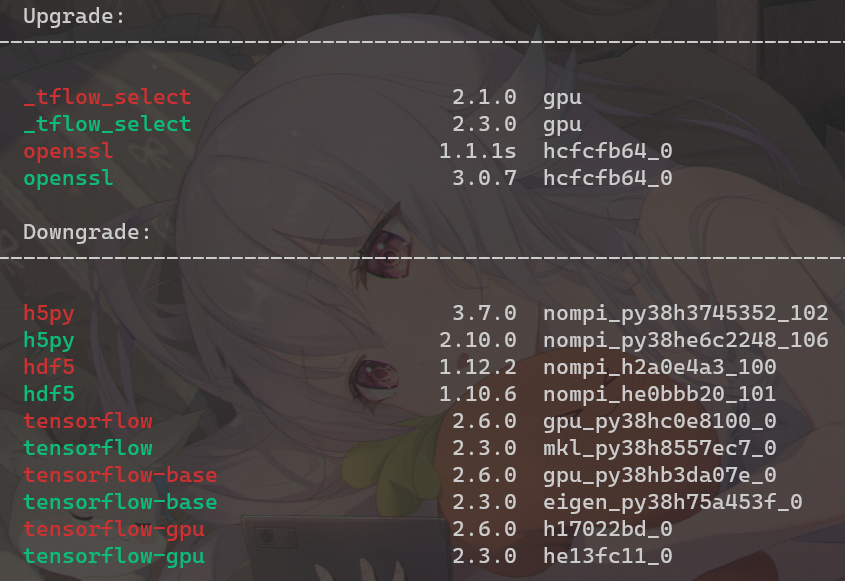
在后期修改环境的时候,留意不要把 tensorflow-gpu 从 gpu 版本换成 cpu 版本,如下图所示:
- 「参考」TensorFlow — Anaconda documentation: https://docs.anaconda.com/anaconda/user-guide/tasks/tensorflow/
- 「扩展」Anaconda | TensorFlow in Anaconda: https://www.anaconda.com/blog/tensorflow-in-anaconda
- 如果文章对你有帮助,欢迎点个赞哦!
- 署名:cc01cc: https://github.com/cc01cc
- 欢迎大家转载分享,本作品采用署名-非商业性使用-禁止演绎 4.0 国际进行许可
- 转载请标明源地址,切莫修改或破坏原文结构,谢谢


 9512
9512


 被折叠的 条评论
为什么被折叠?
被折叠的 条评论
为什么被折叠?
 到【灌水乐园】发言


