


1 串口引脚关系
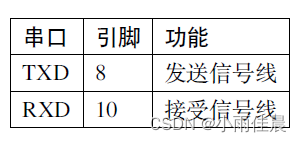
其中串口的引脚关系如下表所示
2 使能串口接口
串口在默认情况是关闭状态的,需要使能才能使用。
2.1 方法一
#工具配置
sudo fire-config
2.2 方法二
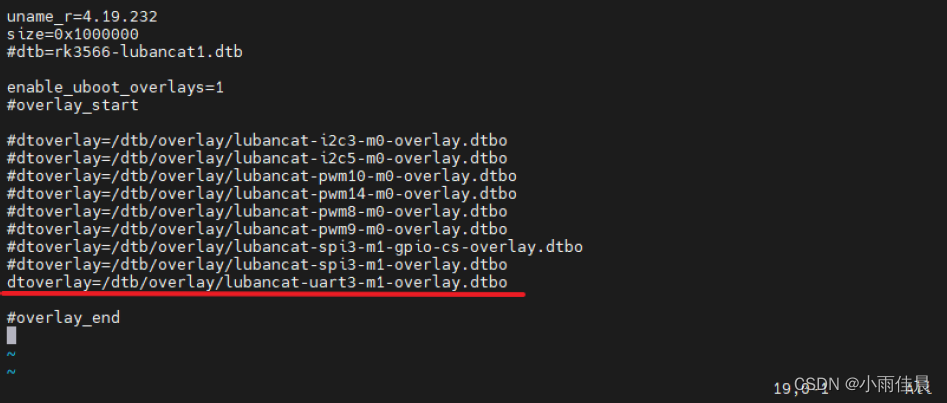
可以直接修改配置文件,查看是否启用了uart 相关设备设备树插件。编辑文件,将带有uart (以uart3 为例) 的那一行的注释符号去掉如下图:
然后重启激活设备
3 检查串口设备
查看串口有没有成功使能
#执行命令查看终端设备
ls /dev/tty*
4 串口通讯实验
4.1 连接串口
实验前需要使用串口线或USB 转串口线把它与板卡与电脑连接起来。
• 板子 — 电脑
• TXD — RXD
• RXD — TXD
• GND — GND
4.2 查询串口通信参数
#在板卡的终端执行如下命令
stty -F /dev/ttyS3
4.3 修改串口波特率
# 设置通讯速率,其中ispeed 为输入速率,ospeed 为输出速率
stty -F /dev/ttyS3 ispeed 115200 ospeed 115200
4.4 关闭回显
# 默认串口是开启回显的可以使用以下命令关闭回显
stty -F /dev/ttyS3 -echo
4.5 与Windows 主机通讯
4.5.1 串口通讯实验
配置好串口调试助手后,尝试使用如下命令测试发送数据:
# 使用echo 命令向终端设备文件写入字符串"Hello!"
echo Hello! > dev/ttyS3
通过串口调试助手可以看到,往/dev/ttyS3 设备文件写入的内容会直接通过串口线发送至Winodws 的主机。
而读取设备文件则可接收Winodws 主机发往板卡的内容(字符串最后必须加回车!),可以使用cat 命令来读取:
#使用cat 命令读取终端设备文件
cat /dev/ttyS3
4.5.2 minicom 通讯
#安装minicom软件包
sudo apt install minicom

#设置串口号
sudo minicom -s

#设置完成后,可以按这按键保存配置,保存后,以后打开不用设置
5 串口通讯实验(系统调用)
5.1 实验代码
#include <stdio.h>
#include <stdlib.h>
#include <unistd.h>
#include <fcntl.h>
#include <sys/stat.h>
#include <sys/types.h>
#include <termios.h>
#include <string.h>
#include <sys/ioctl.h>

//第一部分代码/
//根据具体的设备修改
const char default_path[] = "/dev/ttyS3";

int main(int argc, char *argv[])
{
    int fd;
    int res;
    char *path;
    char buf[1024] = "Embedfire tty send test.\n";

    //第二部分代码/
    //若无输入参数则使用默认终端设备
    if (argc > 1)
        path = argv[1];
    else
        path = (char *)default_path;

    //获取串口设备描述符
    printf("This is tty/usart demo.\n");
    fd = open(path, O_RDWR);
    if (fd < 0) {
        printf("Fail to Open %s device\n", path);
        return 0;
    }


    //第三部分代码/
    struct termios opt;
    //清空串口接收缓冲区
    tcflush(fd, TCIOFLUSH);
    // 获取串口参数opt
    tcgetattr(fd, &opt);
    //设置串口输出波特率
    cfsetospeed(&opt, B9600);
    //设置串口输入波特率
    cfsetispeed(&opt, B9600);

    //设置数据位数
    opt.c_cflag &= ~CSIZE;
    opt.c_cflag |= CS8;
    //校验位
    opt.c_cflag &= ~PARENB;
    opt.c_iflag &= ~INPCK;
    //设置停止位
    opt.c_cflag &= ~CSTOPB;
    //更新配置
    tcsetattr(fd, TCSANOW, &opt);
    printf("Device %s is set to 9600bps,8N1\n",path);

    //第四部分代码/
    do {
        //发送字符串
        write(fd, buf, strlen(buf));
        //接收字符串
        res = read(fd, buf, 1024);
        if (res >0 )
            //给接收到的字符串加结束符
            buf[res] = '\0';
        printf("Receive res = %d bytes data: %s\n",res, buf);
    } while (res >= 0);

    printf("read error,res = %d",res);
    close(fd);
    return 0;
}
5.2 编译运行
#编译方法
#方法一
make

#方法二
gcc uart_t.c -o uart_t


#运行
sudo ./uart_t
5.3 代码分析总结
为便于讲解,我们把代码分成四个部分:
• 第一部分:定义了默认使用的串口终端设备路径及其它一些变量。
• 第二部分:根据main 是否有输入参数确认使用哪个设备路径,并通过open 的读写模式打开该设备。
• 第三部分:定义了一个结构体termios 用于获取、设置终端设备的参数,包括波特率、数据位数、校验位等,这是本章的重点,在下一小节详细说明。
• 第四部分:在while 循环中对终端设备使用read 和write 进行读写,从而控制串口收发数据。代码中在接收到的内容末尾加了’0’结束符,主要是为了方便使用字符串的方式处理内容。


 2万+
2万+

 被折叠的 条评论
为什么被折叠?
被折叠的 条评论
为什么被折叠?
 到【灌水乐园】发言


