基本概念
卷积神经网络(Convolutional Neural Network)是一个专门针对图像识别问题设计的神经网络。它模仿人类识别图像的多层过程:瞳孔摄入像素;大脑皮层某些细胞初步处理,发现形状边缘、方向;抽象判定形状(如圆形、方形);进一步抽象判定(如判断物体是气球)。
如何理解卷积层和池化层?
卷积神经网络除了全连接层以外,还包含了卷积层和池化层。卷积层用来提取特征,而池化层可以减少参数数量。
卷积层
先谈一下卷积层
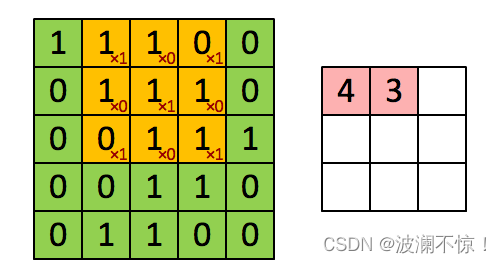
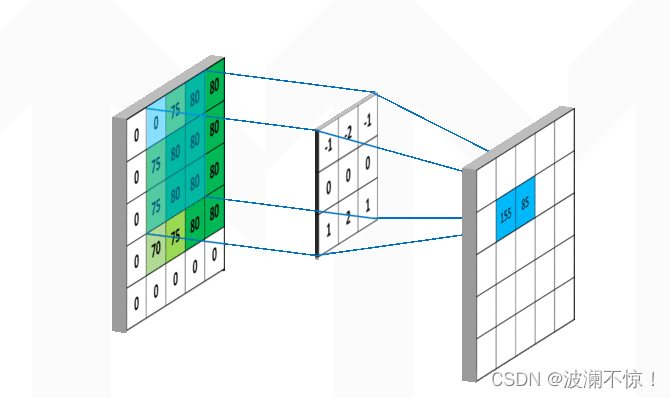 从左上角开始,卷积核就对应着数据的3*3的矩阵范围,然后相乘再相加得出一个值。按照这种顺序,每隔一个像素就操作一次,我们就可以得出9个值。这九个值形成的矩阵被我们称作激活映射(Activation map)。其中,卷积核为
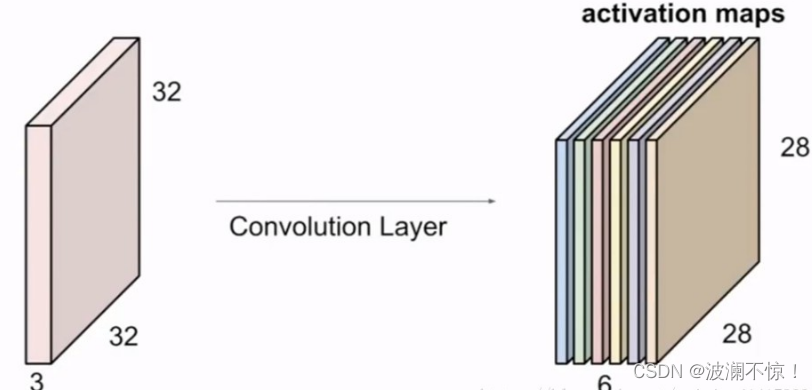
但其实我们输入的图像一般为三维,即含有R、G、B三个通道。但其实经过一个卷积核之后,三维会变成一维。它在一整个屏幕滑动的时候,其实会把三个通道的值都累加起来,最终只是输出一个一维矩阵。而多个卷积核(一个卷积层的卷积核数目是自己确定的)滑动之后形成的Activation Map堆叠起来,再经过一个激活函数就是一个卷积层的输出了。
池化层
前面说到池化层是降低参数,而降低参数的方法当然也只有删除参数了。
一般我们有最大池化和平均池化,而最大池化就我认识来说是相对多的。需要注意的是,池化层一般放在卷积层后面。所以池化层池化的是卷积层的输出
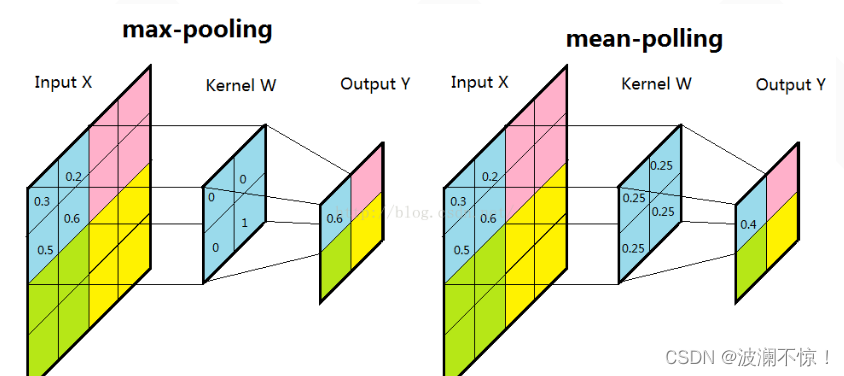
扫描的顺序跟卷积一样,都是从左上角开始然后根据你设置的步长逐步扫描全局。
激活函数的作用是什么?
在神经网络中,每一层输出的都是上一层输入的线性函数,所以无论网络结构怎么搭,输出都是输入的线性组合。
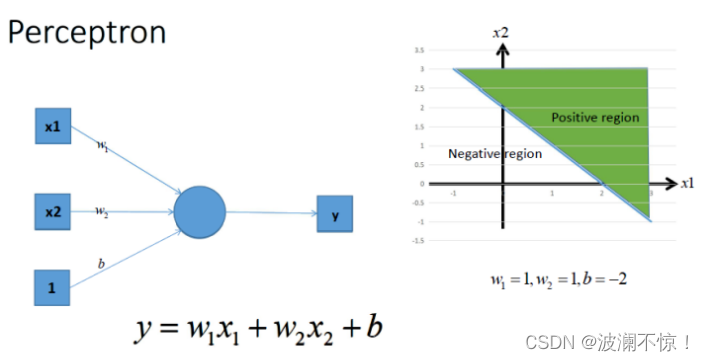
- 引入非线性因素。
在我们面对线性可分的数据集的时候,简单的用线性分类器即可解决分类问题。但是现实生活中的数据往往不是线性可分的,面对这样的数据,一般有两个方法:引入非线性函数、线性变换。 - 线性变换
就是把当前特征空间通过一定的线性映射转换到另一个空间,让数据能够更好的被分类。 - 激活函数
激活函数是如何引入非线性因素的呢?在神经网络中,为了避免单纯的线性组合,我们在每一层的输出后面都添加一个激活函数
AI Studio使用CNN实现猫狗分类
准备数据
#导入需要的包
import paddle as paddle
import paddle.fluid as fluid
import numpy as np
from PIL import Image
import matplotlib.pyplot as plt
import os
数据集下载
!mkdir -p /home/aistudio/.cache/paddle/dataset/cifar/
!wget "http://ai-atest.bj.bcebos.com/cifar-10-python.tar.gz" -O cifar-10-python.tar.gz
!mv cifar-10-python.tar.gz /home/aistudio/.cache/paddle/dataset/cifar/
BATCH_SIZE = 128
#用于训练的数据提供器
train_reader = paddle.batch(
    paddle.reader.shuffle(paddle.dataset.cifar.train10(),
                          buf_size=128*100),
    batch_size=BATCH_SIZE)
#用于测试的数据提供器
test_reader = paddle.batch(
    paddle.dataset.cifar.test10(),
    batch_size=BATCH_SIZE)
网络配置
在CNN模型中,卷积神经网络能够更好的利用图像的结构信息。下面定义了一个较简单的卷积神经网络。显示了其结构:输入的二维图像,先经过三次卷积层、池化层和Batchnorm,再经过全连接层,最后使用softmax分类作为输出层。
def convolutional_neural_network(img):
    # 第一个卷积-池化层
    conv_pool_1 = fluid.nets.simple_img_conv_pool(
        input=img,         # 输入图像
        filter_size=5,     # 滤波器的大小
        num_filters=20,    # filter 的数量。它与输出的通道相同
        pool_size=2,       # 池化核大小2*2
        pool_stride=2,     # 池化步长
        act="relu")        # 激活类型
    conv_pool_1 = fluid.layers.batch_norm(conv_pool_1)
    # 第二个卷积-池化层
    conv_pool_2 = fluid.nets.simple_img_conv_pool(
        input=conv_pool_1,
        filter_size=5,
        num_filters=50,
        pool_size=2,
        pool_stride=2,
        act="relu")
    conv_pool_2 = fluid.layers.batch_norm(conv_pool_2)
    # 第三个卷积-池化层
    conv_pool_3 = fluid.nets.simple_img_conv_pool(
        input=conv_pool_2,
        filter_size=5,
        num_filters=50,
        pool_size=2,
        pool_stride=2,
        act="relu")
    # 以softmax为激活函数的全连接输出层,10类数据输出10个数字
    prediction = fluid.layers.fc(input=conv_pool_3, size=10, act='softmax')
    return prediction
#定义输入数据
data_shape = [3, 32, 32]
images = fluid.layers.data(name='images', shape=data_shape, dtype='float32')
label = fluid.layers.data(name='label', shape=[1], dtype='int64')
# 获取分类器,用cnn进行分类
predict =  convolutional_neural_network(images)
# 获取损失函数和准确率
cost = fluid.layers.cross_entropy(input=predict, label=label) # 交叉熵
avg_cost = fluid.layers.mean(cost)                            # 计算cost中所有元素的平均值
acc = fluid.layers.accuracy(input=predict, label=label)       #使用输入和标签计算准确率
# 定义优化方法
optimizer =fluid.optimizer.Adam(learning_rate=0.001)
optimizer.minimize(avg_cost)
print("完成")
模型训练
EPOCH_NUM = 20
model_save_dir = "/home/aistudio/work/catDogModel"
# 获取测试程序
test_program = fluid.default_main_program().clone(for_test=True)
for pass_id in range(EPOCH_NUM):
    # 开始训练
    for batch_id, data in enumerate(train_reader()):                        #遍历train_reader的迭代器,并为数据加上索引batch_id
        train_cost,train_acc = exe.run(program=fluid.default_main_program(),#运行主程序
                             feed=feeder.feed(data),                        #喂入一个batch的数据
                             fetch_list=[avg_cost, acc])                    #fetch均方误差和准确率


        all_train_iter=all_train_iter+BATCH_SIZE
        all_train_iters.append(all_train_iter)
        all_train_costs.append(train_cost[0])
        all_train_accs.append(train_acc[0])

        #每100次batch打印一次训练、进行一次测试
        if batch_id % 100 == 0:
            print('Pass:%d, Batch:%d, Cost:%0.5f, Accuracy:%0.5f' %
            (pass_id, batch_id, train_cost[0], train_acc[0]))


    # 开始测试
    test_costs = []                                                         #测试的损失值
    test_accs = []                                                          #测试的准确率
    for batch_id, data in enumerate(test_reader()):
        test_cost, test_acc = exe.run(program=test_program,                 #执行测试程序
                                      feed=feeder.feed(data),               #喂入数据
                                      fetch_list=[avg_cost, acc])           #fetch 误差、准确率
        test_costs.append(test_cost[0])                                     #记录每个batch的误差
        test_accs.append(test_acc[0])                                       #记录每个batch的准确率

    # 求测试结果的平均值
    test_cost = (sum(test_costs) / len(test_costs))                         #计算误差平均值(误差和/误差的个数)
    test_acc = (sum(test_accs) / len(test_accs))                            #计算准确率平均值( 准确率的和/准确率的个数)
    print('Test:%d, Cost:%0.5f, ACC:%0.5f' % (pass_id, test_cost, test_acc))

#保存模型
# 如果保存路径不存在就创建
if not os.path.exists(model_save_dir):
    os.makedirs(model_save_dir)
print ('save models to %s' % (model_save_dir))
fluid.io.save_inference_model(model_save_dir,
                              ['images'],
                              [predict],
                              exe)
print('训练模型保存完成!')
draw_train_process("training",all_train_iters,all_train_costs,all_train_accs,"trainning cost","trainning acc")
模型预测
with fluid.scope_guard(inference_scope):
    #从指定目录中加载 推理model(inference model)
    [inference_program, # 预测用的program
     feed_target_names, # 是一个str列表,它包含需要在推理 Program 中提供数据的变量的名称。
     fetch_targets] = fluid.io.load_inference_model(model_save_dir,#fetch_targets:是一个 Variable 列表,从中我们可以得到推断结果。
                                                    infer_exe)     #infer_exe: 运行 inference model的 executor

    infer_path=['dog1.jpg','dog2.jpg','dog3.jpg','Cat1.jpg','Cat2.jpg','Cat3.jpg']
    label_list = [
        "airplane", "automobile", "bird", "cat", "deer", "dog", "frog", "horse",
        "ship", "truck"
        ]
    predict_result = []
    for image in infer_path:
        img = Image.open(image)
        plt.imshow(img)
        plt.show()

        img = load_image(image)

        results = infer_exe.run(inference_program,                 #运行预测程序
                                feed={feed_target_names[0]: img},  #喂入要预测的img
                                fetch_list=fetch_targets)          #得到推测结果
        predict_result.append(label_list[np.argmax(results[0])])
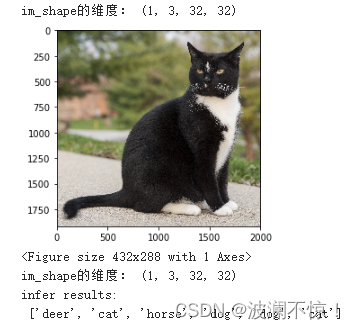
    print("infer results: \n", predict_result)


 1175
1175


 被折叠的 条评论
为什么被折叠?


