


一、论文笔记
1.什么是感受野
感受野(Receptive Field)的定义:卷积神经网络每一层输出的特征图(feature map)上的像素点映射回输入图像上的区域大小。换句话说就是这个点是卷积核看过原图的多少个点得到的,而这个区域我们就叫做感受野。
1.1举例:
若输入图像的尺寸大小是55,经过两次33的卷积核(其中stride=1,padding=0)后,其感受野大小为55,如下图所示:
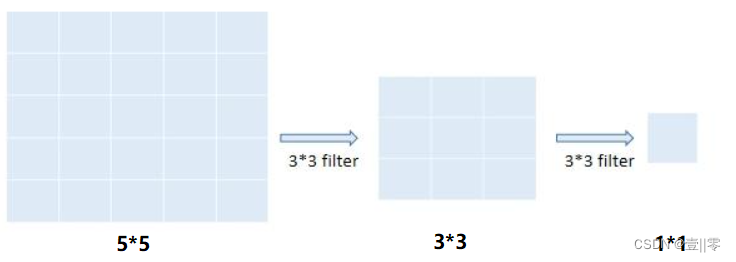
由卷积计算公式:N=(W-F+2P)/S+1可得,第一次卷积后的图像大小为33,第二次卷积后的图像大小为11,所以感受野为55。
VGG模型基本结构
(下面的图片是从原论文中截取的)
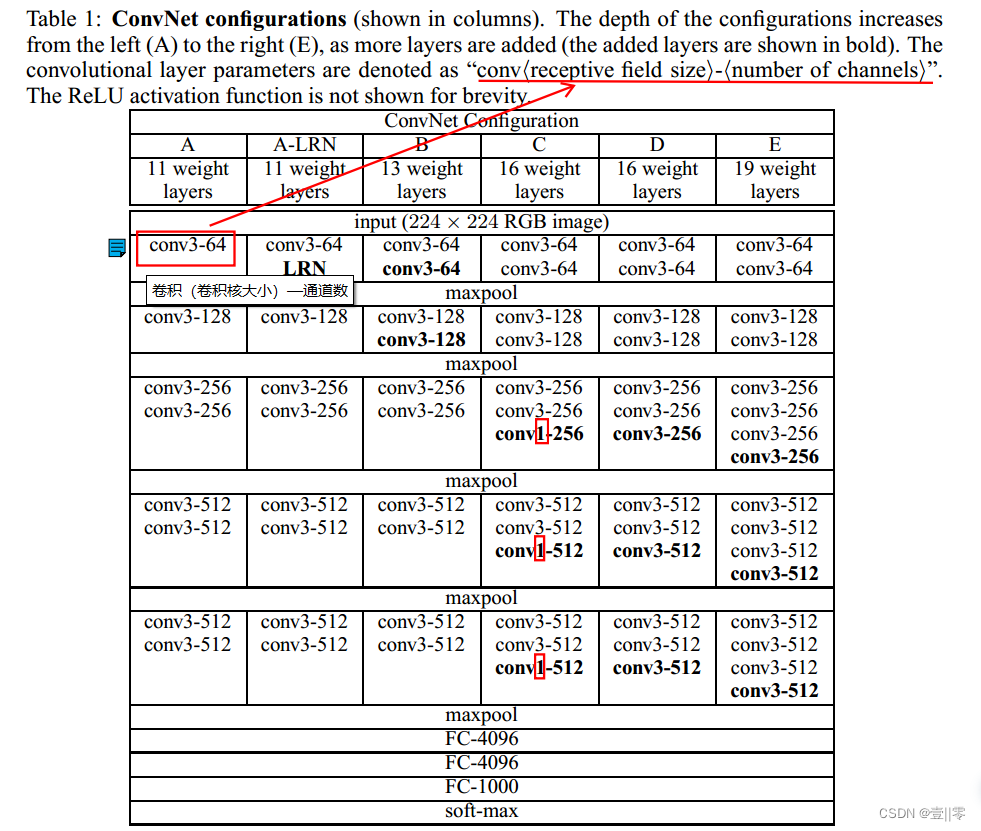

在第一个图中,从网络 A 中的 11 个权重层(8 个卷积层和 3 个 FC 层)到网络 E 中的 19 个权重层(16 个卷积层和 3 个 FC 层)。卷积层的宽度(通道数)相当小,从第一层的 64 开始,然后在每个最大池层之后增加 2 倍,直到达到 512。
在训练期间,ConvNet 的输入是固定大小的 224 × 224 RGB 图像。做的唯一预处理是从每个像素中减去在训练集上计算的平均 RGB 值。图像通过一堆卷积层,其中论文作者使用具有非常小的感受野的滤波器:3 × 3(这是捕获左/右、上/下、中心概念的最小尺寸) 。在其中一种配置中,论文还利用 1 × 1 卷积滤波器,这可以看作是输入通道的线性变换(随后是非线性)。卷积步幅固定为1像素;3 × 3 卷积层的填充为 1 像素。空间池化由五个最大池化层执行,这些层在卷积层之后(并非所有的卷积层后面都有最大池化)。最大池化在 2 × 2 像素窗口上执行,步长为 2。
一堆卷积层(在不同的架构中具有不同的深度)后面是三个全连接层(FC):前两个层每个都有 4096 个通道,第三个执行 1000种 ILSVRC 分类,因此包含 1000 个通道(每个通道一种分类)。最后一层是 softmax 层。所有网络中全连接层的配置都是相同的。
所有隐藏层都配备了非线性校正(ReLU)。我们注意到,VGG网络(除了上图中A-LRN)都不包含局部响应归一化(LRN),因为这种归一化并没有提高ILSVRC数据集上的性能,而且导致内存消耗和计算时间增加。
Training Image Size
作者还运用了随机裁剪的数据增强方法,其中我们把图像的最小边设置成S(裁剪大小),其中S不小于224,如果S=224,那么送入网络的就是完整的图像,如果S大于224,模型就会拿到图片中的一个小物体,或者物体的一部分。作者提到了两种设置S的方法:
- 第一种方法:固定S,我们采用两个尺寸,分别为256和384(也就是说用S=256训练一个模型,让后用S=384训练一个模型,最后集成两个模型的结果)。为了加速训练,我们初始化S=256的参数,然后训练收敛后,把它256的参数用作384参数的初始化。
- 第二种方法:多尺度训练,也就是是说S不固定,我们选用了一个S的范围:[S_min,S_max],其中原文为:[256,512],对于每一种图片,我们在这个范围中随机选取一个S。为了加速训练,我们把S=384的收敛参数作为多尺度训练S的初始化参数。
通过作者后面的实验验证S不固定的效果比较好。
代码复现笔记
数据集的准备、测试(test.py)和处理(dataset.py)和AlexNet部分一样,可以参考AlexNet理论及代码复现笔记(PyTorch)仅模型文件不完全一样(VGG.py和AlexNet.py中训练以及验证部分一样)
VGG.py
import torch
import torch.nn as nn
import torch.optim as optim
import time
import torch.nn.functional as F
import dataset
from matplotlib import pyplot as plt
from dataset import MyDataset

class VGG(nn.Module):
    def __init__(self,features,num_classes=2,init_weights=False):  #init_weights表示是否初始化模型参数。
        super(VGG,self).__init__()
        self.features=features
        self.classifier=nn.Sequential(
            nn.Linear(512*7*7,4096),
            nn.ReLU(True),
            nn.Dropout(p=0.5),
            nn.Linear(4096,4096),
            nn.ReLU(True),
            nn.Dropout(p=0.5),
            nn.Linear(4096,num_classes)
        )
        if init_weights:
            self._initialize_weights()  # 参数初始化
        # if init_weights:
        #     for m in self.modules():
        #         if isinstance(m, nn.Conv2d):
        #             nn.init.kaiming_normal_(m.weight, mode="fan_out", nonlinearity="relu")
        #             if m.bias is not None:
        #                 nn.init.constant_(m.bias, 0)
        #         elif isinstance(m, nn.BatchNorm2d):
        #             nn.init.constant_(m.weight, 1)
        #             nn.init.constant_(m.bias, 0)
        #         elif isinstance(m, nn.Linear):
        #             nn.init.normal_(m.weight, 0, 0.01)
        #             nn.init.constant_(m.bias, 0)
    def forward(self, x):
        #N表示batchsize,需要将其展开为一维向量,方便与全连接层连接。
        # N x 3 x 224 x 224
        x=self.features(x)
        # N x 512 x 7 x 7
        x=torch.flatten(x,start_dim=1)
        # N x 512 × 7 × 7
        x=self.classifier(x)
        return x
    def _initialize_weights(self):#初始化模型参数
        for m in self.modules():         #遍历各个层进行参数初始化
            if isinstance(m, nn.Conv2d):   #如果是卷积层的话 进行下方初始化
                nn.init.xavier_uniform_(m.weight)  #正态分布初始化
                if m.bias is not None:
                    nn.init.constant_(m.bias, 0)     #如果偏置不是0 将偏置置成0  相当于对偏置进行初始化
            elif isinstance(m, nn.Linear):        #如果是全连接层
                nn.init.xavier_uniform_(m.weight)    #也进行正态分布初始化
                nn.init.constant_(m.bias, 0)  #将所有偏执置为0

"""在VGG16的模型中,"M"代表的是最大池化层。在make_features函数中,当遇到"M"时,会向layers列表中添加一个最大池化层。
当遇到数字时,会向layers列表中添加一个卷积层和一个ReLU激活函数。这个函数的作用是构建VGG16模型的特征提取部分。"""
def make_features(cfg:list):
    layers=[]
    in_channels=3
    for v in cfg:
        if v=='M':
            layers+=[nn.MaxPool2d(kernel_size=2,stride=2)]
        else:
            conv2d=nn.Conv2d(in_channels,v,kernel_size=3,padding=1)
            layers+=[conv2d,nn.ReLU(True)]
            in_channels=v
    return nn.Sequential(*layers)
cfgs={
    'vgg11':[64,'M',128,'M',256,256,'M',512,512,'M',512,512,'M'],
'vgg13': [64, 64, 'M', 128, 128, 'M', 256, 256, 'M', 512, 512, 'M', 512, 512, 'M'],
    'vgg16': [64, 64, 'M', 128, 128, 'M', 256, 256, 256, 'M', 512, 512, 512, 'M', 512, 512, 512, 'M'],
    'vgg19': [64, 64, 'M', 128, 128, 'M', 256, 256, 256, 256, 'M', 512, 512, 512, 512, 'M', 512, 512, 512, 512, 'M'],
}
def vgg(model_name="vgg16",**kwargs):  #调用VGG16
    assert model_name in cfgs,"Warning: model number {} not in cfgs dict!".format(model_name)
    cfg=cfgs[model_name]
    model=VGG(make_features(cfg),**kwargs)
    return model
#以上都是PyTorch官方的VGG的源代码


#创建模型,部署gpu
device = torch.device("cuda" if torch.cuda.is_available() else "cpu")
model_name = "vgg16"
model = vgg(model_name=model_name, num_classes=2, init_weights=True)
model.to(device)
#定义优化器
loss_function = nn.CrossEntropyLoss()
optimizer = optim.Adam(model.parameters(), lr=0.0001)

def train_runner(model, device, trainloader, loss_function, optimizer, epoch):
    #训练模型, 启用 BatchNormalization 和 Dropout, 将BatchNormalization和Dropout置为True
    model.train()
    total = 0
    correct =0.0
    #enumerate迭代已加载的数据集,同时获取数据和数据下标
    for i, data in enumerate(trainloader, 0):
        inputs, labels = data
        #把模型部署到device上
        inputs, labels = inputs.to(device), labels.to(device)
        #初始化梯度
        optimizer.zero_grad()
        #保存训练结果
        outputs = model(inputs)
        #计算损失和
        #loss = F.cross_entropy(outputs, labels)
        loss = loss_function(outputs, labels)
        #获取最大概率的预测结果
        #dim=1表示返回每一行的最大值对应的列下标
        predict = outputs.argmax(dim=1)
        total += labels.size(0)
        correct += (predict == labels).sum().item()
        #反向传播
        loss.backward()
        #更新参数
        optimizer.step()
        if i % 100 == 0:
            #loss.item()表示当前loss的数值
            print("Train Epoch{} \t Loss: {:.6f}, accuracy: {:.6f}%".format(epoch, loss.item(), 100*(correct/total)))
            Loss.append(loss.item())
            Accuracy.append(correct/total)
    return loss.item(), correct/total


def test_runner(model, device, testloader):
    #模型验证, 必须要写, 否则只要有输入数据, 即使不训练, 它也会改变权值
    #因为调用eval()将不启用 BatchNormalization 和 Dropout, BatchNormalization和Dropout置为False
    model.eval()
    #统计模型正确率, 设置初始值
    correct = 0.0
    test_loss = 0.0
    total = 0
    #torch.no_grad将不会计算梯度, 也不会进行反向传播
    with torch.no_grad():
        for data, label in testloader:
            data, label = data.to(device), label.to(device)
            output = model(data)
            test_loss += F.cross_entropy(output, label).item()
            predict = output.argmax(dim=1)
            #计算正确数量
            total += label.size(0)
            correct += (predict == label).sum().item()
        #计算损失值
        print("test_avarage_loss: {:.6f}, accuracy: {:.6f}%".format(test_loss/total, 100*(correct/total)))

#调用
epoch = 1
Loss = []
Accuracy = []
for epoch in range(1, epoch+1):
    print("start_time",time.strftime('%Y-%m-%d %H:%M:%S',time.localtime(time.time())))
    loss, acc = train_runner(model, device, dataset.trainloader, loss_function, optimizer, epoch)
    Loss.append(loss)
    Accuracy.append(acc)
    test_runner(model, device, dataset.testloader)
    print("end_time: ",time.strftime('%Y-%m-%d %H:%M:%S',time.localtime(time.time())),'\n')
print('Finished Training')
plt.subplot(2,1,1)
plt.plot(Loss)
plt.title('Loss')
plt.show()
plt.subplot(2,1,2)
plt.plot(Accuracy)
plt.title('Accuracy')
plt.show()

print(model)
torch.save(model, './models/vgg-catvsdog.pth') #保存模型
test.py
import matplotlib.pyplot as plt
from PIL import Image
import torch
import numpy as np
from torchvision.transforms import transforms
import torch.nn.functional as F


class VGG(nn.Module):
    def __init__(self,features,num_classes=2,init_weights=False):  #init_weights表示是否初始化模型参数。
        super(VGG,self).__init__()
        self.features=features
        self.classifier=nn.Sequential(
            nn.Linear(512*7*7,4096),
            nn.ReLU(True),
            nn.Dropout(p=0.5),
            nn.Linear(4096,4096),
            nn.ReLU(True),
            nn.Dropout(p=0.5),
            nn.Linear(4096,num_classes)
        )
        if init_weights:
            self._initialize_weights()  # 参数初始化
        # if init_weights:
        #     for m in self.modules():
        #         if isinstance(m, nn.Conv2d):
        #             nn.init.kaiming_normal_(m.weight, mode="fan_out", nonlinearity="relu")
        #             if m.bias is not None:
        #                 nn.init.constant_(m.bias, 0)
        #         elif isinstance(m, nn.BatchNorm2d):
        #             nn.init.constant_(m.weight, 1)
        #             nn.init.constant_(m.bias, 0)
        #         elif isinstance(m, nn.Linear):
        #             nn.init.normal_(m.weight, 0, 0.01)
        #             nn.init.constant_(m.bias, 0)
    def forward(self, x):
        #N表示batchsize,需要将其展开为一维向量,方便与全连接层连接。
        # N x 3 x 224 x 224
        x=self.features(x)
        # N x 512 x 7 x 7
        x=torch.flatten(x,start_dim=1)
        # N x 512 × 7 × 7
        x=self.classifier(x)
        return x
    def _initialize_weights(self):#初始化模型参数
        for m in self.modules():         #遍历各个层进行参数初始化
            if isinstance(m, nn.Conv2d):   #如果是卷积层的话 进行下方初始化
                nn.init.xavier_uniform_(m.weight)  #正态分布初始化
                if m.bias is not None:
                    nn.init.constant_(m.bias, 0)     #如果偏置不是0 将偏置置成0  相当于对偏置进行初始化
            elif isinstance(m, nn.Linear):        #如果是全连接层
                nn.init.xavier_uniform_(m.weight)    #也进行正态分布初始化
                nn.init.constant_(m.bias, 0)  #将所有偏执置为0

"""在VGG16的模型中,"M"代表的是最大池化层。在make_features函数中,当遇到"M"时,会向layers列表中添加一个最大池化层。
当遇到数字时,会向layers列表中添加一个卷积层和一个ReLU激活函数。这个函数的作用是构建VGG16模型的特征提取部分。"""
def make_features(cfg:list):
    layers=[]
    in_channels=3
    for v in cfg:
        if v=='M':
            layers+=[nn.MaxPool2d(kernel_size=2,stride=2)]
        else:
            conv2d=nn.Conv2d(in_channels,v,kernel_size=3,padding=1)
            layers+=[conv2d,nn.ReLU(True)]
            in_channels=v
    return nn.Sequential(*layers)
cfgs={
    'vgg11':[64,'M',128,'M',256,256,'M',512,512,'M',512,512,'M'],
'vgg13': [64, 64, 'M', 128, 128, 'M', 256, 256, 'M', 512, 512, 'M', 512, 512, 'M'],
    'vgg16': [64, 64, 'M', 128, 128, 'M', 256, 256, 256, 'M', 512, 512, 512, 'M', 512, 512, 512, 'M'],
    'vgg19': [64, 64, 'M', 128, 128, 'M', 256, 256, 256, 256, 'M', 512, 512, 512, 512, 'M', 512, 512, 512, 512, 'M'],
}
def vgg(model_name="vgg16",**kwargs):  #调用VGG16
    assert model_name in cfgs,"Warning: model number {} not in cfgs dict!".format(model_name)
    cfg=cfgs[model_name]
    model=VGG(make_features(cfg),**kwargs)
    return model
#以上都是PyTorch官方的VGG的源代码


if __name__=='__main__':
    device=torch.device('cuda' if torch.cuda.is_available() else 'cpu')
    model=VGG()
    print("加载模型")
    model=torch.load('./models/VGG.pth')
    print("模型加载成功")
    model=model.to(device)
    model.eval()   #把模型转为test模式

    #读取要预测的图片
    img=Image.open("./images/dog.10010.jpg")
    plt.axis('off')#不显示坐标
    plt.show()

    #导入图片,图片扩展后为[1,1,32,32]
    trans=transforms.Compose([
        transforms.Resize((224,224)),
        transforms.ToTensor(),
        transforms.Normalize((0.5,0.5,0.5), (0.5,0.5,0.5))
    ])
    img=trans(img)
    img=img.to(device)
    img=img.unsqueeze(0) #图片扩展多一维,因为输入到保存的模型中是4维的[batch_size,通道,长,宽],而普通图片只有三维,[通道,长,宽]

    #预测
    classes=('cat','dog')
    output=model(img)
    prob=F.softmax(output,dim=1)
    print("概率:",prob)
    value,predicted=torch.max(output.data,1)
    predict=output.argmax(dim=1)
    pred_class=classes[predicted.item()]
    print("预测类别:",pred_class)


 5423
5423


 被折叠的 条评论
为什么被折叠?
被折叠的 条评论
为什么被折叠?
 到【灌水乐园】发言


