


Slurm是面向Linux和Unix的开源工作调度程序,由世界上许多超级计算机使用,主要功能如下:
1、为用户分配计算节点的资源,以执行工作;
2、提供的框架在一组分配的节点上启动、执行和监视工作(通常是并行作业);
3、管理待处理作业的工作队列来仲裁资源争用问题;
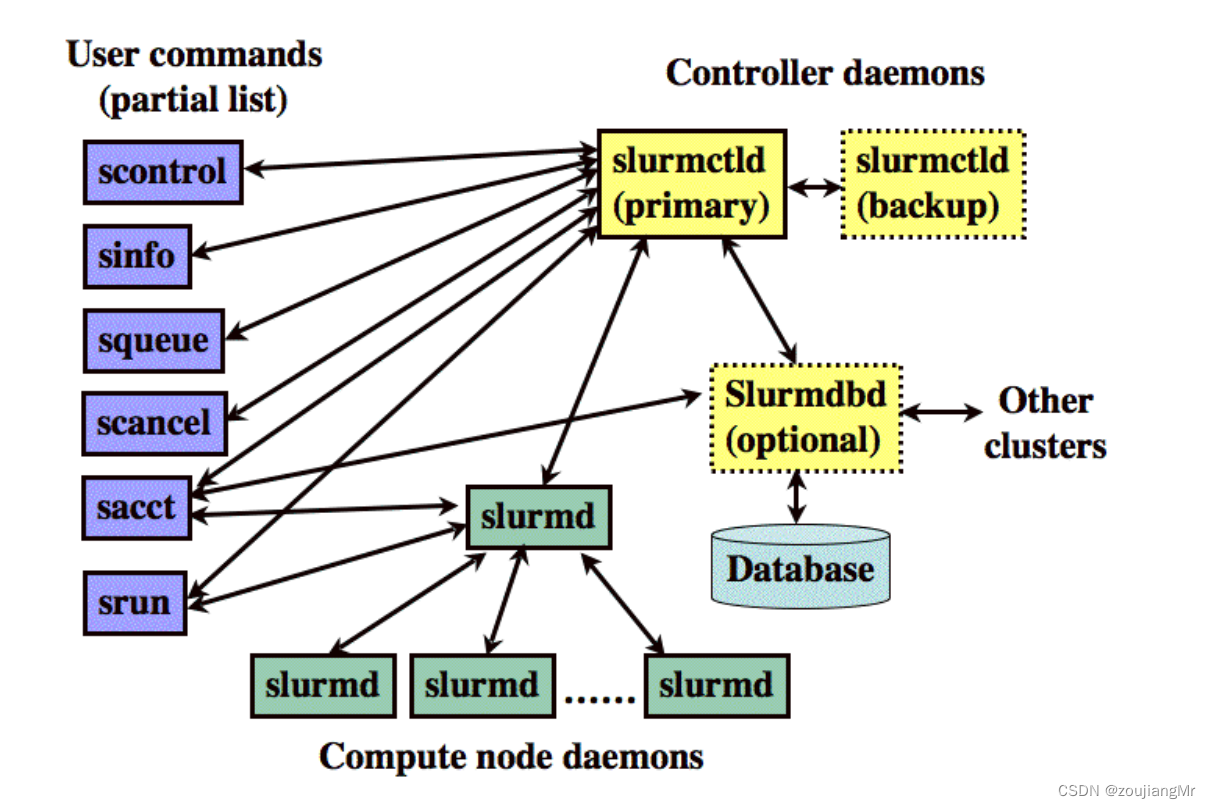
Slurm架构
环境配置
服务器 IP 主机名 操作系统 配置
控制节点 172.18.0.115 master CentOS7.9 4核8G
计算节点1 172.18.0.116 node01 CentOS7.9 4核8G
计算节点2 172.18.0.117 node02 CentOS7.9 4核8G
一、基础环境(除说明外,所有机器都要执行)
关闭防火墙/selinux
systemctl stop firewalld
systemctl disable firewalld
sed -i -e  's/^SELINUX=.*/SELINUX=disabled/g' /etc/selinux/config
setenforce 0
开启ipv6(部署IPa需要)
vi /etc/sysctl.conf
net.ipv6.conf.all.disable_ipv6 = 1
net.ipv6.conf.default.disable_ipv6 = 1
net.ipv6.conf.lo.disable_ipv6 = 0
换成阿里云的源
rm -rf /etc/yum.repos.d/*
curl -o /etc/yum.repos.d/CentOS-Base.repo https://mirrors.aliyun.com/repo/Centos-7.repo
curl -o /etc/yum.repos.d/epel.repo https://mirrors.aliyun.com/repo/epel-7.repo

yum clean all
yum makecache fast -y
设置主机名,主机名一定不能重复(分别执行)
hostnamectl set-hostname master
hostnamectl set-hostname node01
hostnamectl set-hostname node02
设置hosts
cat >>  /etc/hosts << EOF
172.18.0.115 master
172.18.0.116 node01
172.18.0.117 node02
EOF
存储目录挂载
服务端:
yum   install nfs-utils rpcbind  -y

1)准备需要共享的文件夹
mkdir /var/version/home/

2)建立NFS共享配置
echo  "/var/version/home/  *(rw) " >> /etc/exports

3)启动系统服务nfs-server,并设置开机自启

 systemctl  restart  rpcbind
systemctl  restart  nfs-server
 systemctl  enable  nfs-server
4)测试:
showmount -e
客户端:
yum   install nfs-utils rpcbind  -y
1)创建挂载点

mkdir -p /var/version/tools
2)配置开机挂载

 vim  /etc/fstab
.. ..
192.168.201.192:/var/version/tools  /var/version/tools  nfs defaults,_netdev   0  0
192.168.201.192:/home   /home  nfs defaults,_netdev   0  0


3)测试挂载配置

 mount  -a

[root@T4-D02-194 /etc/yum.repos.d]
#df -Th
Filesystem                         Type      Size  Used Avail Use% Mounted on
devtmpfs                           devtmpfs  252G     0  252G   0% /dev
tmpfs                              tmpfs     252G     0  252G   0% /dev/shm
tmpfs                              tmpfs     252G  2.0M  252G   1% /run
tmpfs                              tmpfs     252G     0  252G   0% /sys/fs/cgroup
/dev/sda2                          ext4      219G  2.3G  206G   2% /
/dev/sda1                          ext4      976M  110M  800M  12% /boot
192.168.201.192:/var/version/tools nfs4      3.5T   88M  3.3T   1% /var/version/tools
192.168.201.192:/home              nfs4      3.5T   88M  3.3T   1% /home
ntp时间同步
NTP服务端配置
#yum -y install chrony
 #vim  /etc/chrony.conf
 server 0.centos.pool.ntp.org iburst         //server用户客户端指向上层NTP服务器
allow   all        //允许那个IP或网络访问NTP
local stratum 10            //设置NTP服务器的层数量
.. ..
systemctl  restart chronyd
systemctl  enable chronyd
NTP客户端配置
yum -y install chrony
vim /etc/chrony.conf
server  192.168.200.1  iburst
systemctl  restart chronyd
systemctl  enable chronyd
chronyc sources -v

这个要改时间服务的配置文件、、
修改方法:
第一步:修改配置文件:vim /etc/chrony.conf 将所有server开头的行注释或者删除、然后在第三行添加下面内容
server 192.168.200.1 iburst
第二步:重启时间服务
systemctl restart chronyd.service
第三步:手动更新一次、后面会自动更新
chronyc -a makestep
返回200 OK 表示同步成功
systemctl restart chronyd.service;chronyc -a makestep
DNS配置
 vi /etc/resolv.conf
search zoujiang-zj.com
nameserver 192.168.201.195
配置SSH免登陆
# 控制节点上面执行
echo y| ssh-keygen -t rsa -P '' -f  ~/.ssh/id_rsa
ssh-copy-id -i ~/.ssh/id_rsa.pub  -o  StrictHostKeyChecking=no root@node01
ssh-copy-id -i ~/.ssh/id_rsa.pub  -o  StrictHostKeyChecking=no root@node02
二、账号系统部署
参考:IPA部署
①、环境配置
配置静态主机名与DNS
 #hostnamectl set-hostname --static master02.zoujiang-zj.com
# vim /etc/resolv.conf
search zoujiang-zj.com
nameserver 192.168.201.195
# vi /etc/hosts
# echo “11.164.24.108 master01.zoujiang-zj.com master01” >> /etc/hosts
# echo “11.238.116.119 master02.zoujiang-zj.com master02” >> /etc/hosts
②、IPA服务端配置
安装ipa-server
yum install -y ipa-server bind bind-dyndb-ldap ipa-server-dns
配置ipa-server
[root@server ~]# ipa-server-install --setup-dns   ---安装ipa-server自动配置dns
Server host name [server.zhuxu.co]:     ---回车键(默认)
Please confirm the domain name [zhuxu.co]:    ---回车键(默认)
Please provide a realm name [ZHUXU.CO]:  ---回车键(默认)
Directory Manager password:   ---设置目录管理的密码 最少是8位
IPA admin password:  ---设置ipa 管理员admin的密码 最少8位 一定要记住,后面要用到
Do you want to configure DNS forwarders? [yes]: no ---你想配置dns为转发器吗? 选择no
Do you want to search for missing reverse zones? [yes]: yes --你想配置dns的反向域吗?选择yes
Continue to configure the system with these values? [no]: yes --继续配置系统其他的值? 选择yes

配置时候如遇上述报错、请更新nss : yum update nss
开机启动sssd
systemctl start sssd  开启服务
authconfig  --enablemkhomedir –update   创建用户,家目录 更新认证
 验证ipa-server和dns
# kinit admin 登录admin管理lolp0pssd
Password for [email protected]: 输入前面设置的admin密码
# ipa user-find –all  查看所有域用户信息
安装验证
# kinit admin
Password for [email protected]: #IPA admin密码
# 生成ca-agent.p12和cacert.p12文件
# ls -a
# klist
# ipa env
# id admin
修改默认shell(非必要)
ipa config-mod --defaultshell=/bin/bash
修改默认家目录
[root@server ~]# ipa config-mod --homedirectory=/nfs/home
  Maximum username length: 32
  Home directory base: /nfs/home
  Default shell: /bin/bash
  Default users group: ipausers
  Default e-mail domain: zoujiang-zj.com
  Search
最低0.47元/天 解锁文章


 2557
2557


 被折叠的 条评论
为什么被折叠?
被折叠的 条评论
为什么被折叠?
 到【灌水乐园】发言


