


1:SMM的含义:spring+springMVC+mybatis
spring:
- 企业级java应用程序开发框架
- 有点:性能好、易于测试、可重用的代码
- 创建者:Rod Jahnson
- 目的:解决企业应用开发的复杂性
- 轻量级控制反转(Inversion of Control IoC)和面向切面(AOP)的容器框架
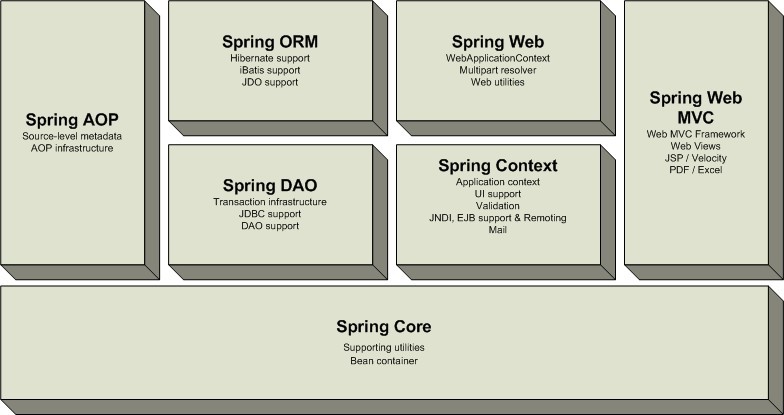
- 结构如图
- Core 封装包是框架的最基础部分,提供IoC和依赖注入特性
- DAO 提供了JDBC的抽象层,它可消除冗长的JDBC编码和解析数据库厂商特有的错误代码。
- ORM 封装包提供了常用的“对象/关系”映射APIs的集成层。
- Spring的 AOP 封装包提供了符合 AOP Alliance规范的面向方面的编程(aspect-oriented programming)实现,
- Spring中的 Web 包提供了基础的针对Web开发的集成特性
- Spring中的 MVC 封装包提供了Web应用的Model-View-Controller(MVC)实现
- Context(上下文) 封装包构筑于Core封装包的坚固基础上:它提供了用一种框架风格的方式来访问对象,有些像JNDI注册表。Context封装包继承了beans包的功能,还增加了国际化(I18N)(用于规范resource bundle),事件传播,资源装载,以及透明创建上下文,例如通过servlet容器。
控制反转:
- 是面向对象编程中的一种设计原则
- 目的:可以用来减低计算机代码之间的耦合度
- 方法:依赖注入(Dependency Injection,简称DI)
- 描述:Class A中用到了Class B的对象b,一般情况下,需要在A的代码中显式的new一个B的对象。采用依赖注入技术之后,A的代码只需要定义一个私有的B对象,不需要直接new来获得这个对象,而是通过相关的容器控制程序来将B对象在外部new出来并注入到A类里的引用中。而具体获取的方法、对象被获取时的状态由配置文件(如XML)来指定
面向切面:
2:SSM框架所需要导入的依赖
<properties>
		<!-- spring版本号 -->
		<spring.version>4.0.2.RELEASE</spring.version>
		<!-- mybatis版本号 -->
		<mybatis.version>3.2.6</mybatis.version>
		<!-- log4j日志文件管理包版本 -->
		<slf4j.version>1.7.7</slf4j.version>
		<log4j.version>1.2.17</log4j.version>
	</properties>

	<dependencies>
		<dependency>
			<groupId>junit</groupId>
			<artifactId>junit</artifactId>
			<version>4.11</version>
			<!-- 表示开发的时候引入,发布的时候不会加载此包 -->
			<scope>test</scope>
		</dependency>
		<!-- spring核心包 -->
		<dependency>
			<groupId>org.springframework</groupId>
			<artifactId>spring-core</artifactId>
			<version>${spring.version}</version>
		</dependency>

		<dependency>
			<groupId>org.springframework</groupId>
			<artifactId>spring-web</artifactId>
			<version>${spring.version}</version>
		</dependency>
		<dependency>
			<groupId>org.springframework</groupId>
			<artifactId>spring-oxm</artifactId>
			<version>${spring.version}</version>
		</dependency>
		<dependency>
			<groupId>org.springframework</groupId>
			<artifactId>spring-tx</artifactId>
			<version>${spring.version}</version>
		</dependency>

		<dependency>
			<groupId>org.springframework</groupId>
			<artifactId>spring-jdbc</artifactId>
			<version>${spring.version}</version>
		</dependency>

		<dependency>
			<groupId>org.springframework</groupId>
			<artifactId>spring-webmvc</artifactId>
			<version>${spring.version}</version>
		</dependency>
		<dependency>
			<groupId>org.springframework</groupId>
			<artifactId>spring-aop</artifactId>
			<version>${spring.version}</version>
		</dependency>

		<dependency>
			<groupId>org.springframework</groupId>
			<artifactId>spring-context-support</artifactId>
			<version>${spring.version}</version>
		</dependency>

		<dependency>
			<groupId>org.springframework</groupId>
			<artifactId>spring-test</artifactId>
			<version>${spring.version}</version>
		</dependency>
		<!-- mybatis核心包 -->
		<dependency>
			<groupId>org.mybatis</groupId>
			<artifactId>mybatis</artifactId>
			<version>${mybatis.version}</version>
		</dependency>
		<!-- mybatis/spring包 -->
		<dependency>
			<groupId>org.mybatis</groupId>
			<artifactId>mybatis-spring</artifactId>
			<version>1.2.2</version>
		</dependency>
		<!-- 导入java ee jar 包 -->
		<dependency>
			<groupId>javax</groupId>
			<artifactId>javaee-api</artifactId>
			<version>7.0</version>
		</dependency>
		<!-- 导入Mysql数据库链接jar包 -->
		<dependency>
			<groupId>mysql</groupId>
			<artifactId>mysql-connector-java</artifactId>
			<version>5.1.30</version>
		</dependency>
		<!-- 导入dbcp的jar包,用来在applicationContext.xml中配置数据库 -->
		<dependency>
			<groupId>commons-dbcp</groupId>
			<artifactId>commons-dbcp</artifactId>
			<version>1.2.2</version>
		</dependency>
		<!-- JSTL标签类 -->
		<dependency>
			<groupId>jstl</groupId>
			<artifactId>jstl</artifactId>
			<version>1.2</version>
		</dependency>
		<!-- 日志文件管理包 -->
		<!-- log start -->
		<dependency>
			<groupId>log4j</groupId>
			<artifactId>log4j</artifactId>
			<version>${log4j.version}</version>
		</dependency>


		<!-- 格式化对象,方便输出日志 -->
		<dependency>
			<groupId>com.alibaba</groupId>
			<artifactId>fastjson</artifactId>
			<version>1.1.41</version>
		</dependency>


		<dependency>
			<groupId>org.slf4j</groupId>
			<artifactId>slf4j-api</artifactId>
			<version>${slf4j.version}</version>
		</dependency>

		<dependency>
			<groupId>org.slf4j</groupId>
			<artifactId>slf4j-log4j12</artifactId>
			<version>${slf4j.version}</version>
		</dependency>
		<!-- log end -->
		<!-- 映入JSON -->
		<dependency>
			<groupId>org.codehaus.jackson</groupId>
			<artifactId>jackson-mapper-asl</artifactId>
			<version>1.9.13</version>
		</dependency>
		<!-- 上传组件包 -->
		<dependency>
			<groupId>commons-fileupload</groupId>
			<artifactId>commons-fileupload</artifactId>
			<version>1.3.1</version>
		</dependency>
		<dependency>
			<groupId>commons-io</groupId>
			<artifactId>commons-io</artifactId>
			<version>2.4</version>
		</dependency>
		<dependency>
			<groupId>commons-codec</groupId>
			<artifactId>commons-codec</artifactId>
			<version>1.9</version>
		</dependency>


	</dependencies>
3:spring使用
- 普通xml的基础头文件
<?xml version="1.0" encoding="UTF-8"?>
<beans xmlns="http://www.springframework.org/schema/beans"
       xmlns:xsi="http://www.w3.org/2001/XMLSchema-instance"
       xsi:schemaLocation="http://www.springframework.org/schema/beans
           http://www.springframework.org/schema/beans/spring-beans-2.5.xsd">

  <bean id="..." class="...">
    <!-- collaborators and configuration for this bean go here -->
  </bean>

  <bean id="..." class="...">
    <!-- collaborators and configuration for this bean go here -->
  </bean>

  <!-- more bean definitions go here -->

</beans>
注入p命名空间的头文件
<beans xmlns="http://www.springframework.org/schema/beans"
    xmlns:xsi="http://www.w3.org/2001/XMLSchema-instance"
    xmlns:p="http://www.springframework.org/schema/p"
    xmlns:p="http://www.springframework.org/schema/c"
    xsi:schemaLocation="http://www.springframework.org/schema/beans
        http://www.springframework.org/schema/beans/spring-beans-2.5.xsd">

    <bean name="john-classic" class="com.example.Person">
        <property name="name" value="John Doe"/>
        <property name="spouse" ref="jane"/>
    </bean>

    <bean name="john-modern"
        class="com.example.Person"
        p:name="John Doe"
        p:spouse-ref="jane"/>

    <bean name="jane" class="com.example.Person">
        <property name="name" value="Jane Doe"/>
    </bean>
</beans>
p:就是省略了<property>标签适合于set注入的方法 C:是适合于构造注入的方法
2:bean为什么能实例化对象
因为创建对象的的过程交给了xml来处理,采用的实际技术是使用反射的原理,即通过xml找到全限定名,然后加载类,最后使用反射。
id=对象的变量名,class=new 类型();
四:创建spring项目
在普通的maven项目中加入
<!--       spring框架的包-->
    <dependency>
        <groupId>org.springframework</groupId>
        <artifactId>spring-webmvc</artifactId>
        <version>5.2.0.RELEASE</version>
    </dependency>
然后删除src那么就可以创建modul了
目的是为了在同一个maven中建立多个项目可以使用了

五:支持注解的方式
<?xml version="1.0" encoding="UTF-8"?>
<beans xmlns="http://www.springframework.org/schema/beans"
       xmlns:xsi="http://www.w3.org/2001/XMLSchema-instance"
       xmlns:context="http://www.springframework.org/schema/context"
       xsi:schemaLocation="http://www.springframework.org/schema/beans
           http://www.springframework.org/schema/beans/spring-beans-2.5.xsd
           http://www.springframework.org/schema/context
           http://www.springframework.org/schema/context/spring-context-2.5.xsd">

     <context:annotation-config/>

</beans>
@Autowired是通过byname
@Resource是默认byname如果找不到就按照byType
正常情况是放在属性上面就可以了
六:动态代理,所代理的类是接口并非是实现接口的类
万能的代理类
package chen.cheng.proxy;

import java.lang.reflect.InvocationHandler;
import java.lang.reflect.Method;
import java.lang.reflect.Proxy;

public class ProxyInvocationHandler implements InvocationHandler {
//被代理的接口
    private Object target;
    public void setTarget(Object target)
    {
        this.target=target;
    }

    //生成得到代理类
    public Object getProxy(){
      return   Proxy.newProxyInstance(this.getClass().getClassLoader(),target.getClass().getInterfaces(),this);

    }

   //处理代理实列,调用代理类的方法并返回结果
    public Object invoke(Object proxy, Method method, Object[] args) throws Throwable {
        Object invoke = method.invoke(target, args);
//        fun(method.getName());
        return invoke;
    }

//    public void fun(String addr){
//
//        System.out.println("你所住的地址是"+addr);
//    }
}
七:AOP
需要实现依赖
<dependency> <groupId>org.aspectj</groupId> <artifactId>aspectjweaver</artifactId> <version>1.8.10</version> </dependency>动态代理的xml约束条件在xml中是不能接口而是接口的实现类
<?xml version="1.0" encoding="UTF-8"?>
<beans xmlns="http://www.springframework.org/schema/beans"
       xmlns:xsi="http://www.w3.org/2001/XMLSchema-instance"
       xmlns:context="http://www.springframework.org/schema/context"
       xmlns:aop="http://www.springframework.org/schema/aop"
       xsi:schemaLocation="http://www.springframework.org/schema/beans
           http://www.springframework.org/schema/beans/spring-beans-2.5.xsd
           http://www.springframework.org/schema/context http://www.springframework.org/schema/context/spring-context-2.5.xsd
           http://www.springframework.org/schema/aop http://www.springframework.org/schema/aop/spring-aop-2.5.xsd">
</bens>
八:代码自动生成器
package com.chen;

import com.baomidou.mybatisplus.annotation.DbType;
import com.baomidou.mybatisplus.generator.AutoGenerator;
import com.baomidou.mybatisplus.generator.config.DataSourceConfig;
import com.baomidou.mybatisplus.generator.config.GlobalConfig;
import com.baomidou.mybatisplus.generator.config.PackageConfig;
import com.baomidou.mybatisplus.generator.config.StrategyConfig;
import com.baomidou.mybatisplus.generator.config.rules.NamingStrategy;

/**
 * @author chen
 * @date @{DATE} -10:20
 **/
public class GenerateTest {
    public static void main(String[] args) {
        //创建generator对象
        AutoGenerator autoGenerator = new AutoGenerator();
        //数据源
        DataSourceConfig dataSourceConfig = new DataSourceConfig();
        dataSourceConfig.setDbType(DbType.MYSQL);
        dataSourceConfig.setDriverName("com.mysql.cj.jdbc.Driver");
        dataSourceConfig.setUsername("root");
        dataSourceConfig.setPassword("chen1998");
        dataSourceConfig.setUrl("jdbc:mysql://localhost:3306/test");
        autoGenerator.setDataSource(dataSourceConfig);
        //全局配置
        GlobalConfig globalConfig = new GlobalConfig();
        globalConfig.setOutputDir(System.getProperty("user.dir")+"/src/main/java");
        globalConfig.setAuthor("admin");
        globalConfig.setOpen(false);
        globalConfig.setServiceName("%sService");
        autoGenerator.setGlobalConfig(globalConfig);
        //包信息
        PackageConfig packageConfig = new PackageConfig();
        packageConfig.setParent("com.chen");
        packageConfig.setEntity("entity");
        packageConfig.setMapper("mapper");
        packageConfig.setService("service");
        packageConfig.setServiceImpl("service.impl");
        packageConfig.setController("controller");
        autoGenerator.setPackageInfo(packageConfig);
        //策略配置
        StrategyConfig strategyConfig = new StrategyConfig();
        strategyConfig.setInclude("fruit");
        strategyConfig.setNaming(NamingStrategy.underline_to_camel);
        strategyConfig.setColumnNaming(NamingStrategy.underline_to_camel);
        strategyConfig.setEntityLombokModel(true);
        autoGenerator.setStrategy(strategyConfig);
        //运行
        autoGenerator.execute();
    }
}
九:mybatis配置
spring:
  datasource:
    url: jdbc:mysql://localhost:3306/test11
    username: root
    password: 123456
    driver-class-name: com.mysql.cj.jdbc.Driver
mybatis-plus:
  configuration:
    log-impl: org.apache.ibatis.logging.stdout.StdOutImpl
  mapper-locations: classpath:com/southwind/mapper/xml/*.xml
server:
  port: 8181
十:跨越问题
package com.southwind.configuration;

import org.springframework.context.annotation.Configuration;
import org.springframework.web.servlet.config.annotation.CorsRegistry;
import org.springframework.web.servlet.config.annotation.WebMvcConfigurer;

@Configuration
public class CrosConfiguration implements WebMvcConfigurer {

    @Override
    public void addCorsMappings(CorsRegistry registry) {
        registry.addMapping("/**")
                .allowedOriginPatterns("*")
                .allowedMethods("GET", "HEAD", "POST", "PUT", "DELETE", "OPTIONS")
                .allowCredentials(true)
                .maxAge(3600)
                .allowedHeaders("*");
    }

}
十一:前端中从后端进行拿数据
created() {
    let _this=this
    axios.get('http://localhost:8181/fruit/list').then(function (response){
_this.tableData=response.data
    })
},
十二:与图片进行绑定
<template slot-scope="scope">
    <img :src="scope.row.icon" style="height: 70px"/>
</template>
十三:将前端数据传入后端(删除数据+弹框)
 fruitDelete(row) {
    let _this=this
      this.$confirm('是否确定要删除'+row.name+'?','删除数据',{
        confirmButtonText: '确定',
        cancelButtonText: '取消',
        type :'warning'
      }).then(()=>{
        axios.delete('http://localhost:8181/fruit/fruitDelete/'+row.id).then(function (resq){
          if (resq.data){
         _this.$alert(row.name+'删除成功','删除数据',{
    confirmButtonText:'确定',
    callback:action => {
      local.reload()
    }
  });
}
        })
      }).catch(()=>{

      })

    }
  },
十四:shiro的综合使用
用户制定realm
package com.chen.shopping.shiro;

import com.chen.shopping.pojo.Users;
import com.chen.shopping.service.UserService;
import com.xiaoleilu.hutool.crypto.SecureUtil;
import org.apache.shiro.SecurityUtils;
import org.apache.shiro.authc.*;
import org.apache.shiro.authz.AuthorizationInfo;
import org.apache.shiro.authz.SimpleAuthorizationInfo;
import org.apache.shiro.realm.AuthorizingRealm;
import org.apache.shiro.subject.PrincipalCollection;
import org.apache.shiro.subject.Subject;
import org.springframework.beans.factory.annotation.Autowired;

/**
 * @功能描述:TODO
 * @创建日期: 2019/2/22 18:56
 */
public class UserRealm extends AuthorizingRealm {

    @Autowired
    private UserService userService;

    /**
     * 执行授权逻辑
     */
    @Override
    protected AuthorizationInfo doGetAuthorizationInfo(PrincipalCollection principalCollection) {
        //给资源进行授权
        //获取当前登录用户
        Subject subject = SecurityUtils.getSubject();
        Users user = (Users)subject.getPrincipal();

//设置角色
Set<String> roles=new HashSet();
roles.add(user.getRole());
SimpleAuthorizationInfo info = new SimpleAuthorizationInfo();

//设置权限
info.addStringPermission(user.getPerm());

        return info;
    }


    /**
     * 执行认证逻辑
     */
    @Override
    protected AuthenticationInfo doGetAuthenticationInfo(AuthenticationToken authenticationToken) throws AuthenticationException {


        UsernamePasswordToken token  =  (UsernamePasswordToken)authenticationToken;
        Users user = userService.getUserByName(token.getUsername());
        if(user == null){
            return null; //shiro底层会抛出UnKnowAccountException
        }
        //2、判断密码, 这里的user是principal
      return new SimpleAuthenticationInfo(user,user.getPassword(),getName());
    }


}
(2)配置
package com.chen.shopping.config;

import at.pollux.thymeleaf.shiro.dialect.ShiroDialect;
import com.chen.shopping.property.RedisProperties;
import com.chen.shopping.redis.CustomRedisManager;
import com.chen.shopping.service.UserService;
import com.chen.shopping.shiro.CredentialsMatcher;
import com.chen.shopping.shiro.RetryLimitCredentialsMatcher;
import com.chen.shopping.shiro.UserRealm;
import org.apache.shiro.codec.Base64;
import org.apache.shiro.spring.web.ShiroFilterFactoryBean;
import org.apache.shiro.util.ThreadContext;
import org.apache.shiro.web.mgt.CookieRememberMeManager;
import org.apache.shiro.web.mgt.DefaultWebSecurityManager;
import org.apache.shiro.web.servlet.SimpleCookie;
import org.apache.shiro.web.session.mgt.DefaultWebSessionManager;
import org.crazycake.shiro.RedisCacheManager;
import org.crazycake.shiro.RedisManager;
import org.crazycake.shiro.RedisSessionDAO;
import org.springframework.beans.factory.annotation.Autowired;
import org.springframework.beans.factory.annotation.Qualifier;
import org.springframework.context.annotation.Bean;
import org.springframework.context.annotation.Configuration;

import java.util.LinkedHashMap;
import java.util.Map;

/**
 * @功能描述:Shiro配置类
 * @创建日期: 2019/2/22 18:46
 */
@Configuration
public class NewShiroConfig {
//    @Autowired
//    private UserService userService;
    /**
     * 创建ShiroFilterFactoryBean
     * shiro过滤bean
     */
    @Bean
    public ShiroFilterFactoryBean getShiroFilterFactoryBean(@Qualifier("securityManager") DefaultWebSecurityManager securityManager){
        ShiroFilterFactoryBean shiroFilterFactoryBean = new ShiroFilterFactoryBean();

        // 设置安全管理器
        shiroFilterFactoryBean.setSecurityManager(securityManager);

        // 添加Shiro内置过滤器
        /**
         * Shiro内置过滤器,可以实现权限相关的拦截器
         *  常用的过滤器:
         *      anon: 无需认证(登录)可以访问
         *      authc: 必须认证才可以访问
         *      user: 如果使用rememberMe功能可以直接访问
         *      perms: 该资源必须得到资源权限才可以访问
         *      role: 该资源必须得到角色权限才可以访问
         */

        Map<String, String> filerMap = new LinkedHashMap<>(); //顺序的map

        //配置记住我或认证通过可以访问的地址
        filerMap.put("/Book/adminBooks", "user");
        //如果没有拦截,默认会跳转到login.jsp,可以通过setLoginUrl设置登录页面

        filerMap.put("/wx/**","anon");
        filerMap.put("/users/addUsers","anon");
        filerMap.put("/users/toRegister","anon");
        filerMap.put("/users/newRegister","anon");

        filerMap.put("/user/login","anon");
        filerMap.put("/user/logininform","anon");
        filerMap.put("/user/getImage","anon");

        filerMap.put("/image/**","anon");
        filerMap.put("/file/**","anon");
        filerMap.put("/users/**","anon");
        filerMap.put("/Book/**", "anon");
        filerMap.put("/shopping/**","anon");
        filerMap.put("/css/**","anon");
        filerMap.put("/fonts/**","anon");
        filerMap.put("/js","anon");
        filerMap.put("https://www.amazon.cn/gp/bestsellers/digital-text/116169071","anon");
        //授权过滤器
        filerMap.put("/**","user");
        //设置登录的页面,发送toLogin请求
        shiroFilterFactoryBean.setLoginUrl("/user/login");
        //设置未授权的页面
        shiroFilterFactoryBean.setUnauthorizedUrl("/user/403");
        //设置过滤器
        shiroFilterFactoryBean.setFilterChainDefinitionMap(filerMap);


        return shiroFilterFactoryBean;
    }

    /**
     * 创建DefaultWebSecurityManager
     */
    @Bean(name = "securityManager")
    public DefaultWebSecurityManager getDefaultWebSecurityManager(@Qualifier("userRealm") UserRealm userRealm){
        DefaultWebSecurityManager securityManager = new DefaultWebSecurityManager();
        // 关联realm
        securityManager.setRealm(userRealm);
        return securityManager;
    }

    /**
     * 创建Realm
     */
    @Bean(name = "userRealm")
    public UserRealm getRealm(@Qualifier("credentialsMatcher") RetryLimitCredentialsMatcher credentialsMatcher){
        UserRealm shiroRealm = new UserRealm();
        return  shiroRealm;
    }


    /**
     * 配置ShiroDialect,用于thymeleaf和shiro标签配合使用
     */
    @Bean
    public ShiroDialect getShiroDialect(){
        return new ShiroDialect();
    }


}
3:利用shiro的方言,进行页面是权限控制与展现
需要的依赖
<dependency>
<groupId>com.github.theborakompanioni</groupId>
<artifactId>thymeleaf-extras-shiro</artifactId>
<version>2.0.0</version>
</dependency>
在html的标签中加
<html lang="en" xmlns:th="http://www.thymeleaf.org" xmlns:shiro="http://www.thymeleaf.org/thymeleaf-extras-shiro">代码
<div shiro:hasPermission="manage"> <a href="/manage">manage</a></div></br>
<div shiro:hasRole="administrator"> <a href="/administrator">administrator</a>


 1万+
1万+


 被折叠的 条评论
为什么被折叠?
被折叠的 条评论
为什么被折叠?
 到【灌水乐园】发言


