


前言
最近入坑了搭载10元超便宜全志F1C100S的荔枝派Nano(入坑晚了导致痛失58大洋),考虑到之后还会用同系列芯片做其它项目,还是忍痛购入了超高价配套屏幕以确保验证其开发Linux应用的可行性,断断续续做了两三天,踩了不少坑,终于小有所成,本着崇高的互联网精神,决定把近期摸索出的可行流程分享给诸位爱好捡垃圾的嵌友。
一、安装依赖
参考Sipeed官方文档,在实际调试过程中,完全按照官方文档的流程可能会出现一些依赖的缺失,所以在这里都列出来了。
sudo apt-get install gcc make cmake rsync wget unzip build-essential git bc swig libncurses-dev libpython3-dev libssl-dev python3-distutils android-tools-mkbootimg -y
sudo apt install vim python python-dev
二、从u-boot启动
1、安装交叉编译链
wget http://releases.linaro.org/components/toolchain/binaries/7.2-2017.11/arm-linux-gnueabi/gcc-linaro-7.2.1-2017.11-x86_64_arm-linux-gnueabi.tar.xz
tar -vxJf gcc-linaro-7.2.1-2017.11-x86_64_arm-linux-gnueabi.tar.xz
sudo cp -r ./gcc-linaro-7.2.1-201711-x86_64_arm-linux-gnueabi /opt/
sudo vim /etc/bash.bashrc
添加环境变量:
PATH="$PATH:/opt/gcc-linaro-7.2.1-2017.11-x86_64_arm-linux-gnueabi/bin"
使路径生效:
source /etc/bash.bashrc
可使用arm-linux-gnueabi-gcc -v检验工具链是否安装成功。
2、编译u-boot
sudo apt-get install git
git clone https://gitee.com/LicheePiNano/u-boot.git
cd u-boot
git branch -a
git checkout nano-lcd800480
make ARCH=arm CROSS_COMPILE=arm-linux-gnueabi- f1c100s_nano_defconfig
make ARCH=arm menuconfig
这里若使用800*480分辨率的屏幕,可直接使用默认配置,否则请参照官方u-boot文档在图形化界面中更改配置。
我们是从TF启动Linux,因此要在menuconfig中将boot args修改为:
console=ttyS0,115200 panic=5 rootwait root=/dev/mmcblk0p2 rw vt.global_cursor_default=0
打开uboot/include/suniv.h,将原有宏定义注释,并添加:
#define CONFIG_BOOTCOMMAND   "setenv bootm_boot_mode sec; "                           \
                     "load mmc 0:1 0x80C00000 suniv-f1c100s-licheepi-nano.dtb; "  \
                     "load mmc 0:1 0x80008000 zImage; " \
                     "bootz 0x80008000 - 0x80C00000;"
使用交叉编译器进行编译(可以根据自己设备修改编译线程数):
make ARCH=arm CROSS_COMPILE=arm-linux-gnueabi- -j8
将编译好的二进制文件写入TF卡固定偏移处(参考坑网):
sudo dd if=u-boot-sunxi-with-spl.bin of=/dev/sdb bs=1024 seek=8
三、主线Linux编译
git clone --depth=1 -b master https://gitee.com/LicheePiNano/Linux.git
make ARCH=arm f1c100s_nano_linux_defconfig
make ARCH=arm CROSS_COMPILE=arm-linux-gnueabi- -j8
make ARCH=arm CROSS_COMPILE=arm-linux-gnueabi- -j8 INSTALL_MOD_PATH=out modules
make ARCH=arm CROSS_COMPILE=arm-linux-gnueabi- -j8 INSTALL_MOD_PATH=out modules_install
内核img文件:./arch/arm/boot/zImage
设备树dtb文件:./arch/arm/boot/dts/suniv-f1c100s-licheepi-nano.dtb
modules文件夹:./out/lib/modules
建议在编译根文件系统后,将这个modules文件夹移入根文件系统/lib下。
将TF卡现有分区全部删除,新建如下两个分区:

将zImage复制到TF卡第一分区中。
四、设备树添加电阻屏节点
在Linux/drivers/input/touchscreen文件夹下新建ns2009.c,并复制以下内容(参考荔枝派zero驱动):
/*
 * Nsiway NS2009 touchscreen controller driver
 *
 * Copyright (C) 2017 Icenowy Zheng <icenowy@aosc.xyz>
 *
 * Some codes are from silead.c, which is
 *   Copyright (C) 2014-2015 Intel Corporation
 *
 * This program is free software; you can redistribute it and/or modify
 * it under the terms of the GNU General Public License as published by
 * the Free Software Foundation; either version 2 of the License, or
 * (at your option) any later version.
 *
 * This program is distributed in the hope that it will be useful,
 * but WITHOUT ANY WARRANTY; without even the implied warranty of
 * MERCHANTABILITY or FITNESS FOR A PARTICULAR PURPOSE. See the
 * GNU General Public License for more details.
 */

#include <linux/kernel.h>
#include <linux/module.h>
#include <linux/input.h>
#include <linux/input-polldev.h>
#include <linux/input/touchscreen.h>
#include <linux/i2c.h>

/* polling interval in ms */
#define POLL_INTERVAL	30

/* this driver uses 12-bit readout */
#define MAX_12BIT	0xfff

#define NS2009_TS_NAME	"ns2009_ts"

#define NS2009_READ_X_LOW_POWER_12BIT	0xc0
#define NS2009_READ_Y_LOW_POWER_12BIT	0xd0
#define NS2009_READ_Z1_LOW_POWER_12BIT	0xe0
#define NS2009_READ_Z2_LOW_POWER_12BIT	0xf0

#define NS2009_DEF_X_FUZZ	32
#define NS2009_DEF_Y_FUZZ	16

/*
 * The chip have some error in z1 value when pen is up, so the data read out
 * is sometimes not accurately 0.
 * This value is based on experiements.
 */
#define NS2009_PEN_UP_Z1_ERR	80

struct ns2009_data {
	struct i2c_client		*client;
	struct input_dev		*input;

	struct touchscreen_properties	prop;

	bool				pen_down;
};

static int ns2009_ts_read_data(struct ns2009_data *data, u8 cmd, u16 *val)
{
	u8 raw_data[2];
	int error;

	error = i2c_smbus_read_i2c_block_data(data->client, cmd, 2, raw_data);
	if (error < 0)
		return error;

	if (unlikely(raw_data[1] & 0xf))
		return -EINVAL;

	*val = (raw_data[0] << 4) | (raw_data[1] >> 4);

	return 0;
}

static int ns2009_ts_report(struct ns2009_data *data)
{
	u16 x, y, z1;
	int ret;

	/*
	 * NS2009 chip supports pressure measurement, but currently it needs
	 * more investigation, so we only use z1 axis to detect pen down
	 * here.
	 */
	ret = ns2009_ts_read_data(data, NS2009_READ_Z1_LOW_POWER_12BIT, &z1);
	if (ret)
		return ret;

	if (z1 >= NS2009_PEN_UP_Z1_ERR) {
		ret = ns2009_ts_read_data(data, NS2009_READ_X_LOW_POWER_12BIT, &x);
		if (ret)
			return ret;

		ret = ns2009_ts_read_data(data, NS2009_READ_Y_LOW_POWER_12BIT, &y);
		if (ret)
			return ret;

		if (!data->pen_down) {
			input_report_key(data->input, BTN_TOUCH, 1);
			data->pen_down = true;
		}

		input_report_abs(data->input, ABS_X, x);
		input_report_abs(data->input, ABS_Y, y);
		input_sync(data->input);
	} else if (data->pen_down) {
		input_report_key(data->input, BTN_TOUCH, 0);
		input_sync(data->input);
		data->pen_down = false;
	}
	return 0;
}

static void ns2009_ts_poll(struct input_polled_dev *dev)
{
	struct ns2009_data *data = dev->private;
	int ret;

	ret = ns2009_ts_report(data);
	if (ret)
		dev_err(&dev->input->dev, "Poll touch data failed: %d\n", ret);
}

static void ns2009_ts_config_input_dev(struct ns2009_data *data)
{
	struct input_dev *input = data->input;

	input_set_abs_params(input, ABS_X, 0, MAX_12BIT, NS2009_DEF_X_FUZZ, 0);
	input_set_abs_params(input, ABS_Y, 0, MAX_12BIT, NS2009_DEF_Y_FUZZ, 0);
	touchscreen_parse_properties(input, false, &data->prop);

	input->name = NS2009_TS_NAME;
	input->phys = "input/ts";
	input->id.bustype = BUS_I2C;
	input_set_capability(input, EV_KEY, BTN_TOUCH);
}

static int ns2009_ts_request_polled_input_dev(struct ns2009_data *data)
{
	struct device *dev = &data->client->dev;
	struct input_polled_dev *polled_dev;
	int error;

	polled_dev = devm_input_allocate_polled_device(dev);
	if (!polled_dev) {
		dev_err(dev,
			"Failed to allocate polled input device\n");
		return -ENOMEM;
	}
	data->input = polled_dev->input;

	ns2009_ts_config_input_dev(data);
	polled_dev->private = data;
	polled_dev->poll = ns2009_ts_poll;
	polled_dev->poll_interval = POLL_INTERVAL;

	error = input_register_polled_device(polled_dev);
	if (error) {
		dev_err(dev, "Failed to register polled input device: %d\n", error);
		return error;
	}

	return 0;
}

static int ns2009_ts_probe(struct i2c_client *client,
			   const struct i2c_device_id *id)
{
	struct ns2009_data *data;
	struct device *dev = &client->dev;
	int error;

	if (!i2c_check_functionality(client->adapter,
				     I2C_FUNC_I2C |
				     I2C_FUNC_SMBUS_READ_I2C_BLOCK |
				     I2C_FUNC_SMBUS_WRITE_I2C_BLOCK)) {
		dev_err(dev, "I2C functionality check failed\n");
		return -ENXIO;
	}

	data = devm_kzalloc(dev, sizeof(*data), GFP_KERNEL);
	if (!data)
		return -ENOMEM;

	i2c_set_clientdata(client, data);
	data->client = client;

	error = ns2009_ts_request_polled_input_dev(data);
	if (error)
		return error;

	return 0;
};

static const struct i2c_device_id ns2009_ts_id[] = {
	{ "ns2009", 0 },
	{ }
};
MODULE_DEVICE_TABLE(i2c, ns2009_ts_id);

static struct i2c_driver ns2009_ts_driver = {
	.probe = ns2009_ts_probe,
	.id_table = ns2009_ts_id,
	.driver = {
		.name = NS2009_TS_NAME,
	},
};
module_i2c_driver(ns2009_ts_driver);
在同目录下的Makefile中添加:
obj-$(CONFIG_TOUCHSCREEN_NS2009) += ns2009.o
Kconfig中添加以下代码,并在menuconfig中使能驱动:
config TOUCHSCREEN_NS2009
	tristate "Nsiway NS2009 touchscreen"
	depends on I2C
	select INPUT_POLLDEV
	help
	  Say Y here to enable Nsiway NS2009 resistive touchscreen
	  controller support.

	  If unsure, say N.

	  To compile this driver as a module, choose M here: the
	  module will be called ns2009.
向设备树配置文件suniv-f1c100s-licheepi-nano.dts中添加节点如下:
&i2c0 {
    pinctrl-0 = <&i2c0_pins>;
    pinctrl-names = "default";
    status = "okay";

	ns2009: ns2009@48 {
		compatible = "nsiway,ns2009";
		reg = <0x48>;
	};
};
并在头文件suniv.dtsi中soc下添加:
i2c0: i2c@1C27000 {
    compatible = "allwinner,sun6i-a31-i2c";
	reg = <0x01C27000 0x400>;
	interrupts = <7>;
	clocks = <&ccu CLK_BUS_I2C0>;
	resets = <&ccu RST_BUS_I2C0>;
	pinctrl-names = "default";
	pinctrl-0 = <&i2c0_pins>;
	status = "disabled";
	#address-cells = <1>;
	#size-cells = <0>;
};
并在pio下添加(参考原理图):
i2c0_pins: i2c0 {
	pins = "PE11", "PE12";
	function = "i2c0";
};
编译生成设备树文件:
make ARCH=arm CROSS_COMPILE=arm-linux-gnueabi- dtbs -j8
将suniv-f1c100s-licheepi-nano.dtb复制到TF卡第一分区中。
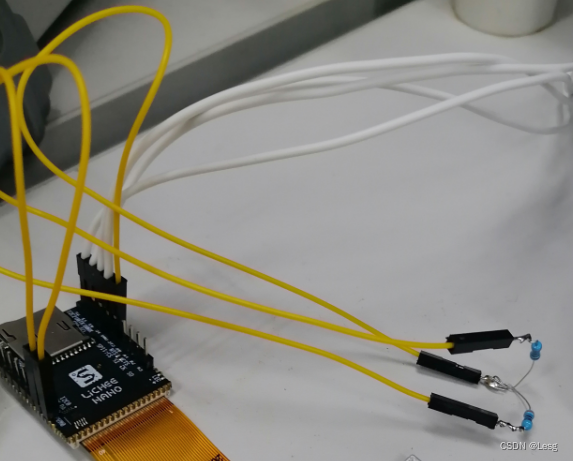
ps:这个时候就会有朋友来问了,为啥跟着你一步一步走,驱动还是不能用嘞?答案是荔枝派Nano的板子设计存在一点小bug,I2C总线居然没有上拉电阻,于是我就给他飞了一个,杜邦线即插即用,非常优雅~
五、根文件系统编译
apt-get install linux-headers-$(uname -r)
wget https://buildroot.org/downloads/buildroot-2021.02.4.tar.gz
tar xvf buildroot-2021.02.4.tar.gz
cd buildroot-2021.02.4/
make menuconfig
以下选项为基础配置(参考Licheepi官方配置):
- Target options
  - Target Architecture (ARM (little endian))
  - Target Variant arm926t
- Toolchain
  - C library (musl) # 使用musl减小最终体积
- System configuraton
  - Use syslinks to /usr .... # 启用/bin, /sbin, /lib的链接
  - Enable root login # 启用root登录
  - Run a getty after boot # 启用登录密码输入窗口
  - (licheepi) Root password # 默认账户为root 密码为licheepi
- Target packages
  - Networking applications
    -[*]lrzsz # 启用rz,sz命令
非常建议进行最后一步配置,因为荔枝派是没有网口的(虽然官方提供了可以插到TF卡槽里的网卡,但如果用了那个本文就完全没有意义了),如果不想每次传文件都要关机拔卡再插卡再拔卡再插卡的话,有个串口传输文件的软件还是非常方便的。
在.config文件生成后,可将其中软件包换源,亲测可以提高速度(国内):
BR2_BACKUP_SITE="http://sources.buildroot.net"
BR2_KERNEL_MIRROR="https://mirror.bjtu.edu.cn/kernel/"
BR2_GNU_MIRROR="http://mirrors.nju.edu.cn/gnu/"
BR2_LUAROCKS_MIRROR="https://luarocks.cn"
BR2_CPAN_MIRROR="http://mirrors.nju.edu.cn/CPAN/"
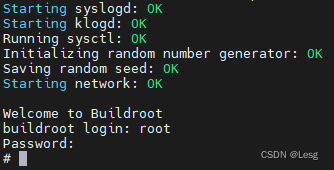
以上配置完成后,在命令行输入make,之后将buildroot2021.02.4/output/images/rootfs.tar复制到TF卡第二分区并解压,这一步完成后,就可以插卡启动Linux了,非常的神奇,非常的有趣。
后记
本文与其说是一篇博文,不如说更像一篇笔记或者开发记录,能最大程度上的帮助零基础小白搭建起相对廉价的Linux开发平台,如果有幸刷到了本文,那么恭喜你将失去了一个学习嵌入式环境搭建的绝好机会(笑),因为真的很保姆级了,有问题欢迎在下方留言,我会尽量解答的。


 2231
2231


 被折叠的 条评论
为什么被折叠?
被折叠的 条评论
为什么被折叠?
 到【灌水乐园】发言


