


Object类
Object类的介绍
- java.lang.Object类是所有类的父类。
- Object类定义了“对象”的基本“行为”,被子类继承这些行为。
- 万事万物皆对象。
- 一个类定义的时候,没有使用extends继承某个特定父类,那么该类的父类就是Object
toString
- Object类中的toString方法,用于返回对象成员变量的字符串表示。
- Object类中的toString方法的定义:
public String toString() {
return getClass().getName() + "@" + Integer.toHexString(hashCode());
} - 所有java类都有toString方法,通常会要求根据需要重写toString方法,返回更有意义的字符串。
- System.out.println(obj) 等价于 System.out.println(obj.toString())
equals
- Object类的equals方法,用于判断对象是否相等。
- Object类equals方法的定义:
自己和某个对象进行比较。
public boolean equals(Object obj) {
return (this == obj);
} - 子类中可以根据实际需求,自定义比较规则,然后重写equals方法
hashCode
- Object类的hashCode方法,根据对象的内容,返回一个整数值。
Returns a hash code value for the object。
一般重写了equals方法,就会要求重写hashCode方法。 - Object类hashCode方法的定义:
public native int hashCode();
String 类型
字符串对象不可变
- java.lang.String中封装的是字符串序列。
- String在内存中采用Unicode编码方式,一个字符两个字节的定长。
- String对象创建之后,这个对象的内容(即对象中的字符串序列不可变)不可变化。
String str = “abc”;
str = str.toUpperCase(); // 创建了新的字符串对象“ABC” ,str指向新对象。
// 引用指向的对象变了, 原来的对象“abc”不变。
System.out.println(str);// “ABC”
字符串常量池
- java中可以使用直接量,创建字符串对象。
String str = “hello world.”; - 出于性能的考虑,jvm会将这些字符串字面量对象,保存在常量池中,对于重复出现的字符串直接量,jvm优先在缓存中查找,如果存在就直接返回该对象。
String str1 = “nice to meet you .”;
String str2 = “nice to meet you .”;
System.out.println(s1 == s2) ;// true.
String str3 = new String(“nice to meet you .”);
System.out.println(s3 == s2) ;// false.
参考代码
// 字符串不可变, 常量池。
public class StringDemo1 {
public static void main(String[] args) {
String str = "hello";
String str1 = "hello1";
System.out.println(str == str1); // false
String str2 = "hello";
System.out.println(str == str2); // true
String str3 = "hello" + "1"; // 编译的时候,会对这种直接量做运算。 运算的结
果是“hello1” ,常量池存在hello1. 所以就把hello1的地址,赋值给str3.
System.out.println(str1 == str3); // true
String str4 = str2 + "1"; // 运行的时候,才会拼字符串。 和常量池
的“hello1”的地址不等。
System.out.println(str4 == str1); // false
String str5 = new String("hello"); // new的对象,不在常量池中。
System.out.println(str == str5);// false .
}
}
字符串常用方法
- 字符串对象equals方法
// String重写了父类的equals方法 // equals :字符串内容相等则为true, 否则false. // equalsIgnoreCase : 忽略大小写的比较。 public class StringDemo2 { public static void main(String[] args) { String str1 = "nice to meet you."; // ** 常用的 String str2 = new String("nice to meet you."); if(str1.equals(str2)){ System.out.println("两个字符串相等"); }else{ System.out.println("两个字符串不等"); } // 练习: 输入验证码, 忽略大小写比较。 // **equalsIgnoreCase String yzm ="YUqq10"; Scanner scanner = new Scanner(System.in); System.out.println("请输入验证码-"+yzm+":"); String userYzm = scanner.next(); if(yzm.equalsIgnoreCase(userYzm)){ System.out.println("输入正确。"); }else{ System.out.println("输入错误。"); } } } - 字符串的大小写转换,长度,以什么开始,什么结尾等方法
package seday1; import java.util.Arrays; import java.util.Locale; import java.util.Scanner; // String的一些常用方法 public class StringDemo3 { public static void main(String[] args) { String str = "nice to meet you."; // 转为全部大写 str = str.toUpperCase();// System.out.println(str); String str1 = "GOOD MORING!"; // 转为全小写 str1 = str1.toLowerCase(); System.out.println(str1); // 现在有多少个字符串对象存在?4个 // 练习: 让用户输入用户名 ,去掉用户输入的字符串前后多余的空格。 // trim:去掉字符串前后多余的空格 Scanner sc = new Scanner(System.in); System.out.println("请输入你的用户名:"); String uname = " xxx "; // sc.nextLine(); // " fjm ... "; System.out.println("你的名字:" + uname); uname = uname.trim(); System.out.println("程序去掉前后空格:" + uname); // 练习:判断 某个字符串是否以.com结尾 , www.开始 // startsWith : 以某个字符串开始。 // endsWith : 以某个字符串结束。 String bd = "www.baidu.com"; if(bd.startsWith("www.") && bd.endsWith(".com")){ System.out.println("是一个正确的域名"); } // 练习:按字符串的长度排序 // 字符串.length(): 获取到字符的长度的方法 // 数组.length : 数组的属性。 String[] strs = {"tom" , "alice" , "rose" , "tom hanks" , "hi"}; for(int i=0 ; i < strs.length ; i++){ for(int j = 0 ; j < strs.length -1 ; j ++){ // 判断是否要交换位置 if(strs[j].length() > strs[j+1].length()){ // 前面大,后面小, 需要交换位置,把大的挪到后面去。 String temp = strs[j]; strs[j] = strs[j+1]; strs[j+1] = temp; } } } System.out.println("排序后的数组:" + Arrays.toString(strs)); // 练习:把数组元素全部转换为大写。 // for(int i = 0 ; i < strs.length ; i ++){ // strs[i] = strs[i].toUpperCase(); // } // System.out.println("大写转换后的数组:" + Arrays.toString(strs)); // 练习:把数组元素全部转换为大写 ,但是原数组不变。 String[] strs1 = new String[strs.length]; for(int i = 0 ; i < strs.length ; i ++){ strs1[i] = strs[i].toUpperCase(); } System.out.println("全大写的数组:" + Arrays.toString(strs1)); System.out.println(Arrays.toString(strs).toUpperCase()); } } - 字符串的索引位置相关的方法
// indexOf(String) , indexOf(String , int) , lastIndexOf( String , int) public class StringDemo4 { public static void main(String[] args) { String str = "abctomabcdtomabcdtomabcd"; // 字符串中的每个字符都有一个对 应的索引位置。从0开始,到长度-1. // 1.找到字符串tom int index = str.indexOf("tom"); System.out.println("index:" + index); // 3. //2. 找到字符串tom 的位置,指定从第5个位置开始找。 index = str.indexOf("tom" , 5) ; System.out.println("index:" + index); // 10. /* str.indexOf(10); str.indexOf('t'); */ // 3. 最后一个tom index = str.lastIndexOf("tom"); System.out.println("index:" + index); // 17 // 4. 找到tom , 从后往前找,从16开始 index = str.lastIndexOf("tom" ,16); System.out.println("index:" + index); // 10 // 5. 找到"tom1" index = str.indexOf("tom1"); // 方法找不到,返回-1,否则返回字符串所在的索 引位置 if(index != -1){ System.out.println("index:" + index); }else{ System.out.println("没有找到这个字符串"); } // 6. 练习。统计tom在str中出现的次数 int count = 0 ; // str = "abctomabcdtomabcdtomabcd"; int i = 0 ; while (true){ if(count == 0){ i = str.indexOf("tom" , 0 ); }else{ i = str.indexOf("tom" , i+3 ); } if(i==-1){ break; } count ++; } System.out.println("count:" + count); } } - 根据索引位置,找到对应位置的字符
// charAt的使用 : 根据索引位置,找到对应位置的字符。 public class StringDemo5 { public static void main(String[] args) { String str = "abc"; char c1 = str.charAt(0) ; char c2 = str.charAt(1); char c3 = str.charAt(2); System.out.println(c1 + ":"+ c2 +":" + c3); // char c4 = str.charAt(3); // java.lang.StringIndexOutOfBoundsException: String index out of range: 3 // 练习:判断一个字符串是否为回文 String str1 = "上海自来水化来自海上"; boolean flag = true;// 标志是回文。 for(int i =0 ; i < str1.length() /2 ; i ++){ if(str1.charAt(i) != str1.charAt(str1.length()-i-1)){ //System.out.println("不是回文"); flag = false ;// 标志不是回文。 break; } } if(flag == true){ System.out.println("是回文"); }else{ System.out.println("不是回文"); } } } - 子字符串 , 获取字符串的字节数组
package seday1;
import jdk.management.resource.internal.inst.SocketOutputStreamRMHooks;
import java.io.UnsupportedEncodingException;
import java.util.Arrays;
// substring : 子字符串
// getBytes : 获取字节数组
public class StringDemo6 {
public static void main(String[] args) throws
UnsupportedEncodingException {
String str1 = "hello tom .";
// 1. 找其中的一部分
String substr = str1.substring(5);
System.out.println("substr:" + substr);
// 2. 找到tom :
substr = str1.substring(6 , 9); // tom - t对应的是6 。 m 对应的是8 ,
java中的指定索引的原则是:包含签名,不包含后面。
// 所以,这里的参数是6 ,9. 找到的是678三
个位置的字符。
System.out.println("substr:" + substr);
int begin = str1.indexOf("tom") ;// 截取子字符串的起点
int end = begin + "tom".length() ;
substr = str1.substring(begin , end);
System.out.println("substr:" + substr);
// 3. 练习: alice@qq.com , 把邮箱名找出来。
String email = "alice@qq.com";
int index = email.indexOf('@');
String emailName = email.substring(0 , index);
System.out.println(emailName);
// 4. getBytes :
// ** 字符编码方式: utf-8(3个字节代表一个中文) , gbk(2个字代表一个中文)
String str2 = "中国";
byte[] b1 = str2.getBytes() ;// 表示没有设置用什么字符编码来获取。 就看当
前文件使用的编码方式: utf-8
byte[] b2 = str2.getBytes("utf-8"); // 指定utf-8
byte[] b3 = str2.getBytes("gbk"); // 指定gbk.
System.out.println(Arrays.toString(b1)); //[-28, -72, -83, -27,
-101, -67]
System.out.println(Arrays.toString(b2)); //[-28, -72, -83, -27,
-101, -67]
System.out.println(Arrays.toString(b3)); //[-42, -48, -71, -6]
String str3 = new String(b2);
System.out.println("str3:" + str3);
String str4 = new String(b2 , "gbk"); // gbk编码,两个字节转为一个字符。
System.out.println("str4:" + str4); // str4:涓
正则表达式
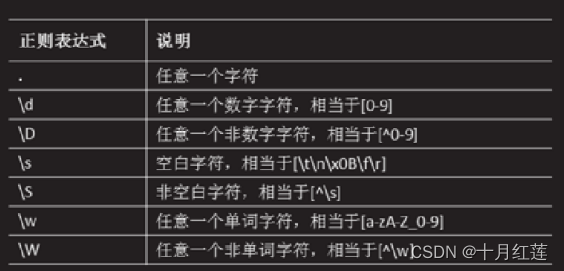
正则表达式介绍
- 正则表达式是一个特殊的字符串,是由一些特定的字符串组成的“规则字符串”。
- 正则表达式,主要用于对字符串进行匹配,查找,替换等操作。
- 正则表达式的规则:
可以出现的字符
 可以出现的字符简写
字符出现的次数限定

其它规定
String中正则表达式的使用
- split方法把字符串按照指定的分隔符,分割为字符串数组。

- String提供了用于字符串替换的方法

StringBuffer & StringBuilder
StringBuilder
- StringBuilder封装可变的字符串, StringBuilder对象创建后,可以通过调用方法,修改字符串的内容。
- StringBuilder构造器函数
public StringBuilder();
public StringBuilder(String str);
- StringBuilder提供的操作字符串的方法: append , insert , delete , replace,reverse等。
- StringBuilder提供的很多方法,返回值是StringBuilder (return this ) , 所以支持链式操作: StringBuilder sb = new StringBuilder(“a”);
sb.append(“b”).append(“b”)........
StringBuffer
- StringBuffer封装可变的字符串, StringBuffer对象创建后,可以通过调用方法,修改字符串的内容。
- StringBuffer构造器函数
public StringBuffer();
public StringBuffer(String str); - StringBuffer提供的操作字符串的方法: append , insert , delete , replace,reverse等。
- StringBuffer提供的很多方法,返回值是StringBuffer(return this ) , 所以支持链式操作: StringBuffersb = new StringBuffer(“a”);
sb.append(“b”).append(“b”)........
Date & SimpleDateFormat
Date
- java.util.Date用于封装日期和时间信息。
- Date date = new Date();
date中的日期为系统的当前时间。
重写了toString方法,输出内容为日期。 - Date类中大多数用于操作时间分量的方法都被Calendar取代。
- Date中的getTime , setTime方法是用于获取/设置时间毫秒数
SimpleDateFormat
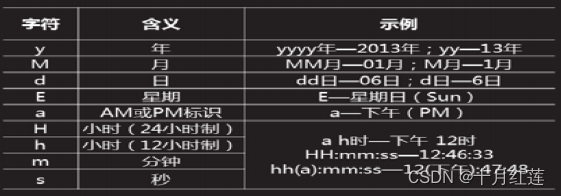
- 将日期类型,格式化为指定日期表示的字符串。
- 将符合日期格式的字符串,解析为日期类型。
- 日期符号: yyyy 年, MM 月 , dd , 日 , 时间: HH 小时, hh小时, mm , 分, ss 秒
Calendar
- java.util.Calendar类,用于封装日历信息,包含了日期,主要用于操作时间分量。
- Calendar是抽象类, 可以通过其工厂方法获取到其子类的对象。
- java.util.GregorianCalendar是Calendar的最主要使用的实现类,其对应世界上大多数国家/地区使用的标准日历。
获取时间分量:get
// Calendar :抽象类。日历
public class CalendarDemo {
public static void main(String[] args) {
// 1. 创建对象
Calendar c1 = Calendar.getInstance();
System.out.println("c1:" + c1);
Calendar c2 = new GregorianCalendar();
System.out.println("c2:" + c2);
// 2. 获取时间分量(年,月,日,时分秒,周几.....)
int year = c1.get(Calendar.YEAR); // public final static int YEAR = 1;
// c1.get(1)--获取年; ** 不推荐
int month = c1.get(Calendar.MONTH); // 月: 0 ~11 ,代表1~12月。
int day = c1.get(Calendar.DATE);
int hour = c1.get(Calendar.HOUR_OF_DAY); // HOUR_OF_DAY (24小时制) ,
HOUR(12小时)
int min = c1.get(Calendar.MINUTE);
int second = c1.get(Calendar.SECOND);
int week = c1.get(Calendar.DAY_OF_WEEK); // 周日 周1~周5 周六 : 1~7
// ?: 三目运算
String wk = week == 1? "周日": "周"+(week-1);
System.out.println( year +"-"+ (month+1) +"-"+day +" " + hour +":"+min
+":"+second + " " + wk);
}
}设置时间分量:set
// Calendar :抽象类。日历
public class CalendarDemo {
public static void main(String[] args) {
// 1. 创建对象
Calendar c2 = new GregorianCalendar();
// 3. 设置时间分量 : 2021-11-11 12:00:00
//c2.set(2021, 10 , 11 , 12 ,00,00);
c2.set(Calendar.YEAR , 2021);
c2.set(Calendar.MONTH , 10);
c2.set(Calendar.DAY_OF_MONTH , 11);
c2.set(Calendar.HOUR_OF_DAY , 12);
System.out.println(c2);
}
}增加时间分量:add
package seday2;
import java.text.SimpleDateFormat;
import java.util.Calendar;
import java.util.GregorianCalendar;
// 通过add方法,实现对世间分量的增加操作。
// ** add: 原有时间上做增加(减少)
// set: 直接设置为某个指定的时间
// get: 获取时间分量的
public class CalendarDemo4 {
public static void main(String[] args) {
// 2021-10-10
Calendar c = new GregorianCalendar(2021,9,10);
SimpleDateFormat sdf = new SimpleDateFormat("yyyy-MM-dd");
// sdf.format(Date) -- 日期格式化
System.out.println("起始时间:" + sdf.format(c.getTime())); // c.getTime
-是Date.
// 10年后的今天
// ** add: 对时间分量进行增加。
c.add(Calendar.YEAR , 10);
System.out.println("10年后的今天:" + sdf.format(c.getTime()));
// 如果能倒回去20年
c.add(Calendar.YEAR , -20);
System.out.println("倒回去的20年:" + sdf.format(c.getTime()));
// 希望15年后,又2个月, 又30天,相聚在母校。
c.add(Calendar.YEAR , 15);
c.add(Calendar.MONTH , 2);
c.add(Calendar.DAY_OF_MONTH , 30);
System.out.println("聚会的日期:" + sdf.format(c.getTime()));
}
// 练习: 提供用户输入出生年,月, 日 都是int类型,然后告诉用户,再过20年,用户多少岁。
}Calendar的getTime方法
// Calendar的 getTime方法 : 返回值是Date类型
// Date的getTime方法 :返回值是时间毫秒数, 是long类型
// *** 从Calendar类型,可以得到Date类型。
public class CalendarDemo3 {
public static void main(String[] args) {
Calendar calendar = Calendar.getInstance() ;// Instance - 实例化 , 包含的
是当前系统时间。
Date time = calendar.getTime(); // 日期类型: time中包含的日期就是日历中的同一
个日期。
// 获取时间毫秒数
long c1 = calendar.getTimeInMillis() ;
long t1 = time.getTime() ;// 时间毫秒数
System.out.println(c1);
System.out.println(t1);
// 练习:2012-12-8 15:2:20 -- 一个Date中包含的日期
// 使用Calendar来完成: 创建Calendar对象,设置时间分量,然后通过getTime方法,
得到这个Date.
Calendar c11 = Calendar.getInstance() ;
c11.set(2012,11,8 ,15,2,20);
Date d11 = c11.getTime() ;
SimpleDateFormat sdf = new SimpleDateFormat("yyyy-MM-dd HH:mm:ss");
System.out.println(sdf.format(d11));
}
}
种包装类
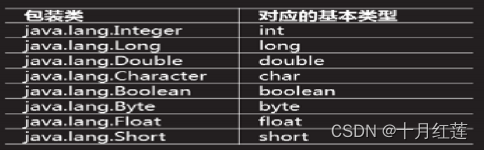
基本数据类型和包装类的对应
8
种基本数据类型,对应了
8
种包装类。每一个包装类封装了一个对应基本数据类型的成员变量,同
时还提供了一些针对该类型操作的方方法
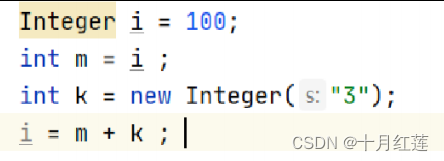
自动装箱&自动拆箱
jdk5
之后,基本数据类型和包装类的转换,依靠编译器的
“
预处理”完成
Integer的使用
package seday3;
// 8种基本数据类型,jdk都提供了对应的引用类型, 一般把8种引用类型称为基本类型的包装类。
// ** 如果java没有这8个基本数据类型,那么java就是纯面向对象。
// ** 平时使用的时候,包装类和基本数据类型会自动转换(自动装箱,自动拆箱)
// ** 需要注意包装类可以是null。 基本数据类型有自己的默认值。
public class IntegerDemo {
public static void main(String[] args) {
// 1. 创建对象,
Integer i1 = new Integer(100);
System.out.println(i1); // 100
// NumberFormatException: 数字格式化异常。
// Integer i2 = new Integer("100a"); // java.lang.NumberFormatException:
For input string: "100a"
// System.out.println(i2);
Integer i3 = new Integer("200");
System.out.println(i3);
// 2. 调用方法。
float f1 = i3.floatValue(); // 调用方法,把int 转化为float.
Integer i2 = new Integer(100);
int b = i3.compareTo(i2) ;// 如果i3 > i2 成立, 返回值为正数 。 如果是i3 < i2
,返回值是负数。 否则0.
System.out.println("b:" +b );//b:1
if(b >0){
System.out.println("i3大");
}else if(b<0){
System.out.println("i2大");
}else{
System.out.println("相等");
}
System.out.println(i1.equals(i2)); // true :重写了equals方法
// 3. 类型转换
Integer i4 = 100 ; // 自动装箱
int i = new Integer(100); // 自动拆箱
System.out.println(i4 == i); // true : 因为自动拆箱 , 转换为int类型了。
System.out.println(i4.equals(i)); // true : 自动装箱
// System.out.println(i.equals(i4)); // 编译错误: int类型, 没有方法。
// 4. Integer的其它方法
System.out.println("最大值:" + Integer.MAX_VALUE);
System.out.println("最小值:" + Integer.MIN_VALUE);
String str = "100";
int a = Integer.parseInt(str) ;// 解析为整数
System.out.println(a);
String str1 = "1000.2345";
// ** 有异常
// int a1= Integer.parseInt(str1); // java.lang.NumberFormatException:
For input string: "1000.2345"
// System.out.println(a1);
System.out.println(Integer.toBinaryString(100)); // 转为2进制的字符串:
1100100
System.out.println(Integer.toHexString(100)); // 转为16进制: 64
System.out.println(Integer.reverse(123456));
}
}
BigDecimal & BigInteger
BigDecimal
java
中的浮点数类型
(float , double)
在运算时会有舍入误差,如果希望得到精确的运算结果,可以
使用
java.math.BigDecimal
类
BigInteger
- dk中提供的整数类型(int ,long )的储值范围有限,当需要进行很大的整数运算时,可以使用 java.math.BigInteger,理论上BigInteger数据范围只受内存容量的限定。
- BigInteger提供了: add , multiply,subtract,divide等方法
集合
jdk中提供了将对象存储于特定数据结构的容器,被称为集合
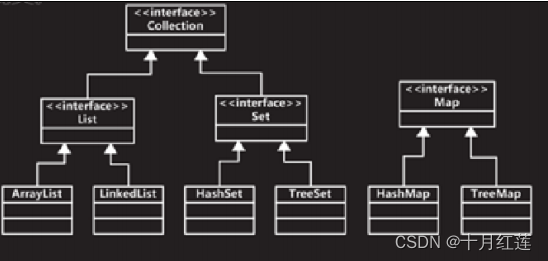
Collection

List
- List接口的实现类实现了Collection接口中的方法。
- 重写了父类的方法
- List接口中根据线性表的数据结构定义了一些基于下标操作的方法。
get & set :
get(i)
set(i, obj)
add & remove
add(i ,obj)
remove(i)
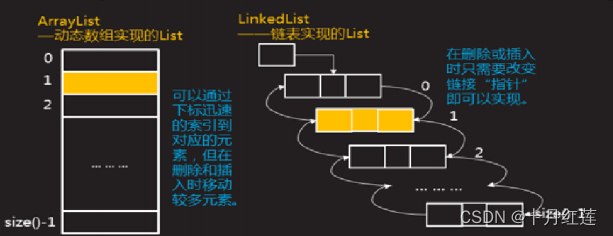
ArrayList & LinkedList
- List接口的两个实现类分别用ArrayList , LinkedList
- ArrayList用动态数组实现,适合于随机访问。
- LinkedList用链表实现,适合于插入和删除。
- ArrayList和LinkedList的方法一样,但是性能不同。
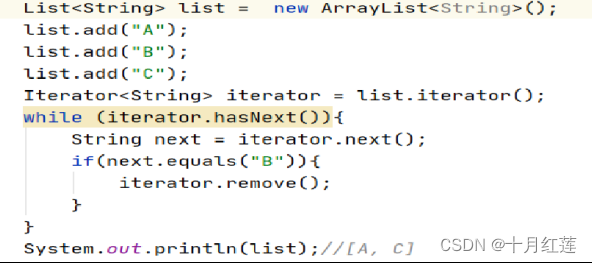
迭代器
- 所有Collection的实现类,都实现了iterator方法, 该方法返回一个Iterator接口类型的对象,用于对于集合中的元素进行迭代遍历。
- Iterator中有三个方法:
boolean hasNext(); // 判断是否还有下一个元素
E next(); // 取出下一个元素
default void remove();// 在原集合中返回刚刚
java泛型机制
- 泛型是java 1.5引入的新特性,泛型的本质是参数类型化。在类,接口和方法的定义过程中,所操作的数据类型被传入的参数指定。
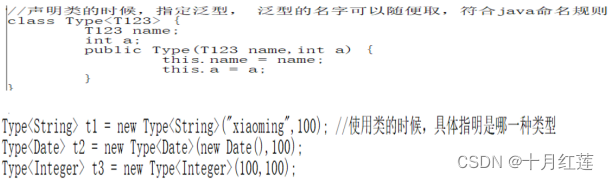
- java泛型机制广泛低应用于集合中,所有集合类型都带有泛型, 在创建集合对象的时候,指定集合中元素的类型。
- java编译器根据泛型的类型,对集合中元素进行类型检查,减少运行的时候错误。
增强for循环
jdk1.5
中,推出了增强型
for
循环的语法,适用于遍历数组和集合中的元素
package seday4;
import java.util.ArrayList;
import java.util.List;
// 增加for循环: for(类型 变量名:集合){ 使用变量}
public class ForDemo {
public static void main(String[] args) {
List<Character> list = new ArrayList<>();
list.add('A');
list.add('B');
list.add('C');
list.add('D');
// 增强for循环 : 集合遍历的时候,简化for循环。
for(Character c : list){
System.out.println(c); // c代表的就是集合种的当前被遍历的元素。
}
String[] strs = {"acb" ,"def" , "hij" , "mnk"};
for(String str: strs){
System.out.println(str);
}
}
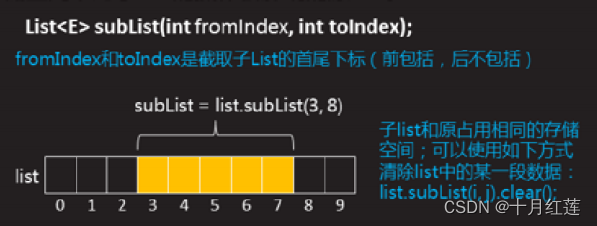
}List集合的方法——subList
- List的subList方法用于获取子list
- subList获取的子list和原来的list占有相同的存储空间,对subList进行操作会影响原来的list.
Queue - 队列
- 队列是常用的数据结构,可以将队列堪称是特殊的线性表,队列只能从一端添加元素(offer),另一端取出元素(poll)
- 队列遵循先进先出的原则(FIFO, first in first out)
- Queue是jdk中的接口, LinkedList是Queue的实现类。
- Queue接口中的主要方法:

Dueue - 双端队列,模拟栈
- Deque是Queue的子接口, 被称为双端队列,即可以从队列的两端入队(offer),出队 (poll),LinkedList实现了该接口。
- 将Deque限定为为只能从一段出队和入队,就可以模拟栈的数据结构,栈数据结构,入栈为push, 出栈为pop.
- 栈遵循先进后出的原则FILO(first int last out)

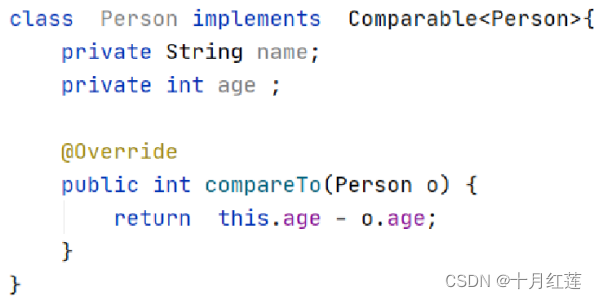
Comparable接口 & 接口排序
- Comparable 接口
针对对象数组或者集合中的元素进行排序的时候,首先需要确定元素的比较逻辑,制定比较的 比较规则。
jdk中的Comparable接口 , 定义了对象间大小比较的方法, 需要大小比较的类,可以实现该 接口。
public int compareTo(T o);
返回正数: this > o
返回负数: this < o
返回0 : this == o - Comparable接口的实现
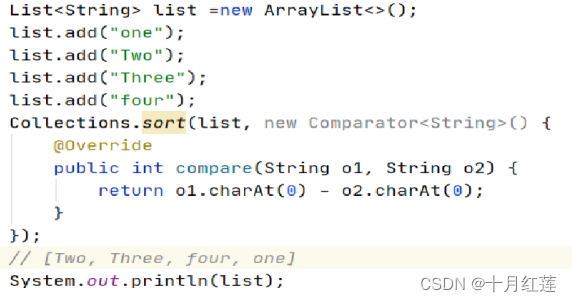
- Collections类中提供了一些对集合操作的方法,其中比较常用的有对List的排序方法。
如果要使用Collections.sort()方法进行对集合中的元素排序,那么要求集合中的元素是实现类
Comparable接口的,即对象可以比较大小。 - Comparator接口的实现
Set集合
- Set 用于存储不重复的对象集合, set集合中存储的对象,不存在两个对象的equals相等。
- HashSet 和 TreeSet是Set集合的两个常用实现类。
- HashSet 用hash表实现了Set集合。
- TreeSet 用排序二叉树实现了Set集合。
- Set集合中的元素,不能和顺序的下标对应,无法从Set集合中获取除特定的元素。
Map
- Map集合主要用于存储“key-value”键值对的数据,key可以看作是value的索引,通过key,查找到value值, key不能重复。
- Map是一个interface , 有多种实现类,比如hash表实现的HashMap ,排序二叉树实现的TreeMap等
- HashMap是Map比较常用的实现类。
- Map接口中常用的get,put方法
package seday4;

import java.util.Collection;
import java.util.HashMap;
import java.util.Map;
import java.util.Set;

public class MapDemo {
public static void main(String[] args) {
// 存储数据: 语文- 80, 数学-90 , 英语-65
Map<String ,Integer> map = new HashMap<>();
map.put("语文" , 80); // key - value
map.put("数学" , 90);
map.put("英语" , 65) ;
System.out.println(map.containsKey("语文")); // true
System.out.println(map.containsValue(90)); // true
Integer integer = map.get("语文");// 根据key , 找value
System.out.println(integer);
System.out.println(map.get("物理")); // 找不到, 返回值是null.
map.put("语文" , 100); // 因为可以已经存在, 所以是在修改value值。
map.remove("语文");// 删除key-value
System.out.println(map.size()); // 2.
Set<String> strings = map.keySet(); // 把键取出来,保存在一个set中。
System.out.println(strings); // [数学, 英语]
Collection<Integer> values = map.values(); // 把所有的value取出来,存储
在集合中。
System.out.println(values); // [90, 65]
}
}
- Map的遍历
for遍历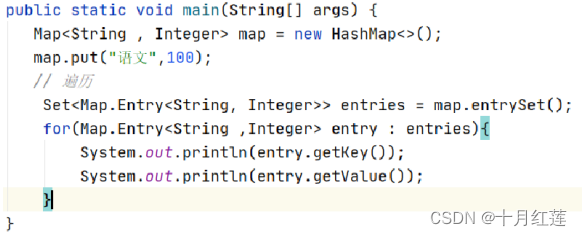
迭代器遍历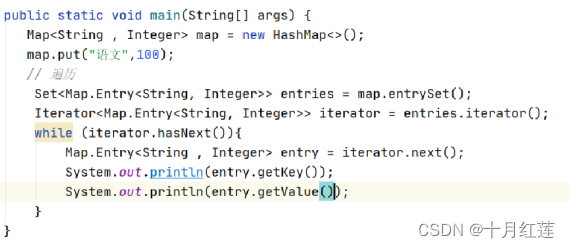
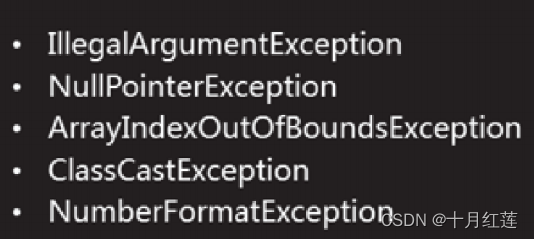
异常
异常类-Exception类
- java异常结构中定义有Throwable, Exception 和 Error 是其派生的两个子类。其中Exception表示由于网络故障,文件损坏,设备错误,用户输入非法等情况导致的异常,而Error表示java运行时环境出现的错误,例如jvm内存资源耗尽。
- 异常出来就是当异常发生的时候妥善地终止程序,避免灾难性后果的发生,具体的操作通常包括:
通知:向用户通知异常的发生。
恢复:保存重要的数据,恢复文件, 回滚事务等
退出:以更好的方式结束程序的运行
try...catch
- try{...}语句包裹了一段代码,该段代码就是捕获异常的范围。
- 在执行try语句块的过程中,该段代码可能会抛出一种或多种异常,catch语句块可以分别对不同的异常做处理。
- 如果try语句块没有发生,那么所有的catch语句都被忽略,不被执行。
- catch语句块中是对异常处理的代码,不同的异常,可以多个不同的catch语句块。
- 当由多个catch语句的块的是,应该先捕获小类型的异常,或捕获大类型的异常。
- try...catch代码参考
//exception: 异常 // *** 异常捕获 : try ... catch // try: 尝试执行这些代码块, 如果有异常, 转到catch语句执行,如果没有异常,就跳过catch. public class ExceptionDemo1 { public static void main(String[] args) { // 程序员想的是: 这几行代码,如果执行的是,有异常发生了,就跑出去, 自己不处理。这里由于是main方法, 抛出去就给jvm了。 然后jvm就把异常的堆栈信息,打印在控制台。 //String str = "abc"; //char c = str.charAt(str.length()); //System.out.println("c:" + c); /* try ... catch , 程序员想的是: 如果有异常了,就在catch语句块中的处理。*/ try{ String str = "abc"; //char c = str.charAt(str.length()); // 发生异常了。 char c = str.charAt(str.length()-1); // 根据异常的提示,修改代码。 System.out.println("c:" + c); }catch (StringIndexOutOfBoundsException e){ // 捕获到这个异常,然后就处理。 // e.getMessage() : 是异常类中的方法,返回值是异常的提示信息。 //System.out.println(e.getMessage()); System.out.println("不能获取到最后一个字符,因为你的索引位置超出字符串的索 引位置。"); } } } - try...catch..catch代码参考
// 异常捕获: try...catch ...catch , 语法规则: 可以try后面写多个catch语句块,把不同的异常,用不同的处理方式。
// ** try语句块中出现异常,则立即转入catch中执行代码,然后try语句块中异常代码之后的代码不再被执行。
// 异常种类: 编译时异常 : 必须处理,处理方案: ① try...catch , ② throws 抛出去
// 运行时异常 : 是否程序员决定 ,如果程序没有捕获,就选择抛出去。
// *** 异常是给程序员看的: 根据异常去调试程序,解决程序的bug。
public class ExceptionDemo2 {
    public static void main(String[] args) {
        try {
            SimpleDateFormat sdf = new SimpleDateFormat("yyyy-MM-dd");
            // sdf.parse("abc"); // 异常.... ParseException
            sdf.parse("2023-1-11");// 根据异常提示,修改为正确的代码。
            int k = 0;
            int m = 10 / k; // 异常。。。ArithmeticException
            String str = null;
            str.length();// 异常....
        } catch (ParseException e){
            System.out.println("只能yyyy-MM-dd格式的字符串,才能解析为日期类型。");
        }catch (ArithmeticException e){
            System.out.println("请检查除数, 除法运算,除数不能为0.");
        }catch (NullPointerException e){
            System.out.println("空指针异常。null没有方法和属性。");
        }catch (Exception e){
            e.printStackTrace();
        }
        // 向上造型: 子类对象赋值给父类的引用。
        try{
            SimpleDateFormat sdf = new SimpleDateFormat("yyyy-MM-dd");
            // sdf.parse("abc"); // 异常.... ParseException
            sdf.parse("2023-1-11") ;// 根据异常提示,修改为正确的代码。
            int k = 0;
            int m = 10/k ; // 异常。。。ArithmeticException
            String str = null;
            str.length();// 异常....
        }catch (Exception e) { // catch的是所以异常的父类。因此try中的任意异常,都会被诶这个catch捕获。
            System.out.println("糟糕,遇到异常了,请检查代码:" +
                    e.getMessage());
            e.printStackTrace(); // 输出异常的堆栈信息。
        }
    }
}
throw & throws
- 当程序发生异常,不能处理的时候,会抛出对应的异常。
- 可以通过throw 语句 ,将异常抛出,那么被抛出的异常,可以让其他代码来捕获这个异常。如果需要自行抛出异常,需要使用“throw”关键字,并且要创建出抛出的异常类的对象。
throw new XXException(); - 类中有很多方法,当在类中的方法中使用到了throw 语句抛出了异常,那么在这些方法的声明过程中,需要使用throws 关键字,声明该方法抛出的异常。
public void add() thows XXExcedption{
// code
} - 如果在方面声明的时候,使用throws抛出了异常,那么在调用方法的时候,就需要捕获异常,或者继续抛出异常。
- 代码参考
// throw: 抛 ,一次只能抛一个异常, 用于在方法内部抛出异常。 throw newXxException();
// throws : 抛 , 用于在方法声明上, 支持一个方法抛出多个异常。
//public void 方法名() throws xx ,yy { }
public class ExceptionDemo3 {
    public static void main(String[] args) {
        try {
            age(20);
        } catch (Exception e) {
            e.printStackTrace();
        }
        throw new NullPointerException();// 抛出一个异常。
    }
    // 练习: 定义一个方法,判断用户的年龄,如果用户的年龄大于120 , 小于0 ,则抛出异常。
// **age方法内部通过throw 抛出了异常。 要求程序必须解决这个问题:
// ① 使用try...catch , ② 在方法声明上使用throws 声明抛出异常
// **定义方法的时候,如果内部使用throw抛出异常,那么一般就会在方法声明上,
// 使用throws抛出这个异常。让调用方法的人,决定怎么处理这个异常。
/*
public static void age(int age) throws RuntimeException{} .抛出的是运行时异常,所以调用方法的时候,就要求处理异常。
public static void age(int age) throws Exception{} ,抛出的是Exception的时候,调用方法,就会要求要处理异常。
Exception 包含:编译时异常 和 运行时异常
*/
    public static void age(int age) throws Exception{
        if(age > 120 || age < 0 ){
            // 异常
            // throw new Exception("年龄必须在0~120之内。");
            throw new RuntimeException("年龄必须在0~120之内。");
        }
        try{
            int k = 0 ;
            int m = 10/ k;
        }catch (ArithmeticException e){
            throw e ; // 抛出异常
        }
        System.out.println("年龄:" + age);
    }
}
finally
- finally语句为异常处理提供一个统一的出口,使得在控制流程转到其他程序其他部分之前,能够对程序的状态做统一管理。
- 无论try语句块中是否有异常,finally语句块的内容都会被执行。
- 通常在finally语句块中完成一些必须要执行的代码。比如: 文件的关闭,数据库的关闭等。
- 代码参考:
// try ...catch ... finally
// ** finally : 有没有异常,最终都要被执行的的代码就放在finally中。
// ** return : finally语句块之前的return ,不能阻止finally中的代码运行。
// ** System.exit(0); finally语句块之前的System.exit(0) ,能阻止finally中的代码运行。
public class ExceptionDemo4 {
    public static void main(String[] args) {
        try{
            int k = 0 ;
            int m = 10/5 ;
        }catch (Exception e){
            System.out.println(e.getMessage());
        }finally {
            System.out.println("程序结束了。");
        }
// 笔试题:
        int a = data();
        System.out.println("a=" + a); // 12
    }
    public static int data(){
        int a = 10 ;
        try{
            int k = 1 ;
            int m = 10/ k;
            a++;
            return a ;
        }catch (ArithmeticException e){
            a ++ ;
            return a;
        }finally {
            a++;
            return a ;
        }
    }
}
自定义异常
程序员可以自定义异常,解决自己程序中的一些特定内容:
public class GenderErrorException extends Exception{
//
重写异常类的方法
}
RuntimeException
程序运行过程中,由某些特定操作引发的异常,被称为运行时异常。
重写中异常的处理
- 如果父类的方法抛出了异常,那么子类重写父类的时候,异常可以如下处理:
a.不处理异常(重写的时候,不抛出异常)
b.可以只抛出部分异常
c.可以抛出异常的子异常
d. 抛出其他运行时异常 - 但是不可以如下操作:
a.重写的时候抛出父类没有抛的非运行时异常。
b.重写的时候抛出父类没有抛的Exception。
文件
- java.io.File用于表示文件(目录),程序员可以通过File类在程序中操作硬盘上的文件或目录。
- File类只用于表示文件(目录)的信息(大小,名称等),不能对文件内容进行访问
- 参考代码
// File: java.io.File -- jdk中提供的用于表示硬盘上文件或目录的类型。
public class FileDemo {
    public static void main(String[] args) throws IOException {
// 创建对象: File(文件路径)
        File file = new
                File("C:\\Users\\Administrator\\Desktop\\hello.txt");
        final boolean b = file.canExecute();
        System.out.println(b); // true
        final String absolutePath = file.getAbsolutePath();
        System.out.println(absolutePath); // 绝对路径:
        C:\Users\Administrator\Desktop\hello.txt
        final long length = file.length(); // 获取字节数
        System.out.println(length); // 38 字节。
        final String name = file.getName();
        System.out.println(name); // hello.txt
// 练习: 找出后缀名。
        final String substr = name.substring(name.indexOf(".") + 1,
                name.length());
        System.out.println(substr);
        final boolean file1 = file.isFile(); // 判断是否是文件
        if(file1){
            System.out.println("是一个文件");
        }else{
            System.out.println("是一个目录");
        }
        File file0 = new
                File("C:\\Users\\Administrator\\Desktop\\hello1.txt");
        final boolean exists = file0.exists();
        if(exists){
            System.out.println("存在");
        }else{
            System.out.println("不存在");
// createNewFile -- 创建新文件。
            file0.createNewFile() ;//
        }
// //file0.mkdir() - 创建目录
// 练习: 在桌面上创建一个文件夹名字叫abc , 然后在abc中创建一个文件,名字叫
        def.txt.
                File abc = new File("C:\\Users\\Administrator\\Desktop\\abc");
        if(!abc.exists()){
            abc.mkdir() ;// 创建目录
        }
        File def = new
                File("C:\\Users\\Administrator\\Desktop\\abc\\def.txt");
        if(!def.exists()){
            def.createNewFile();
        }
    }
}
递归
递归求和
package seday6;

public class DiDuiDemo {
    public static void main(String[] args) {
        long begin = System.currentTimeMillis();
        int sum = sum(20000);
        long end = System.currentTimeMillis();
        System.out.println("sum函数用时:" + (end - begin));
        begin = System.currentTimeMillis();
        int sum1 = sum(20000);
        end = System.currentTimeMillis();
        System.out.println("sum1函数用时:" + (end - begin));

    }
    //1+2+3+4+ ..... + 100,计算结果,要求:不允许使用循环
    //递归的思想:
    public static int sum(int n){
        if (n == 1){
            return 1;
        }
        int sum = sum(n - 1) + n;
        return sum;
    }
    //for循环求和
    public  static  int sum1(int n){
        int sum = 0;
        for (int i = 1;i<=n;i++){
            sum += i;
        }
        return sum;
    }
}
递归找文件名
package seday6;

import java.io.File;

public class FileUtil {
    public static void main(String[] args) {
        File file = new File("C: \\Users\\ldayclean\\Desktop\\ltesta");
        seeFileName(file);
    }

    public static void seeFileName(File file){
        if (file.isDirectory()){//判断file是否为文件夹
            File[] files = file.listFiles();
            System.out.println("文件夹:" + file.getAbsolutePath());
            for (File f:files){
                seeFileName(f);//递归调用自己
            }
        }else {
            System.out.println(file.getAbsolutePath());
        }
    }

    public static void deleteFile(File file){

    }
}
IO
FileInputStream & FileOutputStream
- 节点流: 从特定的地方读写的流,例如磁盘或一块内存区域。
- FileInputStream : 输入流,操作的是字节,又叫字节流。
- FileOutputStrean: 输出流, 操作的是字节,又叫字节流。
文件复制
public class IOUtil {
    public static void main(String[] args) throws IOException {
        File file = new File("C:\\Users\\Administrator\\Desktop\\hello.txt");
        copy(file);
    }
    // 用户调用copy方法的时候,赋值用户传入的文件
    public static void copy(File file) throws IOException {
        FileInputStream in = new FileInputStream(file) ;// 读这个文件
        FileOutputStream out = new
                FileOutputStream("C:\\Users\\Administrator\\Desktop\\abc.txt") ;// 在文件中写入内容
/*
while(true){
int read = in.read();
if(read == -1){
break;
}
out.write(read);
}*/
        int read = 0;
        while( (read = in.read()) !=-1){ // 读取内容,然后判断是否为末尾。
            out.write(read); // 写入内容
        }
        in.close();
        out.close();
    }
}
BufferedInputStream & BufferedOutputStream
- 使用节点流作为输入或输出。过滤流是使用一个已经存在的输入流或输出流进行创建的。
- BufferedInputStream & BufferedOutputStream 是过滤流
- 输入流
// ** BufferedInputStream : 带缓冲区的输入流 , 读取效率高于FileInputStream public class BufferedInputStreamDemo { public static void main(String[] args) throws IOException { File file = new File("C:\\Users\\Administrator\\Desktop\\abc.txt"); FileInputStream inputStream = new FileInputStream(file) ; BufferedInputStream bin = new BufferedInputStream(inputStream); /* byte[] bs = new byte[1024] ;// 一次读取1k. final int read = bin.read(bs); System.out.println("读取的内容:" + new String(bs)); System.out.println("read:" + read); */ // 读取abc.txt的所有内容。 byte[] bs = new byte[99] ;// while (true){ int read = bin.read(bs); if(read < bs.length){ // 读到最后的内容了。 byte[] last = new byte[read]; System.arraycopy(bs , 0 , last , 0 , read); System.out.println(new String(bs)); break; }else{ System.out.println(new String(bs)); // 把读取到的内容,转换为字符串。 } } inputStream.close(); bin.close(); } } - 输出流
public class BufferedOutputStreamDemo {
public static void main(String[] args) throws IOException {
FileOutputStream fos = new
FileOutputStream("C:\\Users\\Administrator\\Desktop\\abc.txt",true);
BufferedOutputStream bos =new BufferedOutputStream(fos);
String str = new String("dkldjkldjkldXXXXX");
bos.write(str.getBytes()); // 写入缓冲区
bos.flush(); // 刷新,把内容真的写入到文件中
bos.close(); // ** 关闭的时候,会先把缓冲区的数据,写入到文件中,然后在关闭
流。
fos.close();
}
}
DataOutputStream & DataInputStream
- DataOutputStream & DataInputStream是对流功能的扩展,可以更方便的读取int ,long ,char等 类型的数据
- DataOutputStream对基本的输出流功能进行扩展,提供了基本数据类型的输出方法
- DataInputStream对基本的输入流功能的扩展,它提供了基本类型的输入方法
- 参考代码
// ** DataOutputStream
// ** DataInputStream
import java.io.*;
public class DataOutputStreamDemo {
public static void main(String[] args) throws IOException {
File file = new File("C:\\Users\\Administrator\\Desktop\\1.txt");
/*
FileOutputStream fos = new FileOutputStream(file);
DataOutputStream dos = new DataOutputStream(fos) ;
dos.write(111);
dos.writeInt(20);
dos.writeChar('A');
dos.writeChars("nice to meet you.");
//dos.flush();
dos.close();
fos.close();
*/
FileInputStream fis = new FileInputStream(file);
DataInputStream dis =new DataInputStream(fis);
final int read = dis.read();
System.out.println("read:" + read);
System.out.println(dis.readInt());
System.out.println(dis.readChar());
byte[] bs = new byte[40];
dis.read(bs);
System.out.println(new String(bs));
dis.close();
fis.close();
}
}
InputStreamReader & OutputStreamWriter
- 提供字符的处理,一次处理一个字符(unicode)
- 字符的底层仍然是基本的字节流
- InputStreamReader : 完成byte流解析为char流,按照编码解析。
- OutputStreamWriter: 提供char流到字节,按照编码处理。
- 参考代码
public class OutputStreamWriterDemo {
public static void main(String[] args) throws IOException {
/*
FileOutputStream fos = new
FileOutputStream("C:\\Users\\Administrator\\Desktop\\2.txt");
OutputStreamWriter osw = new OutputStreamWriter(fos);
osw.write("床前明月光,\n");
osw.write("疑似地上霜.\n");
osw.write("作者...李白");
osw.flush();
osw.close();
fos.close();
*/
FileInputStream fis = new
FileInputStream("C:\\Users\\Administrator\\Desktop\\2.txt");
InputStreamReader reader = new InputStreamReader(fis);
char[] c = new char[6];
reader.read(c);
System.out.println(new String(c));
reader.close();
fis.close();
}
}
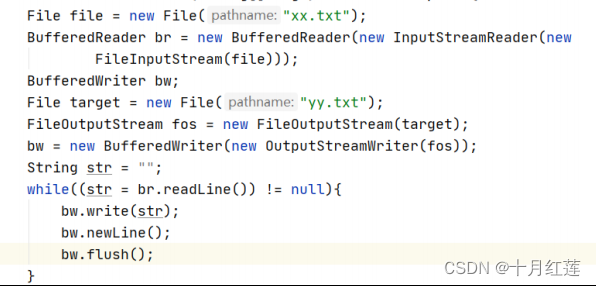
BufferReader & BufferWriter
BufferReader & BufferWriter更方便处理字符
对象序列化的原理
- 将Object转换为byte序列,就是序列化,反之将byte序列转换为Object就是反序列化。
- 对象序列化的目的,是为了将对象,以byte流的方式存储。
- 使用writeObject(Object)/readObject()进行序列化和反序列化
ObjectInputStream ois ; ois.readObject(); ObjectOutputStream oos ; oos.writeObject(obj); -
Serializable 接口Serializable 是序列化接口,对象必须实现序列化接口,才能进行序列化,否则抛出异常。java 的 API 中的类,大部分都实现了 Serializable 接口。
// ** 类实现了implements Serializable 这个接口,就可以支持被序列化。 public class Student implements Serializable { private String stuName; // ** transient,透明 , 用这个关键字修饰的成员变量,不会被序列化到文件夹中。 private transient int sutAge; private String stuSex; public String getStuName() { return stuName; } public void setStuName(String stuName) { this.stuName = stuName; } public int getSutAge() { return sutAge; } public void setSutAge(int sutAge) { this.sutAge = sutAge; } public String getStuSex() { return stuSex; } public void setStuSex(String stuSex) { this.stuSex = stuSex; } } -
transient 关键字transient 关键字修饰的成员变量,不会被序列化。private transient Integer brId;
package seday6;
import java.io.FileInputStream;
import java.io.FileOutputStream;
import java.io.ObjectInputStream;
import java.io.ObjectOutputStream;
// 把自定义的类型,序列化到文件中
public class ObjectInputStreamDemo2 {
public static void main(String[] args) throws Exception{
FileOutputStream fos = new
FileOutputStream("C:\\Users\\Administrator\\Desktop\\4.txt") ;
ObjectOutputStream oos =new ObjectOutputStream(fos);
Student stu = new Student();
stu.setStuName("alice");
stu.setStuSex("女");
stu.setSutAge(18);
oos.writeObject(stu); //写入对象
oos.close();
fos.close();
// 反序列化,找到Student对象。
FileInputStream fis = new
FileInputStream("C:\\Users\\Administrator\\Desktop\\4.txt") ;
ObjectInputStream ois = new ObjectInputStream(fis);
Object o = ois.readObject();
if(o instanceof Student){
Student o1 = (Student)o;
System.out.println(o1.getStuName() +":" + o1.getStuSex() +":" +
o1.getSutAge());
}
ois.close();
fis.close();
}
}
线程
java
程序支持多线程,并且
java
中的多线程处理较为简单。
一般操作系统都支持同时运行多个任务,一个任务通常就是一个程序,每个运行中的程序被称为进程,当也给程序运行时候,内部可能包含多个顺序流执行,每个顺序执行流就是一个线程。
继承线程
- Thread类代表线程类型
- 任何线程对象都是Thread类(子类)的实例
- Thread类是线程的模板(封装了复杂的线程开启等操作,封装了操作系统的差异性等)
- 只要重写run方法,就可以实现具体线程。
- 创建线程实例(即子类的对象)
通过start方法,启动线程,线程启动之后,会尽快执行run方法
重写Runnable接口
- 创建一个类,实现Runnable接口, 重写run 方法
- 以实现了Runnable接口的类的实例,作为创建Thread类的参数。
package seday7;
public class TestThread1 {
public static void main(String[] args) {
//Thread thread = new Thread() ;// Thread是线程类。
Thread t = new Thread(new B());
t.start(); // 启动线程。
}
}
class A {
}
class B extends A implements Runnable{
@Override
public void run() {
System.out.println("hello. 吃了吗");
}
}
使用匿名内部类创建线程
public class TestThread2 {
public static void main(String[] args) {
Thread t1 = new Thread(){
@Override
public void run() {
for(int i = 0 ; i < 1000 ; i++){
// try {
// // Thread.sleep(50);
// } catch (InterruptedException e) {
// e.printStackTrace();
// }
System.out.println("在选衣服" +i);
}
}
};
Thread t2= new Thread(new Runnable() {
@Override
public void run() {
for(int i = 0 ; i < 1000 ; i++){
try {
Thread.sleep(50);
} catch (InterruptedException e) {
e.printStackTrace();
}
System.out.println("在试衣服" +i);
}
}
});
t1.start();
t2.start();
t1.setPriority(5); // 改变优先级
t2.setPriority(10);
}
}
线程的生命周期
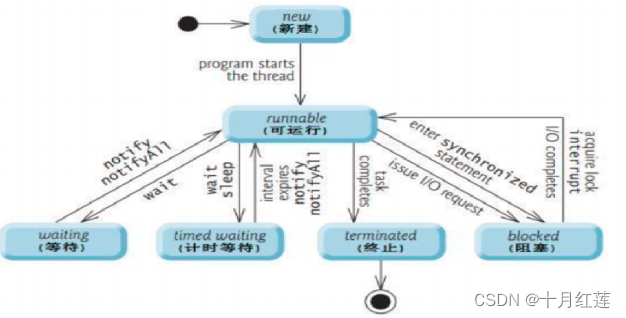
sleep方法
Thread.sleep(times)
使当前线程从
running
放弃处理器,进入
block
状态,休眠
times
毫秒,在进入
runnable
状态。
守护线程
守护线程是指,在线程运行前,将线程设置为守护线程,那么当程序中没有其他线程运行时候,
jvm
退出,程序就终止。
public class TestThread3 {
public static void main(String[] args) {
Thread t1 = new Thread(){
@Override
public void run() {
for(int i =0 ; i < 100 ; i++){
try {
sleep(50);
} catch (InterruptedException e) {
e.printStackTrace();
}
System.out.println("hello ....." + i);
}
}
};
Thread t2 = new Thread(){
@Override
public void run() {
for(int i =0 ; i < 1000 ; i++){
try {
sleep(50);
} catch (InterruptedException e) {
e.printStackTrace();
}
System.out.println("hi ....." + i);
}
}
};
t1.start();
t2.setDaemon(true); // 设置t2的线程为守护线程。
t2.start(); // 先设置为守护线程,然后才能启动线程。
}
}
线程的信息
// 线程相关的方法
public class TestThread4 {
public static void main(String[] args) {
// 获取当前线程。
Thread t = Thread.currentThread() ;// 获取当前线程。
System.out.println(t); // Thread[main,5,main]
// 线程id
System.out.println(t.getId());
// 线程名字
System.out.println(t.getName());
// 线程的优先级
System.out.println(t.getPriority());
// state
System.out.println(t.getState());
// alive - 活着
System.out.println(t.isAlive());
// ** 是否为守护线程
System.out.println(t.isDaemon());
}
}
线程同步
- 所谓同步,就是指在调用某个功能的时候,在没有得到结果之前,该调用不返回,同时其他线程无法使用这个功能。
- 异步: 并发,线程间互不影响,自己干自己的。
- 同步: 步调一致的处理,有序地执行。
- 多个线程并发读写同一个临界资源的时候,会发生“线程并发安全问题”,使用同步代码块,解决并发安全问题
synchronized可以修饰方法,表示整个方法修的全部内容需要同步。
synchronized(同步监视器){ // .... } ,同步监视器一般是一个对象。
单例模式
public class SynchronizedDemo1 {
public static void main(String[] args) {
// SingleA a1 = SingleA.getInstance();
// SingleA a2 = SingleA.getInstance();
// System.out.println(a1);
// System.out.println(a2);
// System.out.println(a1 == a2); // == 判断两个引用指代的对象的地址是否相同。
SingleB b1 = SingleB.getInstance();
SingleB b2 = SingleB.getInstance();
System.out.println(b1 == b2);
}
}
// 单例模式-- 指一个类只能有一个实例,就被称为单例。
class SingleA{
private static SingleA sa = null;
// ① 私有化构造函数 , 避免程序自己创建对象。
private SingleA(){
}
// ② 提供一个公开的方法,由这个方法,返回实例。
// ** synchronized 把这个方法设置为同步的, 那么同一时间只能被一个线程调用到。
public static synchronized SingleA getInstance(){
if(sa == null){
sa = new SingleA(); // 方法同步之后,保重这句代码只会被执行一次。
}
return sa;
}
}
class SingleB{
private static SingleB sb = new SingleB();
private SingleB(){}
public static SingleB getInstance(){
return sb;
}
}socket编程
- 在C/S模式下,客户向服务器端发出请求,服务器端接收到请求之后,提供相应的服务。
- 客户端部分: 每个用户都有自己的客户端,负责发送请求。
- 服务端部分: 多个用户共享一个服务器,处理每个客户端的请求。
- 服务器端:
package seday7; import java.io.BufferedReader; import java.io.IOException; import java.io.InputStream; import java.io.InputStreamReader; import java.net.InetAddress; import java.net.ServerSocket; import java.net.Socket; /* 服务端程序: -- 启动之后,等待客户端来连接。 -- 一定要先启动服务端,然后再启动客户端。 */ public class Server { // 运行在服务器端的socket private ServerSocket server; // 构造方法: 初始化server变量 public Server() throws IOException { System.out.println("开始初始化了......"); server = new ServerSocket(9999); System.out.println("初始化成功了......"); } // 启动服务器 public void start(){ while (true){ System.out.println("等待客户端的连接....."); try { Socket socket = server.accept() ;// 阻塞方法。 InetAddress inetAddress = socket.getInetAddress(); String ip = inetAddress.getHostAddress(); // 客户端的ip. int port = socket.getPort() ; System.out.println( ip+":" + port + "连接成功......"); // 流的使用 InputStream inputStream = socket.getInputStream(); InputStreamReader isr = new InputStreamReader(inputStream); BufferedReader br = new BufferedReader(isr); String word = br.readLine() ; System.out.println( ip+":" + port + "说:" + word); } catch (IOException e) { e.printStackTrace(); } } } public static void main(String[] args) throws IOException { Server server = new Server() ; server.start(); } } - 客户端:
package seday7;
import java.io.IOException;
import java.io.OutputStream;
import java.io.OutputStreamWriter;
import java.io.PrintWriter;
import java.net.Socket;
import java.util.Scanner;
public class Client {
private Socket socket ;
/*
如果对象创建成功了。说明连接到服务器了 ,服务器端会给这个
客户端程序分配一个端口号。
localhost : 代表的是自己电脑 - 本机。 对应的ip: 127.0.0.1
*/
public Client() throws IOException {
System.out.println("开始连接服务器....");
socket = new Socket("localhost" , 9999);
System.out.println("服务器连接成功...");
}
// 启动客户端
public void start() throws IOException{
OutputStream outputStream = socket.getOutputStream();
OutputStreamWriter osw = new OutputStreamWriter(outputStream);
PrintWriter pw = new PrintWriter(osw);
Scanner sc = new Scanner(System.in);
String s = sc.nextLine();
pw.println(s);
pw.flush();
pw.close();
}
public static void main(String[] args) throws IOException {
Client c = new Client() ;
c.start();
}
}


 262
262


 被折叠的 条评论
为什么被折叠?
被折叠的 条评论
为什么被折叠?
 到【灌水乐园】发言


