


驱动理论专题一
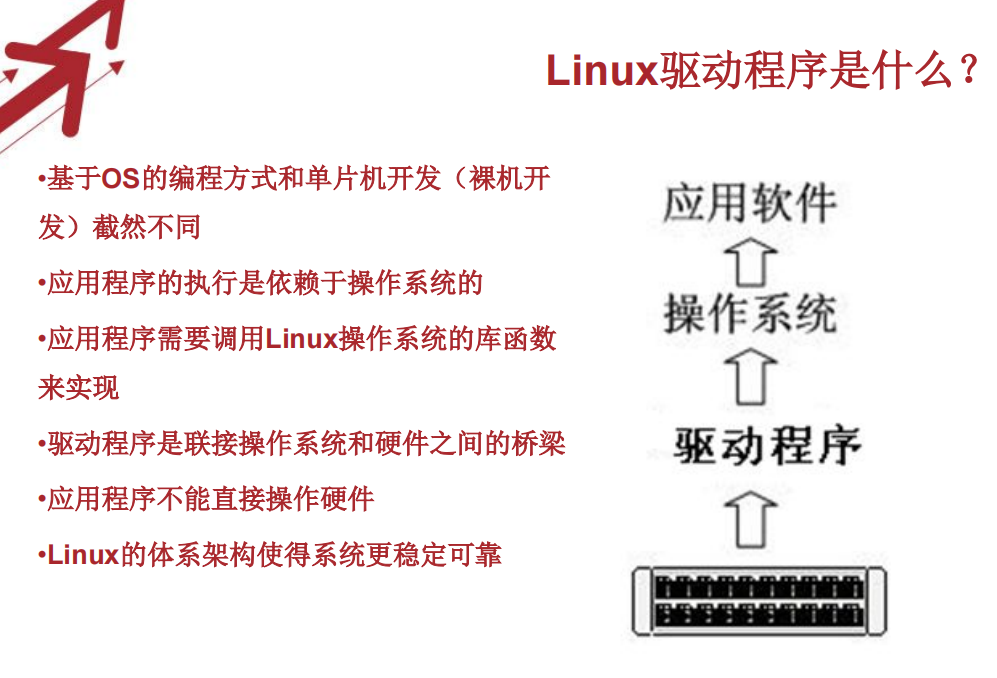
Linux驱动程序的基本认识
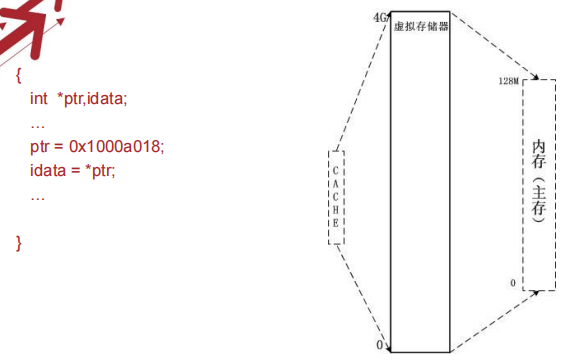
 有了内存管理单元,就有虚拟地址,物理地址。
驱动理论专题二
学会查看原理图

以LED2为示例

通过原理图查看到KP_COL0,赋予高电平则能点亮LED2,反则LED2不亮。
然后查阅芯片引脚图

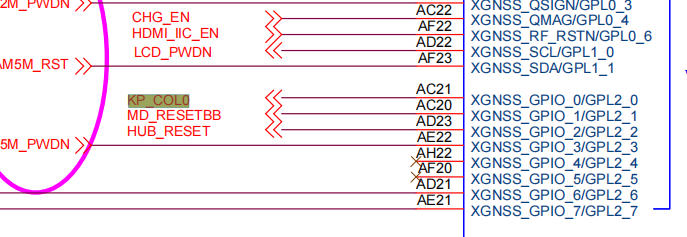
得知由GPL2_0控制。
学会查阅数据手册

数据手册中 Base Address(基地址)+Offset(偏移)=物理地址

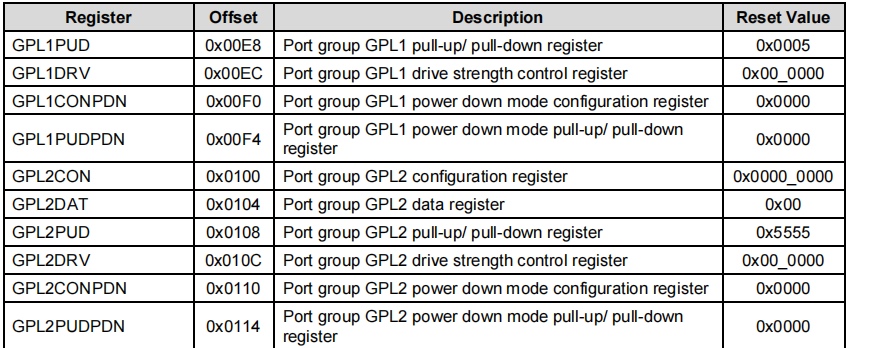
GPL2CON 配置寄存器 配置口的功能方式
GPL2DAT 数据寄存器
GPL2PUD 内部上拉/下拉寄存器
GPL2DRV 驱动寄存器
GPL2CONPDN GPL2PUDPDN 低功耗模式下的两个功能,一般不用。
完成对外设的操作

通过编写程序操作寄存器
方式1
0x11000104
unsigned int * pintx;
pintx =0x11000104;
*pintx =0;
*pintx =1;
方式2
*(unsigned int *) 0x11000104=0;
驱动理论专题三
虚拟地址 在ARM-LINUX中把物理地址转换为虚拟地址,通过虚拟地址直接来对设备进行操作
CPU
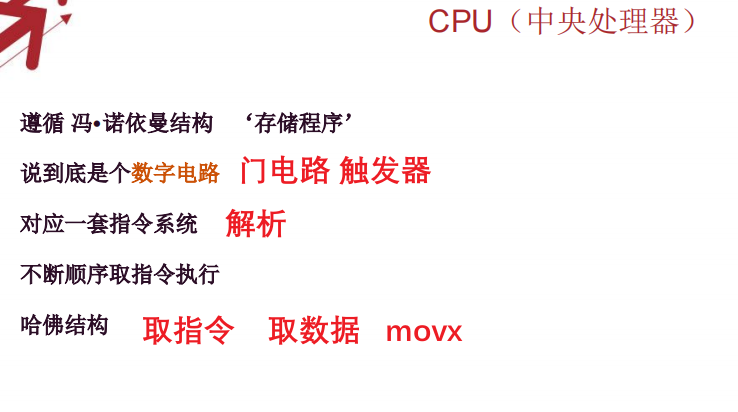
指令系统

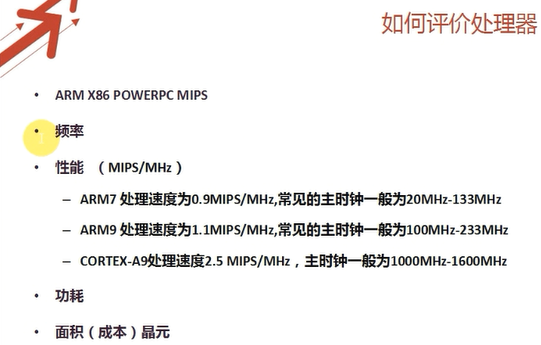
精简指令集:ARM MIPS POWERPC
特点: 指令的时间,长度一样 就称为精简指令集
复杂指令集:8051 X86
指令流水线

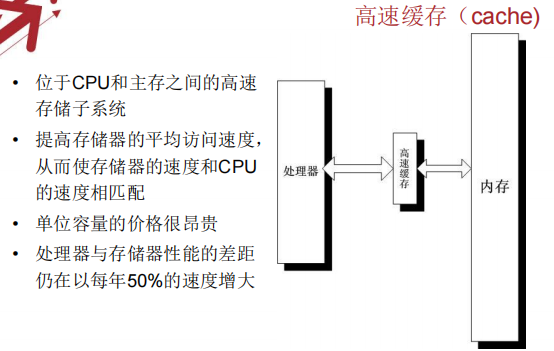
内存管理单元MMU


虚拟内存
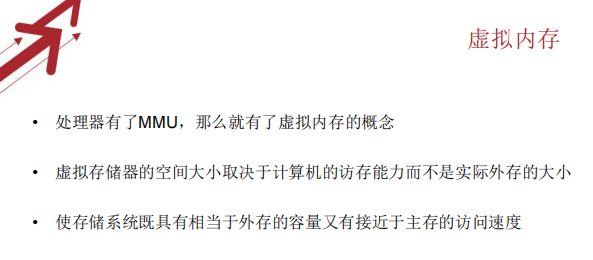
-32位2^32=4G 可能实际外存是1G或者其他
-硬盘 EMMC FLASH


A 应用型 R实时型 M微控制器型 SECURCORE安全型
内核开发基础
Linux体系结构


Linux内核结构


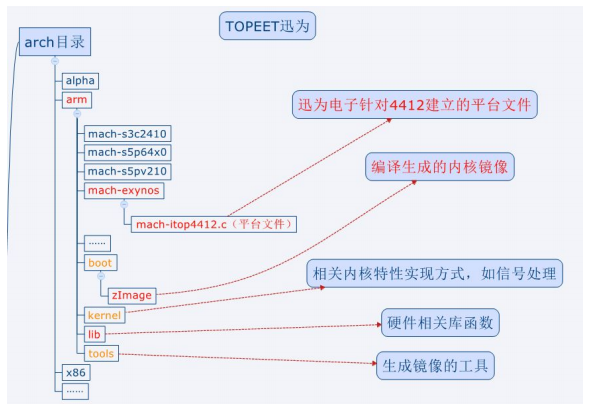
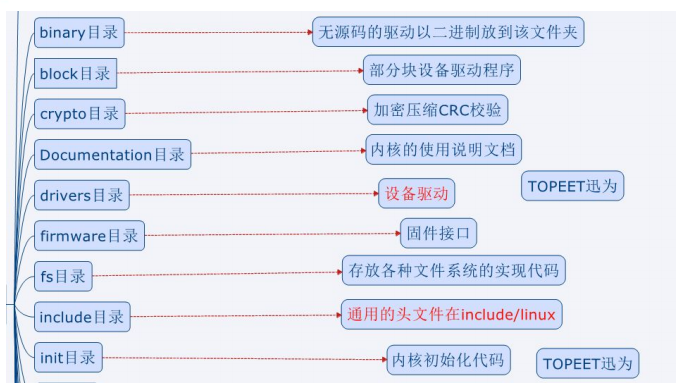
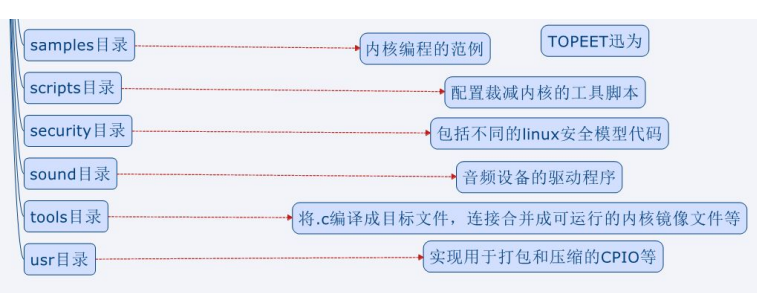
目录结构


小结
单片机、Linux和Linux驱动学习方法
单片机驱动和Linux嵌入式驱动的主要区别


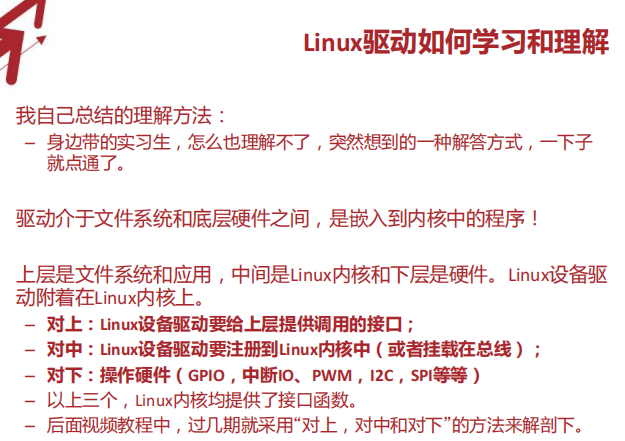
Linux驱动如何学习和理解
DriverModule

最简Linux驱动

最简Linux驱动–必备的头文件

最简Linux驱动–模块的入口和出口

最简Linux驱动–声明区

最简Linux驱动–功能区

mini_linux_module.c
#include <linux/module.h>
/*包含初始化宏定义的头文件,代码中的module__init和module__exit在此文件中*/
#include <linux/init.h>
/*包含初始化加载模块的头文件,代码中的MODULE_LICENSE在此文件中*/
MODULE_LICENSE("Dual BSD/GPL");//声明是开源的,没有内核版本限制
MODULE_AUTHOR("TOPEET");//声明作者

static int hello_init(void)
{
	//打印信息,KERN_EMERG表面紧急信息
   printk(KERN_EMERG"HELLO WORLD enter!\n");
   return 0;

}
static void hello_exit(void)
{
   printk(KERN_EMERG"HELLO WORLD exit!\n");


}
module_init(hello_init);//初始化函数
module_exit(hello_exit);//卸载函数
驱动模块的编译

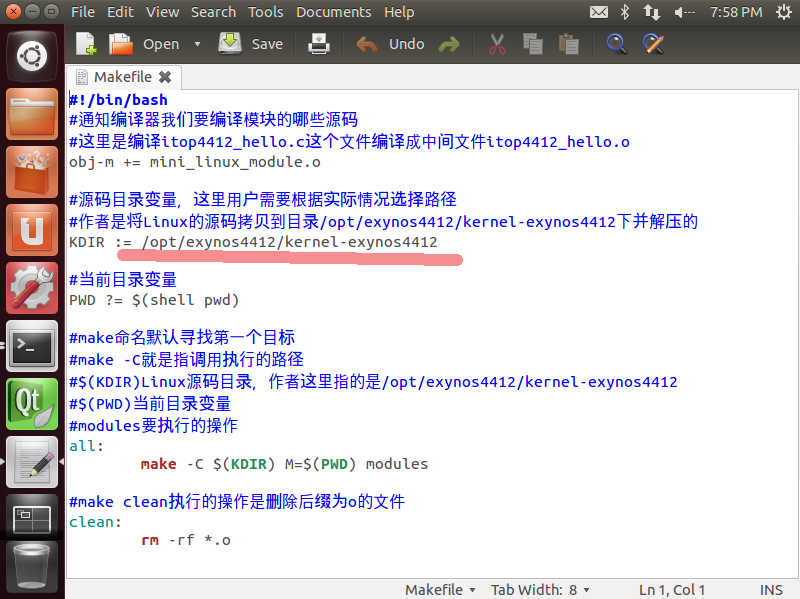
Makefile
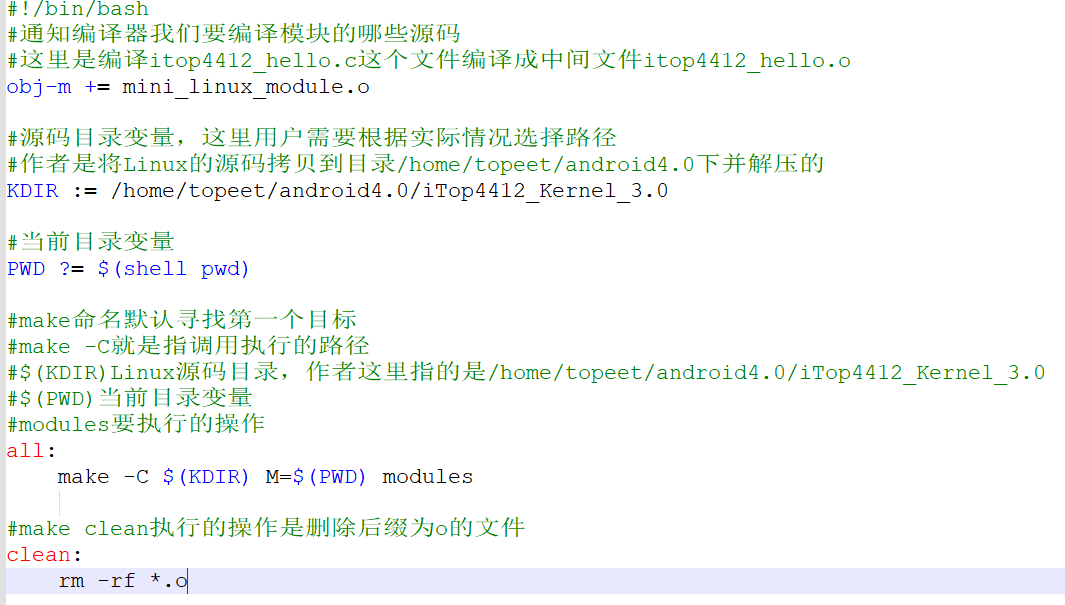
#!/bin/bash
#通知编译器我们要编译模块的哪些源码
#这里是编译itop4412_hello.c这个文件编译成中间文件itop4412_hello.o
obj-m += mini_linux_module.o

#源码目录变量,这里用户需要根据实际情况选择路径
#作者是将Linux的源码拷贝到目录/home/topeet/android4.0下并解压的
KDIR := /home/topeet/android4.0/iTop4412_Kernel_3.0

#当前目录变量
PWD ?= $(shell pwd)

#make命名默认寻找第一个目标
#make -C就是指调用执行的路径
#$(KDIR)Linux源码目录,作者这里指的是/home/topeet/android4.0/iTop4412_Kernel_3.0
#$(PWD)当前目录变量
#modules要执行的操作
all:
	make -C $(KDIR) M=$(PWD) modules

#make clean执行的操作是删除后缀为o的文件
clean:
	rm -rf *.o
编译流程的分析

实验操作–编译文件

内核代码路径改为
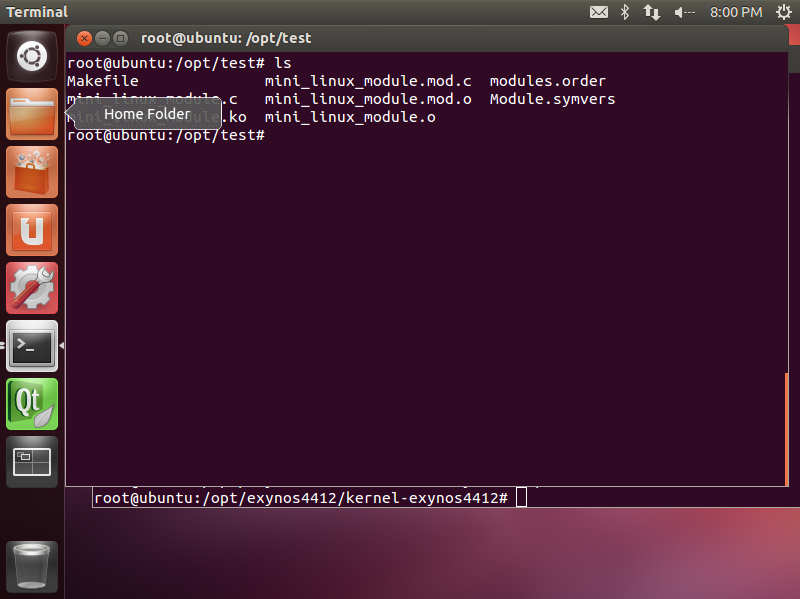
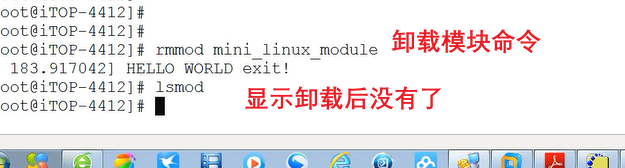
实验操作–加载模块和卸载模块


小结

Vim编辑器显示中文字符

无法卸载模块的解决办法


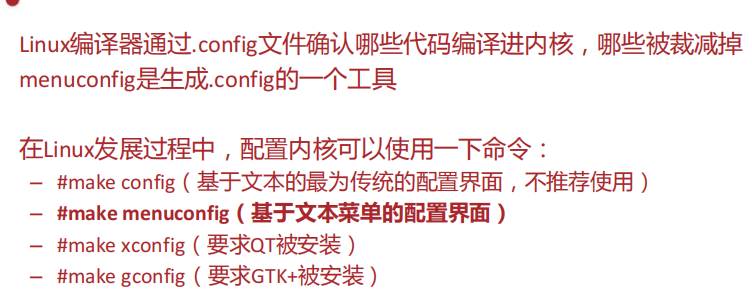
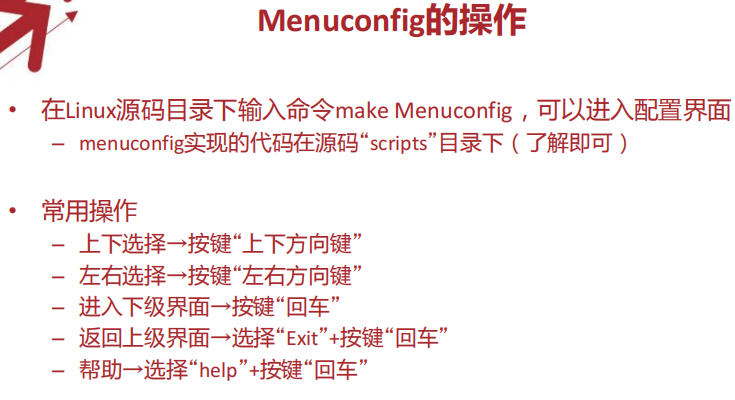
Menuconfig和Kconfig
Menuconfig的操作


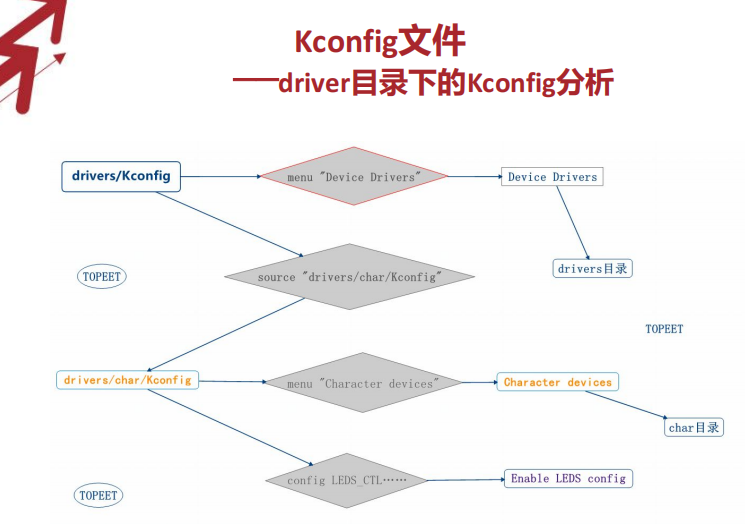
Kconfig文件–driver目录下的Kconfig分析

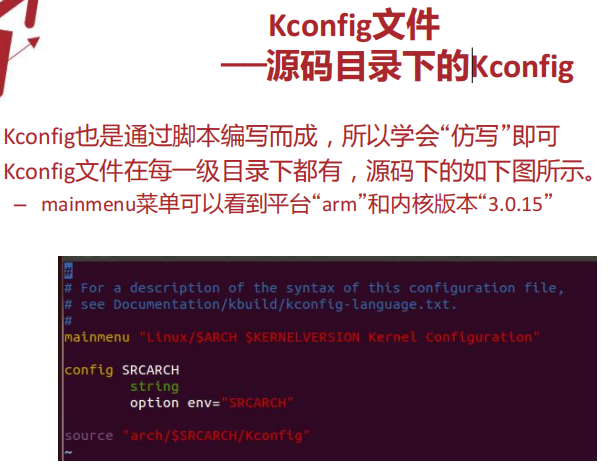
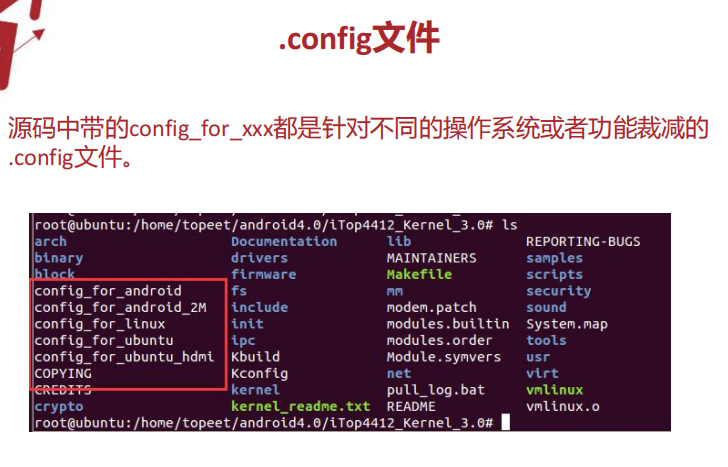
Kconfig文件
.config
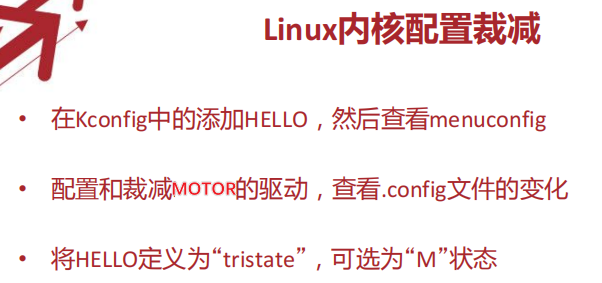
Linux内核配置裁减
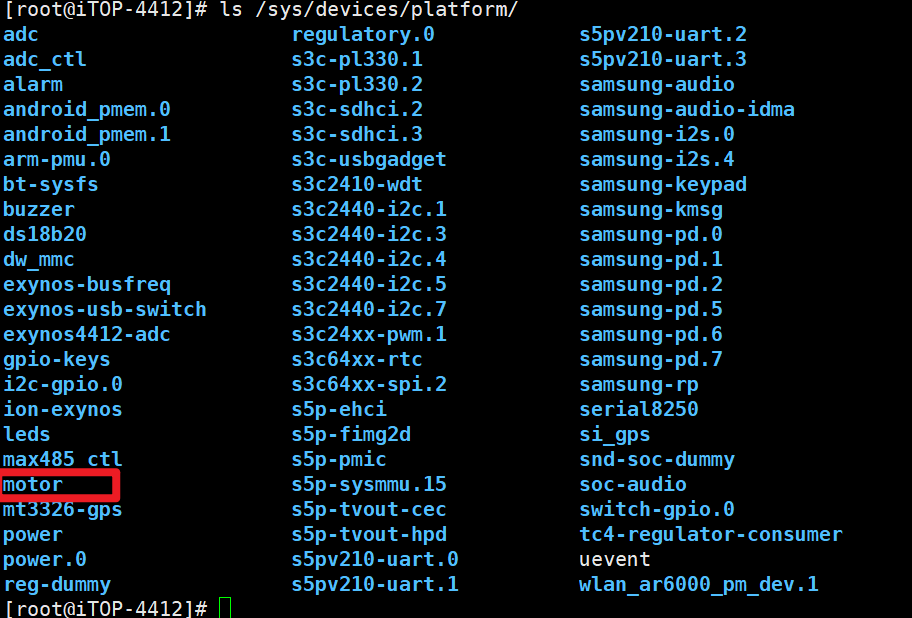
(以添加motor.c文件为示例)
进入/opt/exynos4412/kernel-exynos4412 /drivers/char
ls -a 显示隐藏文件
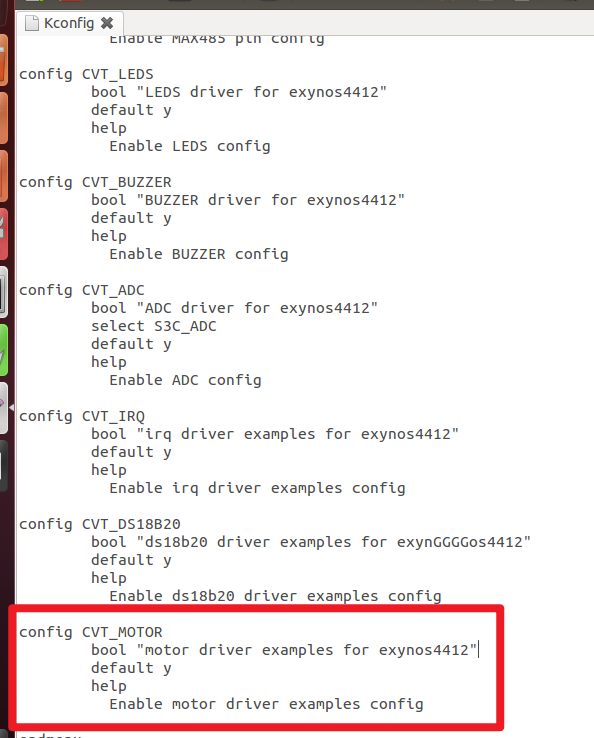
修改Kconfig文件 gedit Kconfig用记事本方式打开文件
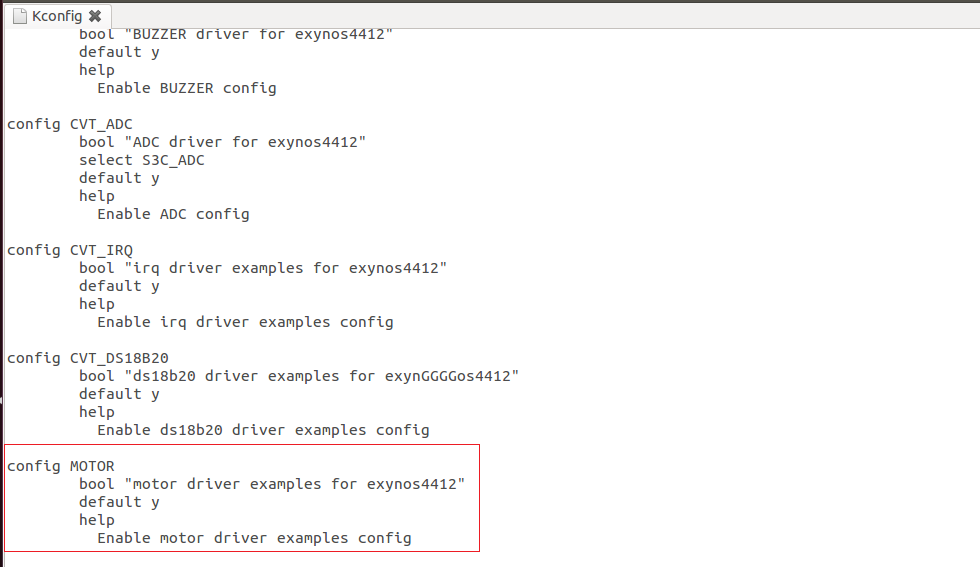
Ctrl+F 查找 ds18b20
仿照其他写motor
添加如下内容
Ctrl+s保存
终端Ctrl+c停止
cd …/…/返回到上上个文件夹
make menuconfig 进入图形化菜单界面
Device Drivers -->Character devices–>

/ 查找关键字 Esc 退出 长空格 选中 Enter 确认
保存以后,检查.config文件

进入/opt/exynos4412/kernel-exynos4412/driver/char路径根据.config修改Makefile文件

将motor.c文件复制到/opt/exynos4412/kernel-exynos4412/drivers/char路径下

进入 /opt/exynos4412/kernel-exynos4412/输入以下命令编译zImage
make zImage

检查一下,进入“arch/arm/boot”目录,查看生成zImage文件没有,并且查看zImage文件的更新时间是不是最新的

在进入drivers/char/目录下,查看motor.c文件有没有被编译到。

传到window烧入进开发板

有无烧写LED进内核区别

小结
Makefile编译
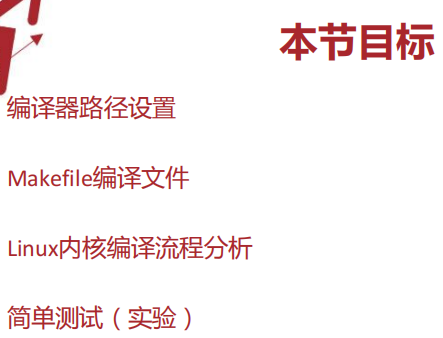
编译器路径设置

强制编译

配置编译

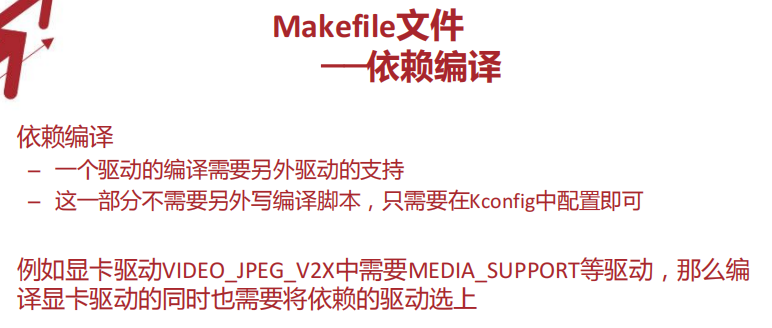
依赖编译
Linux内核编译流程分析

总线设备驱动注册流程详解


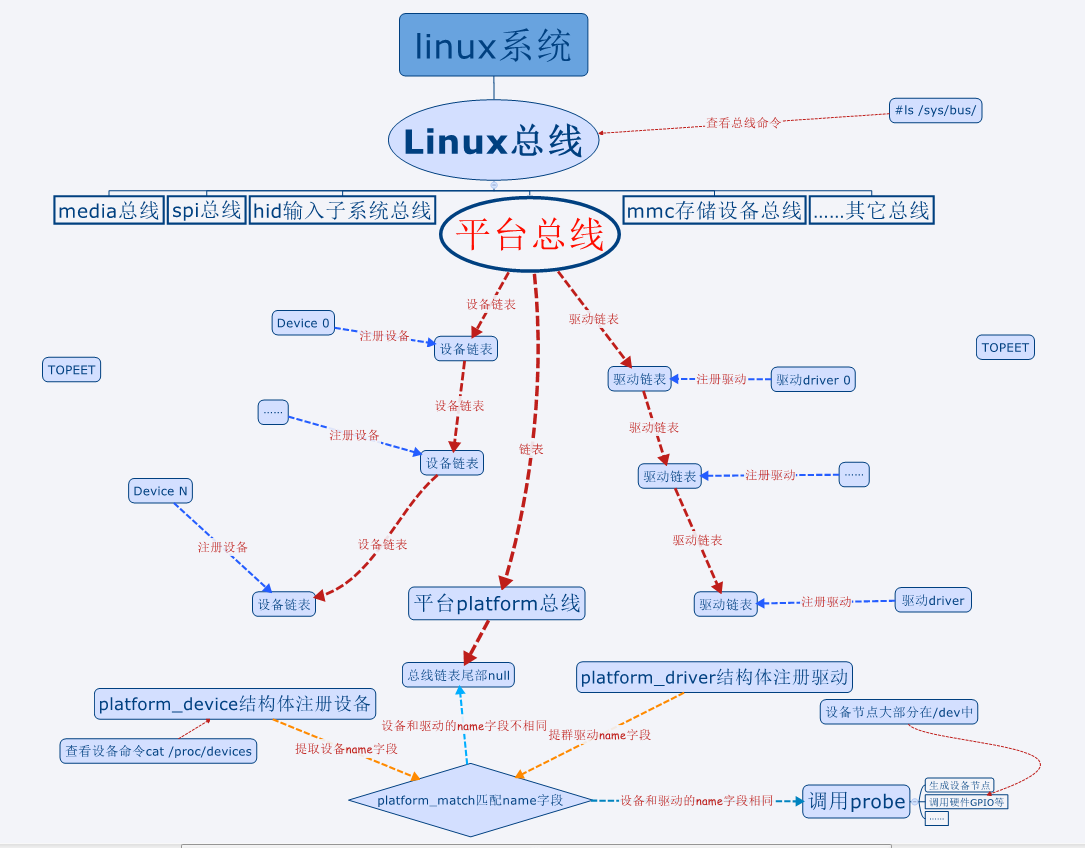
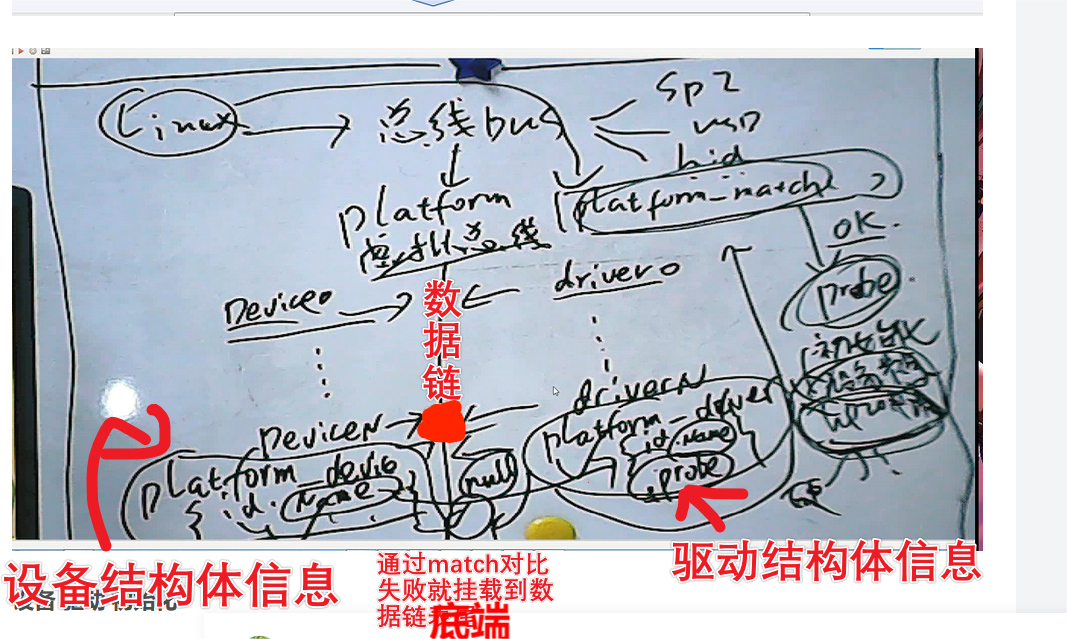
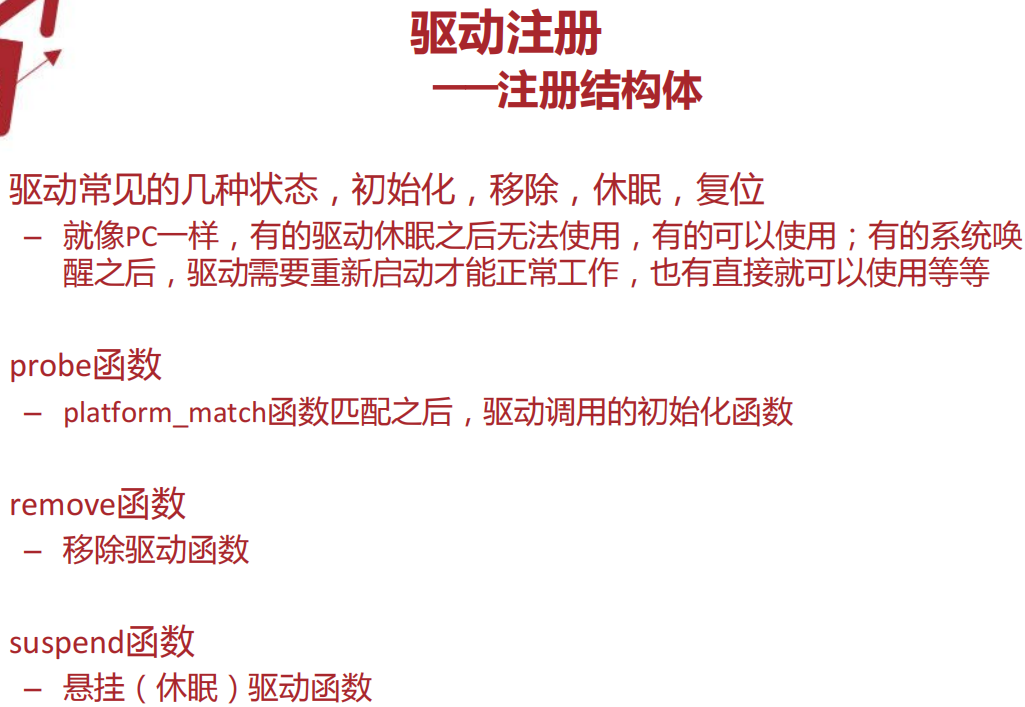
设备device 驱动driver 初始化probe
设备注册


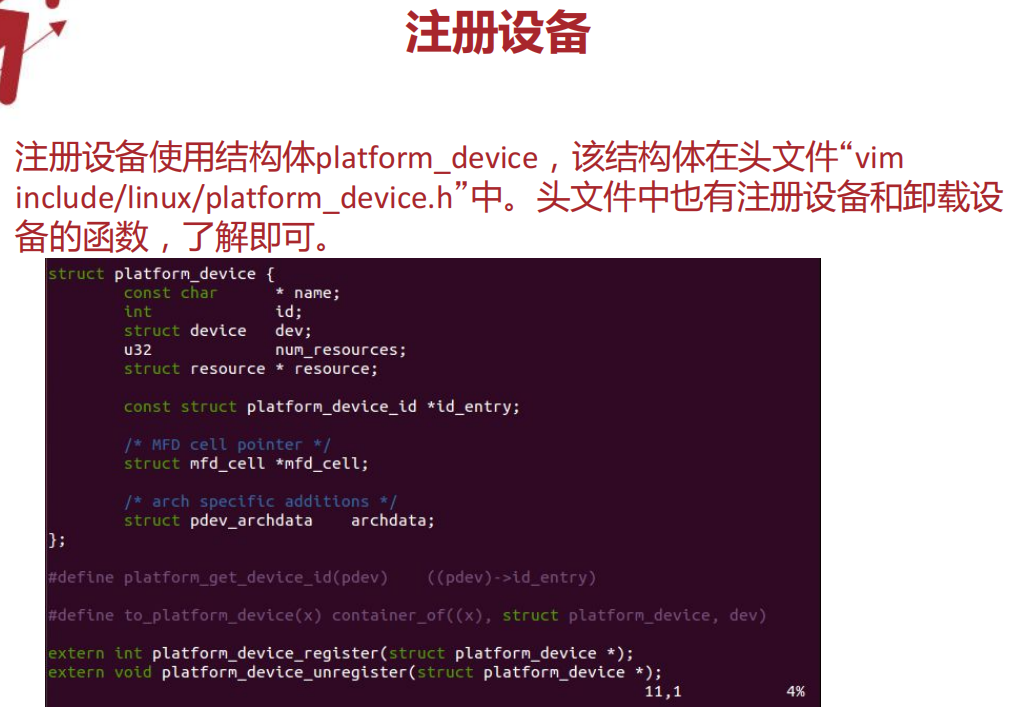
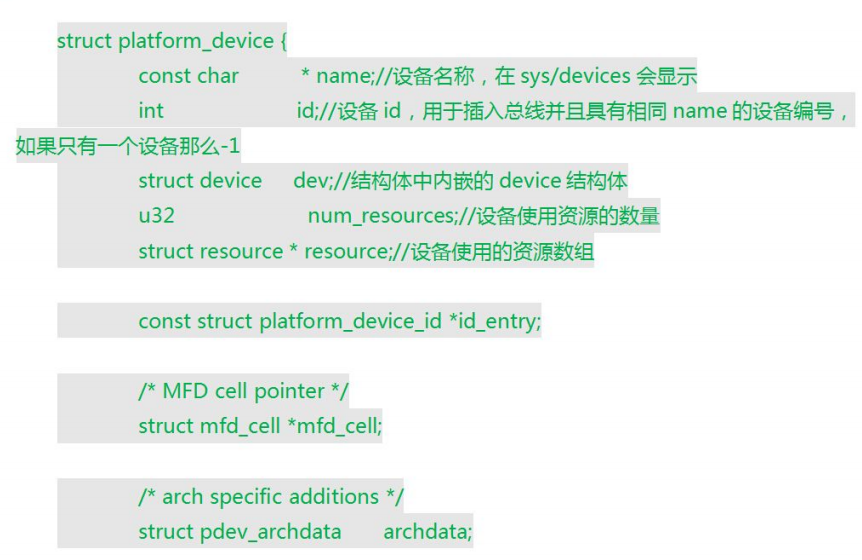
注册设备

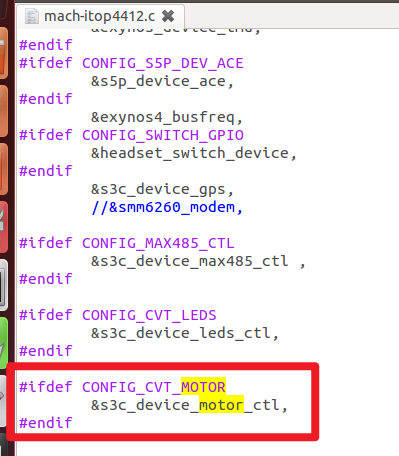
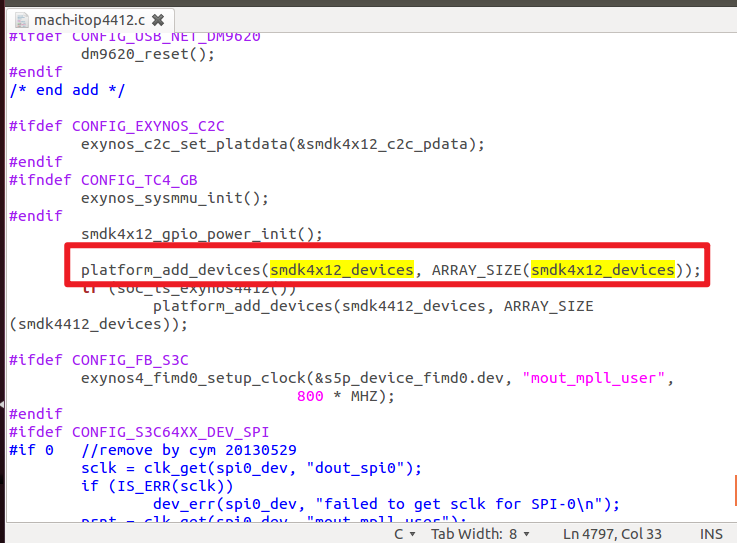
cd /opt/exynos4412/kernel-exynos4412/arch/arm/mach-exynos# 更改mach-itop4412.c文件
注册结构体变量
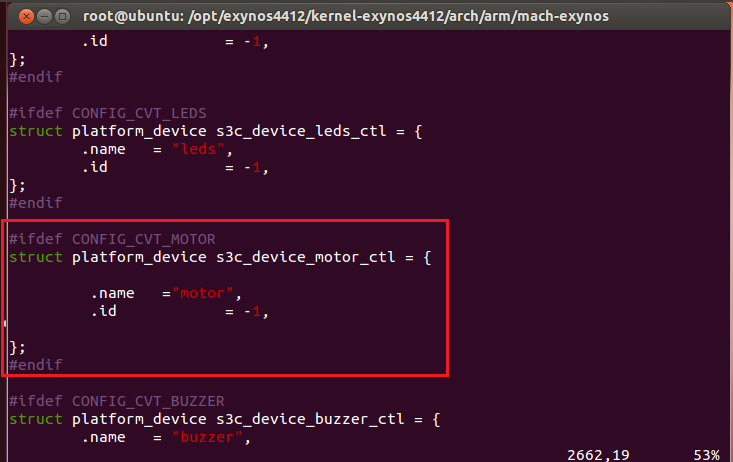
结构体变量导入内核中链表(需要确认一下,是否有“CVT_MOTOR”宏定义,只有定义了这个宏,在生成内核的时候才会将其编译到内核)
cd /opt/exynos4412/kernel-exynos4412/drivers/char vim Kconfig文件
保存退出,然后cd /opt/exynos4412 make menuconfig进行选中motor配置

cd /opt/exynos4412/kernel-exynos4412 vim .config文件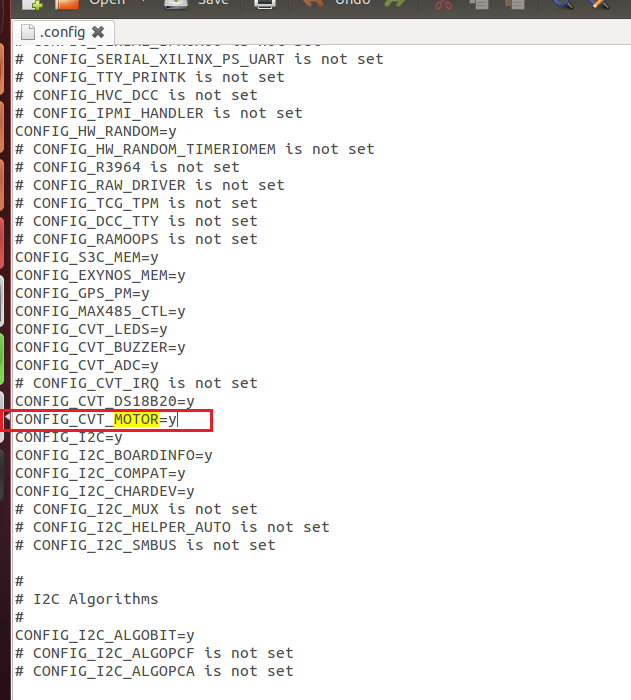
make zImage 生成新的zImage
烧录进开发板 输入以下命令查看注册到的设备
驱动注册(重点)

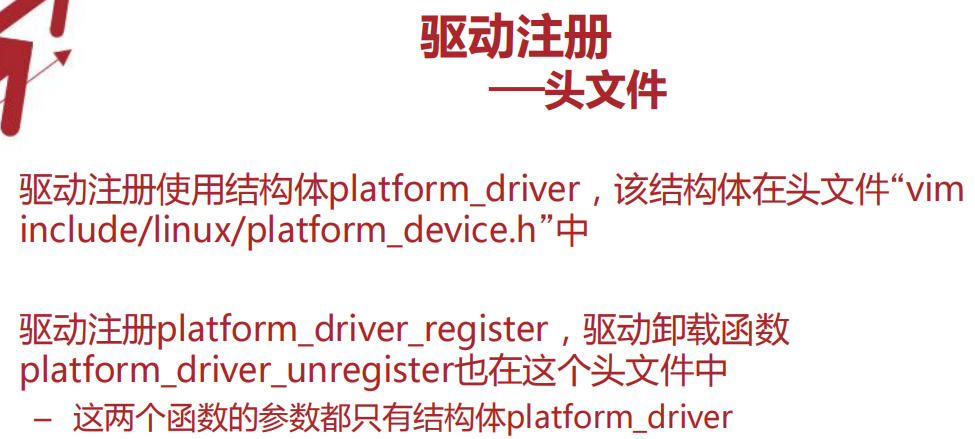

注册结构体

实验
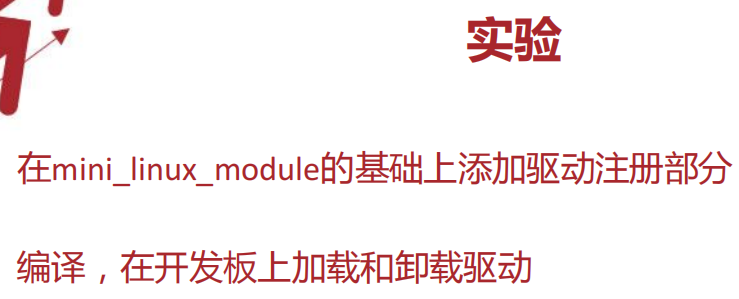
probe_linux_module.c
参照include/linux/platform_device.h文件添加进下面文件
#include <linux/init.h>
#include <linux/module.h>

/*驱动注册的头文件,包含驱动的结构体和注册和卸载的函数*/
#include <linux/platform_device.h>

#define DRIVER_NAME "hello_ctl"

MODULE_LICENSE("Dual BSD/GPL");
MODULE_AUTHOR("TOPEET");

static int hello_probe(struct platform_device *pdv){

	printk(KERN_EMERG "\tinitialized\n");

	return 0;
}

static int hello_remove(struct platform_device *pdv){

	return 0;
}

static void hello_shutdown(struct platform_device *pdv){

	;
}

static int hello_suspend(struct platform_device *pdv){

	return 0;
}

static int hello_resume(struct platform_device *pdv){

	return 0;
}

struct platform_driver hello_driver = {
	.probe = hello_probe,
	.remove = hello_remove,
	.shutdown = hello_shutdown,
	.suspend = hello_suspend,
	.resume = hello_resume,
	.driver = {
		.name = DRIVER_NAME,
		.owner = THIS_MODULE,
	}
};


static int hello_init(void)
{
	int DriverState;

	printk(KERN_EMERG "HELLO WORLD enter!\n");
	DriverState = platform_driver_register(&hello_driver);

	printk(KERN_EMERG "\tDriverState is %d\n",DriverState);
	return 0;
}

static void hello_exit(void)
{
	printk(KERN_EMERG "HELLO WORLD exit!\n");

	platform_driver_unregister(&hello_driver);
}

module_init(hello_init);
module_exit(hello_exit);
新建 /opt/exynos4412/kernel-exynos4412/probe_linux_module文件夹放上面的文件
输入命令make进行编译生成.ko文件
通过SD卡/U盘挂载到开发板进行实现
以module的方式注册设备
平台文件中设备注册分析

以LED为例
gedit /opt/exynos4412/kernel-exynos4412/arch/arm/mach-exynos/mach-itop4412.c


例程1
以module的方式注册设备

platform_device_test.c
#include <linux/init.h>
#include <linux/module.h>
/*驱动注册的头文件,包含驱动的结构体和注册和卸载的函数*/
#include <linux/platform_device.h>
MODULE_LICENSE("Dual BSD/GPL");
MODULE_AUTHOR("TOPEET");
static void motor_release(struct device *dev)
{
printk("motor_release");
}
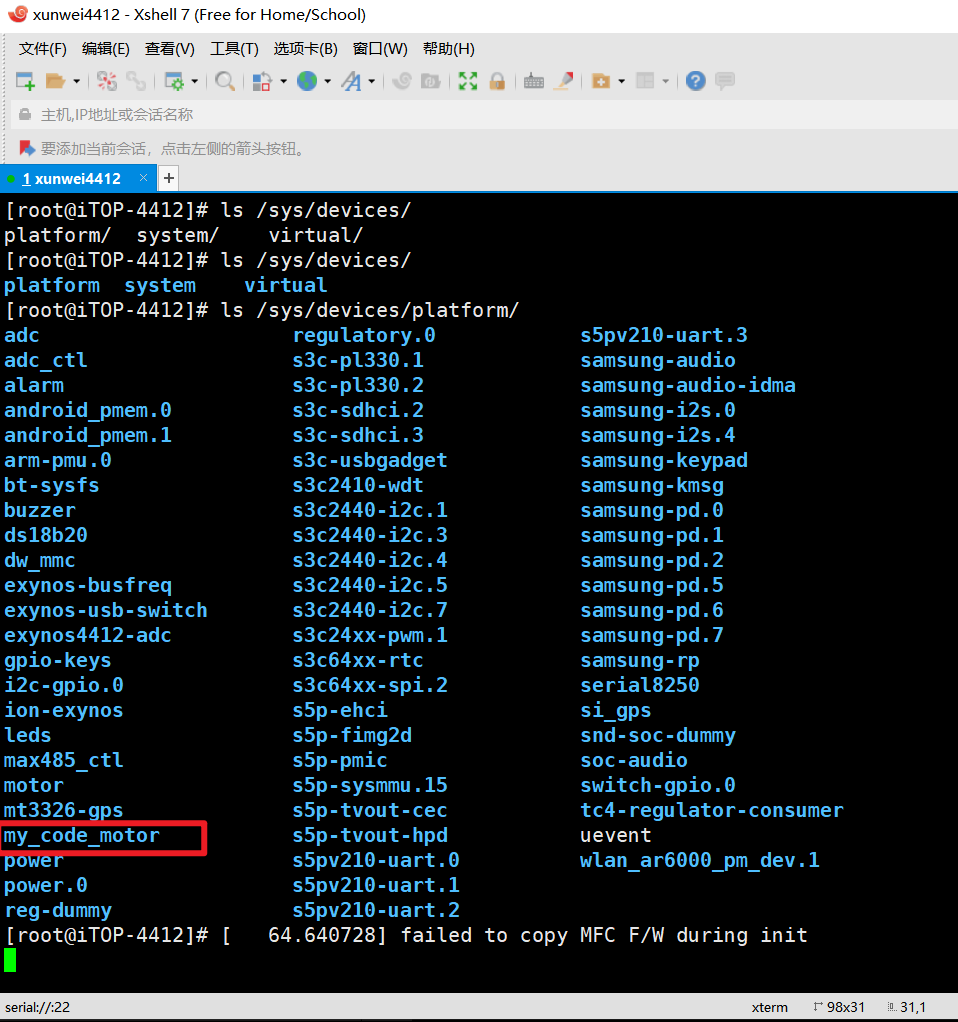
struct platform_device platform_device_motor ={
.name ="my_code_motor",
.id =-1,
.dev={
.release =motor_release,
}
};
static int hello_init(void)
{
platform_device_register(&platform_device_motor);
return 0;
}
static void hello_exit(void)
{
platform_device_register(&platform_device_motor);
}
module_init(hello_init);
module_exit(hello_exit);
将Makefile中的文件名改为 platform_device_test.o

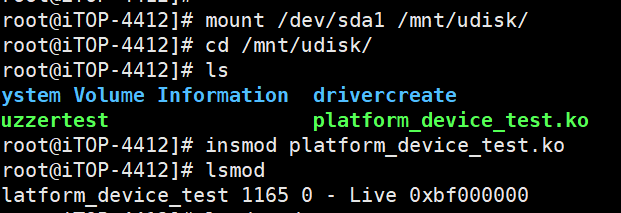
通过ssh传入到虚拟机新建一个文件夹进行命令make生成.ko文件

将U盘或者TF卡插入电脑,将.ko文件通过ssh传到U盘,U盘插入开发板挂载测试
例程2
驱动代码获取设备注册的信息
platform_device_info.c
#include <linux/init.h>
#include <linux/module.h>
/*驱动注册的头文件,包含驱动的结构体和注册和卸载的函数*/
#include <linux/platform_device.h>
#define DRIVER_NAME "my_code_motor"

MODULE_LICENSE("Dual BSD/GPL");
MODULE_AUTHOR("TOPEET");

static int hello_probe(struct platform_device *pdv){

	printk(KERN_EMERG "\tinitialized\n");

	printk("pdv->name is %s\n",pdv->name);
	printk("pdv->id is %d\n",pdv->id);

	pdv->dev.release(&pdv->dev);

	return 0;
}

static int hello_remove(struct platform_device *pdv){

	return 0;
}

static void hello_shutdown(struct platform_device *pdv){

	;
}

static int hello_suspend(struct platform_device *pdv){

	return 0;
}

static int hello_resume(struct platform_device *pdv){

	return 0;
}

struct platform_driver hello_driver = {
	.probe = hello_probe,
	.remove = hello_remove,
	.shutdown = hello_shutdown,
	.suspend = hello_suspend,
	.resume = hello_resume,
	.driver = {
		.name = DRIVER_NAME,
		.owner = THIS_MODULE,
	}
};


static int hello_init(void)
{
	int DriverState;

	printk(KERN_EMERG "HELLO WORLD enter!\n");
	DriverState = platform_driver_register(&hello_driver);

	printk(KERN_EMERG "\tDriverState is %d\n",DriverState);
	return 0;
}

static void hello_exit(void)
{
	printk(KERN_EMERG "HELLO WORLD exit!\n");

	platform_driver_unregister(&hello_driver);
}

module_init(hello_init);
module_exit(hello_exit);
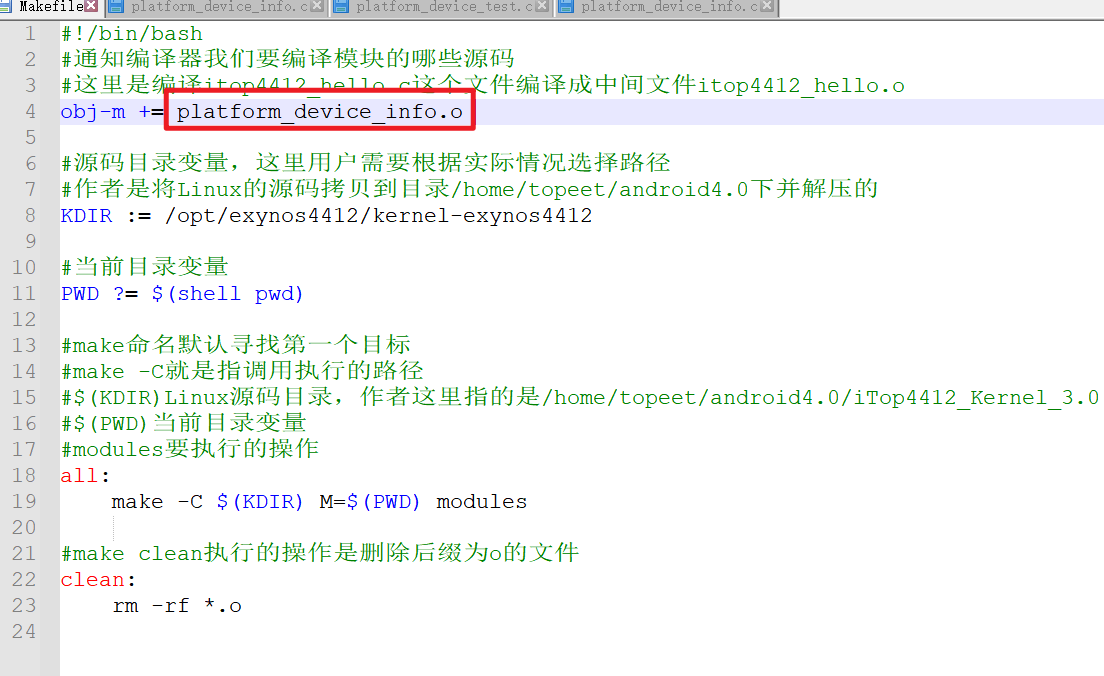
将Makefile中的文件名改为 platform_device_info.o
通过ssh传入到虚拟机新建一个文件夹进行命令make生成.ko文件
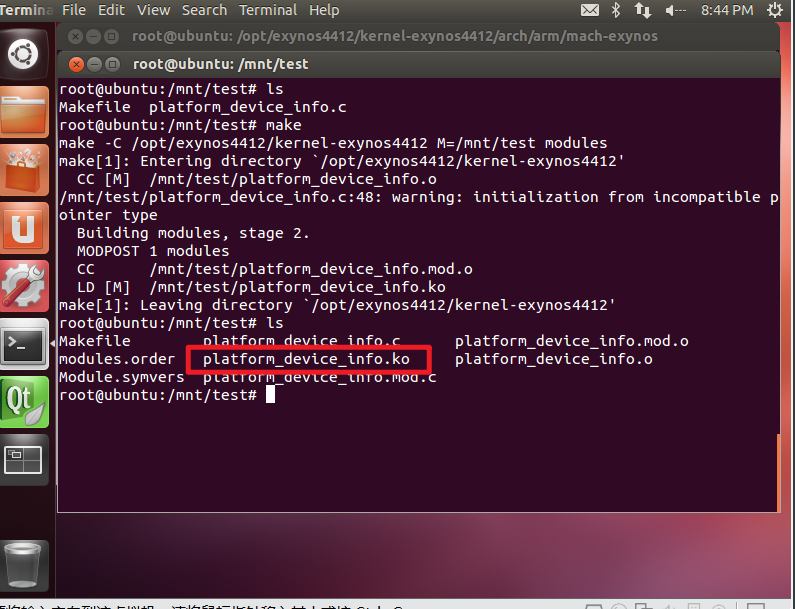
将U盘或者TF卡插入电脑,将.ko文件通过ssh传到U盘,U盘插入开发板挂载测试
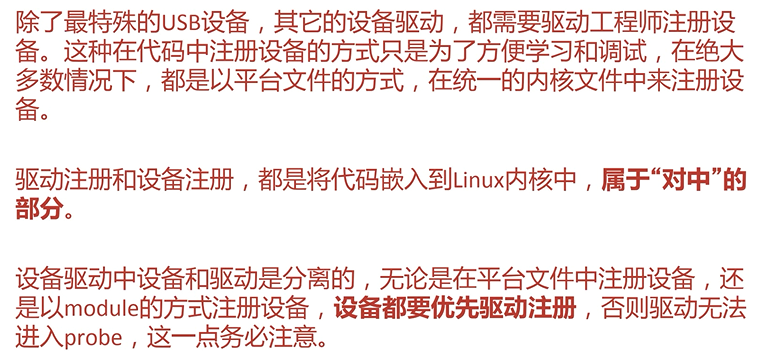
先进行设备注册,再进行驱动注册,否则驱动无法进入probe返回信息
小结


 465
465


 被折叠的 条评论
为什么被折叠?
被折叠的 条评论
为什么被折叠?
 到【灌水乐园】发言


