


前言
1.本次作业如果不去深究,只是单纯完成两个函数问题就不大,如果想了解整个框架是怎么运作的,可以移步其他大佬的博客,如从头到尾理解作业5
2.本博客重点在于推导MT算式,以及总结作业五的重难点
作业要求
1.实现为每个像素生成光线
2.实现MT算法(其实直接按照公式套就可以了)
Render()实现
这个老师上课实际并没有讲明确的步骤,这里推荐看外国大神的博客
总之,生成像素光线总共有3步
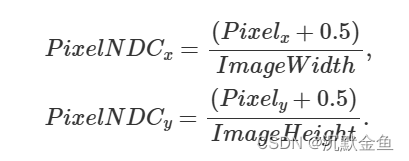
- 将像素转换到[-1,1],也就是转换到屏幕空间坐标,在之前光栅化课程中就说到要先将物体转化为立方体;在光追中,想转换到屏幕空间坐标需要先转换到NDC坐标(归一化),再标准化到[-1,1]
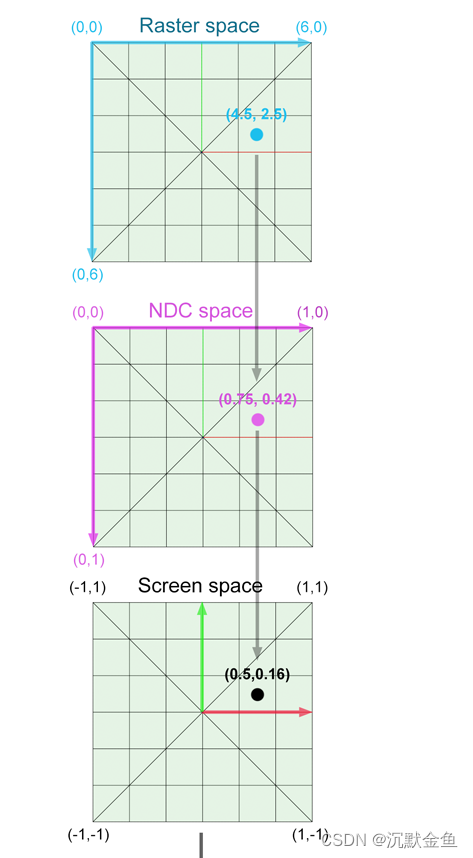
可以看到,一开始是以左上角为起点,最后一步实际就是标准化起点到左下角,可以理解为整个图像颠倒了
具体算式:
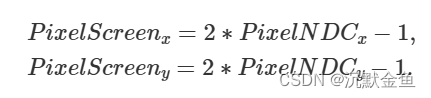
由于起点在左下角,实际是y上下颠倒了,所以算式改变为如下图

- 屏幕空间转换为相机空间,实际就是将标准化的图像转换为对应分辨率的图像
比如下左图,虽然已经将整个图像转换为正方形,但实际内部的像素都不是正方形,需要保证图像内的每个像素都是正方形
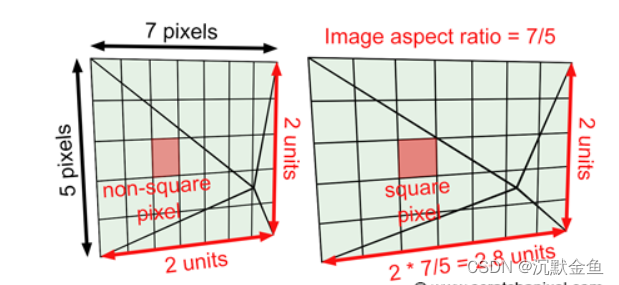
具体算式:利用图像的宽高比,拉伸x轴,实际是因为x轴图像一般比y轴大,比如1920x1080图像

然后由于摄像机的视角问题,所以还需要让x和y同时乘以scale,保证不同的摄像机角度也能够得到正确的摄像机图像

3.求出光线的方向向量,这里由于近平面与摄像机规定距离为1,所以也只需要考虑x和y
作业具体代码
void Renderer::Render(const Scene& scene)
{
    std::vector<Vector3f> framebuffer(scene.width * scene.height);

    float scale = std::tan(deg2rad(scene.fov * 0.5f));
    float imageAspectRatio = scene.width / (float)scene.height;

    // Use this variable as the eye position to start your rays.
    Vector3f eye_pos(0);
    int m = 0;
    for (int j = 0; j < scene.height; ++j)
    {
        for (int i = 0; i < scene.width; ++i)
        {
            // 归一化设备坐标 (NDC)
            float x = (i+0.5)/scene.width;
            float y = (j+0.5)/scene.height;

            // 转换为屏幕坐标
            x = 2 * x - 1;
            y = 1 - 2 * y;

            // TODO: Find the x and y positions of the current pixel to get the direction
            // vector that passes through it.
            // Also, don't forget to multiply both of them with the variable *scale*, and
            // x (horizontal) variable with the *imageAspectRatio*
            Vector3f dir = Vector3f(x * imageAspectRatio * scale, y * scale, -1);
            dir = normalize(dir);
            framebuffer[m++] = castRay(eye_pos, dir, scene, 0);
        }
        UpdateProgress((j+1) / (float)scene.height);
    }

    // save framebuffer to file
    FILE* fp = fopen("binary.ppm", "wb");
    (void)fprintf(fp, "P6\n%d %d\n255\n", scene.width, scene.height);
    for (auto i = 0; i < scene.height * scene.width; ++i) {
        static unsigned char color[3];
        color[0] = (char)(255 * clamp(0, 1, framebuffer[i].x));
        color[1] = (char)(255 * clamp(0, 1, framebuffer[i].y));
        color[2] = (char)(255 * clamp(0, 1, framebuffer[i].z));
        fwrite(color, 1, 3, fp);
    }
    fclose(fp);
}
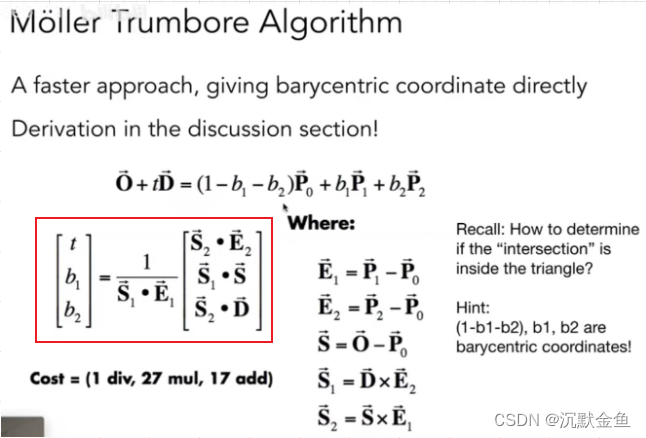
MT算式推导
非常秒的算式,但网上基本没有什么人推导,大概是太简单了吧,但我认为还是要补充一些,先来看看上课截图,我们要求的就是红框部分
先将初始式子展开
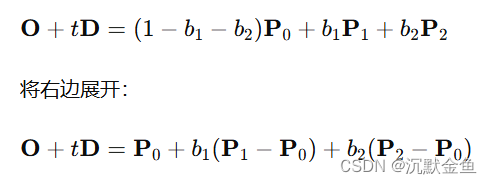
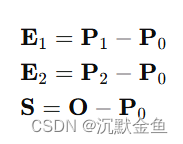
为了减少变量,设如下向量
将P0左移,得如下式子
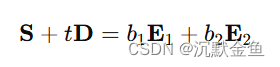
由于向量叉乘自身得到零向量,所以两步叉乘E2,得
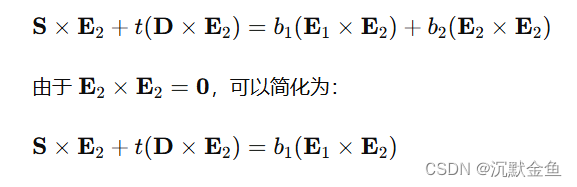
设S1=DxE2, S2=SxE1,然后由于E1xE2正好是三角形的法向量,所以两边点乘E1,得

根据点乘的两个向量垂直等于0,以及点积与叉积交换律,如下

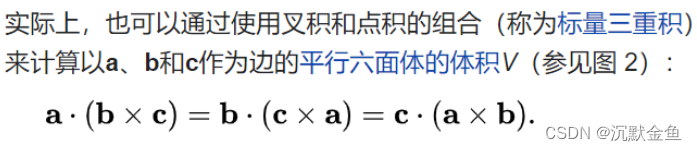
最终可以得到
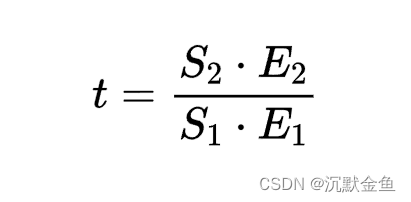
就这样了,本人不是数学专业的,实在证不下去了,哪位大佬有兴趣证一下吧。。
rayTriangleIntersect()代码
由于b1,b2都属于重心坐标的一部分,所以最后判断的时候要注意
bool rayTriangleIntersect(const Vector3f& v0, const Vector3f& v1, const Vector3f& v2, const Vector3f& orig,
                          const Vector3f& dir, float& tnear, float& u, float& v)
{
    //根据公式求
    float t, b1, b2, k;
    Vector3f e1 = v1 - v0, e2 = v2 - v0;
    Vector3f s = orig - v0, s1 = crossProduct(dir, e2), s2 = crossProduct(s, e1);

    k = dotProduct(s1, e1);
    if (k == 0.0)    return false;

    t = dotProduct(s2, e2) / k;
    if (t < 0)   return false;

    b1 = dotProduct(s1, s) / k;
    b2 = dotProduct(s2, dir) / k;
    if (b1 < 0 || b2 < 0 || (1 - b1 - b2) < 0) return false;

    tnear = t;
    u = b1;
    v = b2;
    return true;
}
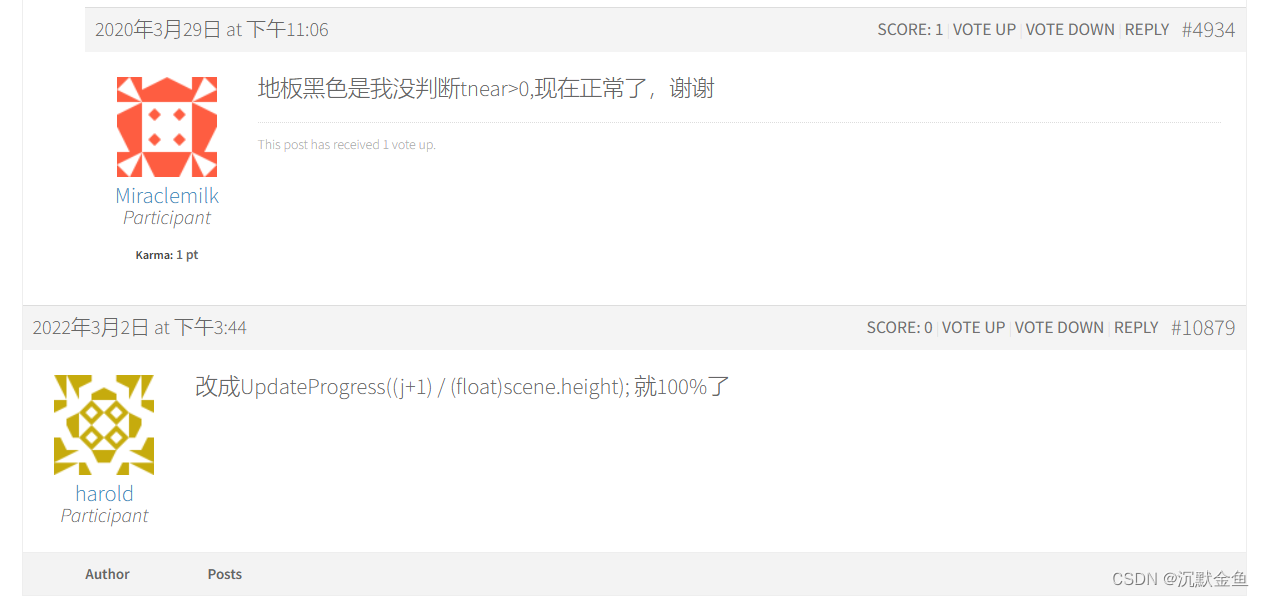
加载百分之99的问题
已经有大佬给出,如下
之后的ppm文件用PS打开就能看到图片了
总结
1.需要清楚整个光线追踪的流程,摄像机发射光线的流程中有一部分是光栅化的知识,包括转化为视图坐标,映射到屏幕上
2.还有要注意MT算法中的隐含条件,如t不能<0,分母不能等于0等
参考博客
1.https://blog.csdn.net/qq_41835314/article/details/124969379
2.https://www.scratchapixel.com/lessons/3d-basic-rendering/ray-tracing-generating-camera-rays/generating-camera-rays.html
3.点积与叉积性质
4.向量内积与点乘


 4905
4905


 被折叠的 条评论
为什么被折叠?
被折叠的 条评论
为什么被折叠?
 到【灌水乐园】发言


