


Spring MVC更多家族成员---框架内处理流程拦截与HandlerInterceptor---08
引言
前面已经讲述了,HandlerMapping返回的用于处理具体Web请求的Handler对象,是通过一个HandlerExecutionChain对象进行封装的(这在HandlerMapping的接口定义上可以看出来)。
我们却一直没有对这个HandlerExecutionChain做进一步的解释,现在是彻底揭开这个谜团的时候了。
说白了,HandlerExecutionchain就是一个数据载体,它包含了两方面的数据,一个就是用于处理Web请求的Handler,另一个则是一组随同Handler一起返回的HandlerInterceptor。
这组HandlerInterceptor可以在Handlerl的执行前后对处理流程进行拦截操作。
HandlerInterceptor定义了如下三个拦截方法:
public interface HandlerInterceptor {

	default boolean preHandle(HttpServletRequest request, HttpServletResponse response, Object handler)
			throws Exception {

		return true;
	}

	default void postHandle(HttpServletRequest request, HttpServletResponse response, Object handler,
			@Nullable ModelAndView modelAndView) throws Exception {
	}

	default void afterCompletion(HttpServletRequest request, HttpServletResponse response, Object handler,
			@Nullable Exception ex) throws Exception {
	}

}
下面是对这三个拦截方法的简单说明。
拦截器方法调用时机都体现在DispathcerServlet的doDispatch方法流程中:
protected void doDispatch(HttpServletRequest request, HttpServletResponse response) throws Exception {
		HttpServletRequest processedRequest = request;
		HandlerExecutionChain mappedHandler = null;
		boolean multipartRequestParsed = false;

		WebAsyncManager asyncManager = WebAsyncUtils.getAsyncManager(request);

		try {
			ModelAndView mv = null;
			Exception dispatchException = null;

			try {
			//文件上传检查
				processedRequest = checkMultipart(request);
				multipartRequestParsed = (processedRequest != request);

				// Determine handler for the current request.
				//利用handlerMapping获得对应的handler
				mappedHandler = getHandler(processedRequest);
				if (mappedHandler == null) {
				//进行handler没有的处理---404
					noHandlerFound(processedRequest, response);
					return;
				}

				// Determine handler adapter for the current request.
				//获取当前handler的适配器
				HandlerAdapter ha = getHandlerAdapter(mappedHandler.getHandler());

				// Process last-modified header, if supported by the handler.
				//处理last-modified请求头
				String method = request.getMethod();
				boolean isGet = HttpMethod.GET.matches(method);
				if (isGet || HttpMethod.HEAD.matches(method)) {
					long lastModified = ha.getLastModified(request, mappedHandler.getHandler());
					if (new ServletWebRequest(request, response).checkNotModified(lastModified) && isGet) {
						return;
					}
				}
                //前置处理
				if (!mappedHandler.applyPreHandle(processedRequest, response)) {
					return;
				}

				//适配器被调用
				mv = ha.handle(processedRequest, response, mappedHandler.getHandler());

				if (asyncManager.isConcurrentHandlingStarted()) {
					return;
				}

				applyDefaultViewName(processedRequest, mv);
				//适配器方法结束后,调用方法后处理拦截
				mappedHandler.applyPostHandle(processedRequest, response, mv);
			}
			catch (Exception ex) {
				dispatchException = ex;
			}
			catch (Throwable err) {
				// As of 4.3, we're processing Errors thrown from handler methods as well,
				// making them available for @ExceptionHandler methods and other scenarios.
				dispatchException = new NestedServletException("Handler dispatch failed", err);
			}
			//上面目标handle中抛出的异常都会被捕获,然后交给processDispatchResult方法进行全局异常处理
			processDispatchResult(processedRequest, response, mappedHandler, mv, dispatchException);
		}
		//如果在进行视图渲染过程中依旧抛出了异常,那么就触发对应的后处理逻辑
		catch (Exception ex) {
			triggerAfterCompletion(processedRequest, response, mappedHandler, ex);
		}
		catch (Throwable err) {
			triggerAfterCompletion(processedRequest, response, mappedHandler,
					new NestedServletException("Handler processing failed", err));
		}
		finally {
		//清理工作
			if (asyncManager.isConcurrentHandlingStarted()) {
				// Instead of postHandle and afterCompletion
				if (mappedHandler != null) {
					mappedHandler.applyAfterConcurrentHandlingStarted(processedRequest, response);
				}
			}
			else {
				// Clean up any resources used by a multipart request.
				if (multipartRequestParsed) {
					cleanupMultipart(processedRequest);
				}
			}
		}
	}
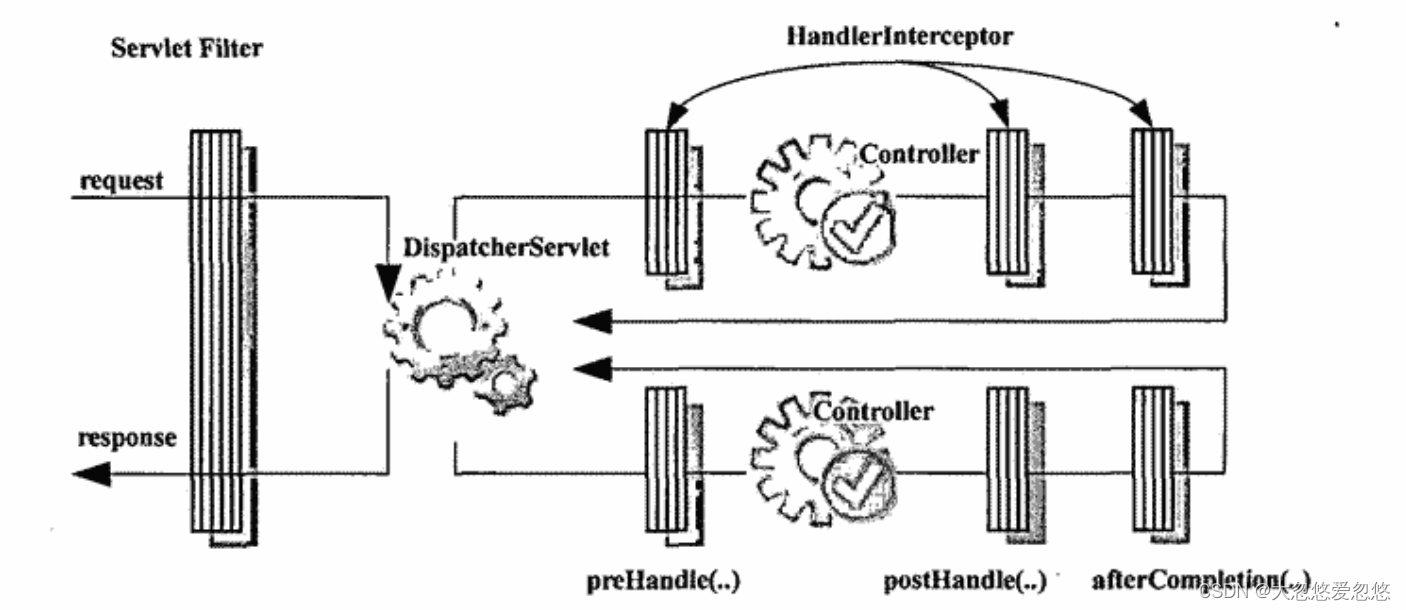
preHandle
- boolean preHandle: 该拦截方法将在相应的HandlerAdaptor调用具体的Handler处理Web请求之前执行。如果想在此之前阻断后继处理流程,preHandle方法将是最合适也是我们唯一的选择。preHandle通过boolean返回值表明是否继续执行后继处理流程。
- true表明允许后继处理流程继续执行。如果当前HandlerInterceptor位于所在HandlerInterceptor链之前或者中间位置,那么后继HandlerInterceptor的preHandle将继续执行。如果HandlerInterceptor是所在HandlerInterceptor链的最后一个,那么处理Web请求的Handler将允许执行。
- false表明preHandle方法不允许后继流程的继续执行,包括HandlerInterceptor链中的其他HandlerInterceptor以及其后的Handler。在这种情况下,通常认为preHandle方法内部已经自行处理掉了当前的Wb请求。当然,通过抛出相应的异常的方式,也可以达到与返回false同样的阻断效果。
一般来说,preHandle将是我们使用最多的拦截方法。我们也可以在这里进行一些必要条件检查,如果没能通过检查,通过preHandle可以阻断后继处理流程的执行。
	boolean applyPreHandle(HttpServletRequest request, HttpServletResponse response) throws Exception {
	//调用HandlerExecutionChain中所有拦截器的preHandle
		for (int i = 0; i < this.interceptorList.size(); i++) {
			HandlerInterceptor interceptor = this.interceptorList.get(i);
			//如果有一个拦截器返回false,那么就进入后置处理环节
			if (!interceptor.preHandle(request, response, this.handler)) {
				triggerAfterCompletion(request, response, null);
				return false;
			}
			//记录当前拦截器执行的索引
			this.interceptorIndex = i;
		}
		return true;
	}
postHandle
该拦截方法的执行时机为HandlerAdaptor调用具体的Handler处理完Web请求之后,并且在视图的解析和渲染之前。
通过该方法我们可以获取Handler执行后的结果,即ModelAndview。
我们可以在原处理结果的基础上对其进行进一步的后处理,比如添加新的统一的模型数据,或者对ModelAndView中的数据进行变更等。
postHandle返回类型为void,不可以阻断后继处理流程。
				//调用handlerAdapter的handle方法
				mv = ha.handle(processedRequest, response, mappedHandler.getHandler());
                ...
				mappedHandler.applyPostHandle(processedRequest, response, mv);
applyPostHandle方法如果执行过程中抛出异常,会直接进入triggerAfterCompletion流程
	void applyPostHandle(HttpServletRequest request, HttpServletResponse response, @Nullable ModelAndView mv)
			throws Exception {

		for (int i = this.interceptorList.size() - 1; i >= 0; i--) {
			HandlerInterceptor interceptor = this.interceptorList.get(i);
			interceptor.postHandle(request, response, this.handler, mv);
		}
	}
afterCompletion
在框架内整个处理流程结束之后,或者说视图都渲染完了的时候,不管是否发生异常,afterCompletion拦截方法将被执行。
如果处理是异常结束的话,我们可以在该方法中获得异常(Exception)的引用并对其进行统一处理。
		catch (Exception ex) {
			triggerAfterCompletion(processedRequest, response, mappedHandler, ex);
		}
		catch (Throwable err) {
			triggerAfterCompletion(processedRequest, response, mappedHandler,
					new NestedServletException("Handler processing failed", err));
		}

        private void triggerAfterCompletion(HttpServletRequest request, HttpServletResponse response,
			@Nullable HandlerExecutionChain mappedHandler, Exception ex) throws Exception {

		if (mappedHandler != null) {
		//调用HandlerExecutionChain的后置处理方法
			mappedHandler.triggerAfterCompletion(request, response, ex);
		}
		throw ex;
	}

    	void triggerAfterCompletion(HttpServletRequest request, HttpServletResponse response, @Nullable Exception ex) {
		for (int i = this.interceptorIndex; i >= 0; i--) {
			HandlerInterceptor interceptor = this.interceptorList.get(i);
			try {
			//方法执行不管是否出现异常,都会把所有拦截器的后置处理方法调用一遍
				interceptor.afterCompletion(request, response, this.handler, ex);
			}
			catch (Throwable ex2) {
				logger.error("HandlerInterceptor.afterCompletion threw exception", ex2);
			}
		}
	}
另外,如果Web请求处理过程中有相应资源需要清理的话,也可以在这里完成。
不用说也知道,afterCompletion的返回值为void,并且到它执行的时候,处理流程已经是尾声了,根本没有阻断执行流程的必要。
processDispatchResult方法进行视图渲染时,如果正常返回,也会调用triggerAfterCompletion:
processDispatchResult(processedRequest, response, mappedHandler, mv, dispatchException);
	private void processDispatchResult(HttpServletRequest request, HttpServletResponse response,
			@Nullable HandlerExecutionChain mappedHandler, @Nullable ModelAndView mv,
			@Nullable Exception exception) throws Exception {

		boolean errorView = false;

		if (exception != null) {
			if (exception instanceof ModelAndViewDefiningException) {
				logger.debug("ModelAndViewDefiningException encountered", exception);
				mv = ((ModelAndViewDefiningException) exception).getModelAndView();
			}
			else {
			//spring mvc提供的统一异常处理
				Object handler = (mappedHandler != null ? mappedHandler.getHandler() : null);
				mv = processHandlerException(request, response, handler, exception);
				errorView = (mv != null);
			}
		}

		// Did the handler return a view to render?
		//正常的视图渲染逻辑
		if (mv != null && !mv.wasCleared()) {
			render(mv, request, response);
			if (errorView) {
				WebUtils.clearErrorRequestAttributes(request);
			}
		}
		else {
			if (logger.isTraceEnabled()) {
				logger.trace("No view rendering, null ModelAndView returned.");
			}
		}

		if (WebAsyncUtils.getAsyncManager(request).isConcurrentHandlingStarted()) {
			// Concurrent handling started during a forward
			return;
		}
         //正常结束或者异常在上面被处理了,触发后置处理
		if (mappedHandler != null) {
			// Exception (if any) is already handled..
			mappedHandler.triggerAfterCompletion(request, response, null);
		}
	}
还有就是在prehandle中返回false时,会触发调用
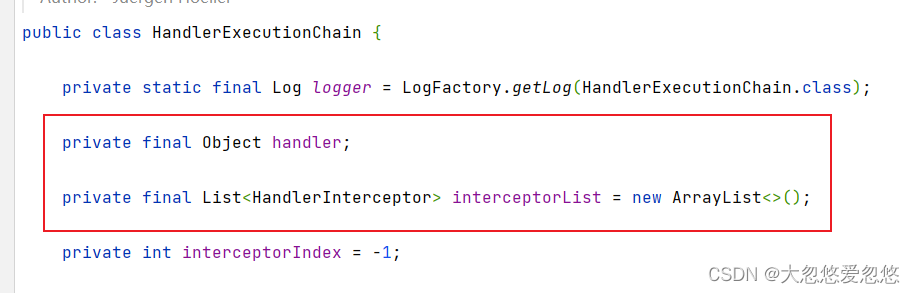
HandlerExecutionChain 源码概览
public class HandlerExecutionChain {

	private static final Log logger = LogFactory.getLog(HandlerExecutionChain.class);
    //目标handler对象
	private final Object handler;
    //handler对象关联的拦截器
	private final List<HandlerInterceptor> interceptorList = new ArrayList<>();
   //记录前置通知中拦截器执行的下标
	private int interceptorIndex = -1;
    ...
    //应用前置拦截
	boolean applyPreHandle(HttpServletRequest request, HttpServletResponse response) throws Exception {
	   //前置通知从头开始通知
		for (int i = 0; i < this.interceptorList.size(); i++) {
			HandlerInterceptor interceptor = this.interceptorList.get(i);
			if (!interceptor.preHandle(request, response, this.handler)) {
				triggerAfterCompletion(request, response, null);
				return false;
			}
			//如果某个拦截器前置通知返回了false,那么对应interceptorIndex记录到的就是最后一个返回true的拦截器的下标
			this.interceptorIndex = i;
		}
		return true;
	}


	void applyPostHandle(HttpServletRequest request, HttpServletResponse response, @Nullable ModelAndView mv)
			throws Exception {
        //从拦截器末尾挨个往前通知
		for (int i = this.interceptorList.size() - 1; i >= 0; i--) {
			HandlerInterceptor interceptor = this.interceptorList.get(i);
			interceptor.postHandle(request, response, this.handler, mv);
		}
	}


	void triggerAfterCompletion(HttpServletRequest request, HttpServletResponse response, @Nullable Exception ex) {
	    //从interceptorIndex开始,往前执行后置通知
		for (int i = this.interceptorIndex; i >= 0; i--) {
			HandlerInterceptor interceptor = this.interceptorList.get(i);
			try {
				interceptor.afterCompletion(request, response, this.handler, ex);
			}
			//后置通知执行不能被打断,就算抛出异常,也会继续挨个往前调用
			catch (Throwable ex2) {
				logger.error("HandlerInterceptor.afterCompletion threw exception", ex2);
			}
		}
	}
     ....
}
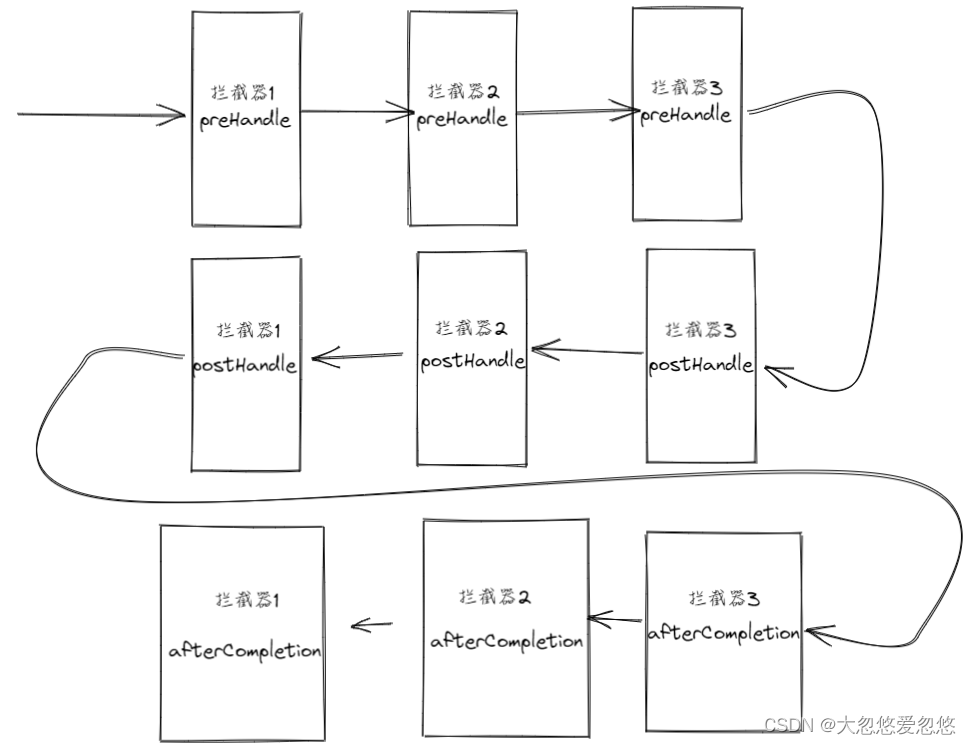
正常拦截器的执行流程如下:
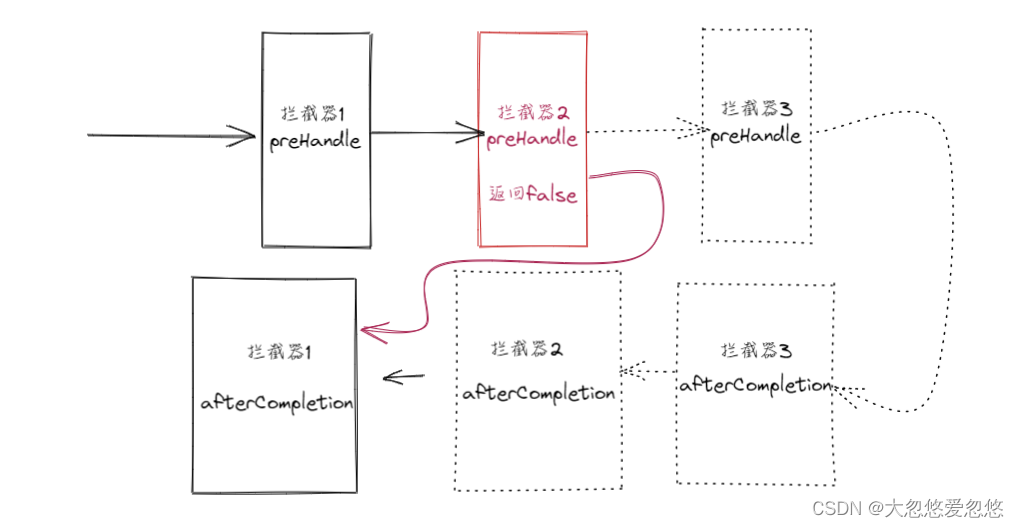
如果某个拦截器的preHandle方法返回false,那么执行流程会向下面这样:
可用的HandlerInterceptor实现
做任何事情之前我们都会先去找一下有没有现成的“锤子”。
对于HandlerInterceptor:来说,情况同样如此。在实现自定义的HandlerInterceptor.之前,我们先看一下Spring MVC都准备了哪些现成的HandlerInterceptor实现。
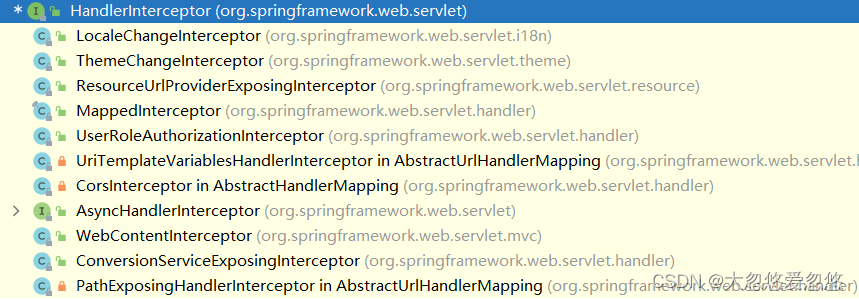
实际上,通过查看HandlerInterceptor的继承层次,我们可以发现很多HandlerInterceptor实现类:
不过,鉴于在稍后介绍LocalResolver和ThemeResolver的时候会再次接触LocaleChangeInterceptor和ThemeChangeInterceptor,我们先将它们放置一边。
重点看一下UserRoleAuthorizationInterceptor和WebContentInterceptori这两个可用的HandlerInterceptor实现类。
UserRoleAuthorizationInterceptor
UserRoleAuthorizationInterceptor允许我们通过HttpServletRequest的isUserInRole方法,使用指定的一组用户角色(UserRoles)对当前请求进行验证。
如果验证通不过,UserRoleAuthorizationInterceptor将默认返回HTTP的403状态码,即forbidden。我们可以通过覆写handleNotAuthorized方法改变这种默认行为,比如将请求导向一个信息页面。
UserRoleAuthorizationInterceptor的使用极其简单,只需要指定验证用的一组用户角色(UserRoles)即可,如下所示:
<bean id="userRolesAuthHandlerInterceptor"
class="org.springframework.Web.servlet.handler.UserRoleAuthorizationInterceptor">
   <property name="authorizedRoles">
      <list>
          <value>Admin</value>
      </list>
   </property>
</bean>
UserRoleAuthorizationInterceptor将循环遍历这组指定的用户角色(UserRoles).对当前请求进行验证。
WebContentInterceptor
WebContentInterceptor对处理流程的拦截主要做如下几件事情。
- 检查请求方法类型是否在支持方法之列。如果当前请求的方法类型超出我们通过setSupportedMethods方法指定的范围,那么WebContentInterceptor将抛出HttpRequestMethodNotSupportedException从而阻断后继处理流程。这通常用于进一步限定请求的方法类型,比如,我们可以通过setSupportedMethods方法设置supportedMethods.只为POST一种,不支持GET或者其他请求方法类型。
- 检查必要的Session实例。如果我们设置requiresession属性为true,同时又发现当前请求不能返回一个已经存在的Session实例,WebContentInterceptor将抛出HttpSessionRequiredException阻断后继处理流程。
- 检查缓存时间并通过设置相应HTTP头(Header)的方式控制缓存行为。WebContentInterceptor允许我们通过setCacheSeconds方法设置请求内容的缓存时间。它将通过设置用于缓存管理的HTTP头(HTTP Header)的形式,对请求内容对应的缓存行为进行管理。我们可以通过useCacheControlHeader或者useExpiresHeader属性,进一步明确是使用的HTTP1.I的Cache-Control指令还是HTTP1.0的Expires指令。
通常,WebContentInterceptor使用方式如下所示:
<bean id="WebContentInterceptor"
class="org.springframework.Web.servlet.mvc.WebContentInterceptor"
p:cacheSeconds="30" p:supportedMethod="POST">
</bean>
除此之外,我们还可以通过setCacheMappings方法,进一步明确指定不同请求与其缓存时间之间的细粒度的映射关系。
注意
UserRoleAuthorizationInterceptor和WebContentInterceptor:都是只在preHandle拦截方法中实现了相应的拦截逻辑。
我想,你应该已经从它们能够“阻断后继处理流程”的功能上看出这一点。
自定义HandlerInterceptor实现
Spring为我们提供了现成的HandlerInterceptor固然不错,但这并不足以满足广大群众的各种需求。
单就HandlerInterceptor作为一个扩展点而存在的意义来讲,如果拦截Web请求处理逻辑的需求就那么几种的话,完全没有必要设置这么一个角色。
而实际上,我们所要面对的系统和场景却是繁杂多变的,所以,大部分时间,我们不得不根据应用的需求提供我们的自定义HandlerInterceptor实现类。
这里给出一个简单的例子,通过校验当前请求是否携带了pass=true这对键值对,来决定是否放行:
public class PassInterceptor extends HandlerInterceptorAdapter {
    @Override
    public boolean preHandle(HttpServletRequest request, HttpServletResponse response, Object handler) throws Exception {
        String pass = request.getParameter("pass");
        if(pass!=null&&pass.equals("true")){
            return true;
        }
        return false;
    }
}
这里我们只需要实现preHandle接口即可,而不需要实现接口中其他两个默认方法。
在spring 2.x版本中,HandlerInterceptor接口的方法在继承后,是需要全部进行实现的。
对于那些需要经常被扩展,而又包含多个方法需要实现的接口声明,通常情况下,使用者并非每次都希望提供所有接口方法的实现逻辑。为了避免在实现这些接口的时候,每次都要去实现接口定义中的所有方法,对应API的设计者通常都会提供一个XXXAdaptor类专门用于子类化的需要,避免实现所有接口方法的烦琐。
因此,在旧版本的spring中,程序员通常是继承HandlerInterceptorAdapter来决定重写那个方法,而不是通通实现一遍。
但是,到了JDK 8以后,接口中有了默认方法的提供,就不再需要额外的HandlerInterceptorAdapter来进行空实现了。

我们还可以在其他地方遇到这种提供XXAdaptor的API设计方式。如果某一天我们也遇到类似的情况的话,说不定也可以借鉴一下哦。只不过,不要将它与Adaptor模式(Adaptor Pattern)里的那个Adaptor相混淆。
HandlerInterceptor寻根
我们已经知道了HandlerInterceptor的作用,也知道了Spring MVC都提供了哪些常用的HandlerInterceptor实现,甚至,也了解了如何自定义一个HandlerInterceptor,却还不知道到底应该如何将HandlerInterceptor纳入应用程序才能使其工作。
HandlerInterceptor和Handler实际上“本是同根生”。如果我们从HandlerInterceptor所处的位置溯源而上(按照HandlerInterceptor→HandlerExecutionChain→HandlerMapping的顺序),则会发现HandlerMapping是其最终的发源地,AbstractHandlerMapping作为几乎所有HandlerMapping实现类的父类,提供了setInterceptors方法以接受一组指定的HandlerInterceptor实例。
所以,要使我们的HandlerInterceptor发挥作用,只要将它添加到相应的HandlerMapping即可,如下所示:
     <bean id="handlerMapping" class="com.example.AnnoHandlerMapping">
          <property name="interceptors">
               <list>
                    <ref bean="interceptor"/>
               </list>
          </property>
     </bean>
     <bean id="interceptor" class="com.example.PassInterceptor"/>
这些指定的HandlerInterceptor将随同处理具体Web请求的Handler一起返回(以HandlerExecutionChain的形式),并对Web请求的处理流程进行拦截。
在讲解HandlerMapping的时候提到过,我们可以在同一Spring MVC应用程序中指定多个拥有不同优先级的HandlerMapping,每一HandlerMapping管理自己所负责的一组Web请求处理的映射关系。
在HandlerInterceptor结合HandlerMapping的这一特性(即Chaining Of HandlerMapping)之后,就可以细化Web请求处理流程的拦截范围,我们可以只赋予某一HandlerMapping相应的HandlerInterceptor实例,这样,该HandlerInterceptor就可以只拦截这一个HandlerMapping所管理的那一组处理Web请求的Handler。相对于只有一个HandlerMapping的情况,这样的处理方式让HandlerInterceptor的使用更加地灵活。
源码概览
流程要从DispathcerServlet的doDispatch方法中调用的getHandler说起:
	protected void doDispatch(HttpServletRequest request, HttpServletResponse response) throws Exception {
		HttpServletRequest processedRequest = request;
		HandlerExecutionChain mappedHandler = null;
		boolean multipartRequestParsed = false;

		WebAsyncManager asyncManager = WebAsyncUtils.getAsyncManager(request);

		try {
			ModelAndView mv = null;
			Exception dispatchException = null;

			try {
				processedRequest = checkMultipart(request);
				multipartRequestParsed = (processedRequest != request);

				//通过查询HandlerMappings集合,获得一个可用的Handler,包装成一个HandlerExecutionChain后返回
				mappedHandler = getHandler(processedRequest);
				....
- 通过查询HandlerMappings集合,获得一个可用的Handler,包装成一个HandlerExecutionChain后返回
	@Nullable
	protected HandlerExecutionChain getHandler(HttpServletRequest request) throws Exception {
		if (this.handlerMappings != null) {
			for (HandlerMapping mapping : this.handlerMappings) {
				HandlerExecutionChain handler = mapping.getHandler(request);
				if (handler != null) {
					return handler;
				}
			}
		}
		return null;
	}
- AbstractHandlerMapping是大部分HandlerMapping的父类,因此这里getHandler方法,最终调用到的就是AbstractHandlerMapping的getHandler
	@Override
	@Nullable
	public final HandlerExecutionChain getHandler(HttpServletRequest request) throws Exception {
	    //具体如何根据请求找到一个handler实现,这个就是子类负责的内容了
		Object handler = getHandlerInternal(request);
		//尝试获取默认的handler进行处理
		if (handler == null) {
			handler = getDefaultHandler();
		}
		//如果默认的也没有被设置,那么就返回null,表示当前请求找不到对应的handler进行处理
		if (handler == null) {
			return null;
		}
		// Bean name or resolved handler?
		//如果返回的handler是一个string,那么把他看做是BeanName,尝试去容器中获取
		if (handler instanceof String) {
			String handlerName = (String) handler;
			handler = obtainApplicationContext().getBean(handlerName);
		}

		// Ensure presence of cached lookupPath for interceptors and others
		if (!ServletRequestPathUtils.hasCachedPath(request)) {
			initLookupPath(request);
		}
        //在这里将handler和拦截器链进行的组合
		HandlerExecutionChain executionChain = getHandlerExecutionChain(handler, request);
        ...
        //对cors跨域进行处理,这里先跳过
	     ...
		return executionChain;
	}
- getHandlerExecutionChain看来才是我们期望的核心步骤
	protected HandlerExecutionChain getHandlerExecutionChain(Object handler, HttpServletRequest request) {
	    //判断当前handler是否已经被包装好了
		HandlerExecutionChain chain = (handler instanceof HandlerExecutionChain ?
				(HandlerExecutionChain) handler : new HandlerExecutionChain(handler));
        //将当前HanlderMapping内部保存的拦截器都设置到当前HandlerExecutionChain 中饭
		for (HandlerInterceptor interceptor : this.adaptedInterceptors) {
		//MappedInterceptor提供额外的过滤功能,可以避免将当前HandlerMapping上的所有拦截器通通与当前handler对象关联
		//可以提高效率
			if (interceptor instanceof MappedInterceptor) {
				MappedInterceptor mappedInterceptor = (MappedInterceptor) interceptor;
				if (mappedInterceptor.matches(request)) {
					chain.addInterceptor(mappedInterceptor.getInterceptor());
				}
			}
			else {
				chain.addInterceptor(interceptor);
			}
		}
		return chain;
	}
HandlerInterceptor之外的选择
在Spring MVC中,并非只有HandlerInterceptor才能对Web请求的处理流程进行拦截并做相应的处理。
既然Spring MVC同样基于Servlet API构建,那么,Servlet提供的规范设施自然也可以在使用Spring MVC的Web应用程序中使用。
所以,能够提供拦截能力的Servlet标准组件Filter,就成为了使用HanlderInterceptor.之外的选择。
HandlerInterceptor和Servlet Filter的共同特点是都可以用于Web请求处理流程的拦截。但在某些方面二者也存在一些差别:
HandlerInterceptor位于DispatcherServlet之后,指定给HandlerMapping的它,可以对HandlerMapping所管理的多组映射处理关系进行拦截。
最主要的是,HandlerInterceptor拥有更细粒度的拦截点。我们可以在Handler执行之前,Handler执行之后,以及整个DispatcherServlet内部处理流程完成时点插入必要的拦截逻辑。
通过结合HandlerMapping的Chaining特性,我们可以对不同HandlerMapping管理的多组不同的Handler,应用不同的HandlerInterceptor进行处理流程的拦截处理,总之,HandlerInterceptor带给我们的是一种具有高灵活性的细粒度的请求处理流程拦截方案。
与HandlerInterceptor不同,Filter提供的拦截方式更像是一种对Web应用程序的“宏观调控”。
作为Servleti规范的标准组件,Filter通常被映射到Java Web应用程序中的某个servlet,或者一组符合某种URL匹配模式的访问资源上。所以,从Spring MVC应用的结构上看,Filter位于DispatcherServlet之前。如果把Filter和HandlerInterceptor看作同一类型的拦截器,Filter将比HandlerInterceptor拥有更高的执行优先级。
不过,二者提供的拦截功能所加诸于上的目标对象却完全是不同级别:Fliter序列在servlet层面对DispatcherServlet进行拦截,而HandlerInterceptor.则位于DispatcherServlet内部,对Handler的执行进行拦截。
Filter的应用位置注定了它不能够提供细粒度的拦截时点,所以,通常情况下,使用Filter对于Web应用程序中的一些普遍关注点进行统一处理是比较适合的,一旦需要细化处理流程的拦截逻辑,可以再转而求助于Handlerinterceptor。
DelegatingFilterProxy
Filter是servlet标准组件,需要在web.xml中配置,这就意味着,其生命周期管理更多是由Web容器进行管理的。如果我们的Filter在实现期间需要某些服务的支持,尤其是当前Spring MVC应用的WebApplicationContext中的某些服务的支持,我们不得不采用某种过度耦合的绑定机制或者查找方式来获取这些服务的支持。
为了能够让Filter的实现更加无拘无束,尽情享用依赖注入所带来的乐趣,Spring MVC引入了org.springframework.web.filter.DelegatingFilterProxy以改变Filter的现状。
顾名思义,DelegatingFilterProxy的作用是作为一个Filter的Proxy对象,当真正需要执行拦截操作的时候,它将把具体的工作委派给它所对应的一个Filter委派对象。
在物理结构上,DelegatingFilterProxy位于web.xml中承担Filter的原始使命,而它所委派的那个Filter对象,也就是做实际工作的那个家伙,却可以置身于WebApplicationContext中,充分享受Spring的IoC容器所提供的各项服
务。
下图演示了DelegatingFilterProxy与其对应的Filter实例之间的存在关系。
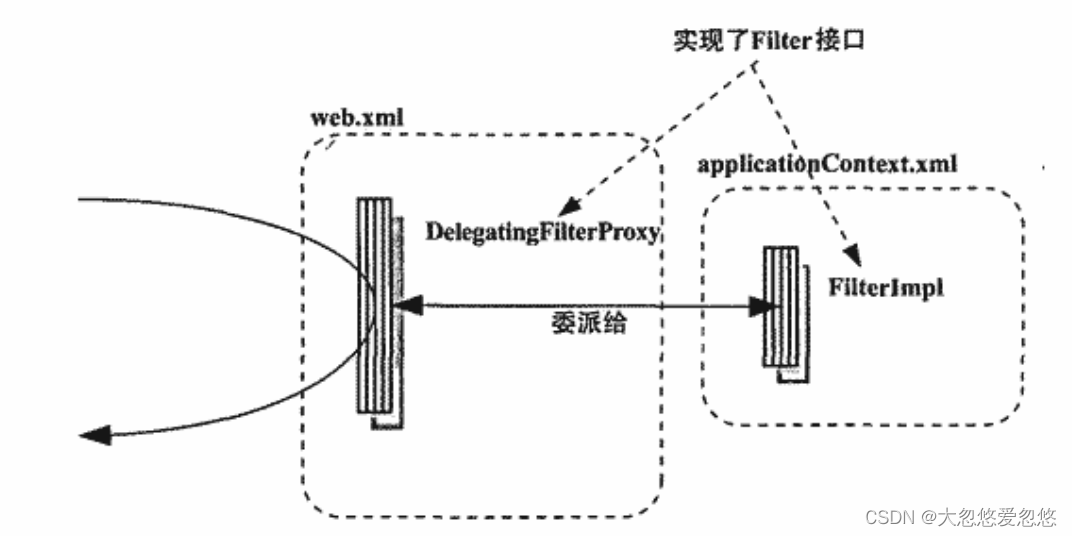
在DelegatingFilterProxy和其Filter委派对象的关系中,基本上所有“脏活儿”(dirty work)都是由DelegatingFilterProxy来做的,包括从绑定到ServletContext的WebApplicationContext中获取其将使用的Filter委派对象,然后读取原始的Filter配置信息,并设置给委派对象使用等。
只有在这些准备工作都完成之后,我们才能使用真正依赖的那个Filter对象。这是不是让我们感觉又回到了IoC
之前的时代了呢?
我们的最终目的只是想要一个直接可用的Filter实例而已。不过,DelegatingFilterProxy做了这些事情,倒是能够解脱实际使用的那个Filter实现类,也算值得吧!
有了DelegatingFilterProxy的付出,我们自己的Filter实现过得就舒服多了。

DelegatingFilterProxy继承了父类GenericFilterBean,通过查看继承图,可以发现GenericFilterBean是Spring内部大部分Filter实现的子类,因此,我们先来看看GenericFilterBean为我们提供了怎样的通用的功能:

GenericFilterBean—通用的Filter
GenericFilterBean是Filter 的简单基本实现,它将其配置参数(web.xml 中过滤器标记内的 init-param 条目)视为 bean 属性。
适用于任何类型过滤器的便捷超类。配置参数的类型转换是自动的,使用转换后的值调用相应的 setter 方法。子类也可以指定所需的属性。没有匹配 bean 属性设置器的参数将被简单地忽略。
此过滤器将实际过滤留给必须实现 Filter.doFilter 方法的子类。
这个通用过滤器基类不依赖于 Spring的ApplicationContext。过滤器通常不加载自己的上下文,而是从Root WebApplicationContext访问相关bean,可通过滤器的 ServletContext获取Root WebApplicationContext。

public abstract class GenericFilterBean implements Filter, BeanNameAware, EnvironmentAware,
		EnvironmentCapable, ServletContextAware, InitializingBean, DisposableBean {

	//当前Filter在IOC容器中的beanName
	//如果当前Filter实现加入了IOC容器管理,那么由BeanNameAware进行设置
	//否则根据web.xml中配置的初始化参数决定
	@Nullable
	private String beanName;

	@Nullable
	//EnvironmentAware接口获得---如果没有加入IOC容器管理,那么会new一个默认的StandardServletEnvironment
	private Environment environment;

	@Nullable
	//优先从filterConfig.getServletContext()获得
	//否则再通过ServletContextAware获得(前提是加入了IOC容器管理)
	private ServletContext servletContext;

	@Nullable
	//Filter接口中的initFilter接口获得
	private FilterConfig filterConfig;

    //web.xml中过滤器配置中,initparams需要的参数
	private final Set<String> requiredProperties = new HashSet<>(4);

	//上述属性的setter和getter方法省略
	...
    //继承InitializingBean接口获得的能力
   	@Override
	public void afterPropertiesSet() throws ServletException {
		initFilterBean();
	}

    //原生servlet容器提供的对Filter进行生命周期管理的销毁方法
    @Override
	public void destroy() {
	}

    //封装web.xml中Filter配置中相关initParams参数
    private static class FilterConfigPropertyValues extends MutablePropertyValues {
		public FilterConfigPropertyValues(FilterConfig config, Set<String> requiredProperties)
				throws ServletException {
            //requiredProperties就是上面给出的requiredProperties属性,必备参数
			Set<String> missingProps = (!CollectionUtils.isEmpty(requiredProperties) ?
					new HashSet<>(requiredProperties) : null);
            //拿到filter配置中的初始化参数
			Enumeration<String> paramNames = config.getInitParameterNames();
			//将初始化参数的key-value都加入当前MutablePropertyValues集合
			while (paramNames.hasMoreElements()) {
				String property = paramNames.nextElement();
				Object value = config.getInitParameter(property);
				//调用父类MutablePropertyValues的方法
				addPropertyValue(new PropertyValue(property, value));
				if (missingProps != null) {
				//挨个移除
					missingProps.remove(property);
				}
			}

			// Fail if we are still missing properties.
			//如果初始化参数都遍历完了,必须参数集合还是不为空,说明出现了参数缺失
			if (!CollectionUtils.isEmpty(missingProps)) {
				throw new ServletException(
						"Initialization from FilterConfig for filter '" + config.getFilterName() +
						"' failed; the following required properties were missing: " +
						StringUtils.collectionToDelimitedString(missingProps, ", "));
			}
		}
	}

    //原生servlet容器提供的对Filter进行生命周期管理的初始化方法
    @Override
	public final void init(FilterConfig filterConfig) throws ServletException {
		Assert.notNull(filterConfig, "FilterConfig must not be null");

		this.filterConfig = filterConfig;

		//PropertyValues中封装的就是initParam中的初始化参数
		PropertyValues pvs = new FilterConfigPropertyValues(filterConfig, this.requiredProperties);
		//如果初始化参数集合不为空
		if (!pvs.isEmpty()) {
			try {
				BeanWrapper bw = PropertyAccessorFactory.forBeanPropertyAccess(this);
				ResourceLoader resourceLoader = new ServletContextResourceLoader(filterConfig.getServletContext());
				Environment env = this.environment;
				if (env == null) {
					env = new StandardServletEnvironment();
				}
				bw.registerCustomEditor(Resource.class, new ResourceEditor(resourceLoader, env));
				//空实现,留给子类覆盖,可以增加一些额外的类型转换器
				initBeanWrapper(bw);
				//将初始化参数设置到当前对象内部--如果有不认识的属性,会进行忽略
				bw.setPropertyValues(pvs, true);
			}
			catch (BeansException ex) {
				String msg = "Failed to set bean properties on filter '" +
						filterConfig.getFilterName() + "': " + ex.getMessage();
				logger.error(msg, ex);
				throw new NestedServletException(msg, ex);
			}
		}

		// Let subclasses do whatever initialization they like.
		//钩子方法,子类覆盖
		initFilterBean();

		if (logger.isDebugEnabled()) {
			logger.debug("Filter '" + filterConfig.getFilterName() + "' configured for use");
		}
	}
    ...
    //获取当前过滤器的名字,默认是web.xml中配置的过滤器名字
    @Nullable
	protected String getFilterName() {
		return (this.filterConfig != null ? this.filterConfig.getFilterName() : this.beanName);
	}
	...
GenericFilterBean的实现子类如果没有被加入IOC容器管理,那么想要获取WebApplicationContext就需要从ServletContext中获得了。
DelegatingFilterProxy源码
- 首先提供了相关属性
    //WebApplicationContext在ServletContext中的key
	@Nullable
	private String contextAttribute;

	@Nullable
	private WebApplicationContext webApplicationContext;
    //被代理的Filter的beanName
	@Nullable
	private String targetBeanName;
    //被代理的对象是否要开启Filter原生生命周期的支持
	private boolean targetFilterLifecycle = false;
    //被代理的Filter对象
	@Nullable
	private volatile Filter delegate;
    //锁----DelegatingFilterProxy具有并发访问的安全性
	private final Object delegateMonitor = new Object();
- DelegatingFilterProxy覆写了父类中提供的钩子方法initFilterBean,在Filter初始时,会被调用
	@Override
	protected void initFilterBean() throws ServletException {
	   //核心是初始化被代理的Filter
		synchronized (this.delegateMonitor) {
			if (this.delegate == null) {
				// If no target bean name specified, use filter name.
				if (this.targetBeanName == null) {
				//如果我们没有提供targetBeanName,那么默认用FilterName进行代替
				//getFilterName方法实现由父类提供,不清楚回看父类源码
					this.targetBeanName = getFilterName();
				}
				// Fetch Spring root application context and initialize the delegate early,
				// if possible. If the root application context will be started after this
				// filter proxy, we'll have to resort to lazy initialization.
				WebApplicationContext wac = findWebApplicationContext();
				if (wac != null) {
				   //初始化被代理的Filter
					this.delegate = initDelegate(wac);
				}
			}
		}
	}
- 初始化被代理的Filter
	protected Filter initDelegate(WebApplicationContext wac) throws ServletException {
		String targetBeanName = getTargetBeanName();
		Assert.state(targetBeanName != null, "No target bean name set");
		//从DispathcerServlet对应的WebApplicationContext中获取对应的bean
		Filter delegate = wac.getBean(targetBeanName, Filter.class);
		//判断被代理的FIlter是否要开启原生Filte的生命周期
		if (isTargetFilterLifecycle()) {
		   //开启的话,就调用原生Filter的init方法,完成过滤器的初始化
		   //FilterConfig来自父类
			delegate.init(getFilterConfig());
		}
		return delegate;
	}
- findWebApplicationContext查询Root WebApplicationContext
	protected WebApplicationContext findWebApplicationContext() {
	   //DelegatingFilterProxy一般不会放入IOC容器中,而是通过DelegatingFilterProxy将相关请求代理到容器中的delegateFilter
	   //一般不会在构造器进行初始化时传入webApplicationContext,因此一般不走该分支
		if (this.webApplicationContext != null) {
			// The user has injected a context at construction time -> use it...
			if (this.webApplicationContext instanceof ConfigurableApplicationContext) {
				ConfigurableApplicationContext cac = (ConfigurableApplicationContext) this.webApplicationContext;
				if (!cac.isActive()) {
					// The context has not yet been refreshed -> do so before returning it...
					cac.refresh();
				}
			}
			return this.webApplicationContext;
		}
		//取出WebApplicationContext在ServletContext中的key---一般也不会进行设置
		String attrName = getContextAttribute();
		if (attrName != null) {
			return WebApplicationContextUtils.getWebApplicationContext(getServletContext(), attrName);
		}
		//按照默认的ROOT_WEB_APPLICATION_CONTEXT_ATTRIBUTE去寻找
		else {
			return WebApplicationContextUtils.findWebApplicationContext(getServletContext());
		}
	}
- destroy属于DelegatingFilterProxy原生Filter的销毁方法
	@Override
	public void destroy() {
		Filter delegateToUse = this.delegate;
		if (delegateToUse != null) {
			destroyDelegate(delegateToUse);
		}
	}
    //判断被代理的Filter是否要经历原生Filter的生命周期
    protected void destroyDelegate(Filter delegate) {
		if (isTargetFilterLifecycle()) {
			delegate.destroy();
		}
	}
- 核心doFilter方法,看看DelegatingFilterProxy是如何将拦截到的请求代理给delegateFilter的
	@Override
	public void doFilter(ServletRequest request, ServletResponse response, FilterChain filterChain)
			throws ServletException, IOException {

		// Lazily initialize the delegate if necessary.
		//被代理的delegateFilter如果是懒加载的,则先初始化,这里有并发问题,需要加锁
		Filter delegateToUse = this.delegate;
		if (delegateToUse == null) {
			synchronized (this.delegateMonitor) {
				delegateToUse = this.delegate;
				if (delegateToUse == null) {
					WebApplicationContext wac = findWebApplicationContext();
					if (wac == null) {
						throw new IllegalStateException("No WebApplicationContext found: " +
								"no ContextLoaderListener or DispatcherServlet registered?");
					}
					delegateToUse = initDelegate(wac);
				}
				this.delegate = delegateToUse;
			}
		}

		// Let the delegate perform the actual doFilter operation.
		//将请求代理给delegateFilter执行
		invokeDelegate(delegateToUse, request, response, filterChain);
	}
	protected void invokeDelegate(
			Filter delegate, ServletRequest request, ServletResponse response, FilterChain filterChain)
			throws ServletException, IOException {

		delegate.doFilter(request, response, filterChain);
	}
实践
- 首先给出一个delegateFilter,放入Root WebApplicationContext中
@Slf4j
public class AuthFilter implements Filter {
    @Override
    public void doFilter(ServletRequest request, ServletResponse response, FilterChain chain) throws IOException, ServletException {
           if(!request.getAttribute("auth").equals("true")){
               log.info("身份校验失败!!!");
               return;
           }
           chain.doFilter(request,response);
    }
}
- 将我们自定义的Filter加入Root WebApplicationContext中进行管理
<bean id="authFilter" class="com.example.AuthFilter"/>
注意加入的是Root WebApplicationContext中去
不过,要想让这个原来本该在web.xml中配置生效,而现在却在WebApplicationContext中的Filter发挥作用,我们需要让它与DelegatingFilterProxy发生关系才行。
而让WebApplicationContext中的Filter实例成为DelegatingFilterProxy的代理对象的默认关系标志,就是容器中Filter实例的BeanName,只需要保证其beanName与DelegatingFilterProxy/所对应的< filter-name>的值相同,就能确定二者之间的委派关系。
- 代理关系建立
<?xml version="1.0" encoding="UTF-8"?>
<web-app xmlns="http://xmlns.jcp.org/xml/ns/javaee"
xmlns:xsi="http://www.w3.org/2001/XMLSchema-instance"
xsi:schemaLocation="http://xmlns.jcp.org/xml/ns/javaee http://xmlns.jcp.org/xml/ns/javaee/web-app_4_0.xsd"
version="4.0">
<display-name>dhy</display-name>
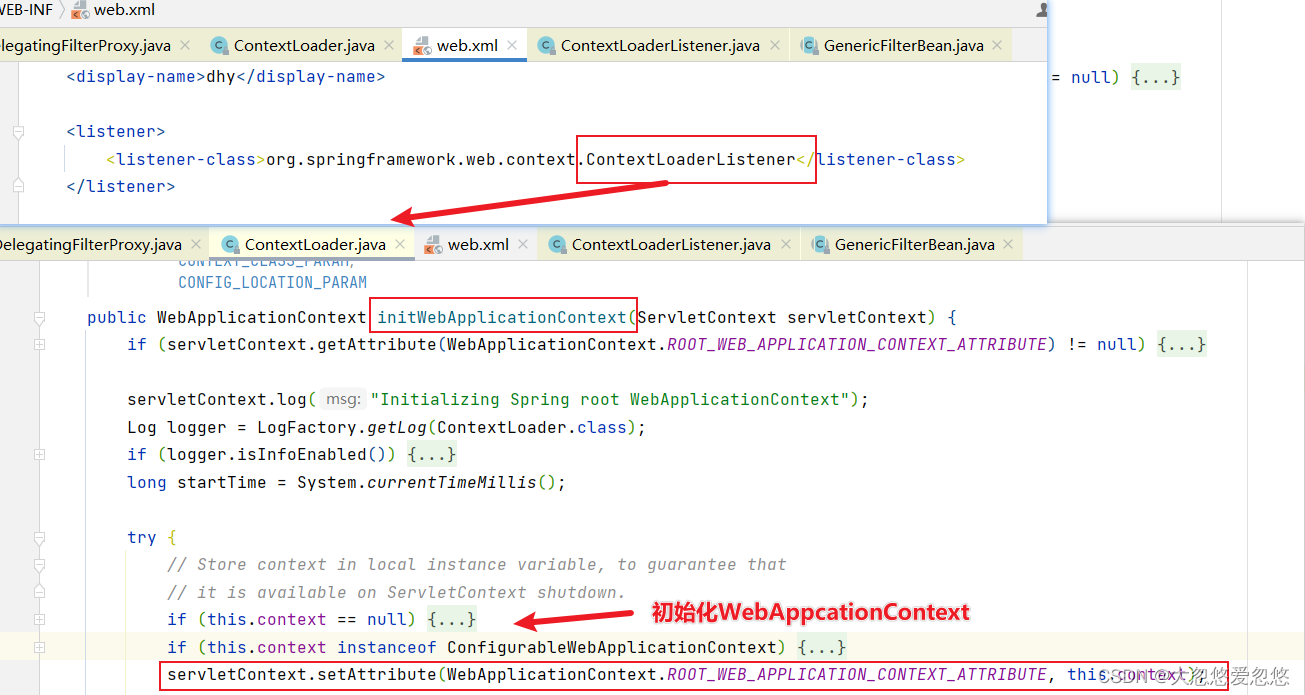
<listener>
<listener-class>org.springframework.web.context.ContextLoaderListener</listener-class>
</listener>
<filter>
<filter-name>encodingFilter</filter-name>
<filter-class>org.springframework.web.filter.CharacterEncodingFilter</filter-class>
<init-param>
<param-name>encoding</param-name>
<param-value>UTF-8</param-value>
</init-param>
</filter>
<filter-mapping>
<filter-name>encodingFilter</filter-name>
<servlet-name>DispatcherServlet</servlet-name>
</filter-mapping>
<filter>
<filter-name>authFilter</filter-name>
<filter-class>
org.springframework.web.filter.DelegatingFilterProxy
</filter-class>
</filter>
<filter-mapping>
<filter-name>authFilter</filter-name>
<servlet-name>DispatcherServlet</servlet-name>
</filter-mapping>
<servlet>
<servlet-name>DispatcherServlet</servlet-name>
<servlet-class>org.springframework.web.servlet.DispatcherServlet</servlet-class>
<load-on-startup>2</load-on-startup>
</servlet>
<servlet-mapping>
<servlet-name>DispatcherServlet</servlet-name>
<!-- 拦截除*.jsp以外的所有请求 -->
<url-pattern>/</url-pattern>
</servlet-mapping>
<welcome-file-list>
<welcome-file>index.jsp</welcome-file>
</welcome-file-list>
</web-app>
DelegatingFilterProxy将根据< filter-name >的值到WebApplicationContext中抓取对应的Filter实例作为其委派对象来使用,在这里也就是“authFilter”所对应的Filter实例。
在使用DelegatingFilterProxy的场景中,具体Filter实例的生命周期默认是由WebApplicationContext容器进行管理的。
也就是说,Filter的标准生命周期管理方法init(.,)和destroy(),对于WebApplicationContext容器来说没有特殊的意义。DelegatingFilterProxy默认不负责调用具体Filter实例的这两个方法。如果我们希望改变这一场景中默认的生命周期管理方式,即希望由默认的WebApplicationContext:容器管理转向原始的Web容器管理,那么,我们可以通过将DelegatingFilterProxy的targetFilterLifecycle属性值从默认的false设置为true以完成这一转变,如下所示:
    <filter>
        <filter-name>authFilter</filter-name>
        <filter-class>
            org.springframework.web.filter.DelegatingFilterProxy
        </filter-class>
        <init-param>
            <param-name>targetFilterLifecycle</param-name>
            <param-value>true</param-value>
        </init-param>
    </filter>
DelegatingFilterProxy从WebApplicationContext中获取到Filter委派对象实例之后,将负责调用该委派对象的init初始化方法,销毁的操作也是同样道理。
注意
除DelegatingFilterProxy之外,Spring MVC还在org.springframework.web.filter包中提供了多个Filter实现类,我们可以在实际开发中根据情况选用它们。
关于这些Filter类的详细情况,可参考Spring框架提供的Javadoc文档。


 3255
3255


 被折叠的 条评论
为什么被折叠?
被折叠的 条评论
为什么被折叠?
 到【灌水乐园】发言


