


一、命名空间的使用
1. 利用 :: 域操作符 制定空间名std::cout2. 通过 using namespace 暴露空间using namespace std ;3. 通过 using 空间名 :: 变量名 暴露空间中的某一成员using std::cout ;
#include <iostream>

//暴露 std 命名空间
using namespace std;

//定义一个命名空间
namespace myspace
{
    int id = 1314400;
    char name[1024] = {"hello"};
}

//2、通过using 暴露命名空间
using namespace myspace;

//定义一个命名空间
namespace yourspace
{
    int Id = 1234;
    char Name[1024] = {"xiaowu"};
}

//3、暴露空间中的某一成员
using yourspace::Name;

int main()
{
    //1.利用域操作符,制定空间名
    std::cout << myspace::id << std::endl;
    std::cout << myspace::name << std::endl;

    //空间暴露后,我们就可以不需要制定空间名
    std::cout << "===========================" << std::endl;
    std::cout << id << std::endl;
    std::cout << name << std::endl;

    //把std的空间名去掉
    cout << "===========================" << endl;
    cout << id << endl;
    cout << name << endl;

    cout << "===========================" << endl;
    cout << Name << endl;
    //cout << Id << endl;  //此时不能这样直接用Id,因为Id这个成员未被暴露

    return 0;
}
编译运行:

二、命名空间的嵌套使用
语法 :namespace 空间名 1{namespace 空间名 2{...... // 可以不断的嵌套}}// 注意:对于嵌套的命名空间,必须要一层一层的解套。不能跨层解套。
#include <iostream>

using namespace std;

namespace T1
{
    namespace T2
    {
        namespace T3
        {
            int data = 10086;
        }

        int data = 110;
    }
}

using namespace T1;
using namespace T2;

int main()
{
    cout << T1::T2::T3::data << endl;

    cout << T3::data << endl;

    cout << data << endl;

    return 0;
}
编译运行结果:

注意:暴露不当,很容易造成变量名冲突。
三、命名空间定义函数
语法:namespace 空间名{函数返回值 函数名 ( 参数列表 ){//函数的主体}}// 例子:在 FUN 空间中定义一个 add 函数namespace FUN{int add ( int a , int b ){return a + b ;}int jian ( int a , int b );}int FUN::jian ( int a , int b ){}
#include <iostream>

using namespace std;    //暴露std命名空间

namespace FUN
{
    int add(int a, int b)
    {
        return a+b;
    }

    //在空间中声明函数
    int jian(int a, int b);
}

//在空间外定义函数
int FUN::jian(int a, int b)
{
    return a-b;
}

//暴露命名空间
using namespace FUN;

int main()
{
    int sum = FUN::add(10,20);
    cout << sum << endl;

    sum = add(1,1);
    cout << sum << endl;

    sum = FUN::jian(10,20);
    cout << sum << endl;

    return 0;
}
编译运行:

四、命名空间的跨文件使用
xxx . cpp - 》 定义命名空间namespace NP{int a = 100 ;float b = 3.14 ;}main . cpp -> 声明空间namespace NP{//声明空间中的数据是外部定义的extern int a ;extern float b ;};练习 : 把命名空间 , 四则运算的函数放到一个Calculator . cpp 文件中 , 在 main . cpp 文件中调用该空间的函数。
//name.cpp
#include <iostream>

using namespace std;

namespace NP
{
    int a = 10086;
    float b = 3.14;
}

void printf_np()
{
    cout << NP::a << endl;
    cout << NP::b << endl;
}
//10test.cpp
#include <iostream>
using namespace std;
//声明一个空间叫NP
namespace NP
{
//声明空间中的数据是外部定义的
extern int a;
extern float b;
}
void printf_np();
int main()
{
printf_np();
cout << "====================" << endl;
cout << NP::a << endl;
cout << NP::b << endl;
return 0;
}编译运行:

五、匿名空间
作用:限制全局变量只能在当前文件中使用。(类似静态 static 全局变量)
复习 static 静态变量的特点 :1. 限制数据只在当前文件有限2. 修改变量的生命周期,存储在数据段3. 静态变量只能被初始化 1 次
匿名空间的定义:
namespace{//匿名空间中的变量,函数成员}
六、复习虚拟内存分配

#include <stdlib.h>void * malloc ( size_t size ); // 分配大小为 size的堆空间void * calloc ( size_t nmemb , size_t size ); // 分配大小为 nmemb*size 大小的堆空间void * realloc ( void * ptr , size_t size ); // 改 变ptr 的堆空间大小为 sizevoid free ( void * ptr ); // 释放 ptr 堆空间练习 :1. 分配一个 int 类型的堆空间赋值并输出2. 分配 10 个 int 类型的堆空间,全部赋值 ,并输出
C语言的动态内存分配:
#include <iostream>
#include <stdlib.h>

using namespace std;

int main()
{
    //1、分配 1 个 int 类型空间
    int *p = (int *)malloc(4);    //C++强调类型匹配,所以一定要强转

    //往空间上赋值
    *p = 10010;

    //输出空间上的数据
    cout << "*p = " << *p << endl;

    //2、分配10个int类型的堆空间
    int *q = (int *)malloc(sizeof(int)*10);

    //往空间上赋值
    for(int i = 0; i < 10; i++)
    {
        q[i] = i;
    }

    //访问空间上的内容
    for(size_t i = 0; i < 10; i++)
    {
        cout << q[i] << endl;
    }

    return 0;
}
编译运行:

那么,可以看到这样子用malloc去分配空间,每次都要自己去想需要分配多大的内存空间。
七、C++中的动态内存分配
在C++中一般使用:new 去分配堆空间,delete 去释放堆空间。
思考:为什么有了 malloc 和 free ,它还要设计一个 new 与 delete?
分配语法:数据类型 * 变量名 = new 数据类型 ;// 例子:分配一块 int 类型的堆空间int * p = new int ; // 优点 : 会自动转换地址类型,并自动确定空间的大小int * q = new int ( 10086 ); // 优点 : 可以在分配空间的时候对空间内容进行初始化释放语法 :delete 变量名 ;// 例子 :delete p ;// 练习:利用 new 分配一块 float 一块 char 类型 的堆空间,并赋值输出。
#include <iostream>

using namespace std;

int main()
{
    //1、分配一块int类型的堆空间
    int *p = new int;

    //往空间上赋值
    *p = 10086;

    //输出空间上的数据
    cout << *p << endl;

    //1、分配一块int类型的堆空间
    //优点:
    //(1)自动转换类型,自动根据类型确定大小
    //(2)可以在分配空间的时候对空间内容进行初始化
    int *q = new int(10010);

    cout << *q << endl;

    //分配一块float类型的堆空间,并赋值输出
    float *p1 = new float(3.14);
    cout << *p1 << endl;

    //分配一块char类型的堆空间,并赋值输出
    char *p2 = new char('W');
    cout << *p2 << endl;

    return 0;
}
编译运行:

八、new分配多块堆空间
分配语法 :数据类型 * 变量名 = new 数据类型 [ size ]; -> size 就是用户需要分配多少块这样的空间// 例子 : 分配 100 个 int 类型的堆空间int * p = new int [ 100 ];// 例子 : 分配 100 个 int 类型的堆空间,并对前 5 个进行 初始化。int * q = new int [ 100 ]{ 10 , 20 , 30 , 40 , 50 };释放语法 :delete [] 变量名 ;//例子 :delete [] p ;练习 :1. 利用 new 分配一块字符串空间 char [ 100 ], 存 放字符串并输出。2. 利用 new 分配一个 struct node { int age , char name [ 100 ];} 的堆空间,并对成员初始化和输出。
#include <iostream>

using namespace std;

int main()
{
    //1、分配100块 int 类型的堆空间
    int *p = new int[100];

    //赋值
    for(int i = 0; i < 100; i++)
    {
        p[i] = i;
    }

    //输出
    for(int i = 0; i < 100; i++)
    {
        cout << p[i] << endl;
    }

    //2、分配100个int类型的堆空间,并对前5个进行初始化。
    int *q = new int[100]{10,20,30,40,50};

     //输出
    for(int i = 0; i < 5; i++)
    {
        cout << q[i] << endl;
    }

    return 0;
}
#include <iostream>
#include <string.h>
using namespace std;
struct node
{
/* data */
int age;
char name[1024] = {0};
};
int main()
{
//1、分配字符串数组的堆空间
char *p = new char[1024]{'a','v','b'};
cout << p << endl;
strcpy(p,"hello world");
cout << p << endl;
//2、分配结构体的堆空间
//struct node *q = new struct node(18,"hello");//对于结构体不可以这样子写,对于类可以
//或者 自己去重载 new 运算符
struct node tmp;
tmp.age = 18;
strcpy(tmp.name,"hello");
struct node *q = new struct node(tmp);
cout << q->age << endl;
cout << q->name << endl;
q->age = 20;
strcpy(q->name,"xiao ming");
cout << q->age << endl;
cout << q->name << endl;
return 0;
}编译运行:

九、练习
1、说出下面定义的四个对象的区别。
(1)int ival = 1024;
定义了一个int类型的ival变量,并初始化该变量的值为1024。
(2)int *pi2 = new int(1024);
定义了一个int类型的指针变量pi2,该指针指向一个int类型的空间,并初始化为1024。
(3)int *pi = &ival;
定义了一个int类型的指针变量pi,该指针指向变量ival的地址。
(4)int *pi3 = new int[1024];
定义了一个int类型的指针变量pi3,该指针指向int[1024]的第一个地址。
2、下面的代码段是做什么的,有什么严重错误。
int *pi = new int(10);

int *pia = new int[10];

while(*pi > 10)
{
    pia[*pi] = *pi;
    *pi = *pi + 1;
}

delete pi;

delete []pia;
上面代码中 pia[*pi] = *pi; 这个语句可以看成 pia[10] = 10;,那么很明显可以看出,pia这个数组下标超出了范围,那么就导致了数组越界。
十、总结:new 与 malloc 的区别
1.new 可以初始化, new 可以自动分空间, new 可以自动转 换地址数据类型。 malloc 不可以。2. 重点,重点,重点 : new 在分配类的空间时,会调用构造函数, malloc 不会!!
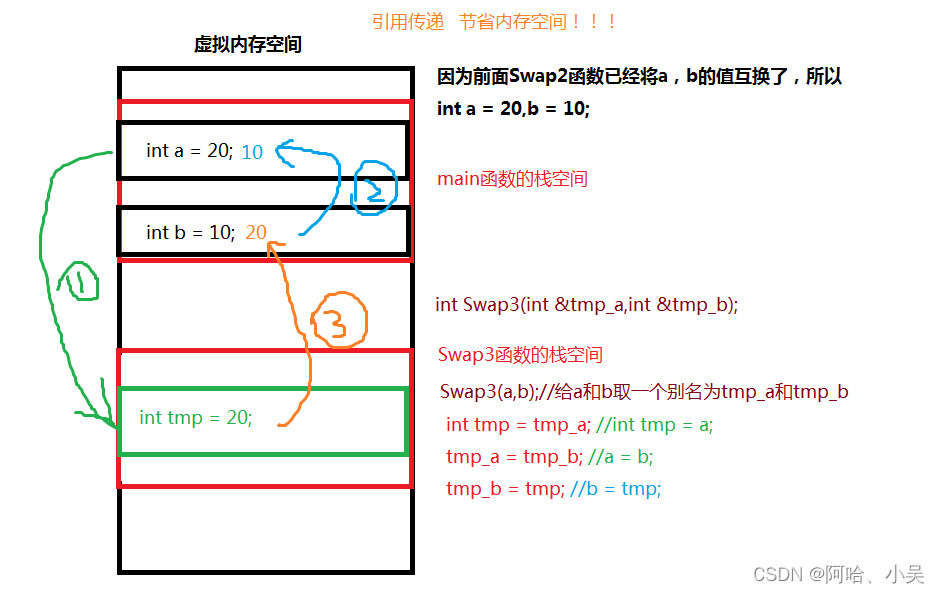
十一、C++引用
引用:就是某一变量(目标)的一个别名,对引用的操作与对变量直接操作完全一样。
引用就是给变量取别名!
作用:提高访问变量的效率,节省内存空间。
引用的定义:
变量类型 & 引用名(别名) = 变量名(原名)// 例子 : 给小明取一个别名int xm = 100 ;// 给小明取一个别名叫 mmint & mm = xm ;// 访问 mm 与 访问 xm 是一模一样的!!
#include <iostream>

using namespace std;

int main()
{
    //定义一个数据xm
    int xm = 100;

    //给变量xm 取 一个别名 mm
    int &mm = xm;

    cout << &xm << ":" << xm << endl;
    cout << &mm << ":" << mm << endl;

    //修改 xm 的数据
    xm = 200;
    cout << "mm=" << mm << " xm=" << xm << endl;

    //修改 mm 的数据
    mm = 10086;
    cout << "mm=" << mm << " xm=" << xm << endl;

    return 0;

}
编译运行:

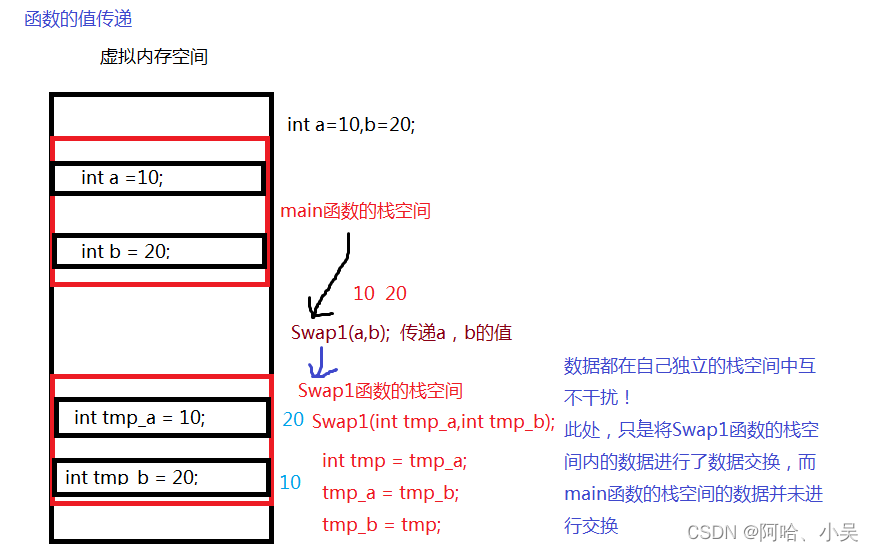
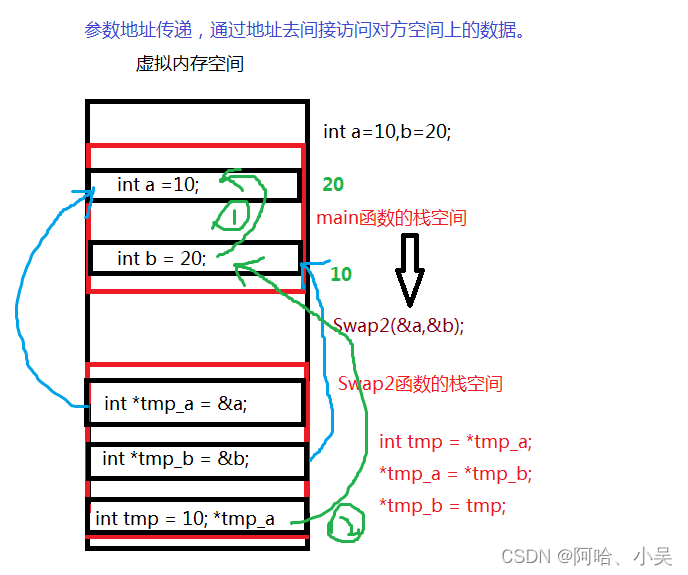
练习:设计一个函数,交换两个数据的值。
#include <iostream>

using namespace std;

//交换函数
void Swap1(int tmp_a, int tmp_b)
{
    int tmp = tmp_a;
    tmp_a = tmp_b;
    tmp_b = tmp;
}

//交换函数
void Swap2(int *tmp_a, int *tmp_b)
{
    int tmp = *tmp_a;
    *tmp_a = *tmp_b;
    *tmp_b = tmp;
}

//交换函数
void Swap3(int &tmp_a, int &tmp_b)
{
    int tmp = tmp_a;
    tmp_a = tmp_b;
    tmp_b = tmp;
}

int main()
{
    int a = 10,b = 20;

    cout << "before swap1: " << a << "," << b << endl;

    Swap1(a,b);

    cout << "swap1 letter: " << a << "," << b << endl;

    cout << "before swap2: " << a << "," << b << endl;

    Swap2(&a,&b);

    cout << "swap2 letter: " << a << "," << b << endl;

    cout << "before swap3: " << a << "," << b << endl;

    Swap3(a,b);

    cout << "swap3 letter: " << a << "," << b << endl;

    return 0;
}
编译运行如下所示:

分析:
首先是Swap1的交换:
其次是Swap2的交换:
最后,是Swap3的交换:
十二、练习
1、利用C++的动态内存分配设计一个单链表,实现 增,删,改,查。

#include <iostream>

using namespace std;

//设计节点
struct node
{
    int date;
    struct node *next;
};

//插入节点
void  inser_node(struct node *head,int date)
{
    //1.新建节点
    struct  node *new_node =  new  struct node;
    new_node->next = NULL;
    new_node->date = date;

    //头插
    new_node->next = head->next;
    head->next     = new_node;
}

void  del_node(struct node *head,int d_date)
{
      struct  node *pos = head->next;
      struct  node *pre = head;

     while (pos != NULL)
     {
        if(pos->date == d_date) //找到需要删除的数据
        {
            pre->next = pos->next;
            pos->next = NULL;

            delete  pos;
            return ;
        }
        pre = pos; //保存上一个位置
        pos = pos->next;
     }
}


//遍历节点
void  show_list(struct  node *head)
{
    //指向第一个节点
    struct  node *pos =  head->next;

    while (pos != NULL)
    {

        cout << pos->date << endl;

        pos = pos->next; //不断偏移
    }

    cout << "______________" << endl;
}

int main()
{
    //1.新建头节点
    struct  node *head =  new  struct node;
    //初始化头节点
    head->next = NULL;
    head->date = 0;

    //插入节点
    inser_node(head,10);
    inser_node(head,20);
    inser_node(head,30);
    inser_node(head,40);

    //遍历节点
    show_list(head);

   //删除20
   del_node(head,20);
   show_list(head);

   //删除40
   del_node(head,40);
   show_list(head);

   //删除10
   del_node(head,10);
   show_list(head);


}
编译运行:

2、实现链表翻转。

#include <iostream>

using namespace std;

//设计节点
struct node
{
    int date;
    struct node *next;
};

//头插  插入节点
void  inser_node(struct node *head,int date)
{
    //1.新建节点
    struct  node *new_node =  new  struct node;
    new_node->next = NULL;
    new_node->date = date;

    //头插
    new_node->next = head->next;
    head->next     = new_node;
}

void  inser_pos(struct node *head,struct node *pos)
{
    //头插
    pos->next  = head->next;
    head->next = pos;
}


//遍历节点
void  show_list(struct  node *head)
{
    //指向第一个节点
    struct  node *pos =  head->next;

    while (pos != NULL)
    {

        cout << pos->date << endl;

        pos = pos->next; //不断偏移
    }

    cout << "______________" << endl;
}

//链表逆序接口
void ListReverse(struct  node *head)
{
    //新建一个临时的头
    struct  node *tmp_head = new    struct  node;
    tmp_head->date = 0;
    tmp_head->next = NULL;


    while (head->next != NULL)
    {
         //1.取出第一个节点
         struct  node *pos = head->next;
         head->next = pos->next;
         pos->next = NULL;

        //插入新建的临时头节点
        inser_pos(tmp_head,pos);
    }

    //让原来的头指向逆序后的节点
    head->next = tmp_head->next;
    tmp_head->next = NULL;

    //释放临时头
    delete  tmp_head;
}


int main()
{
    //1.新建头节点
    struct  node *head =  new  struct node;
    //初始化头节点
    head->next = NULL;
    head->date = 0;

    //插入节点
    inser_node(head,10);
    inser_node(head,20);
    inser_node(head,30);
    inser_node(head,40);
    show_list(head);

 //逆序
   ListReverse(head);

   show_list(head);


   ListReverse(head);
   show_list(head);


}
编译运行:

3、判断链表是否有环。

#include <iostream>

using namespace std;

//设计节点
struct node
{
    int date;
    struct node *next;
};

//插入节点
void  inser_node(struct node *head,int date)
{
    //1.新建节点
    struct  node *new_node =  new  struct node;
    new_node->next = NULL;
    new_node->date = date;

    //头插
    new_node->next = head->next;
    head->next     = new_node;
}


//遍历节点
void  show_list(struct  node *head)
{
    //指向第一个节点
    struct  node *pos =  head->next;

    while (pos != NULL)
    {

        cout << pos->date << endl;

        pos = pos->next; //不断偏移
    }

    cout << "______________" << endl;
}

//判断链表是否带环
bool  if_Loop(struct  node *head)
{
      struct  node *Fast=head->next;
      struct  node *Slow=head;

      //开始跑步
      while (Fast->next != NULL)
      {
          if(Fast == Slow)  //相遇
          {
              return true;
          }

         Fast=Fast->next->next; //每次跑2步
         Slow=Slow->next; //每次跑1步
      }

     return  false;
}


int main()
{
    //1.新建头节点
    struct  node *head =  new  struct node;
    //初始化头节点
    head->next = NULL;
    head->date = 0;

    //插入节点
    inser_node(head,10);
    inser_node(head,20);
    inser_node(head,30);
    inser_node(head,40);
    inser_node(head,50);
    inser_node(head,60);
    inser_node(head,70);

    //设计一个环
     struct  node *pos = head;
     while (pos->next != NULL)  //偏移到最后一个节点
     {
         pos = pos->next;
     }


    pos->next =  head->next->next->next;  //70 -》 30


    if(if_Loop(head))
    {
        cout << "链表带环" << endl;
    }else{
        cout << "链表不带环" << endl;
    }

}
4、查找公共结点。

#include <iostream>

using namespace std;

//设计节点
struct node
{
    int date;
    struct node *next;
};

//插入节点
void  inser_node(struct node *head,int date)
{
    //1.新建节点
    struct  node *new_node =  new  struct node;
    new_node->next = NULL;
    new_node->date = date;
    //头插
    new_node->next = head->next;
    head->next     = new_node;
}

//遍历节点
void  show_list(struct  node *head)
{
    //指向第一个节点
    struct  node *pos =  head->next;

    while (pos != NULL)
    {

        cout << pos->date << endl;
        pos = pos->next; //不断偏移
    }
    cout << "______________" << endl;
}

//求链表长度
int get_len(struct  node *head)
{
   struct  node *pos = head->next;
   int len=0;
   while (pos != NULL)
   {
       len++;
       pos=pos->next;
   }

   return len;
}

void In_Point(struct  node *head1, struct  node *head2)
{

    struct node *pos1 = head1;
    struct node *pos2 = head2;


    //判断那条链表比较长
    int l1 = get_len(head1);
    int l2 = get_len(head2);

    if(l1 > l2)  //pos1 先走
    {
        for(int i=0;i<l1-l2;i++)
        {
            pos1 =pos1->next;
        }
    }
    else if(l2 > l1)  //pos2先走
    {
        for(int i=0;i<l2-l1;i++)
        {
            pos2 =pos2->next;
        }
    }

    //一起根据相同的速度走 ,找相遇点
    while (1)
    {
        if(pos1 == pos2)
        {
            cout << "交点" << pos1->date << ":"<<pos2->date << endl;
            return ;
        }

        pos1 = pos1->next;
        pos2 = pos2->next;
    }
}


int main()
{
    //1.新建头节点
    struct  node *head1 =  new  struct node;
    //初始化头节点
    head1->next = NULL;
    head1->date = 0;

    //插入节点
    inser_node(head1,10);
    inser_node(head1,20);
    inser_node(head1,30);
    inser_node(head1,40);

     //1.新建头节点
    struct  node *head2 =  new  struct node;
    //初始化头节点
    head2->next = NULL;
    head2->date = 0;
    //插入节点
    inser_node(head2,12);
    inser_node(head2,32);
    inser_node(head2,12);
    inser_node(head2,534);  //交点
    inser_node(head2,31);
    inser_node(head2,12);
    inser_node(head2,64);
    inser_node(head2,75);


    //设计交点
    struct  node *pos = head1;
    while (pos->next != NULL)
    {
        pos=pos->next;
    }

    //链接交点
    pos->next = head2->next->next;


    In_Point(head1,head2);


}


 8514
8514

 被折叠的 条评论
为什么被折叠?
被折叠的 条评论
为什么被折叠?
 到【灌水乐园】发言


