


本文为刘二大人的RNN课程学习笔记,及一些博主文章的相关知识点总结而成,代码都在文章末尾。
一、RNN介绍
RNN的优势是具有记忆功能,上一时刻的输入可影响这一时刻的输出。例如一句话中一个个单词相当于不同的时刻,一张图片的不同帧也可看作不同时刻。

明确以下要点可以更好地了解RNN:
· x1、x2、x3 可看成一个句子中的三个单词,而y1、y2、y3是这三个单词经过网络得到输出。
· 图中三个绿块是相同的网络!!即同一网络在三个不同时刻被使用。
· 记忆块会储存绿色块的输出的信息,然后这个信息与下一个单词一起作为输入进入下一层网络。
· 绿色块称为隐藏层,其中包含许多神经元。ai 与 yi 最大的区别是前者没有通过激活函数。
· 记忆块中的权重对于每个单词来说是不变的,一句话后才进行一次更新。
总而言之,就是input中的向量依次输入,每一次输入都伴随着一个输出和一个记忆,这个记忆会影响下一个向量的输出值。是专门用于处理具有时间序列的数据的问题,采用权重共享的概念来减少需要训练的权重的数量。

一提到RNN,就会涉及到sequence、递归、循环等各种绕口的词汇。而RNN的核心就是隐状态的计算公式:
本质上,无论序列长度是多少,RNN模型(严谨说是单层单方向的RNN网络)只包含着四个参数,所谓的训练过程就是在寻找这四个参数的最优值。
在介绍循环神经网络时有一种说法为“RNN每个时刻的输入是 和上一个时刻的隐状态
,输出为当前时刻隐状态
和模型输出
”。而实际上RNN输出的只有
,没有
。
之所以有这种说法是混淆了概念。在将RNN应用于具体任务时(比如情感分析),通常不会将RNN得到的隐状态 与真实标签值label直接关联,而是在
后再连接几层全连接网络,经过全连接网络最后输出的才是
。可以认为前面是RNN模型的结果,而后面是分类模型的结果。
于最简单的RNN,我们可以使用两种方式去调用,分别是 torch.nn.RNNCell()和 torch.nn.RNN()。这两种方式的区别在于RNNCell()只能接受序列中单步的输入,且必须传入隐藏状态,而RNN可以接受一个序列的输入,默认会传入全0的隐藏状态,也可以自己申明隐藏状态传入。
一般情况下,我们都是用nn.RNN()而不是nn.RNNCell(),因为nn.RNN()能够避免我们手动写循环,非常方便。如果不特别说明,我们也会选择使用默认的全0初始化隐藏状态。
二、熟悉RNN的重点-----维度理解

(1)RNNCell.
cell = torch.nn.RNNCell(input_size=input_size, hidden_size=hidden_size)
· inputs.shape = (seq_len, batch_size, input_size)
· hidden.shape = (batch_size, hidden_size)
· outputs.shape = (batch_size, hidden_size)
(2)RNN.
cell = torch.nn.RNN(input_size=input_size, hidden_size=hidden_size, num_layers=num_layers)
outputs, hidden = cell(inputs, hidden)
· inputs.shape =(seq_len, batch_size, input_size)
· hidden.shape =(num_layers, batch_size, hidden_size)
· outputs.shape = (seq_len, batch_size, hidden_size)
对于不同的的网络层,输入的维度虽然不同,但是通常输入的第一个维度都是batch_size。例如torch.nn.Linear 的输入(batch_size, in_features),torch.nn.Conv2d 的输入(batch_size, channels, height, width),而RNN的输入为(seq_len, batch_size, input_size),batch_size位于第二维度!但是可将参数batch_first = True,使得 batch_size 与 seq_len 交换位置。
既然如此,为什么RNN的输入默认不是batch_first = True 呢?其实是为了便于并行计算,因为cuDNN中 RNN 的 API 就是batch_size位于第二维度。进一步解释,batch_first 意味着模型的输入在内存中存储时,按照先存储第一个sequence,再存储第二个sequence的方式进行保存;而在默认情况时(即batch_size位于第二维度),模型的输入在内存中是先存储所有序列的第一个单元,然后是第二个单元这样的方式。具体区别如下图所示。

seq_len first 意味着不同序列中同一时刻对应的输入单元在内存中是毗邻的,这样才能做到真正的并行计算。
而以下情况可能需要将 batch_first 设置为 True:
1.当你的输入数据以批量为第一个维度组织时,设置batch_first=True可以避免对数据进行转置的操作。
2.在处理具有可变长度序列的问题时,若批次内的序列长度变化较大,batch_first 可以帮助你更容易地管理。
3.在实现自定义的前向传播函数或者与其他期望batch_first 的代码交互时,会使得代码逻辑更加清晰。
三、相关知识补充
· Dropout是什么?简单来说就是在前向传播时,让神经元的激活值以一定的概率p(伯努利分布)停止工作,这样可以有效地减少过拟合现象,使模型的泛化性能更强。
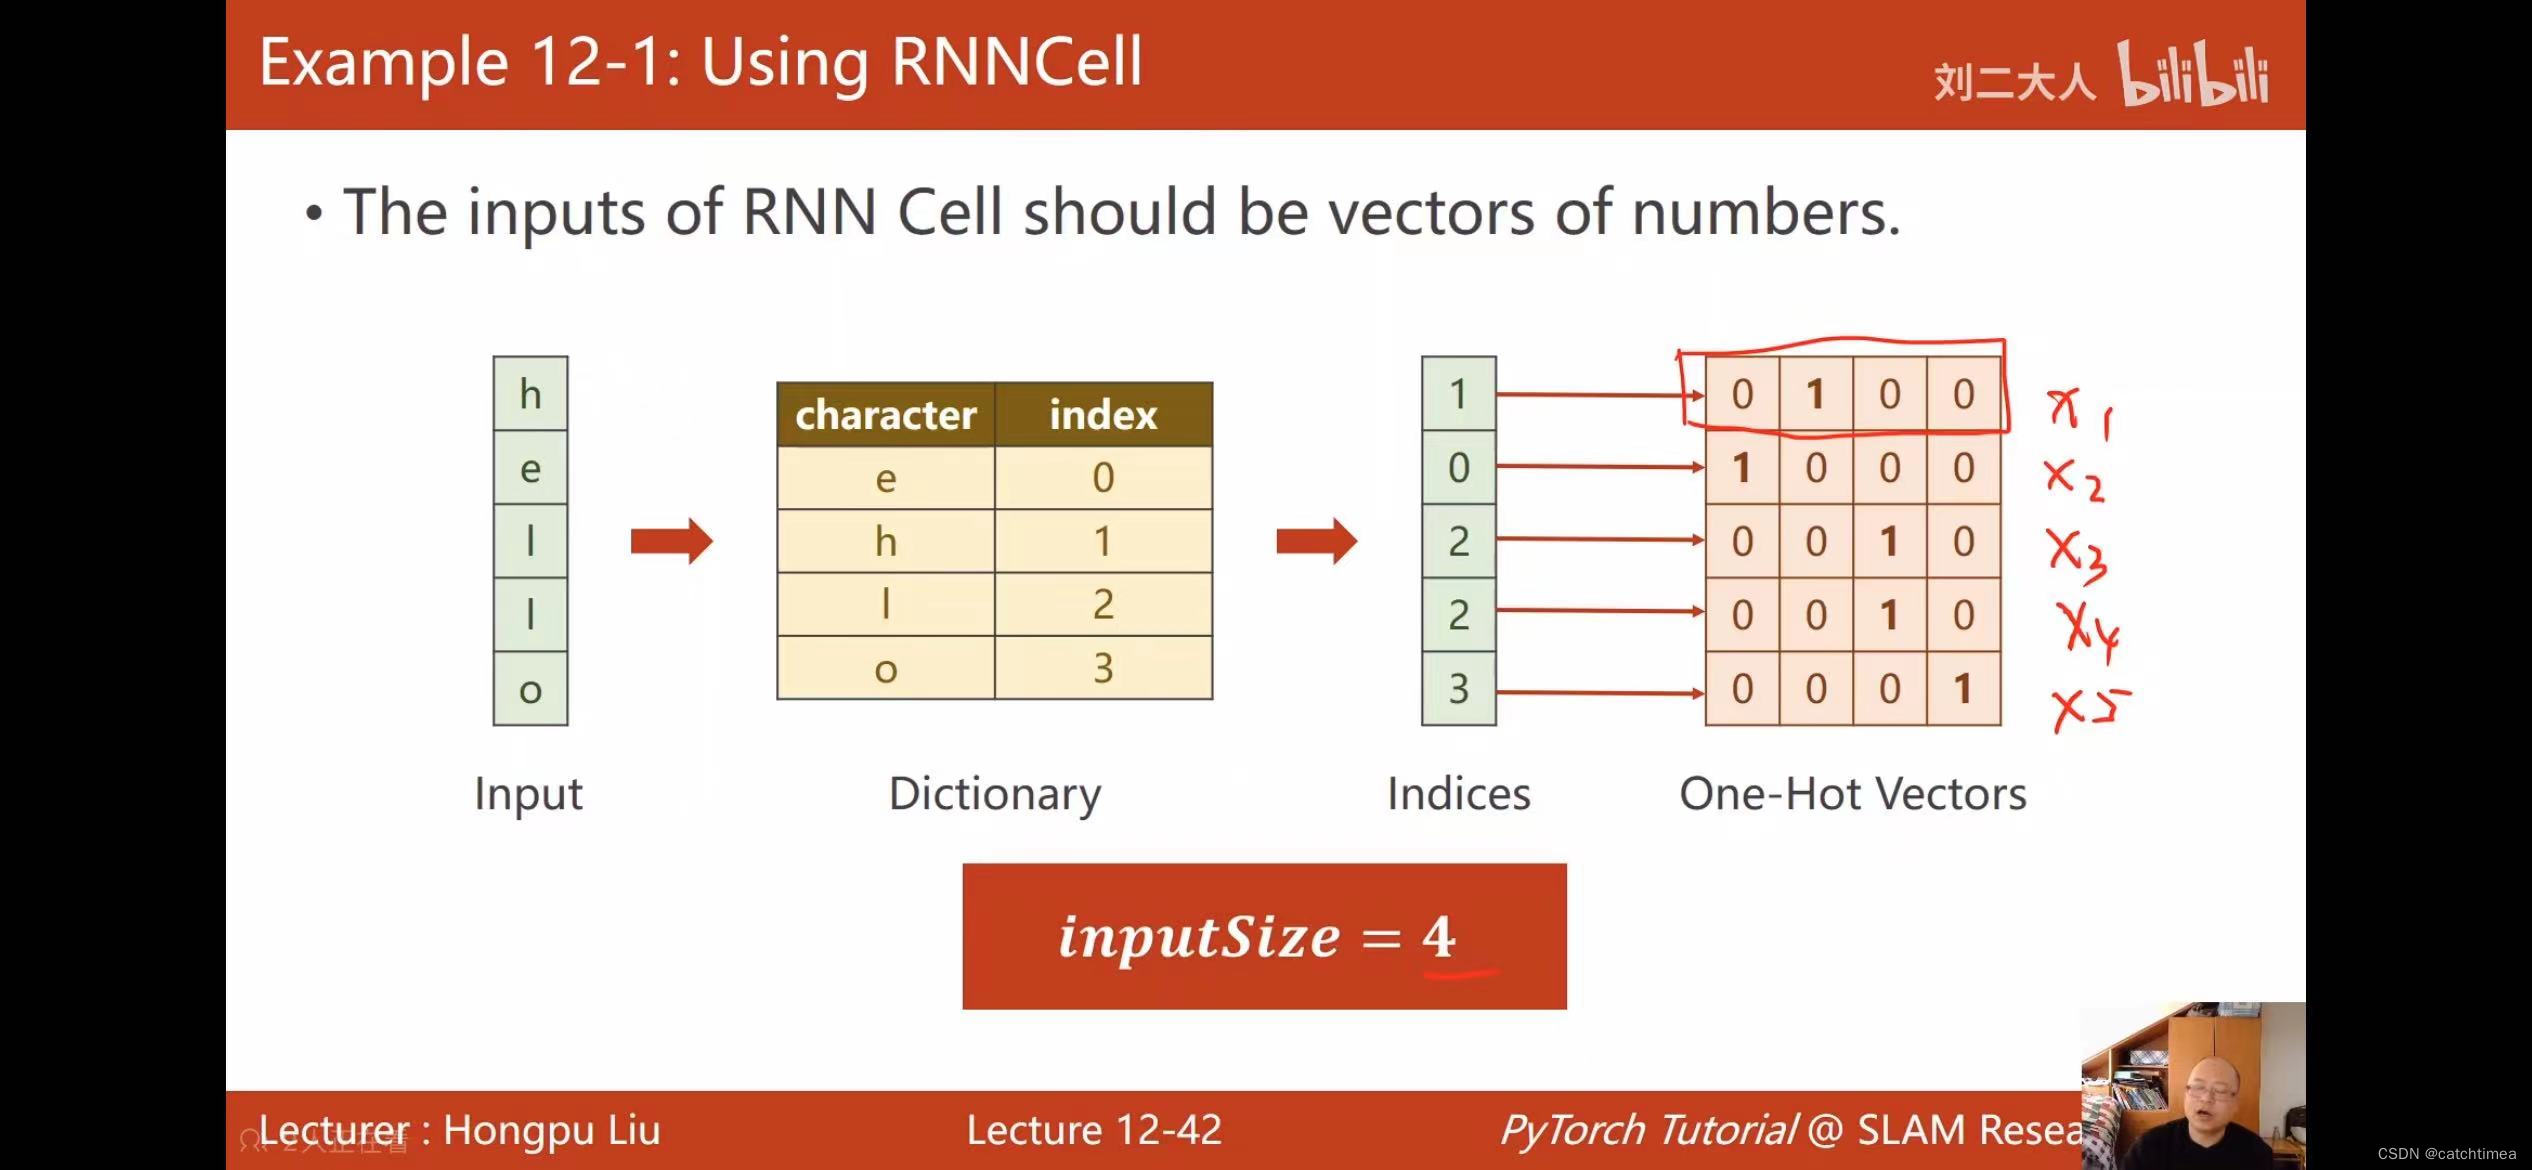
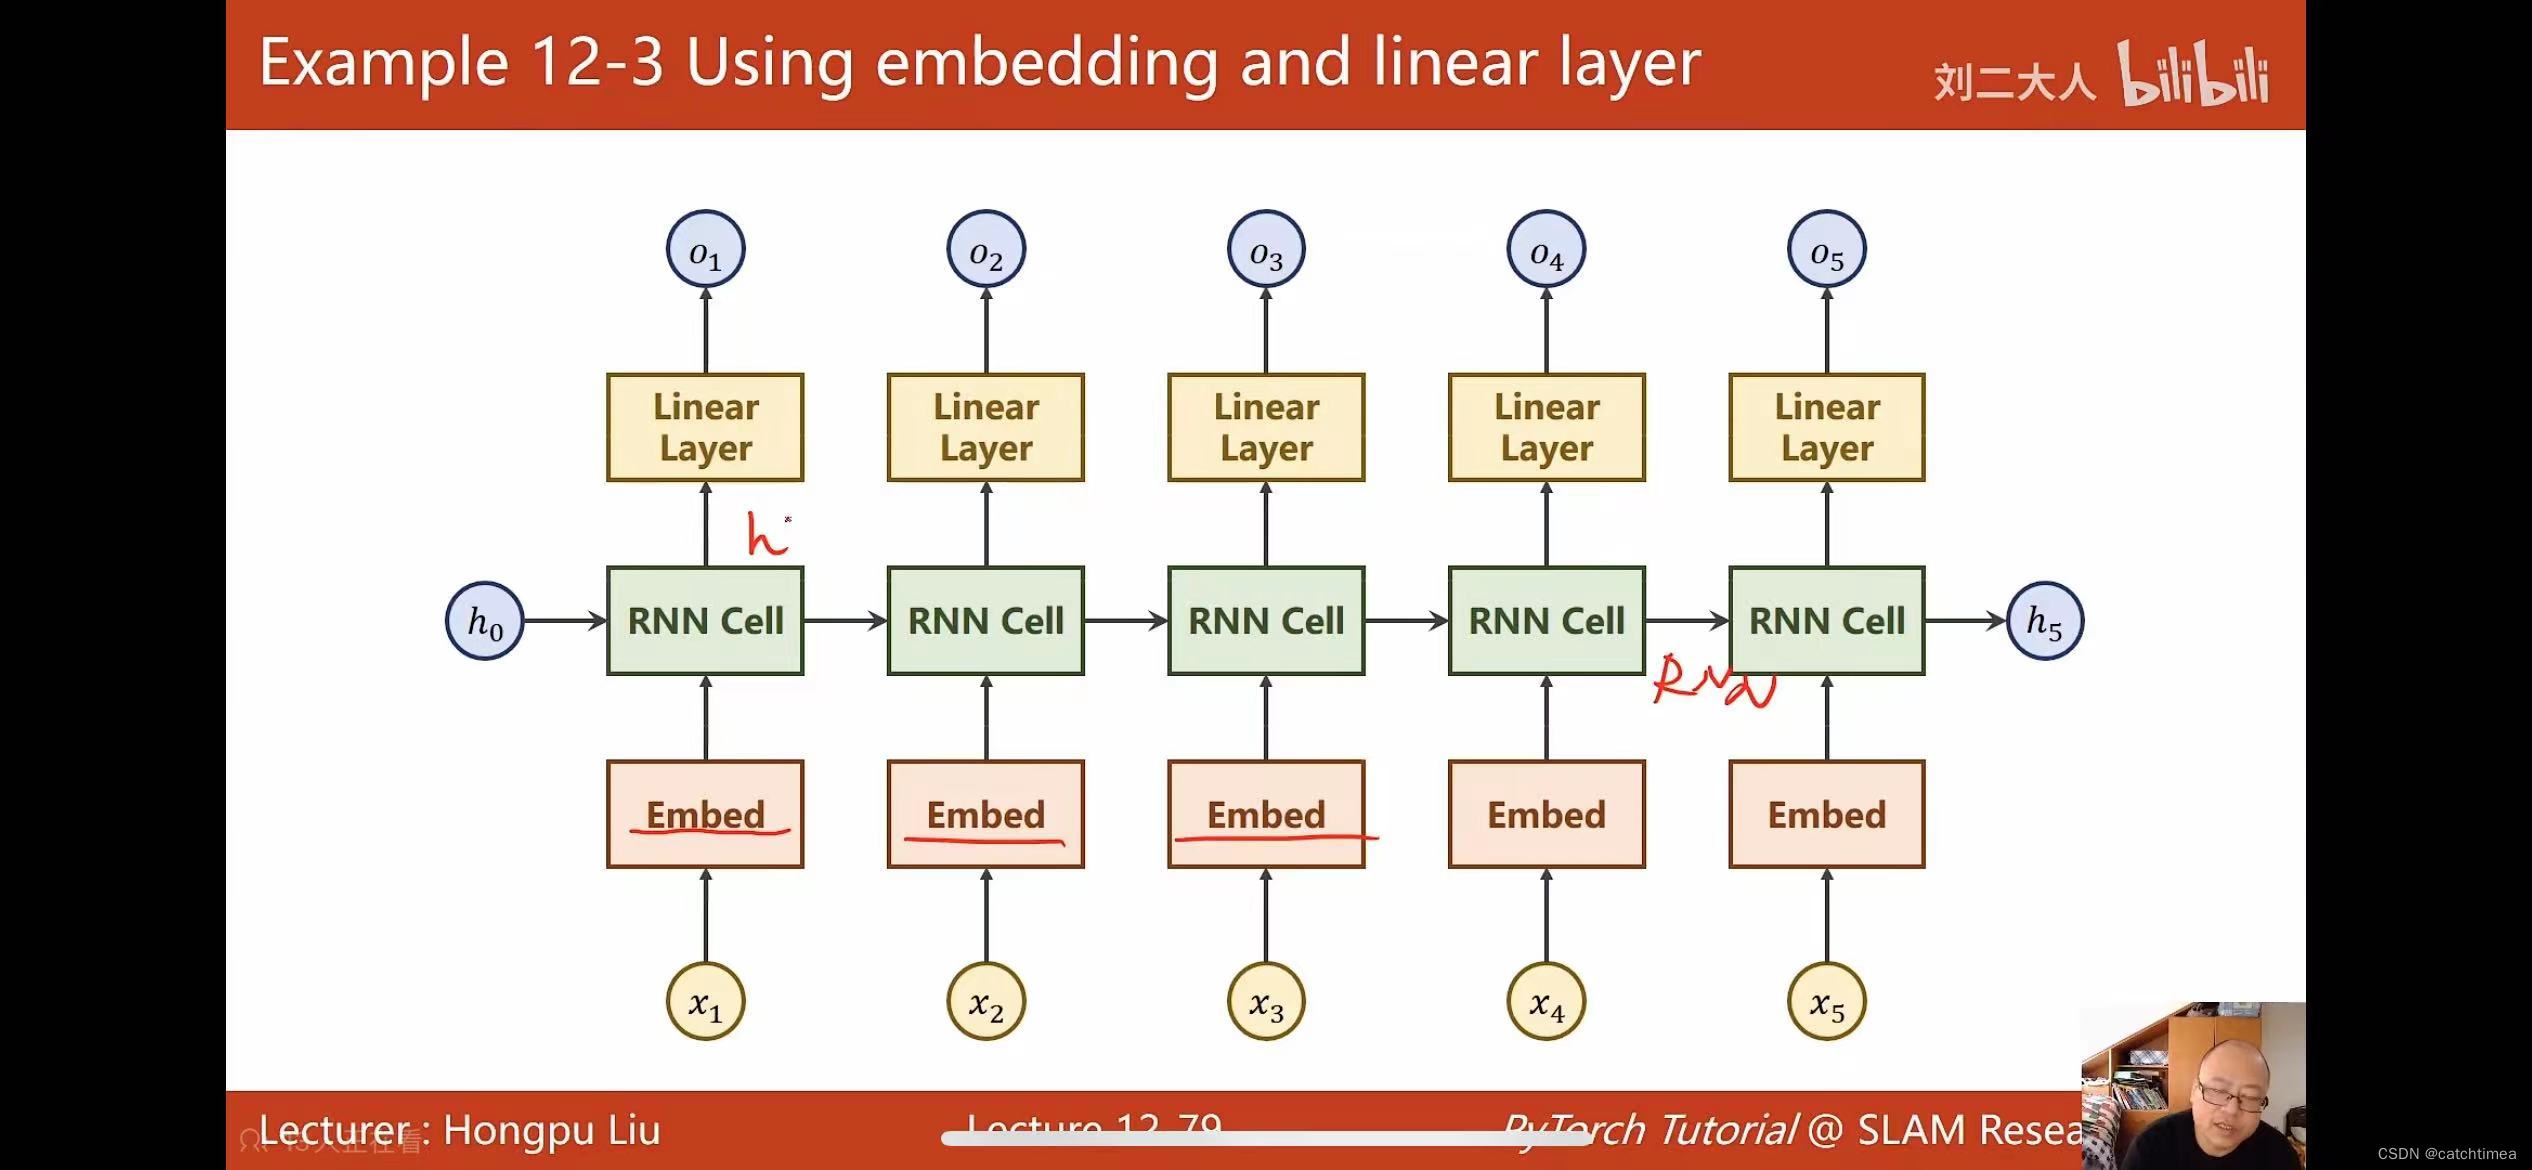
· one-hot 编码可将单词转换为向量,但存在维度过高、向量过于稀疏、属于硬编码等缺点。可以将one-hot 改进为 Embeddig(数据降维)。文章末尾有添加Embedding实现的代码。

· softmax(归一化指数函数),是二分类函数sigmoid在多分类上的推广,它将多个神经元的输出映射到(0,1)区间内,目的是将多分类的结果以概率的形式展现出来,进行多分类。而在该文的多分类中为什么没见到 softmax 层?因为包含在了交叉熵损失函数CrossEntropyLoss中。

四、代码实现
(1)RNNCell 实现。
# 只能接受序列中单步的输入,必须传入隐藏状态,且需手动写循环。
# RNNCell
import torch

batch_size = 1
seq_len = 3
input_size = 4
hidden_size = 2

cell = torch.nn.RNNCell(input_size=input_size, hidden_size=hidden_size)

# (seq, batch, features)
dataset = torch.randn(seq_len, batch_size, input_size)
print(dataset)
hidden = torch.zeros(batch_size, hidden_size)
for idx, input in enumerate(dataset):
        print('='*20, idx, '='*20)
        print('Input size:', input.shape)

        hidden = cell(input, hidden)

        print('outputs size:', hidden.shape)
        print(hidden)
(2)RNN实现。
# RNN可接受一个序列的输入,默认传入全0的隐藏状态,也可自己申明隐藏状态传入。
# RNN
import torch

batch_size = 1
seq_len = 3
input_size = 4
hidden_size = 2
num_layers = 1

cell = torch.nn.RNN(input_size=input_size, hidden_size=hidden_size)

#(seq_len, batch_size, input_size)
inputs = torch.randn(seq_len, batch_size, input_size)
hidden = torch.zeros(num_layers, batch_size, hidden_size)

out, hidden = cell(inputs, hidden)

print('output size:', out.shape)
print('output:', out)
print('hidden size:', hidden.shape)
print('hidden:', hidden)
(3)RNNCell 实现单词的转换。
# using RNNCell (hello->ohlol)

input_size = 4
hidden_size = 4
batch_size = 1

idx2char = ['e', 'h', 'l', 'o']
x_data = [1, 0, 2, 2, 3]
y_data = [3, 1, 2, 3, 2]

one_hot_lookup = [[1, 0, 0, 0],
                  [0, 1, 0, 0],
                  [0, 0, 1, 0],
                  [0, 0, 0, 1]]
x_one_hot = [one_hot_lookup[x] for x in x_data]
print('x_one_hot:', x_one_hot)
print('='*20)

inputs = torch.Tensor(x_one_hot).view(-1, batch_size, input_size)
labels = torch.LongTensor(y_data).view(-1, 1)
print('inputs:', inputs)
print('='*20)
print('labels:', labels)


class Model(torch.nn.Module):
    def __init__(self, input_size, hidden_size, batch_size):
        super(Model, self).__init__()
        # self.num_layers = num_layers
        self.input_size = input_size
        self.hidden_size = hidden_size
        self.batch_size = batch_size
        self.rnncell = torch.nn.RNNCell(input_size=self.input_size, hidden_size=self.hidden_size)

    def forward(self, input, hidden):
        hidden = self.rnncell(input, hidden)
        return hidden

    def init_hidden(self):
        return torch.zeros(self.batch_size, self.hidden_size)


net = Model(input_size, hidden_size, batch_size)
criterion = torch.nn.CrossEntropyLoss()
optimizer = torch.optim.Adam(net.parameters(), lr=0.1)

for epoch in range(15):
    loss = 0
    optimizer.zero_grad()
    hidden = net.init_hidden()
    print('Predicted string:', end='')
    for input, label in zip(inputs, labels):
        hidden = net(input, hidden)
        loss += criterion(hidden, label)
        _, idx = hidden.max(dim=1)
        print(idx2char[idx.item()], end='')
    loss.backward()
    optimizer.step()
    print(', Epoch [%d/15] loss=%.4f' % (epoch+1, loss.item()))
(4)RNN 实现单词的转换。
# using RNN (hello->ohlol)

input_size = 4
output_size = 4
batch_size = 1
num_layer = 1
seq_len = 5

idx2char = ['h', 'e', 'l', 'o']
x_data = [0, 1, 2, 2, 3]
y_data = [3, 0, 2, 3, 2]

one_hot_lookup = [[1, 0, 0, 0],
                  [0, 1, 0, 0],
                  [0, 0, 1, 0],
                  [0, 0, 0, 1]]
x_one_hot = [one_hot_lookup[x] for x in x_data]

inputs = torch.Tensor(x_one_hot).view(seq_len, batch_size, input_size)
labels = torch.LongTensor(y_data)

class Model(torch.nn.Module):
    def __init__(self, input_size, hidden_size, batch_size, num_layer):
        super(Model, self).__init__()
        self.input_size = input_size
        self.hidden_size = hidden_size
        self.batch_size = batch_size
        self.num_layer = num_layer

        self.rnn = torch.nn.RNN(input_size=self.input_size, hidden_size=self.hidden_size, num_layers=self.num_layer)

    def forward(self, input):
        hidden = torch.zeros(self.num_layer, self.batch_size, self.hidden_size)
        out, _ = self.rnn(input, hidden)
        return out.view(-1, self.hidden_size)


net = Model(input_size, hidden_size, batch_size, num_layer)
criterion = torch.nn.CrossEntropyLoss()
optimizer = torch.optim.Adam(net.parameters(), lr=0.1)

for epoch in range(15):
    optimizer.zero_grad()
    output = net(inputs)
    loss = criterion(output, labels)
    loss.backward()
    optimizer.step()

    _, idx = output.max(dim=1)
    idx = idx.data.numpy()
    print('Predicted:',''.join([idx2char[x] for x in idx]), end='')
    print(', Epoch [%d/15] loss=%.3f' % (epoch+1, loss.item()))
(5)使用 Embedding 的RNN 实现单词的转换。
# Embedding 实现
import torch

input_size = 4
seq_len = 5
embedding_size = 10
batch_size = 1
hidden_size = 8
num_class = 4
num_layers = 2

idx2char = ['h', 'e', 'l', 'o']
x_data = [[0, 1, 2, 2, 3]]
y_data = [3, 0, 2, 3, 2]

inputs = torch.LongTensor(x_data)
labels = torch.LongTensor(y_data)


class Model(torch.nn.Module):
    def __init__(self):
        super(Model, self).__init__()
        self.ebd = torch.nn.Embedding(input_size, embedding_size)
        self.rnn = torch.nn.RNN(input_size=embedding_size, hidden_size=hidden_size, num_layers=num_layers, batch_first=True)
        self.fc = torch.nn.Linear(hidden_size, num_class)

    def forward(self, x):
        hidden = torch.zeros(num_layers, x.size(0), hidden_size)
        x = self.ebd(x)
        x,_ = self.rnn(x, hidden)
        x = self.fc(x)
        return x.view(-1, num_class)


net = Model()
criterion = torch.nn.CrossEntropyLoss()
optimizer = torch.optim.Adam(net.parameters(), lr=0.1)

for epoch in range(15):
    optimizer.zero_grad()
    output = net(inputs)
    loss = criterion(output, labels)
    loss.backward()
    optimizer.step()

    _, idx = output.max(dim=1)
    # print('output:',output)
    # print('='*20)
    # print('_, idx = ', _, idx)
    idx = idx.data.numpy()
    print('Predicted:',''.join(idx2char[x] for x in idx), end='')
    print(', Epoch [%d/15] loss=%.3f', epoch+1, loss.item())
(5)LSTM实现单词的转换。
# LSTM 实现
import torch
import matplotlib.pyplot as plt
# 1、准备数据
input_size = 4
batch_size = 1
idx2char = ['e', 'h', 'l', 'o']
x_data = [1, 0, 2, 2, 3] # hell0
y_data = [3, 1, 2, 3, 2] # ohlol
one_hot_lookup = [[1, 0, 0, 0],
[0, 1, 0, 0],
[0, 0, 1, 0],
[0, 0, 0, 1]]
# 将数据转换为独热向量
# data: seqLen(5) * input_size(4)
x_one_hot = [one_hot_lookup[x] for x in x_data]
# 把 inputs 改成 seqLen, batch_size, input_size 的 维度
inputs = torch.Tensor(x_one_hot).view(-1, batch_size, input_size)
# 把 labels 改成 seqLen * 1 的 维度
labels = torch.LongTensor(y_data).view(-1, 1)
# 2、定义模型
class Model(torch.nn.Module):
def __init__(self):
super(Model, self).__init__()
self.lineari = torch.nn.Linear(4, 4)
self.linearf = torch.nn.Linear(4, 4)
self.linearc = torch.nn.Linear(4, 4)
self.linearo = torch.nn.Linear(4, 4)
self.sigmoid = torch.nn.Sigmoid()
self.tanh = torch.nn.Tanh()
self.batch_size = batch_size
self.input_size = input_size
def forward(self, x, hidden, C):
i = self.sigmoid(self.lineari(x) + self.lineari(hidden))
f = self.sigmoid(self.linearf(x) + self.linearf(hidden))
c = self.sigmoid(self.linearc(x) + self.linearc(hidden))
o = self.sigmoid(self.linearo(x) + self.linearo(hidden))
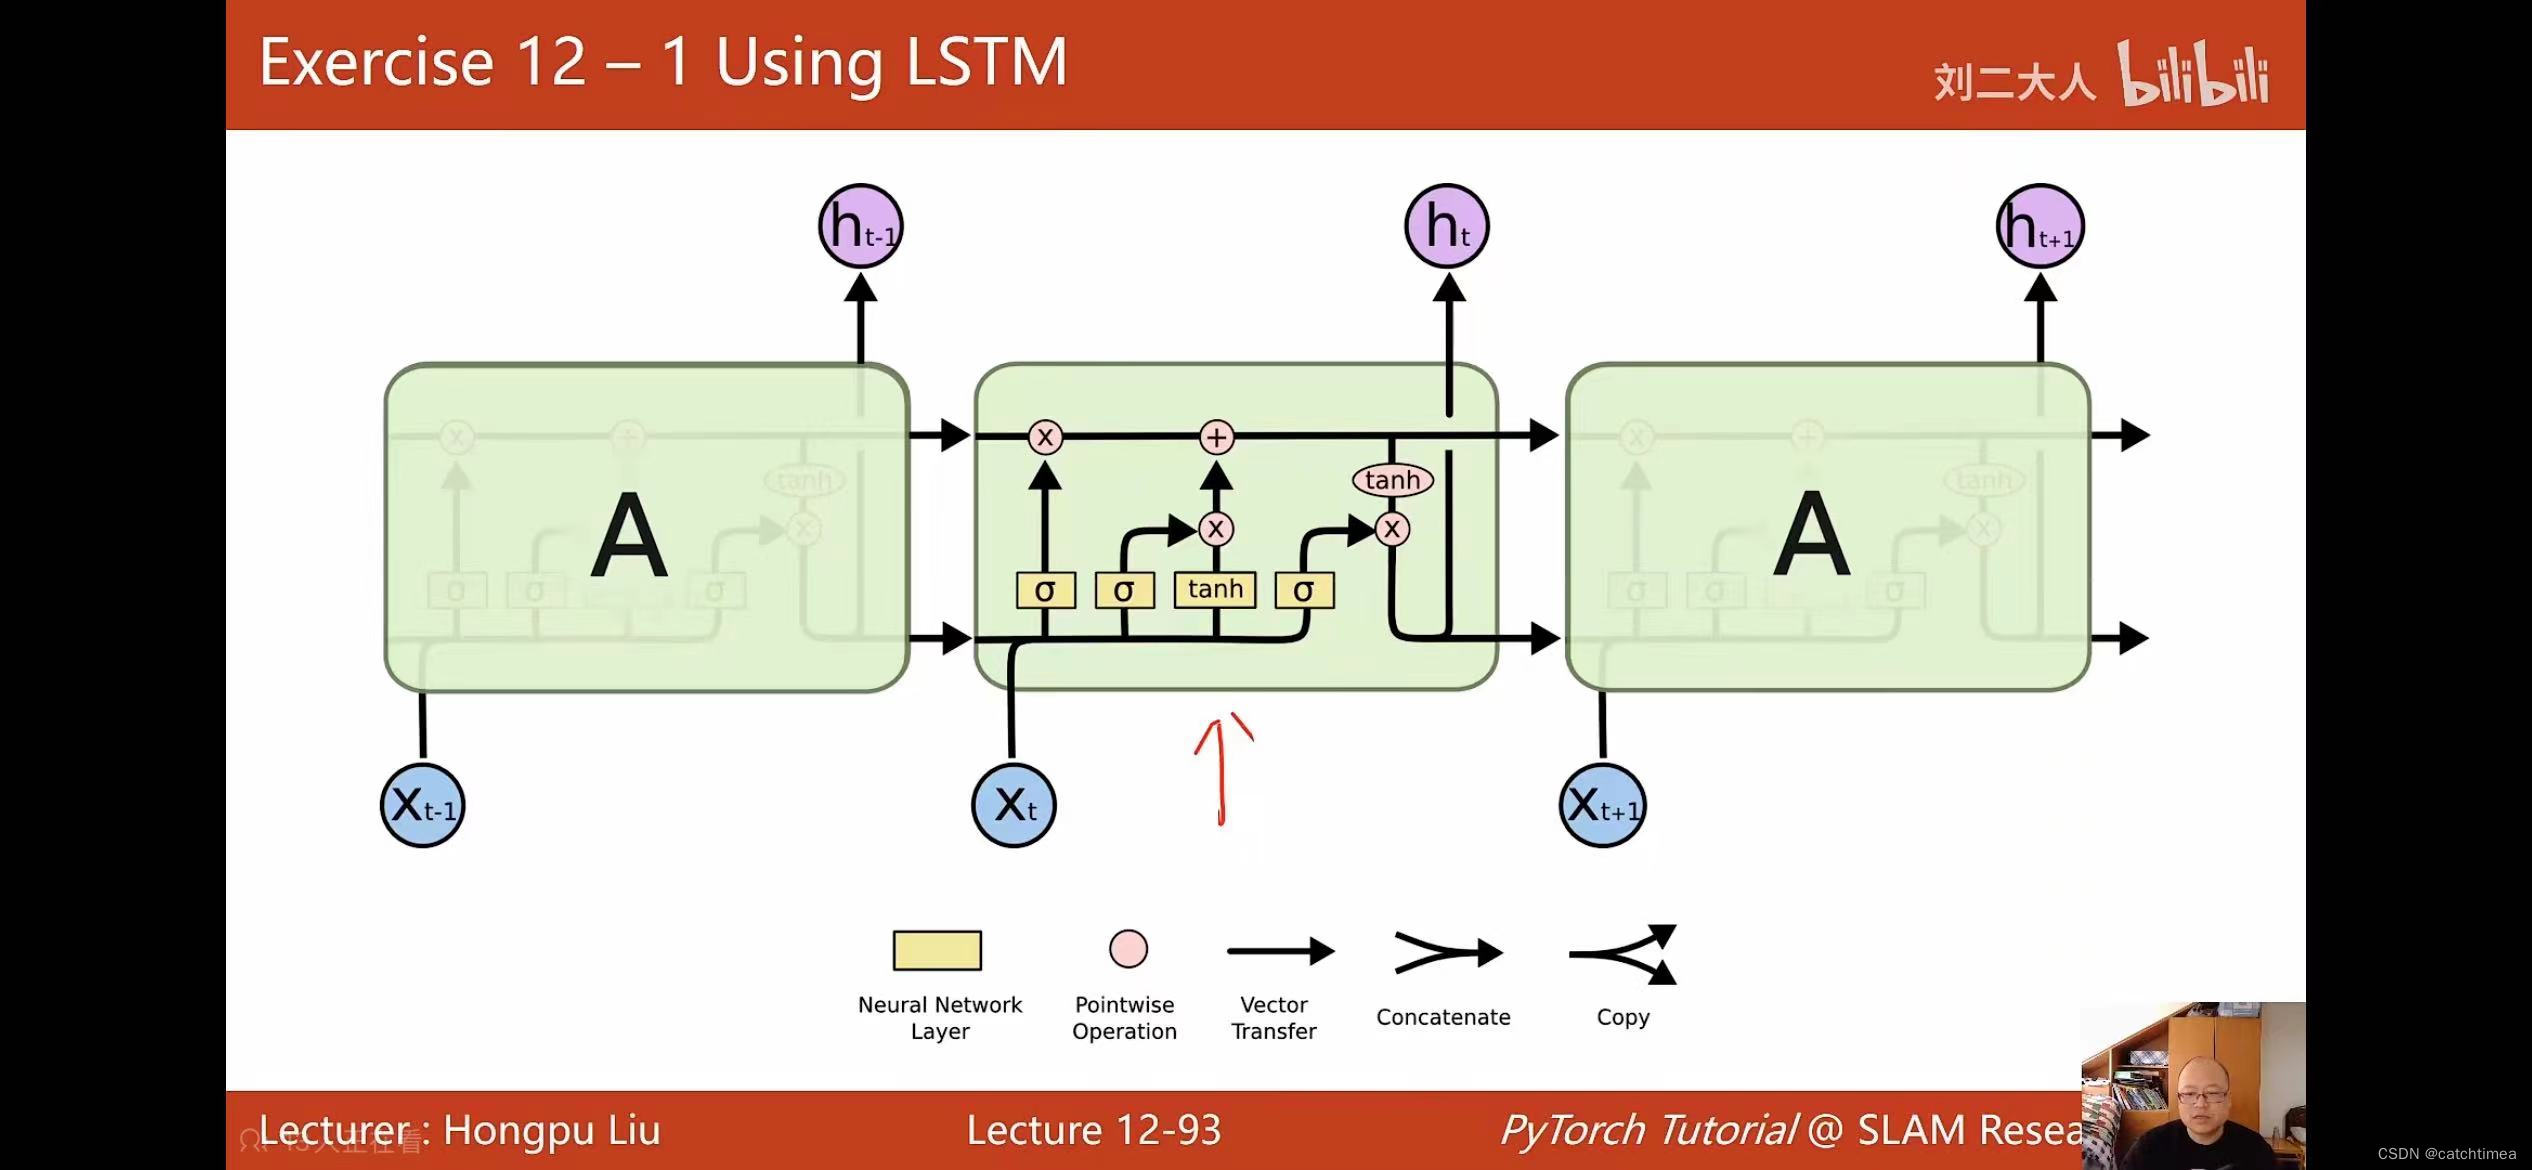
C = f * C + i * c # 候选状态x输入状态+遗忘状态x上一个细胞状态,得到此次细胞状态
hidden = o * self.tanh(C) # 此次得到的细胞状态进行激活后,再乘以输出门,最后得到隐藏层输出
return hidden, C
def init_hidden(self):
# 生成一个默认的 batchSize * hiddenSize 全0的初始隐层h0
# batchSize 只有在需要构造 h0 的时候才需要
return torch.zeros(self.batch_size, self.input_size)
net = Model()
# 3、定义损失函数和优化器
criterion = torch.nn.CrossEntropyLoss()
optimizer = torch.optim.Adam(net.parameters(), lr=0.03)
# 4、训练
loss_list = []
epoch_list = []
for epoch in range(100):
loss = 0
optimizer.zero_grad() # 梯度先归0
hidden = net.init_hidden()
C = net.init_hidden()
print('Predicted string: ', end='')
for input, label in zip(inputs, labels):
# input: batch_size * input_size
# label: 1
hidden, C = net(input, hidden, C)
# loss 没有用 item,因为在计算构造图时整个序列 loss 的和才是最终的损失
loss += criterion(hidden, label)
_, idx = hidden.max(dim=1) # 找最大值的下标
print(idx2char[idx.item()], end='')
epoch_list.append(epoch)
loss_list.append(loss.item())
loss.backward()
optimizer.step()
print(', Epoch [%d/15] loss=%.4f' % (epoch+1, loss.item()))
plt.plot(epoch_list, loss_list)
plt.xlabel("Epoch")
plt.ylabel("Loss")
plt.show()
(6)Embedding + LSTM 实现单词的转换。
# Embedding + LSTM 实现
import torch
import matplotlib.pyplot as plt
# 1、准备数据
input_size = 4
batch_size = 1
idx2char = ['e', 'h', 'l', 'o']
# x_data = [1, 0, 2, 2, 3] # hell0
x_data = torch.LongTensor([[1, 0, 2, 2, 3]]).view(5, 1)
print(x_data.shape)
y_data = [3, 1, 2, 3, 2] # 标签
labels = torch.LongTensor(y_data).view(-1, 1) # -1表示根据列数是1,自动计算其行
emb = torch.nn.Embedding(4, 10)
inputs = emb(x_data) # 将4维输入数据嵌入成10维,为后面的linear_ix等操作进行设置(5,1,10),嵌入值均是随机设定
print(inputs)
print(inputs.shape)
# 2、定义模型
class Model(torch.nn.Module):
def __init__(self):
super(Model, self).__init__()
# 上一时刻的内部状态g(x),外部状态h(x)
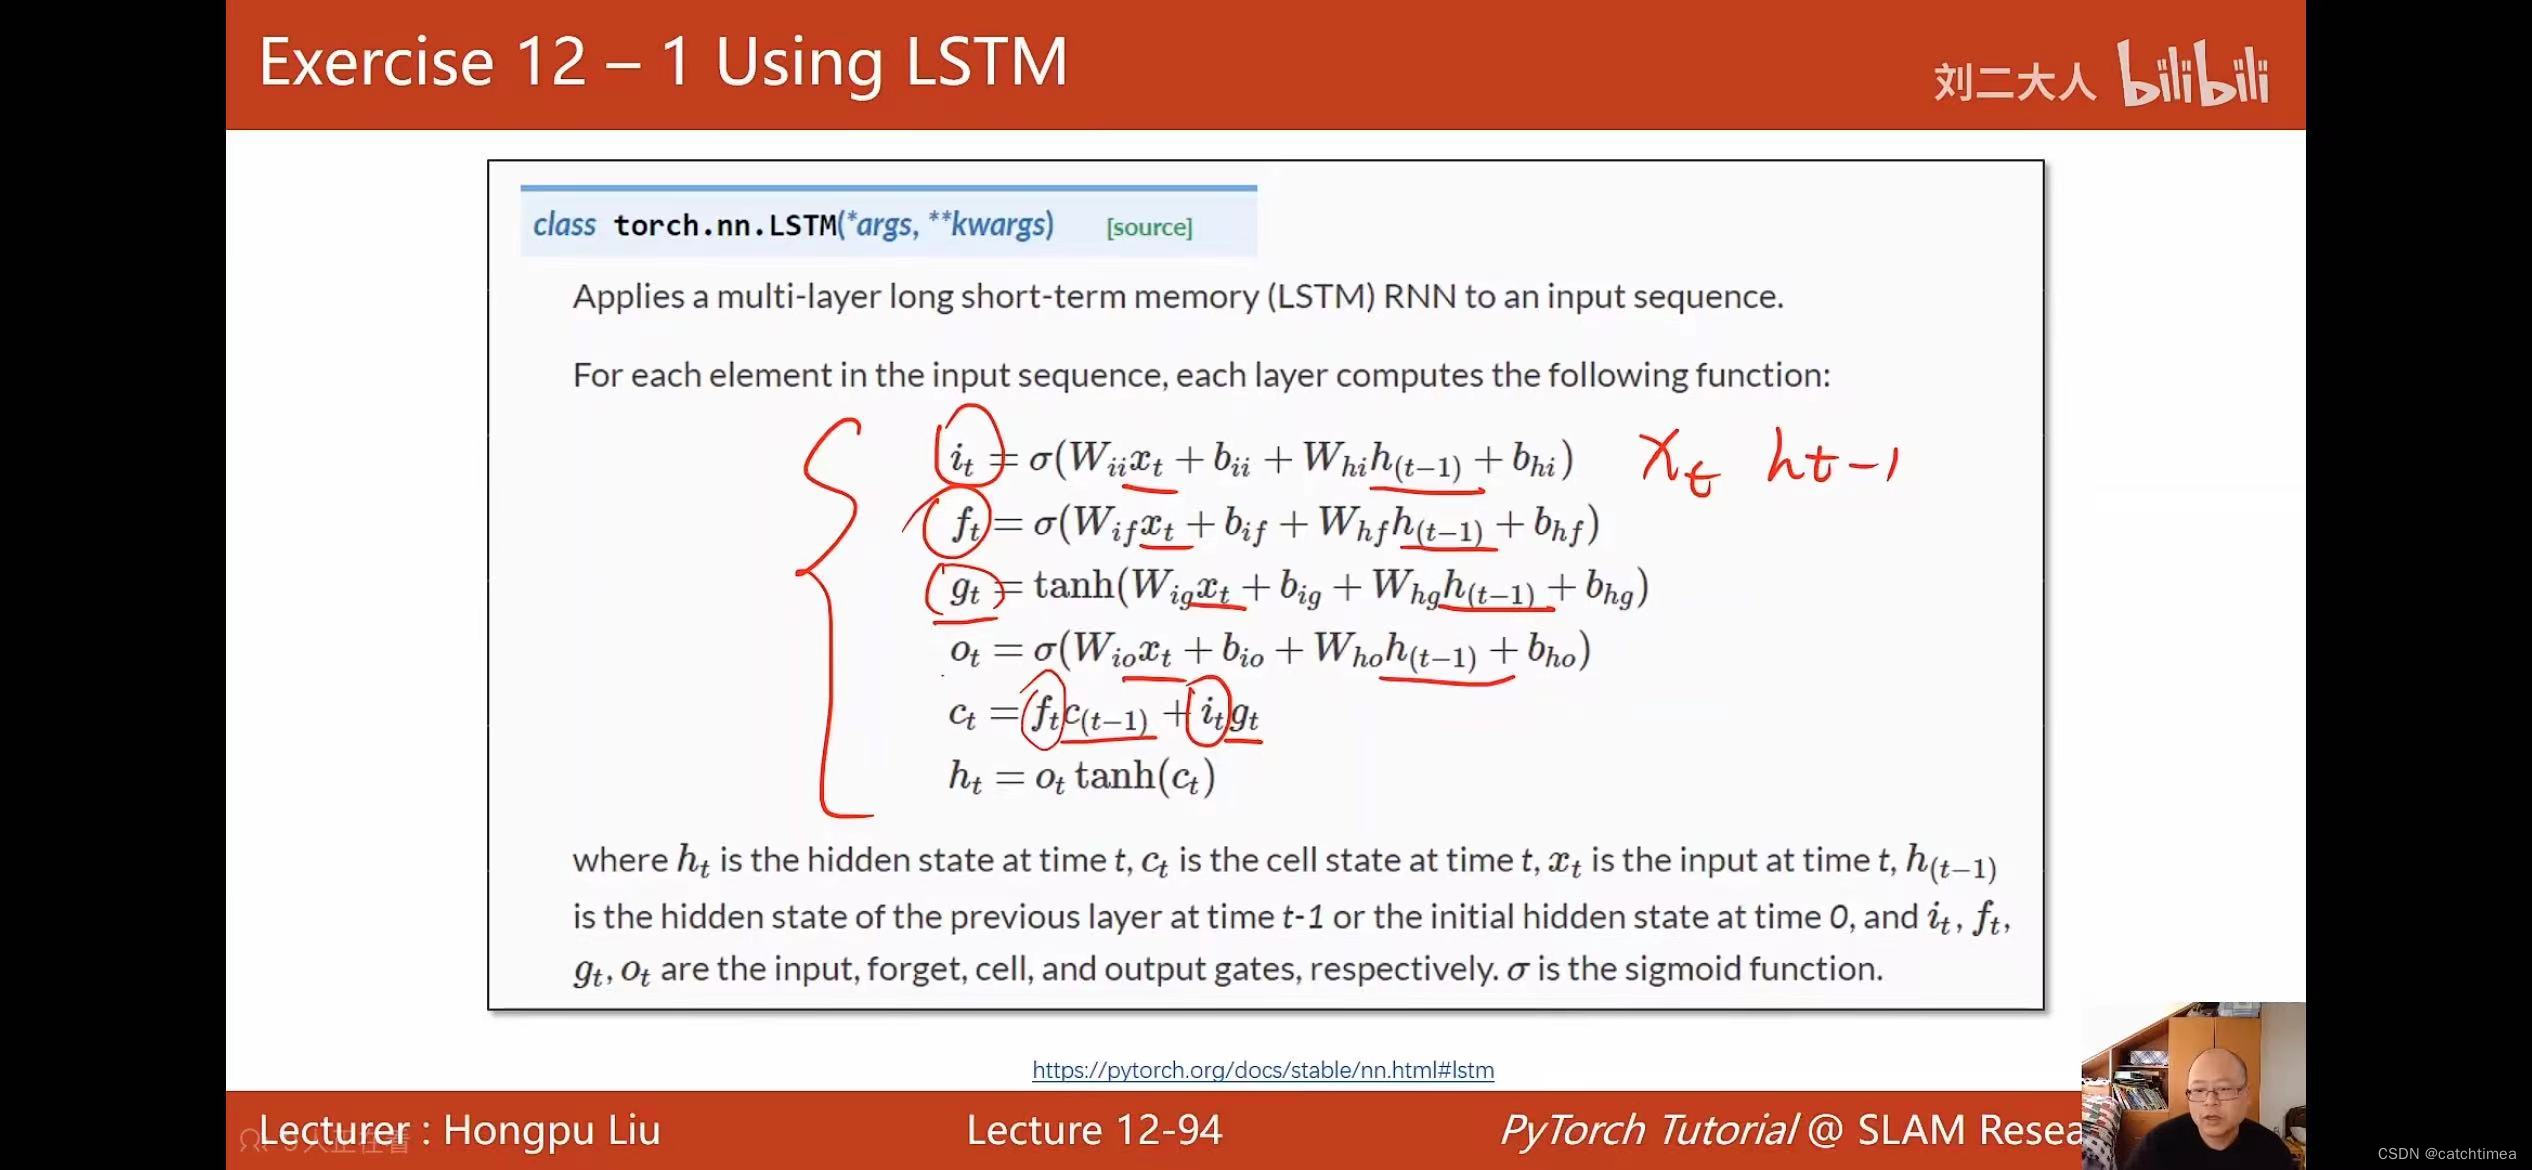
self.linear_ix = torch.nn.Linear(10, 4) # 输入门,输入值和上一阶段的外部状态值通过激活函数激活后成为输入值it
self.linear_fx = torch.nn.Linear(10, 4) # 遗忘门,输入值和上一阶段的外部状态值通过激活函数激活后成为遗忘值ft
self.linear_gx = torch.nn.Linear(10, 4) # 候选变量,输入值和上一阶段的外部状态值通过tanh激活函数激活后成为候选变量值
self.linear_ox = torch.nn.Linear(10, 4) # 输出值,输入值和上一阶段的外部状态值通过激活函数激活后成为输出值ot
# 隐藏层的LSTM变换
self.linear_ih = torch.nn.Linear(4, 4)
self.linear_fh = torch.nn.Linear(4, 4)
self.linear_gh = torch.nn.Linear(4, 4)
self.linear_oh = torch.nn.Linear(4, 4)
self.sigmoid = torch.nn.Sigmoid()
self.tanh = torch.nn.Tanh()
self.batch_size = batch_size
self.input_size = input_size
def forward(self, x, hidden, c):
# 输入值x和外部状态h(x)相结合,再通过激活函数激活得到内部状态的i,f,g(候选状态),o值;
i = self.sigmoid(self.linear_ix(x) + self.linear_ih(hidden))
f = self.sigmoid(self.linear_fx(x) + self.linear_fh(hidden))
g = self.tanh(self.linear_gx(x) + self.linear_gh(hidden))
o = self.sigmoid(self.linear_ox(x) + self.linear_oh(hidden))
# 候选状态g乘以输入值i,再加上上一时刻的内部状态c乘以遗忘值f,得到该时刻的更新的内部状态值c
# 输出元素 o 乘以经过激活函数激活后的该时刻的内部状态值,得到该时刻的外部状态值
c = f * c + i * g # 上一层的结果c通过遗忘门f得到最后的输出值,加上通过输入门的上一层的候选结果g;g是候选变量相比于c,是在激活函数上不同
hidden = o * self.tanh(c) # 上式得到的结果c通过输出门
return hidden, c
def init_hidden(self):
# 生成一个默认的 batchSize * hiddenSize 全0的初始隐层h0
# batchSize 只有在需要构造 h0 的时候才需要
return torch.zeros(self.batch_size, self.input_size)
net = Model()
# 3、定义损失函数和优化器
criterion = torch.nn.CrossEntropyLoss()
optimizer = torch.optim.Adam(net.parameters(), lr=0.06)
# 4、训练
loss_list = []
epoch_list = []
for epoch in range(100):
loss = 0
optimizer.zero_grad() # 梯度先归0
hidden = net.init_hidden()
c = net.init_hidden()
print('Predicted string: ', end='')
for input, label in zip(inputs, labels):
# input: batch_size * input_size
# label: 1
hidden, c = net(input, hidden, c)
# loss 没有用 item,因为在计算构造图时整个序列 loss 的和才是最终的损失
loss += criterion(hidden, label)
_, idx = hidden.max(dim=1) # 找最大值的下标
print(idx2char[idx.item()], end='')
epoch_list.append(epoch)
loss_list.append(loss.item())
loss.backward(retain_graph=True) # 反向传播两次,梯度相加
optimizer.step()
print(', Epoch [%d/15] loss=%.4f' % (epoch+1, loss.item()))
plt.plot(epoch_list, loss_list)
plt.xlabel("Epoch")
plt.ylabel("Loss")
plt.show()
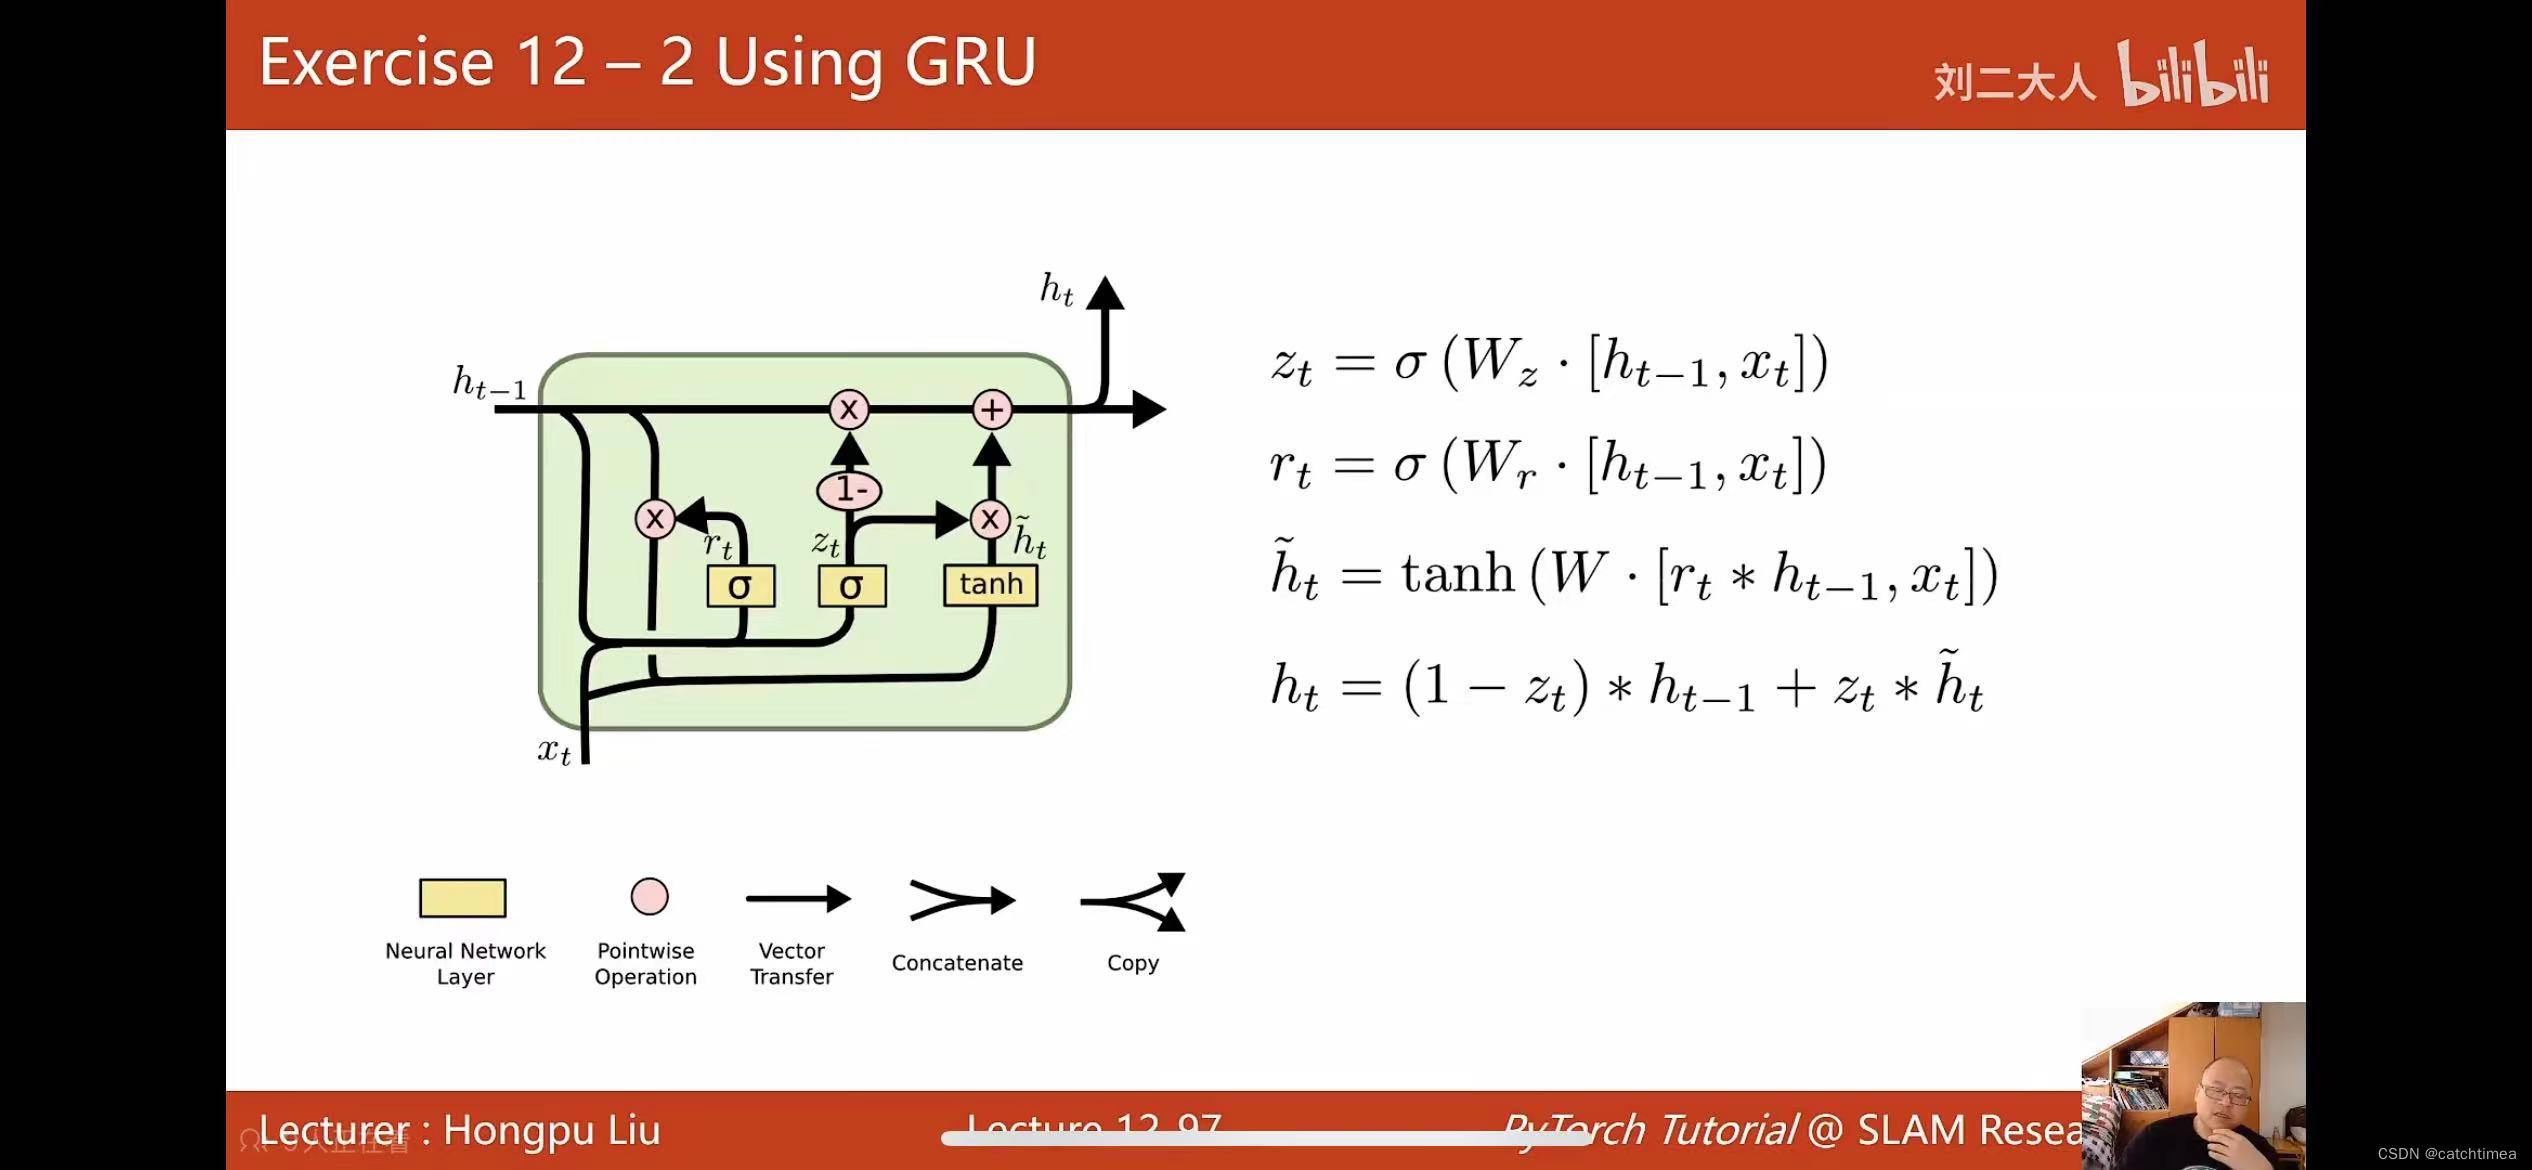
(7)尝试用 GRU 实现。


 714
714


 被折叠的 条评论
为什么被折叠?
被折叠的 条评论
为什么被折叠?
 到【灌水乐园】发言


