


Linux系统架构----LNMP平台部署中部署wordpress
一、LNMP的概述
- LNMP为Linux平台,Nginx web服务软件,mysql数据库软件,PHP编辑语言
- LNMP系统架构相对于LAMP的优点是LNMP比较节省内存,主要支持静态请求,但在访问量大的时候php-fpm容易僵死,容易发生502 bad gateway错误,LAMP适合处理动态请求
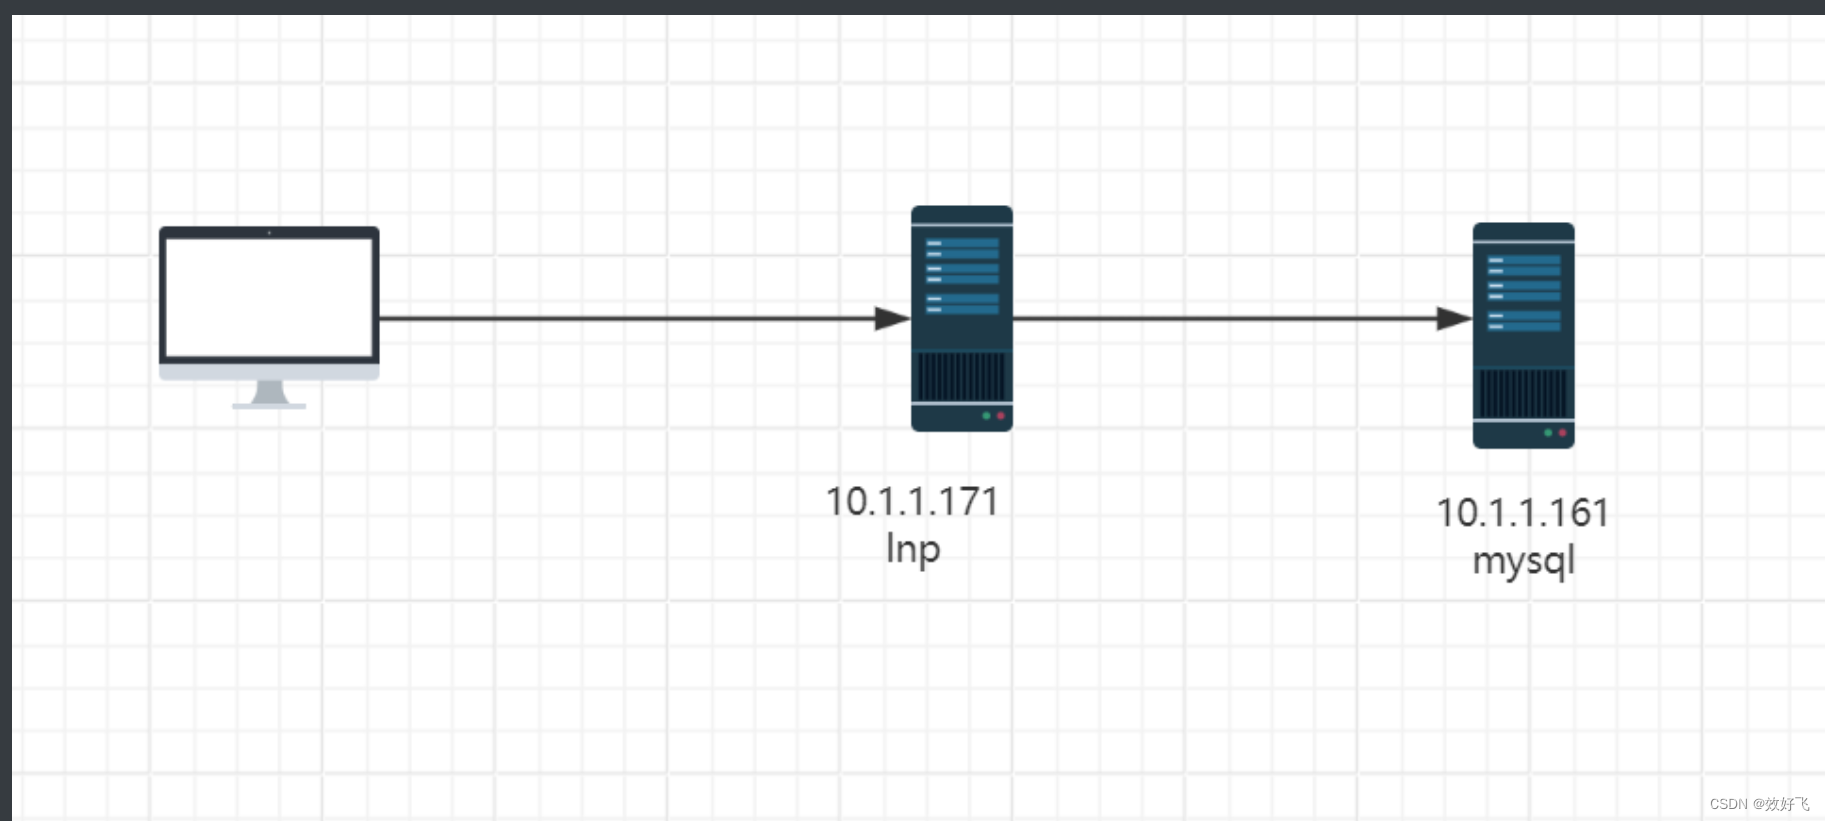
二、Mysql的安装
- 二进制部署Mysql
[root@mysql ~]# cat install_mysql.sh
#!/bin/bash
. /etc/init.d/functions
SRC_DIR=`pwd`
MYSQL='mysql-5.7.29-linux-glibc2.12-x86_64.tar.gz'
COLOR='echo -e \E[01;31m'
END='\E[0m'
MYSQL_ROOT_PASSWORD=magedu

check (){

if [ $UID -ne 0 ]; then
  action "当前用户不是root,安装失败" false
  exit 1
fi

cd  $SRC_DIR
if [ !  -e $MYSQL ];then
        $COLOR"缺少${MYSQL}文件"$END
        $COLOR"请将相关软件放在${SRC_DIR}目录下"$END
        exit
elif [ -e /usr/local/mysql ];then
        action "数据库已存在,安装失败" false
        exit
else
    return
fi
}
install_mysql(){
    $COLOR"开始安装MySQL数据库..."$END
    yum  -y -q install libaio numactl-libs ncurses-compat-libs
    cd $SRC_DIR
    tar xf $MYSQL -C /usr/local/
    MYSQL_DIR=`echo $MYSQL| sed -nr 's/^(.*[0-9]).*/\1/p'`
    ln -s  /usr/local/$MYSQL_DIR /usr/local/mysql
    chown -R  root.root /usr/local/mysql/
    id mysql &> /dev/null || { useradd -s /sbin/nologin -r  mysql ; action "创建mysql用户"; }

    echo 'PATH=/usr/local/mysql/bin/:$PATH' > /etc/profile.d/mysql.sh
    .  /etc/profile.d/mysql.sh
    ln -s /usr/local/mysql/bin/* /usr/bin/
    cat > /etc/my.cnf <<-EOF
[mysqld]
server-id=1
log-bin
datadir=/data/mysql
socket=/data/mysql/mysql.sock
log-error=/data/mysql/mysql.log
pid-file=/data/mysql/mysql.pid
[client]
socket=/data/mysql/mysql.sock
EOF
    [ -d /data ] || mkdir /data
    mysqld --initialize --user=mysql --datadir=/data/mysql
    cp /usr/local/mysql/support-files/mysql.server  /etc/init.d/mysqld
    chkconfig --add mysqld
    chkconfig mysqld on
 service mysqld start
    [ $? -ne 0 ] && { $COLOR"数据库启动失败,退出!"$END;exit; }
    sleep 3
    MYSQL_OLDPASSWORD=`awk '/A temporary password/{print $NF}' /data/mysql/mysql.log`
    mysqladmin  -uroot -p$MYSQL_OLDPASSWORD password $MYSQL_ROOT_PASSWORD &>/dev/null
    action "数据库安装完成"
}
check
install_mysql
[root@mysql ~]# bash install_mysql.sh
开始安装MySQL数据库...
已安装:
  libaio-0.3.112-1.el8.x86_64
创建mysql用户                                              [  确定  ]
Starting MySQL..                                           [  OK  ]
数据库安装完成                                             [  确定  ]
- 创建wordpress数据库和用户并授权
[root@mysql ~]# mysql -uroot -pmagedu
mysql> create database wordpress;
Query OK, 1 row affected (0.01 sec)

mysql> create user wordpress@'10.1.1.%' identified by '123456';
Query OK, 0 rows affected (0.01 sec)

mysql> grant all on wordpress.* to wordpress@'10.1.1.%';
Query OK, 0 rows affected (0.00 sec)

mysql> exit
Bye
- 验证mysql数据库权限
[root@mysql ~]# mysql -uwordpress -p123456 -h10.1.1.172
mysql: [Warning] Using a password on the command line interface can be insecure.
Welcome to the MySQL monitor.  Commands end with ; or \g.
Your MySQL connection id is 11
Server version: 5.7.29-log MySQL Community Server (GPL)

Copyright (c) 2000, 2020, Oracle and/or its affiliates. All rights reserved.

Oracle is a registered trademark of Oracle Corporation and/or its
affiliates. Other names may be trademarks of their respective
owners.

Type 'help;' or '\h' for help. Type '\c' to clear the current input statement.

mysql> show databases;
+--------------------+
| Database           |
+--------------------+
| information_schema |
| wordpress          |
+--------------------+
2 rows in set (0.01 sec)
三、PHP的安装
- 编译安装php
编译安装php
[root@php ~]# wget -O /etc/yum.repos.d/epel.repo http://mirrors.aliyun.com/repo/epel-7.repo
[root@php ~]# yum -y install gcc openssl-devel libxml2-devel bzip2-devel
libmcrypt-devel sqlite-devel oniguruma-devel
[root@lnp ~]# cd /usr/local/src
[root@lnp src]# ls
php-7.4.11.tar.xz
[root@lnp src]# tar xf php-7.4.11.tar.xz
[root@lnp src]# cd php-7.4.11
[root@lnp php-7.4.11]# mkdir /apps/php74 -p
[root@php php-7.4.11]# ./configure --prefix=/apps/php74 --enable-mysqlnd --with-mysqli=mysqlnd --with-pdo-mysql=mysqlnd --with-openssl --with-zlib --with-config-file-path=/etc --with-config-file-scan-dir=/etc/php.d --enable-mbstring --enable-xml --enable-sockets --enable-fpm --enable-maintainer-zts --disable-fileinfo
[root@php php-7.4.11]# make -j 4 && make install
- 准备php配置文件
#生成配置文件
[root@lnp php-7.4.11]# cp php.ini-production /etc/php.ini
[root@lnp php-7.4.11]# cd /apps/php74/etc
[root@lnp etc]# cp php-fpm.conf.default php-fpm.conf
[root@lnp etc]# cd php-fpm.d/
[root@lnp php-fpm.d]# cp www.conf.default www.conf
[root@lnp php-fpm.d]# vim www.conf
[root@lnp php-fpm.d]# grep '^[^;]' www.conf
[www]
user = www
group = www
listen = 127.0.0.1:9000
pm = dynamic
pm.max_children = 5
pm.start_servers = 2
pm.min_spare_servers = 1
pm.max_spare_servers = 3
pm.status_path = /pm_status
ping.path = /ping
access.log = log/$pool.access.log
slowlog = log/$pool.log.slow
[root@lnp php-fpm.d]# useradd -r -s /sbin/nologin www
[root@lnp php-fpm.d]# mkdir /apps/php74/log
- 启动并验证php-fpm服务
[root@lnp ~]# /apps/php74/sbin/php-fpm -t
[22-Jan-2024 16:49:56] NOTICE: configuration file /apps/php74/etc/php-fpm.conf test is successful

[root@lnp ~]# cp /usr/local/src/php-7.4.11/sapi/fpm/php-fpm.service /usr/lib/systemd/system/
[root@lnp ~]# systemctl daemon-reload
[root@lnp ~]# systemctl enable --now php-fpm
Created symlink /etc/systemd/system/multi-user.target.wants/php-fpm.service → /usr/lib/systemd/system/php-fpm.service.
[root@lnp ~]# ss -ntlp
State        Recv-Q       Send-Q               Local Address:Port               Peer Address:Port       Process
LISTEN       0            128                      127.0.0.1:9000                    0.0.0.0:*           users:(("php-fpm",pid=116416,fd=12),("php-fpm",pid=116415,fd=12),("php-fpm",pid=116414,fd=10))
LISTEN       0            128                        0.0.0.0:22                      0.0.0.0:*           users:(("sshd",pid=851,fd=4))
LISTEN       0            100                      127.0.0.1:25                      0.0.0.0:*           users:(("master",pid=1338,fd=16))
LISTEN       0            128                           [::]:22                         [::]:*           users:(("sshd",pid=851,fd=6))
LISTEN       0            100                          [::1]:25                         [::]:*           users:(("master",pid=1338,fd=17))
[root@lnp ~]# pstree -p |grep php
           |-php-fpm(116414)-+-php-fpm(116415)
           |                 `-php-fpm(116416)
[root@lnp ~]# ps -ef |grep php
root      116414       1  0 16:50 ?        00:00:00 php-fpm: master process (/apps/php74/etc/php-fpm.conf)
www       116415  116414  0 16:50 ?        00:00:00 php-fpm: pool www
www       116416  116414  0 16:50 ?        00:00:00 php-fpm: pool www
root      116426    1514  0 16:51 pts/0    00:00:00 grep --color=auto php
四、Nginx的安装
- 编译安装nignx
[root@lnp ~]# yum -y install gcc pcre-devel openssl-devel zlib-devel
[root@lnp ~]# cd /usr/local/src
[root@lnp src]# wget http://nginx.org/download/nginx-1.18.0.tar.gz
[root@lnp src]# tar xf nginx-1.18.0.tar.gz
[root@lnp src]# cd nginx-1.18.0
[root@lnp nginx-1.18.0]# mkdir /apps/nginx
[root@lnp nginx-1.18.0]# ./configure --prefix=/apps/nginx --user=www --group=www                       --with-http_ssl_module --with-http_v2_module --with-http_realip_module --with-http_stub_status_module --with-http_gzip_static_module --with-pcre --with-stream --with-stream_ssl_module --with-stream_realip_module
[root@lnp nginx-1.18.0]# make -j 4 && make install
- 准备服务文件并启动Nginx
[root@lnp nginx-1.18.0]# vim /usr/lib/systemd/system/nginx.service
[Unit]
Description=nginx - high performance web server
Documentation=http://nginx.org/en/docs/
After=network-online.target remote-fs.target nss-lookup.target
Wants=network-online.target
[Service]
Type=forking
PIDFile=/apps/nginx/run/nginx.pid
ExecStart=/apps/nginx/sbin/nginx -c /apps/nginx/conf/nginx.conf
ExecReload=/bin/kill -s HUP $MAINPID
ExecStop=/bin/kill -s TERM $MAINPID
LimitNOFILE=100000
[Install]
WantedBy=multi-user.target
[root@lnp nginx-1.18.0]# mkdir /apps/nginx/run/
[root@lnp nginx-1.18.0]# vim /apps/nginx/conf/nginx.conf
pid   /apps/nginx/run/nginx.pid;
[root@lnp nginx-1.18.0]# systemctl daemon-reload
[root@lnp nginx-1.18.0]# systemctl enable --now nginx
Created symlink /etc/systemd/system/multi-user.target.wants/nginx.service → /usr/lib/systemd/system/nginx.service.
[root@lnp nginx-1.18.0]# ss -ntl
State        Recv-Q       Send-Q               Local Address:Port               Peer Address:Port       Process
LISTEN       0            100                      127.0.0.1:25                      0.0.0.0:*
LISTEN       0            128                      127.0.0.1:9000                    0.0.0.0:*
LISTEN       0            128                        0.0.0.0:80                      0.0.0.0:*
LISTEN       0            128                        0.0.0.0:22                      0.0.0.0:*
LISTEN       0            100                          [::1]:25                         [::]:*
LISTEN       0            128
- 配置nginx支持
[root@lnp ~]# vim /apps/nginx/conf/nginx.conf
[root@lnp ~]# grep -Ev '#|^$' /apps/nginx/conf/nginx.conf
worker_processes  1;
pid       /apps/nginx/run/nginx.pid;
events {
   worker_connections  1024;
}
http {
   include       mime.types;
   default_type application/octet-stream;
   sendfile       on;
   keepalive_timeout  65;
   server {
       listen       80;
       server_name 10.1.1.171;  #指定主机名
       location / {
           root   /data/nginx/wordpress;  #指定数据目录
           index index.php index.html index.htm;          #指定默认主页
       }
       error_page   500 502 503 504 /50x.html;
       location = /50x.html {
           root   html;
       }
       location ~ \.php$ {                         #实现php-fpm
           root           /data/nginx/wordpress;
           fastcgi_pass   127.0.0.1:9000;
           fastcgi_index index.php;
           fastcgi_param SCRIPT_FILENAME  $document_root$fastcgi_script_name;
           include       fastcgi_params;
       }
       location ~ ^/(ping|pm_status)$ {            #实现状态页
           include fastcgi_params;
           fastcgi_pass 127.0.0.1:9000;
           fastcgi_param PATH_TRANSLATED $document_root$fastcgi_script_name;
       }
   }
}
[root@lnp ~]# /apps/nginx/sbin/nginx -t
nginx: the configuration file /apps/nginx/conf/nginx.conf syntax is ok
nginx: configuration file /apps/nginx/conf/nginx.conf test is successful
[root@lnp ~]# /apps/nginx/sbin/nginx -s reload
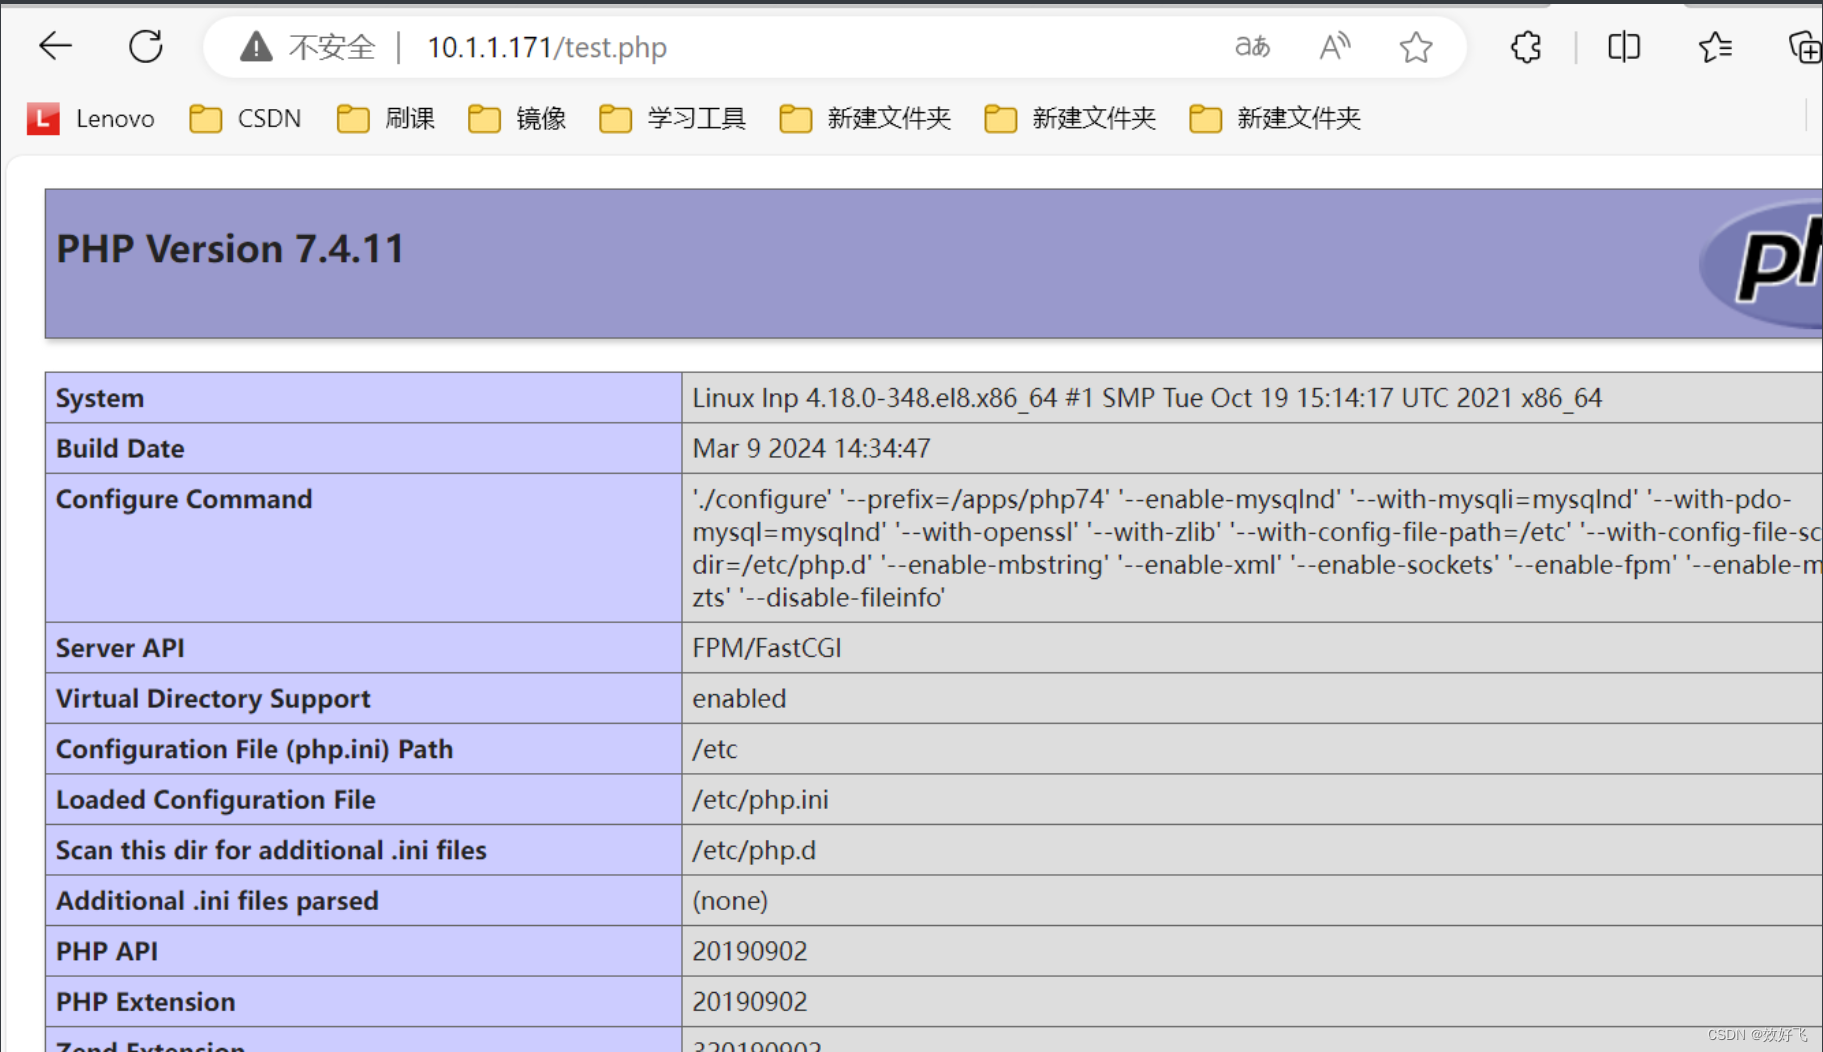
- 主备php测试页
[root@lnp ~]# mkdir -p /data/nginx/wordpress
[root@lnp ~]# vim /data/nginx/wordpress/test.php
<?php
  phpinfo();
?>
- 验证php测试页

五、部署Wordpress
- 准备wordpress文件
[root@lnp ~]# ls
anaconda-ks.cfg  install_mysql.sh  latest-zh_CN.tar.gz
[root@lnp ~]# tar xf latest-zh_CN.tar.gz
[root@lnp ~]# ls
anaconda-ks.cfg  install_mysql.sh  latest-zh_CN.tar.gz  wordpress
[root@lnp ~]# cp -r wordpress/* /data/nginx/wordpress
[root@lnp ~]# chown -R www.www /data/nginx/wordpress/
- 初始化Web页面
http://10.1.1.171/wp-admin
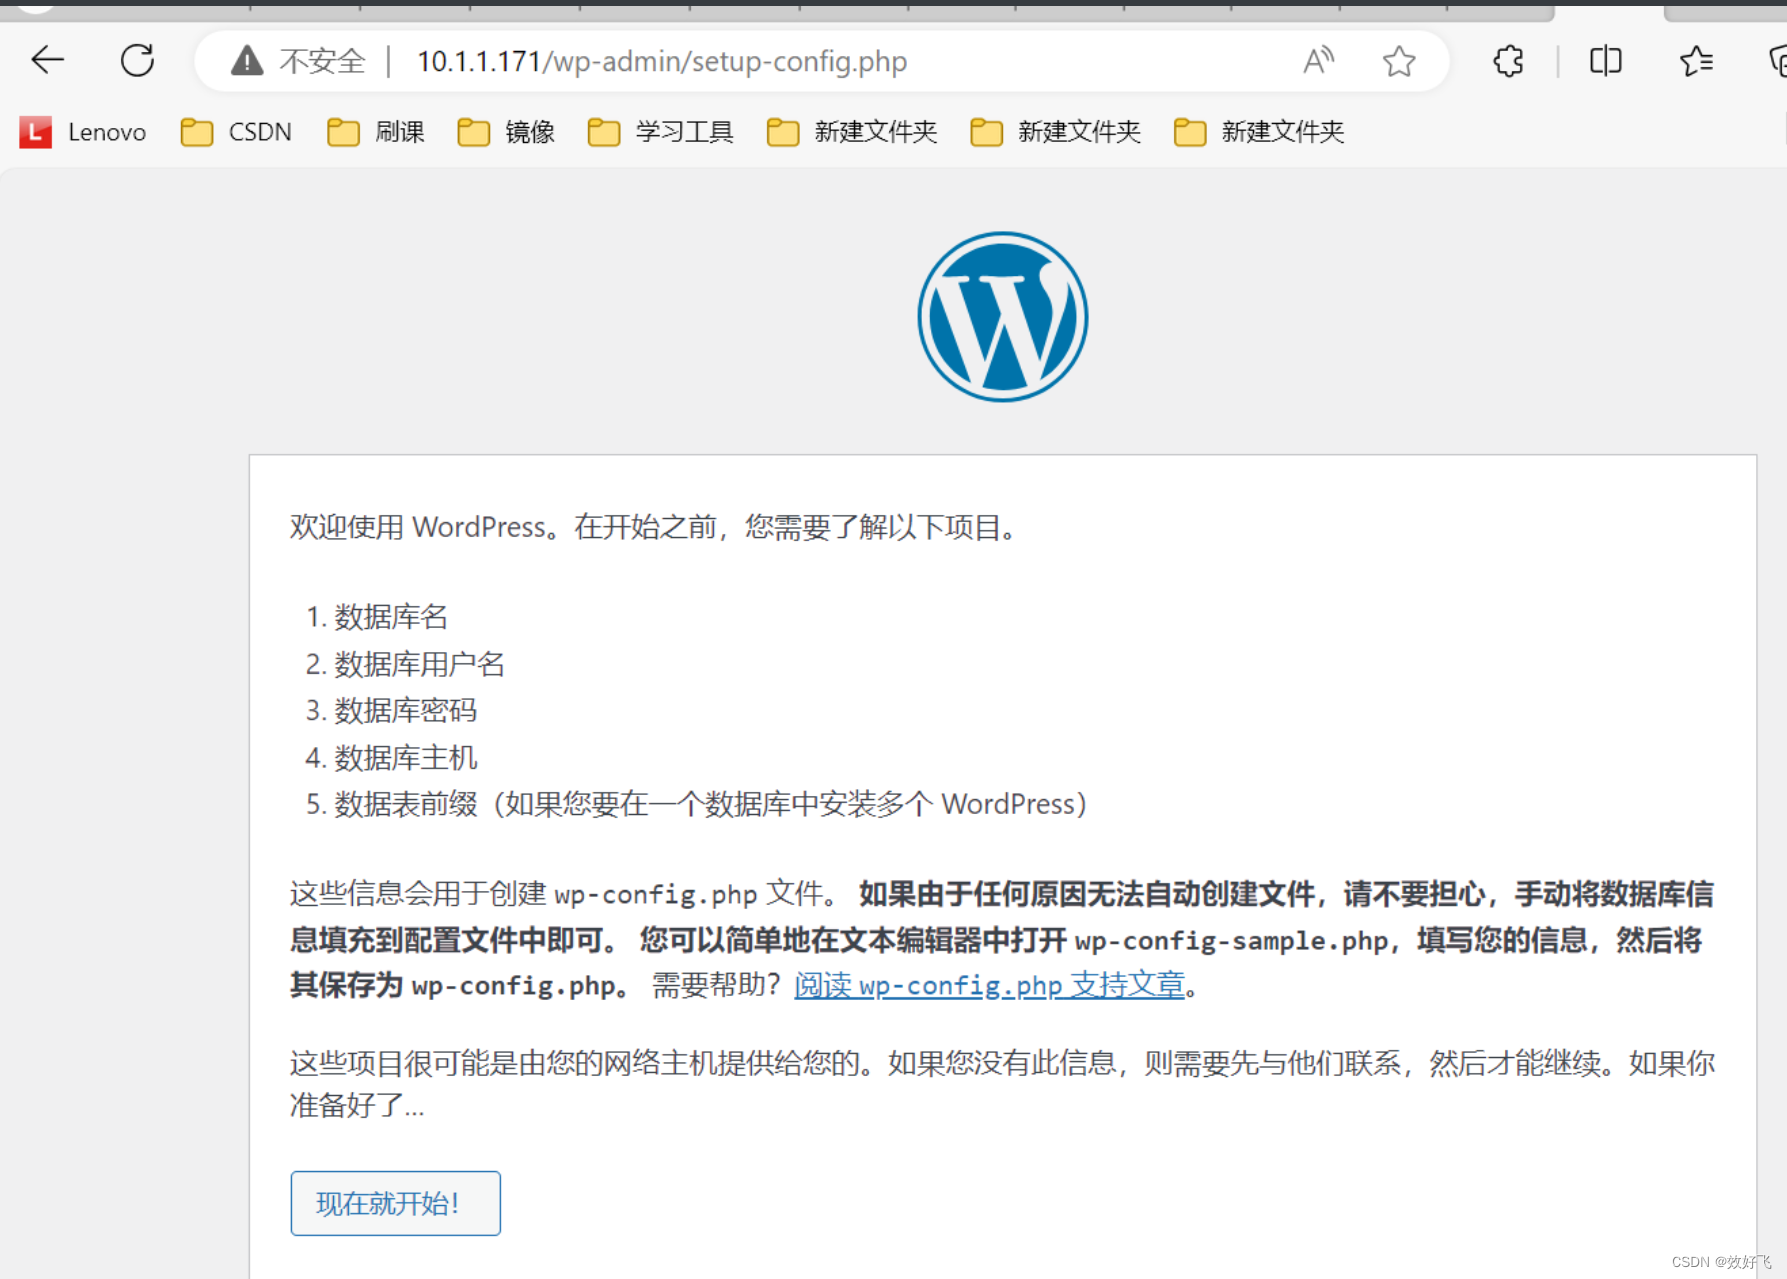
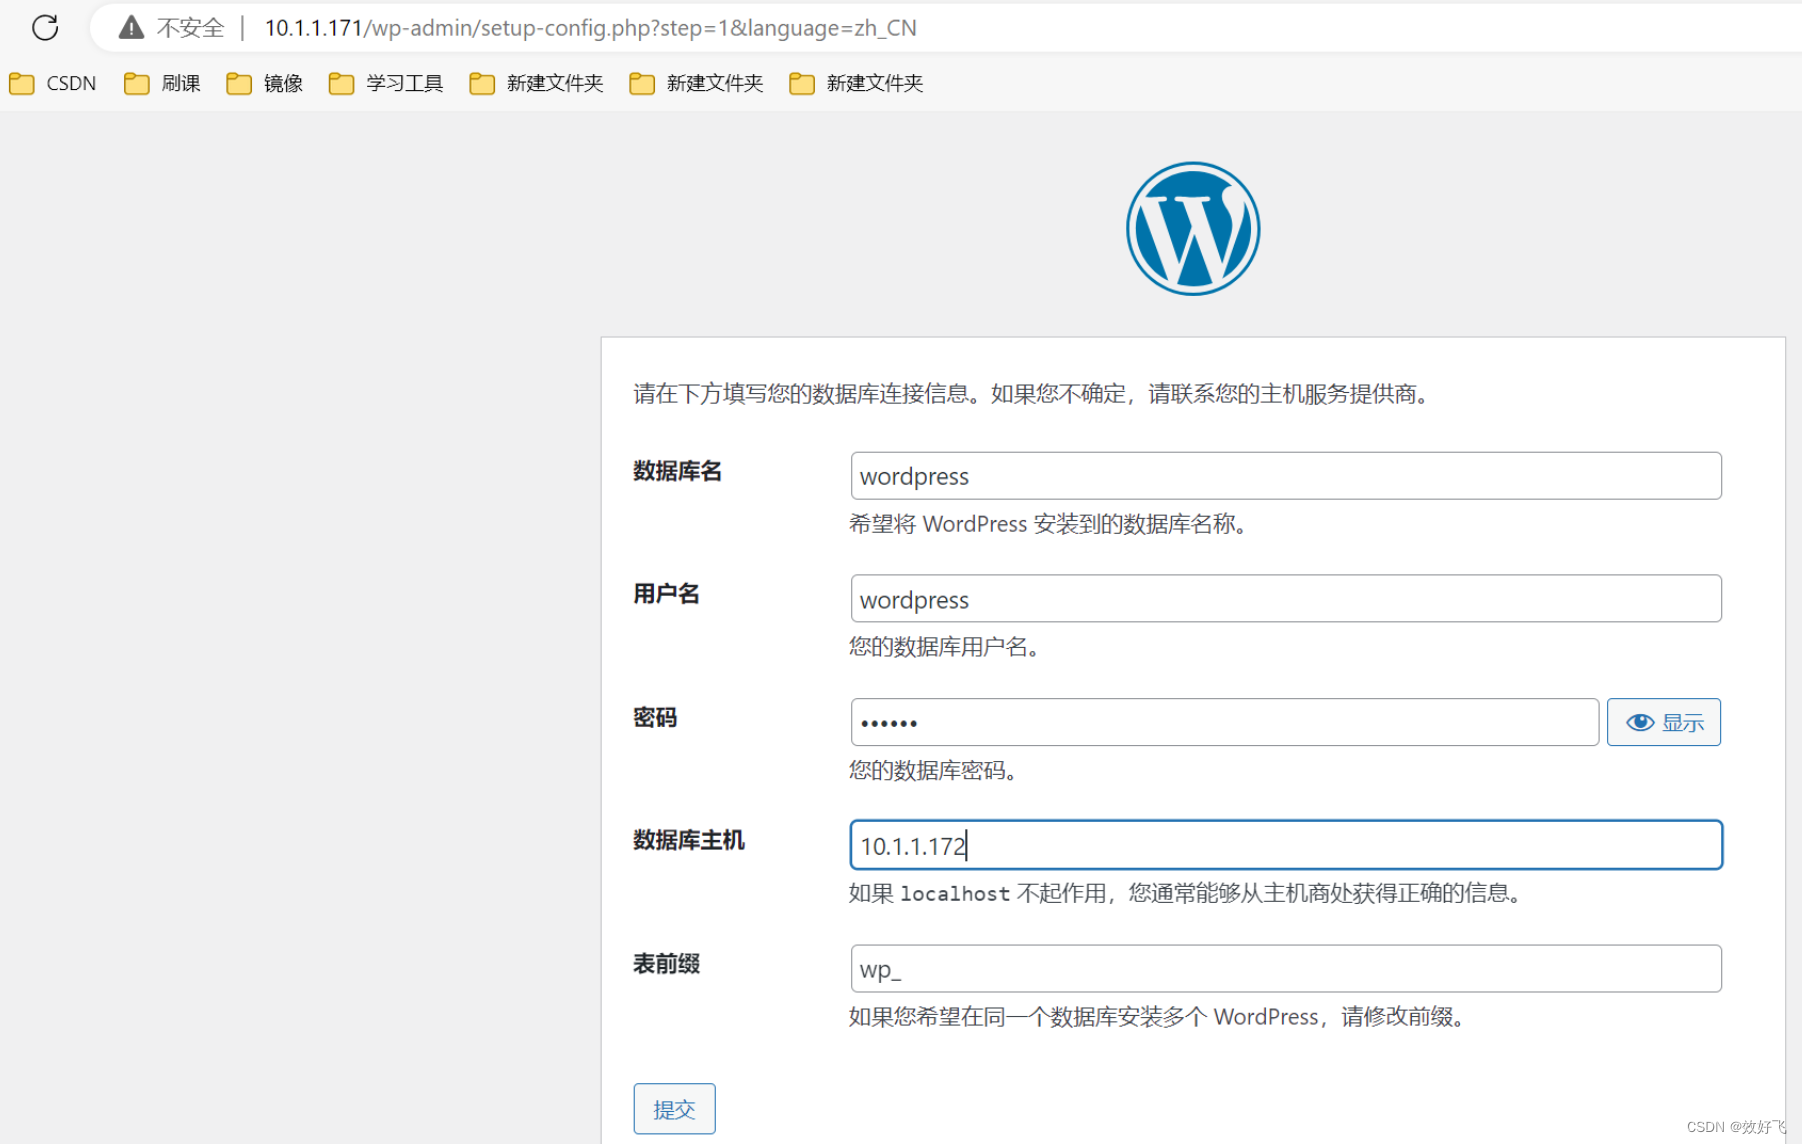

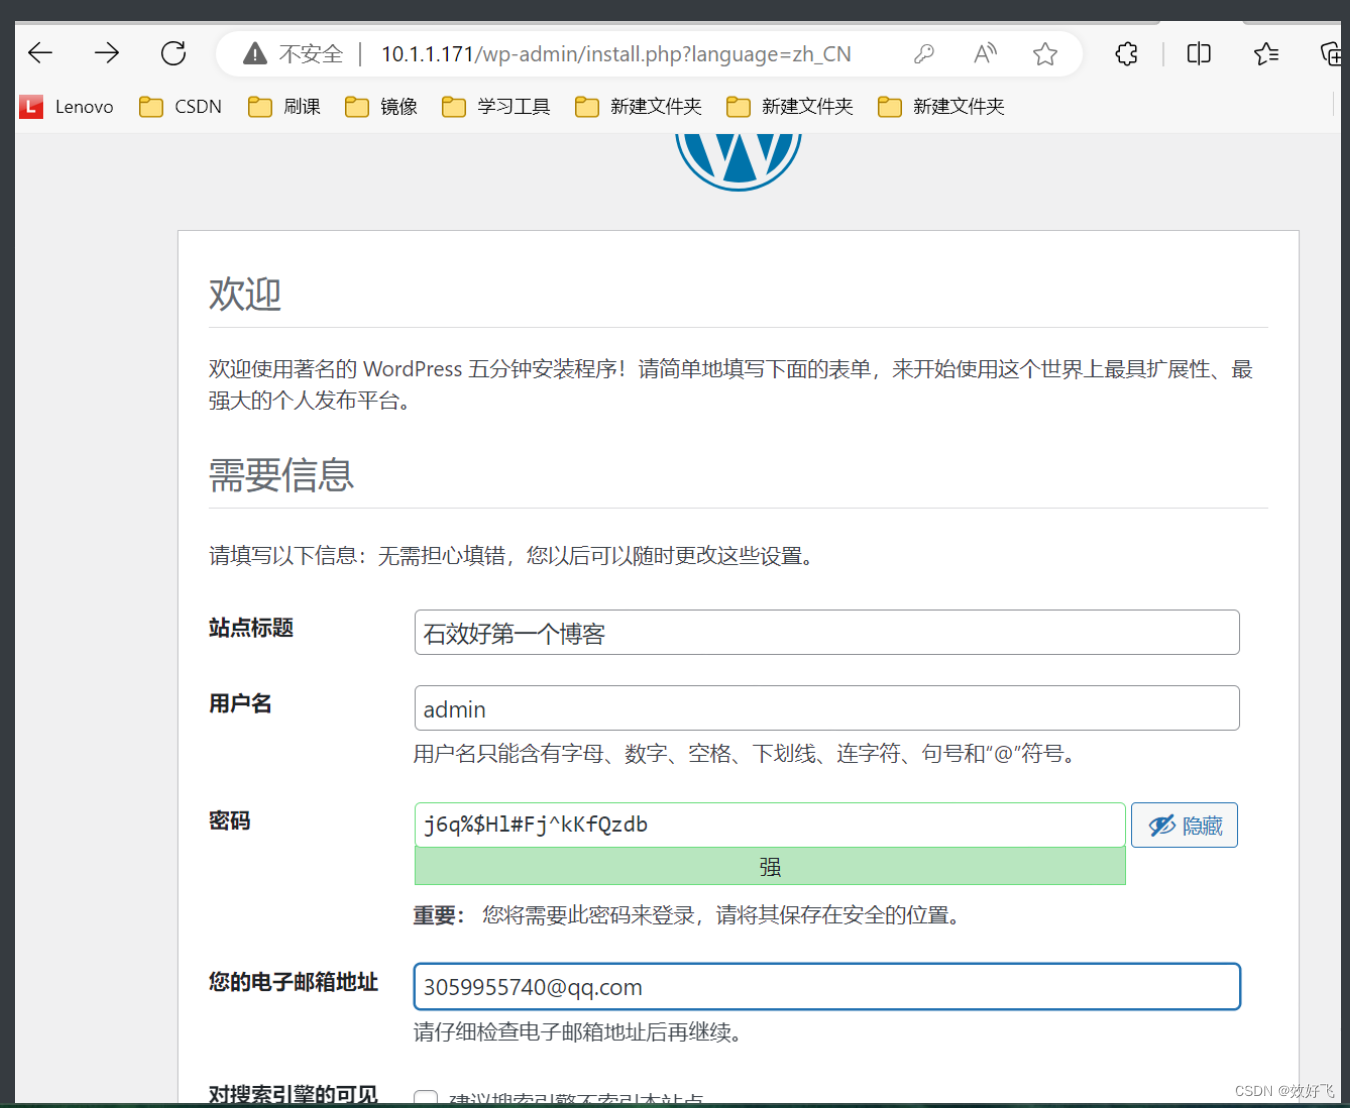
成功登录

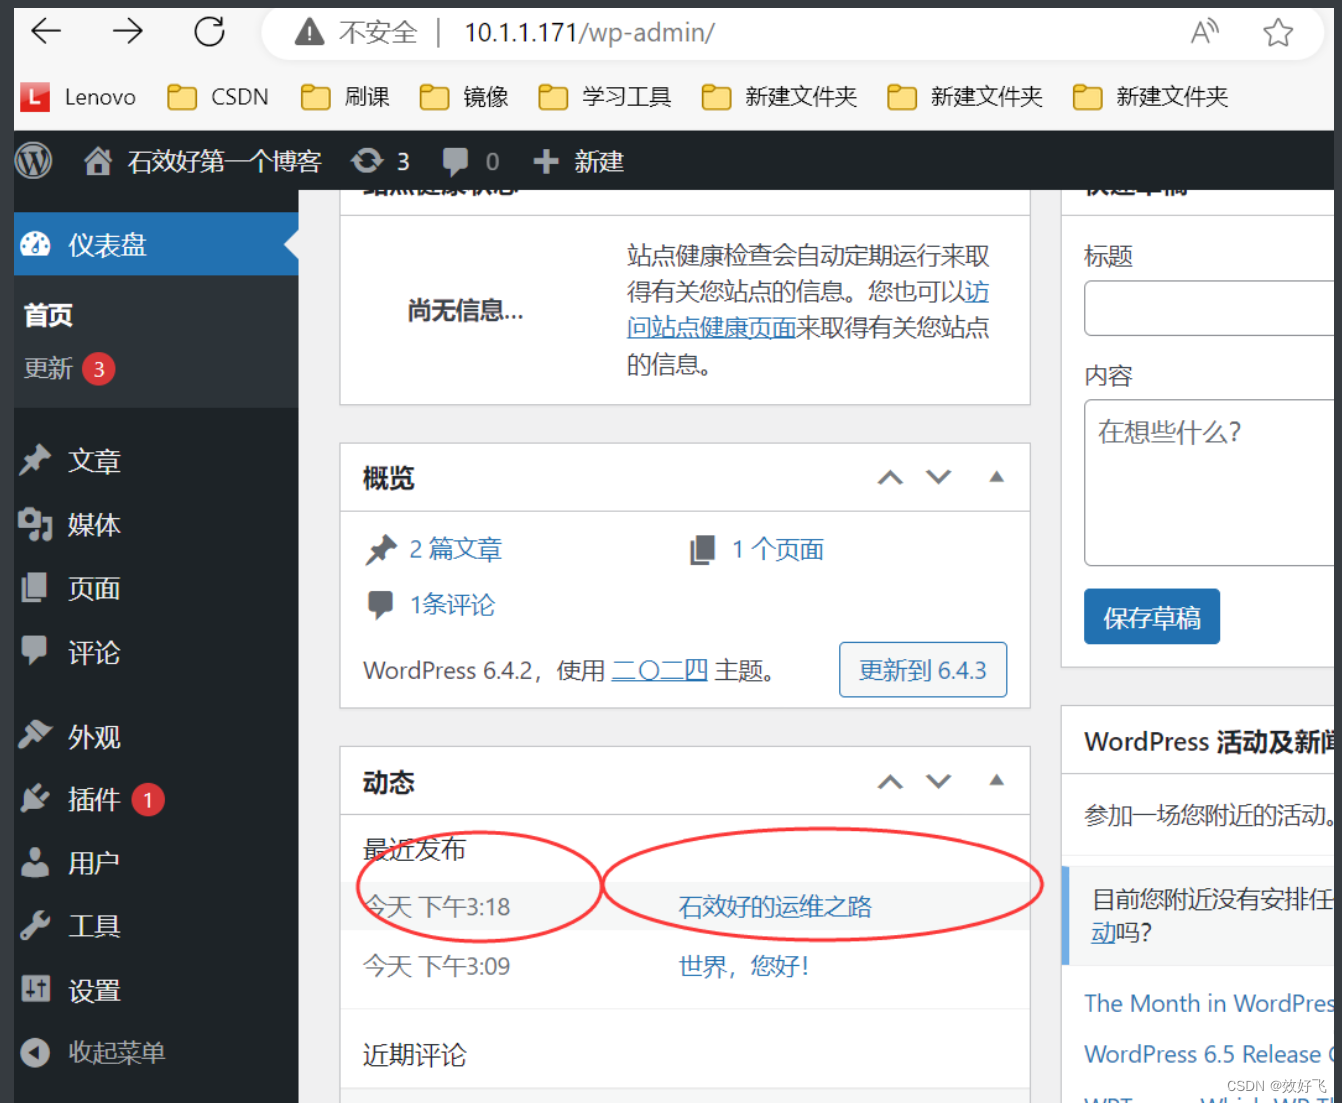
发表文章
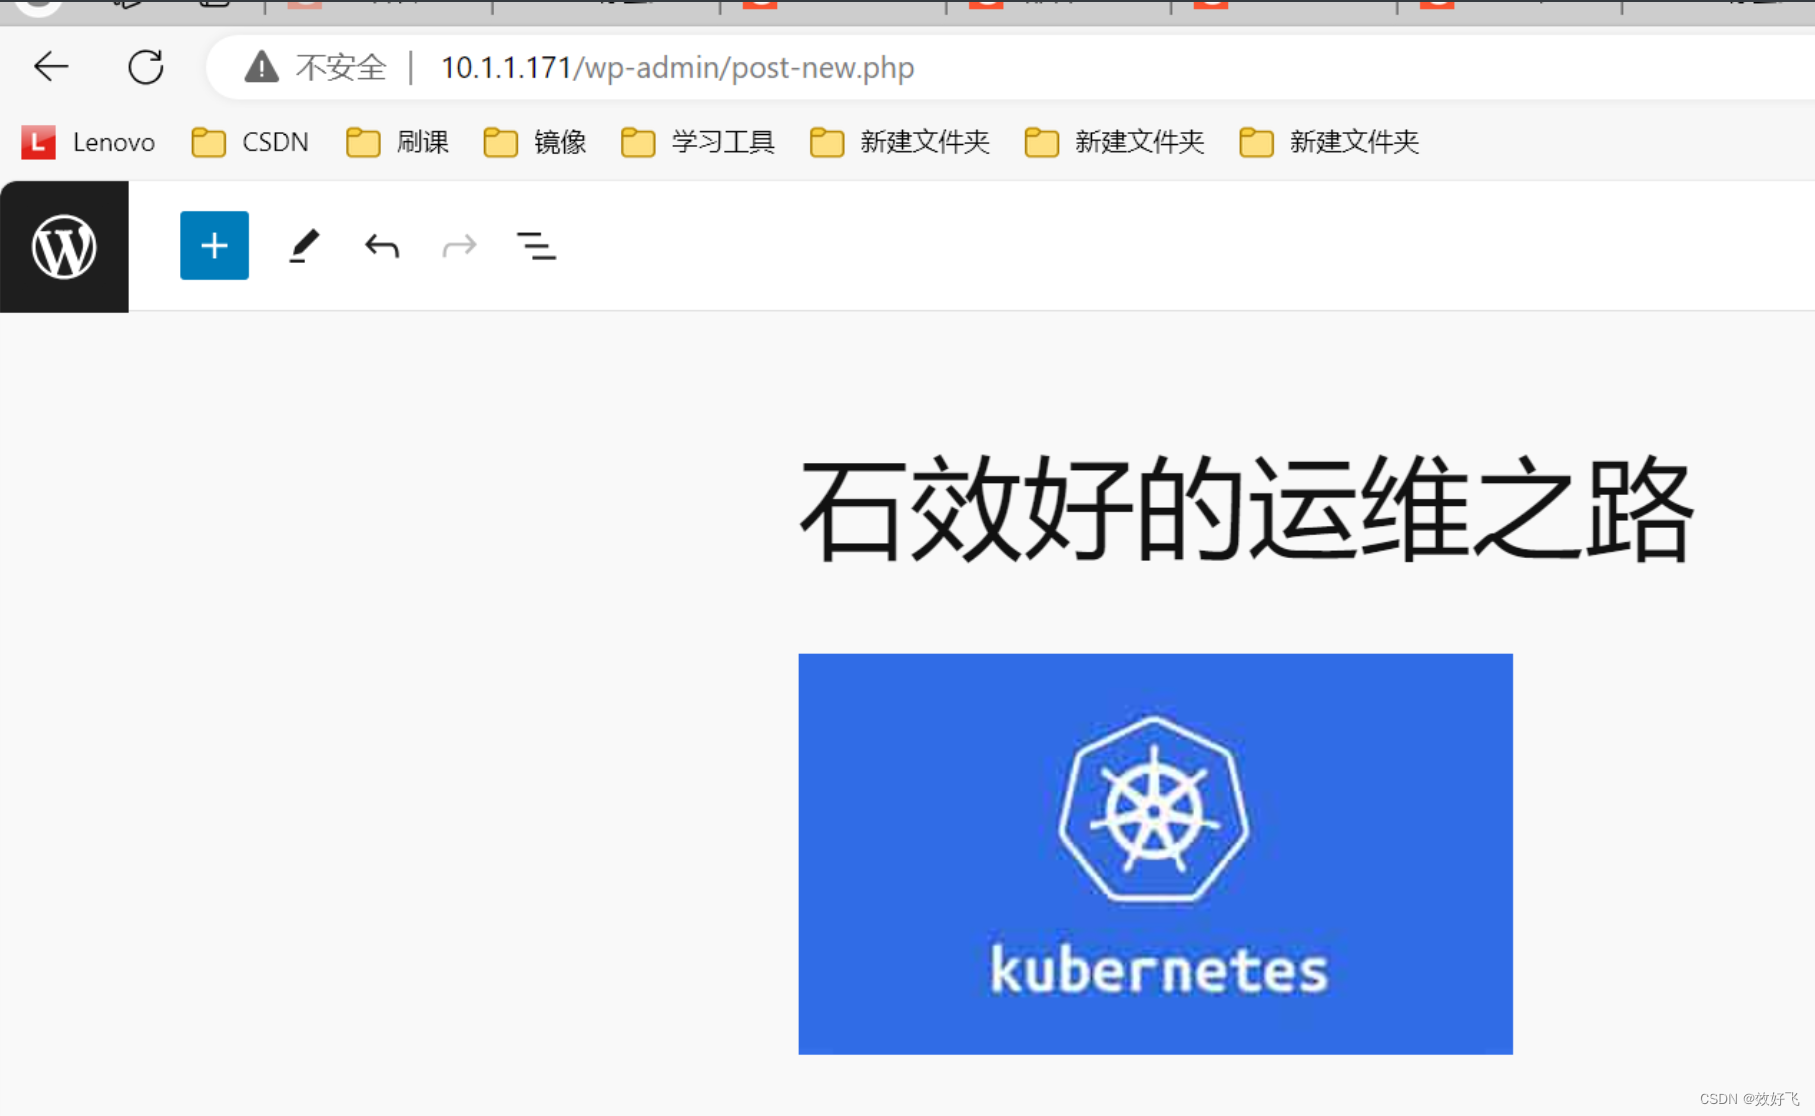
发表成功
六、PHP 扩展session模块支持redis
- 编译安装PHP redis 在10.1.1.171上进行以下编译安装
[root@lnp ~]# cd /usr/local/src
[root@lnp src]# wget http://pecl.php.net/get/redis-5.3.1.tgz
[root@lnp src]# tar xf redis-5.3.1.tgz
[root@lnp src]# cd redis-5.3.1/
[root@lnp redis-5.3.1]# ls
......
#如果是yum安装php,需要执行yum -y install php-cli php-devel
#以下为编译安装php的对应方式
[root@lnp redis-5.3.1]# /apps/php74/bin/phpize
Configuring for:
PHP Api Version: 20190902
Zend Module Api No: 20190902
Zend Extension Api No: 320190902
[root@lnp redis-5.3.1]# yum -y install autoconf
#重新执行成功
[root@lnp redis-5.3.1]# /apps/php74/bin/phpize
Configuring for:
PHP Api Version: 20190902
Zend Module Api No: 20190902
Zend Extension Api No: 320190902
#查看生成configure脚本
[root@lnp redis-5.3.1]# ls
arrays.markdown config.log INSTALL.markdown README.markdown redis_commands.c run-tests.php
autom4te.cache config.m4 liblzf redis_array.c redis_commands.h sentinel_library.c
build config.nice library.c redis_array.h redis_commands.lo sentinel_library.h
cluster_library.c config.status library.h redis_array_impl.c redis.la sentinel_library.lo
cluster_library.h configure library.lo redis_array_impl.h redis.lo sentinel.markdown
cluster_library.lo configure.ac libtool redis_array_impl.lo redis_sentinel.c tests
cluster.markdown config.w32 Makefile redis_array.lo redis_sentinel.h
common.h COPYING Makefile.fragments redis.c redis_sentinel.lo
config.h crc16.h Makefile.objects redis_cluster.c redis_session.c
config.h.in CREDITS modules redis_cluster.h redis_session.h
config.h.in~ include php_redis.h redis_cluster.lo redis_session.lo
#yum安装php,无需指定--with-php-config
[root@lnp redis-5.3.1]# ./configure --with-php-config=/apps/php74/bin/php-config
[root@lnp redis-5.3.1]# make -j 8 && make install
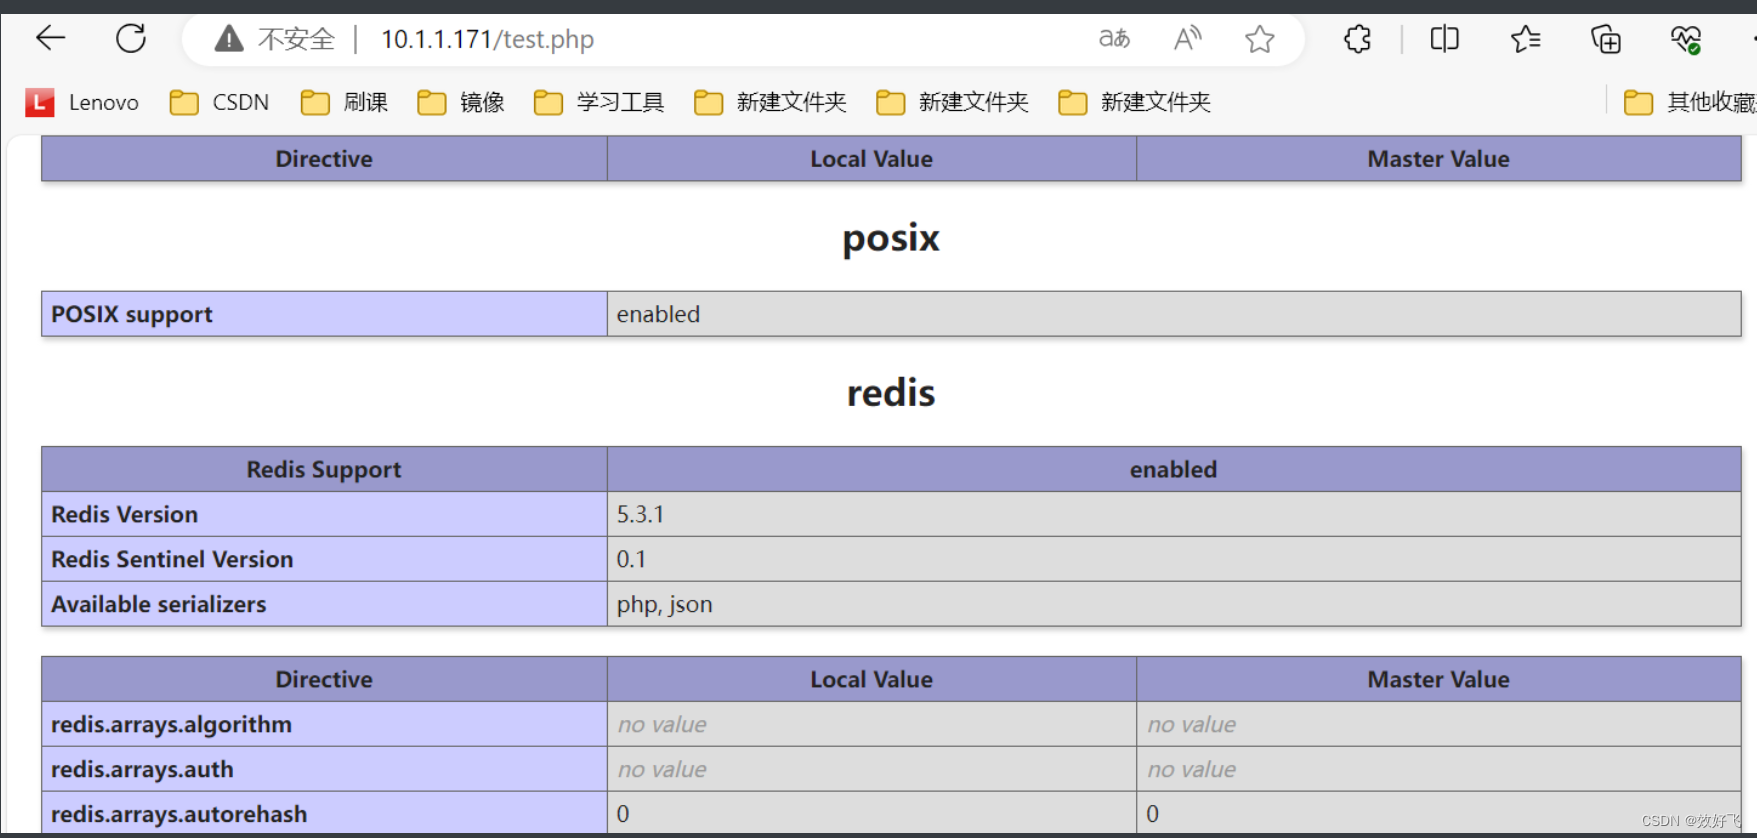
#验证redis模块
#yum安装php,模块文件默认存放在 /usr/lib64/php/modules/redis.so
[root@lnp redis-5.3.1]# ll /apps/php74/lib/php/extensions/no-debug-zts-20190902/
总用量 13404
-rwxr-xr-x 1 root root 6922284 3月 9 14:38 opcache.a
-rwxr-xr-x 1 root root 3228216 3月 9 14:38 opcache.so
-rwxr-xr-x 1 root root 3566896 3月 9 15:26 redis.so
- 编辑php配置文件支持redis
#编辑php.ini配置文件,扩展redis.so模块
[root@lnp ~]# vim /etc/php.ini
.....
#extension=/apps/php74/lib/php/extensions/no-debug-zts-20190902/redis.so
extension=redis.so    #文件最后一行添加此行,路径可省略
[root@lnp ~]# systemctl restart php-fpm
- 验证加载redis模块
- 安装和配置redis服务
在10.1.1.172上进行安装redis服务
#在10.0.0.17主机安装redis服务
[root@mysql ~]#  yum -y install redis
[root@mysql ~]#  vim /etc/redis.conf
bind 0.0.0.0
requirepass 123456
[root@mysql ~]# #systemctl enable --now redis
[root@mysql ~]# #ss -tnl
State     Recv-Q Send-Q                     Local Address:Port
                    Peer Address:Port
LISTEN     0      128                                     *:22
                              *:*
LISTEN     0      100                             127.0.0.1:25
                              *:*
LISTEN     0      128                                     *:6379
                              *:*
LISTEN     0      128                                 [::]:22
                            [::]:*
LISTEN     0      100                                 [::1]:25
                            [::]:*
LISTEN     0      70                                   [::]:33060
                            [::]:*
LISTEN     0      128                                 [::]:3306
- 配置php支持redis保存session
在10.1.1.171主机上配置
#在10.1.1.171主机配置php的session保存在redis服务
root@lnp ~]# vim /etc/php.ini
[Session]
; Handler used to store/retrieve data.
; http://php.net/session.save-handler
session.save_handler = redis
session.save_path = "tcp://10.1.1.172:6379?auth=123456"
root@lnp ~]# systemctl restart php-fpm
- 准备php实现session的测试页面
在10.1.1.171上进行准备相关文件
[root@lnp ~]# vim /data/nginx/wordpress/session.php
<?php
session_start();
//redis用session_id作为key 并且是以string的形式存储
$redisKey = 'PHPREDIS_SESSION:' . session_id();
// SESSION 赋值测试
$_SESSION['message'] = "Hello, I'm in redis";
$_SESSION['arr'] = [1, 2, 3, 4, 5, 6];
echo $_SESSION["message"] , "<br/>";
echo "Redis key =   " . $redisKey . "<br/>";
echo "以下是从Redis获取的数据", "<br/>";
// 取数据'
$redis = new Redis();
$redis->connect('10.1.1.172', 6379);
$redis->auth('123456');
echo $redis->get($redisKey);
?>
- 访问web页面实现session保存在redis服务


 471
471


 被折叠的 条评论
为什么被折叠?
被折叠的 条评论
为什么被折叠?
 到【灌水乐园】发言


