


在分析之前一定要先编译!
uboot启动流程
一、找到入口函数
uboot是从哪里开始启动的为什么?
1.去Makefile中找链接文件
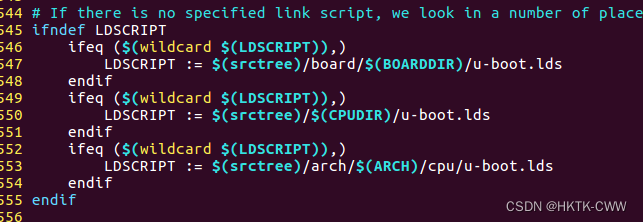
这里有三个lds,经过一一分析,发现最后一个是。
2./uboot-imx-rel_imx_4.1.15_2.1.0_ga/arch/arm/cpu/u-boot.lds:
1.可以通过ENTRY的_start,全局搜索

2.可以在代码段直接找到,是当前目录的对应cpu架构的start.S/C
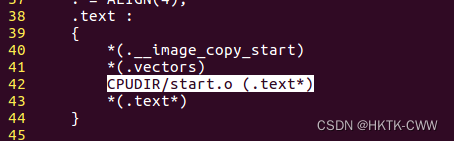
3.我们是armv7

于是我们找到start.S
二、分析start.S
但是发现里面没有_start:于是我们在顶层目录下搜索grep -r “__start”
最终在arch/arm/lib/vectors.S下找到:
48 _start:
49
50 #ifdef CONFIG_SYS_DV_NOR_BOOT_CFG
51 .word CONFIG_SYS_DV_NOR_BOOT_CFG
52 #endif
53
54 b reset
55 ldr pc, _undefined_instruction
56 ldr pc, _software_interrupt
57 ldr pc, _prefetch_abort
58 ldr pc, _data_abort
59 ldr pc, _not_used
60 ldr pc, _irq
61 ldr pc, _fiq
而reset又跳到start.S中
reset:
	/* Allow the board to save important registers */
	b	save_boot_params /*最终会跳到save_boot_params_ret*/
save_boot_params_ret:
	/*
	 * disable interrupts (FIQ and IRQ), also set the cpu to SVC32 mode,
	 * except if in HYP mode already
	 */
	/* 进入svc模式,并且关闭fiq与irq */
	mrs	r0, cpsr
	and	r1, r0, #0x1f		@ mask mode bits
	teq	r1, #0x1a		@ test for HYP mode
	bicne	r0, r0, #0x1f		@ clear all mode bits
	orrne	r0, r0, #0x13		@ set SVC mode
	orr	r0, r0, #0xc0		@ disable FIQ and IRQ
	msr	cpsr,r0

/*
 * Setup vector:
 * (OMAP4 spl TEXT_BASE is not 32 byte aligned.
 * Continue to use ROM code vector only in OMAP4 spl)
 */
 /*设置中断向量表到_start*/
#if !(defined(CONFIG_OMAP44XX) && defined(CONFIG_SPL_BUILD))
	/* Set V=0 in CP15 SCTLR register - for VBAR to point to vector */
	mrc	p15, 0, r0, c1, c0, 0	@ Read CP15 SCTLR Register
	bic	r0, #CR_V		@ V = 0
	mcr	p15, 0, r0, c1, c0, 0	@ Write CP15 SCTLR Register

	/* Set vector address in CP15 VBAR register */
	ldr	r0, =_start
	mcr	p15, 0, r0, c12, c0, 0	@Set VBAR
#endif

	/* the mask ROM code should have PLL and others stable */
#ifndef CONFIG_SKIP_LOWLEVEL_INIT
	bl	cpu_init_cp15/*disable MMU stuff and caches*/
	bl	cpu_init_crit/* setup important registers and setup memory timing*/
#endif

	bl	_main
第一部分主要:
1.设置处理器进入SVC模式
2.关闭FIQ与IRQ
3.设置中断向量表为一开始的_start位置(后面搬移uboot之后会重定位向量表位置)
4.进入_main
三、进入_main
我们在uboot顶层目录下grep -r “_main” ./
结果:

由于我们imx6ull用的是Cortex-A7是32位的,所以是crt0.S
ENTRY(_main)

/*
 * Set up initial C runtime environment and call board_init_f(0).
 */

	.....
	bl	board_init_f_alloc_reserve	//为后面的board_init_f 留出malloc与gd结构体的内存区域

	.....
	/* set up gd here, outside any C code */
	bl	board_init_f_init_reserve	//清零gb结构体

	.....
	bl	board_init_f	//进行大部分外设的初始化,并且初始化 gd 的各个成员变量,后期将根据这个结构体进行uboot的搬移和向量表的重定位
/*
 * Set up intermediate environment (new sp and gd) and call
 * relocate_code(addr_moni). Trick here is that we'll return
 * 'here' but relocated.
 */
	.....
	ldr	r0, [r9, #GD_RELOCADDR]		/* r0 = gd->relocaddr */
	b	relocate_code	//根据gd结构体进行uboot搬移
here:
/*
 * now relocate vectors
 */
	bl	relocate_vectors //根据gd结构体进行向量表重定位


/* Set up final (full) environment */
	bl	c_runtime_cpu_setup	/* we still call old routine here */ //不重要


    //清空BSS段
    .....
	ldr	r0, =__bss_start	/* this is auto-relocated! */

#ifdef CONFIG_USE_ARCH_MEMSET
	ldr	r3, =__bss_end		/* this is auto-relocated! */
	mov	r1, #0x00000000		/* prepare zero to clear BSS */

	subs	r2, r3, r0		/* r2 = memset len */
	bl	memset
#else
	ldr	r1, =__bss_end		/* this is auto-relocated! */
	mov	r2, #0x00000000		/* prepare zero to clear BSS */

clbss_l:cmp	r0, r1			/* while not at end of BSS */
#if defined(CONFIG_CPU_V7M)
	itt	lo
#endif
	strlo	r2, [r0]		/* clear 32-bit BSS word */
	addlo	r0, r0, #4		/* move to next */
	blo	clbss_l
#endif

   	//LED灯亮
#if ! defined(CONFIG_SPL_BUILD)
	bl coloured_LED_init
	bl red_led_on
#endif

	//执行board_init_r,剩余部分外设初始化(),最终调用run_main_loop,进行内核加载处理
	ldr	lr, =board_init_r	/* this is auto-relocated! */
	or
	ldr	pc, =boar_init_r	/* this is auto-relocated! */

ENDPROC(_main)
第二部分:(重要知识点:gd结构体是uboot搬移的灵魂,后面有一个images结构体则是内核搬移的灵魂)
1.为board_init_f执行预留malloc与gd结构体的内存区域
2.清空gd结构体
3.执行board_init_f 进行大部分外设初始化,并设置gd结构体的各个成员
4.relocate_code,根据gd结构体进行内存搬移
5.relocate_vectors,根据gd结构体重定位向量表
6.清空BSS段
7.LED ON
8.执行boar_init_r, 剩余部分外设初始化(),最终调用run_main_loop,进入第三部分
细讲第二部分:
第二部分中有一些函数是值得细讲的,尤其是board_init_f 与board_init_r函数,我们要知道在它们里面都分别执行了哪些外设的初始化,这样当我们uboot启动遇到问题时才好定位到。
board_init_f :
void board_init_f(ulong boot_flags)
{
#ifdef CONFIG_SYS_GENERIC_GLOBAL_DATA
    /*
     * For some archtectures, global data is initialized and used before
     * calling this function. The data should be preserved. For others,
     * CONFIG_SYS_GENERIC_GLOBAL_DATA should be defined and use the stack
     * here to host global data until relocation.
     */
    gd_t data;

    gd = &data;

    /*
     * Clear global data before it is accessed at debug print
     * in initcall_run_list. Otherwise the debug print probably
     * get the wrong vaule of gd->have_console.
     */
    zero_global_data();
#endif

    gd->flags = boot_flags;
    gd->have_console = 0;

    if (initcall_run_list(init_sequence_f))//依次执行init_sequence_f函数指针结构体中的函数
        hang();

#if !defined(CONFIG_ARM) && !defined(CONFIG_SANDBOX) && \
        !defined(CONFIG_EFI_APP)
    /* NOTREACHED - jump_to_copy() does not return */
    hang();
#endif
}
init_sequence_f:
/*****************去掉条件编译语句后的 init_sequence_f***************/
static init_fnc_t init_sequence_f[] = {
setup_mon_len,
initf_malloc,
initf_console_record,
arch_cpu_init, /* basic arch cpu dependent setup */
initf_dm,
arch_cpu_init_dm,
mark_bootstage, /* need timer, go after init dm */
board_early_init_f,
timer_init, /* initialize timer */ //初始化内部定时器,提供uboot时间
board_postclk_init,
get_clocks,
env_init, /* initialize environment */
init_baud_rate, /* initialze baudrate settings */
serial_init, /* serial communications setup */ //初始化串口,在这之后就可以看到uboot在串口打印的一些东西了
console_init_f, /* stage 1 init of console */
display_options, /* say that we are here */
display_text_info, /* show debugging info if required */
print_cpuinfo, /* display cpu info (and speed) */
show_board_info,
INIT_FUNC_WATCHDOG_INIT
INIT_FUNC_WATCHDOG_RESET
init_func_i2c,
announce_dram_init,
/* TODO: unify all these dram functions? */
dram_init, /* configure available RAM banks */ //这里并不是真的dram初始化,真正的在boar_init_r中
post_init_f,
INIT_FUNC_WATCHDOG_RESET
testdram,
INIT_FUNC_WATCHDOG_RESET
INIT_FUNC_WATCHDOG_RESET
/*
* Now that we have DRAM mapped and working, we can
* relocate the code and continue running from DRAM.
*
* Reserve memory at end of RAM for (top down in that order):
* - area that won't get touched by U-Boot and Linux (optional)
* - kernel log buffer
* - protected RAM
* - LCD framebuffer
* - monitor code
* - board info struct
*/
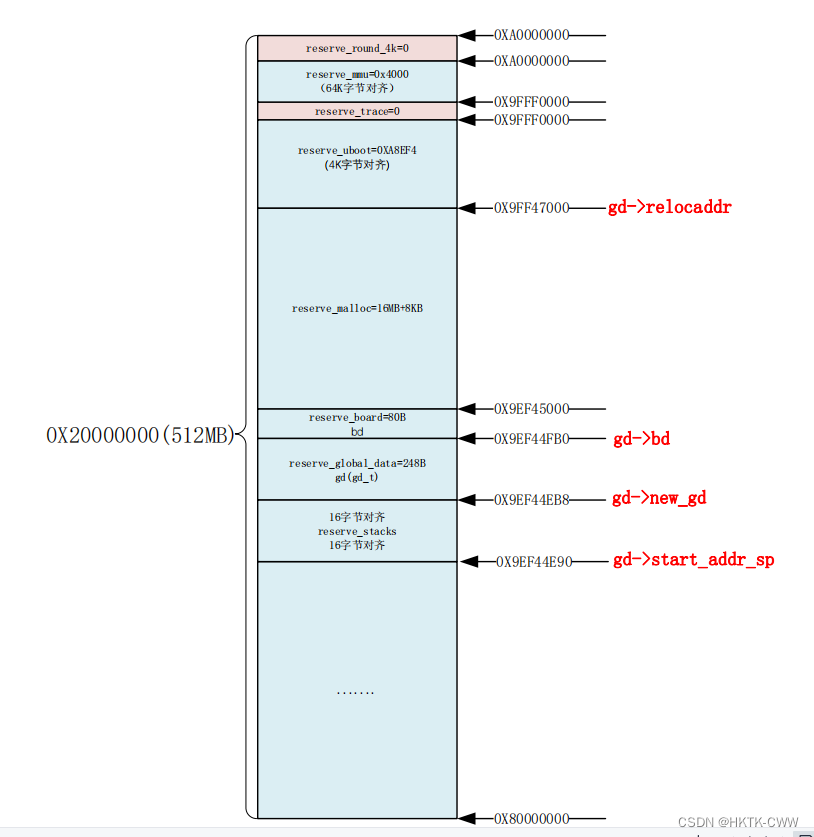
setup_dest_addr,
reserve_round_4k,
reserve_mmu,
reserve_trace,
reserve_uboot, //第一次确定了uboot重定位之后的起始地址(gd->relocaddr)(从高到低)
reserve_malloc,
reserve_board,
setup_machine,
reserve_global_data,
reserve_fdt,
reserve_arch,
reserve_stacks,
setup_dram_config,
show_dram_config,
display_new_sp,
INIT_FUNC_WATCHDOG_RESET
reloc_fdt,
setup_reloc,
NULL,
};
要是以后外设出现了问题或者说是uboot打印一些东西不对,就可以对应到这里来找。
board_init_r:
void board_init_r(gd_t *new_gd, ulong dest_addr)
{
#ifdef CONFIG_NEEDS_MANUAL_RELOC
    int i;
#endif

#ifdef CONFIG_AVR32
    mmu_init_r(dest_addr);
#endif

#if !defined(CONFIG_X86) && !defined(CONFIG_ARM) && !defined(CONFIG_ARM64)
    gd = new_gd;
#endif

#ifdef CONFIG_NEEDS_MANUAL_RELOC
    for (i = 0; i < ARRAY_SIZE(init_sequence_r); i++) //不断执行init_sequence_r中的函数
        init_sequence_r[i] += gd->reloc_off;
#endif

    if (initcall_run_list(init_sequence_r))
        hang();

    /* NOTREACHED - run_main_loop() does not return */
    hang();
}
init_sequence_r:
init_fnc_t init_sequence_r[] = {
    initr_trace,
    initr_reloc,
    initr_caches,
    initr_reloc_global_data,
    initr_barrier,
    initr_malloc, //初始化malloc
    initr_console_record,
    bootstage_relocate,
    initr_bootstage,
    board_init, /* Setup chipselects *///板级初始化,调用到board/xxx/xxx中xxx.c的board_init
    stdio_init_tables,//各种输入输出设备的初始化,如 LCD driver
    initr_serial,
    initr_announce,
    INIT_FUNC_WATCHDOG_RESET,
    INIT_FUNC_WATCHDOG_RESET,
    INIT_FUNC_WATCHDOG_RESET,
    power_init_board,
    initr_flash,
    INIT_FUNC_WATCHDOG_RESET,
    initr_nand,//初始化nand,如果是nand启动,这两句用于初始化外存
    initr_mmc,//初始化emmc,如果是emmc启动
    initr_env,
    INIT_FUNC_WATCHDOG_RESET,
    initr_secondary_cpu,
    INIT_FUNC_WATCHDOG_RESET,
    stdio_add_devices,
    initr_jumptable,
    console_init_r, /* fully init console as a device */ //初始化控制台
    INIT_FUNC_WATCHDOG_RESET,
    interrupt_init, //初始化中断
    initr_enable_interrupts, //使能中断
    initr_ethaddr,
    board_late_init,
    INIT_FUNC_WATCHDOG_RESET,
    INIT_FUNC_WATCHDOG_RESET,
    INIT_FUNC_WATCHDOG_RESET,
    initr_net, //初始化网络
    INIT_FUNC_WATCHDOG_RESET,
    run_main_loop,
};
四、run_main_loop
当第二部分完成一些外设初始化以及uboot搬移工作之后就可以进行内核加载工作了。
static int run_main_loop(void)
{
#ifdef CONFIG_SANDBOX
    sandbox_main_loop_init();
#endif
    /* main_loop() can return to retry autoboot, if so just run it again */
    for (;;)
        main_loop();
    return 0;
}
void main_loop(void)
{
    const char *s;

    bootstage_mark_name(BOOTSTAGE_ID_MAIN_LOOP, "main_loop");

#ifndef CONFIG_SYS_GENERIC_BOARD
    puts("Warning: Your board does not use generic board. Please read\n");
    puts("doc/README.generic-board and take action. Boards not\n");
    puts("upgraded by the late 2014 may break or be removed.\n");
#endif

#ifdef CONFIG_VERSION_VARIABLE
    setenv("ver", version_string);  /* set version variable */ //设置ver环境变量
#endif /* CONFIG_VERSION_VARIABLE */

    cli_init();//初始化shell环境

    run_preboot_environment_command(); //不重要

#if defined(CONFIG_UPDATE_TFTP)
    update_tftp(0UL, NULL, NULL);
#endif /* CONFIG_UPDATE_TFTP */

    s = bootdelay_process();//1.获取延时时间 2.返回bootcmd命令
    if (cli_process_fdt(&s))
        cli_secure_boot_cmd(s);

    autoboot_command(s);//检查倒计时结束是否按下回车,如果是则跳到下一步,不是则执行bootcmd命令

    cli_loop();//如果按下回车,进行命令处理,这一步不重要,因为基本不会有问题
}
执行bootz命令:(内核加载的灵魂images结构体变量)
一般我们会配置bootcmd命令为bootz xxx-xxx
那么bootz 命令的执行函数为 do_bootz。
先了解images:
43 bootm_headers_t images;
typedef struct bootm_headers {
    /*
     * Legacy os image header, if it is a multi component image
     * then boot_get_ramdisk() and get_fdt() will attempt to get
     * data from second and third component accordingly.
     */
    image_header_t *legacy_hdr_os; /* image header pointer */
    image_header_t legacy_hdr_os_copy; /* header copy */
    ulong legacy_hdr_valid;

    ...

#ifndef USE_HOSTCC
    image_info_t os; /* OS 镜像信息 */ //image_info_t也是个结构体需要我们了解
    ulong ep; /* OS 入口点 */

    ulong rd_start, rd_end; /* ramdisk 开始和结束位置 */

    char *ft_addr; /* 设备树地址 */
    ulong ft_len; /* 设备树长度 */

    ulong initrd_start; /* initrd 开始位置 */
    ulong initrd_end; /* initrd 结束位置 */
    ulong cmdline_start; /* cmdline 开始位置 */
    ulong cmdline_end; /* cmdline 结束位置 */
    bd_t *kbd;
#endif

    int verify; /* getenv("verify")[0] != 'n' */

#define BOOTM_STATE_START (0x00000001)
#define BOOTM_STATE_FINDOS (0x00000002)
#define BOOTM_STATE_FINDOTHER (0x00000004)
#define BOOTM_STATE_LOADOS (0x00000008)
#define BOOTM_STATE_RAMDISK (0x00000010)
#define BOOTM_STATE_FDT (0x00000020)
#define BOOTM_STATE_OS_CMDLINE (0x00000040)
#define BOOTM_STATE_OS_BD_T (0x00000080)
#define BOOTM_STATE_OS_PREP (0x00000100)
#define BOOTM_STATE_OS_FAKE_GO (0x00000200)/*'Almost' run the OS*/
#define BOOTM_STATE_OS_GO (0x00000400)
    int state;

#ifdef CONFIG_LMB
    struct lmb lmb; /* 内存管理相关,不深入研究 */
#endif
} bootm_headers_t;
image_info_t:
typedef struct image_info {
    ulong       start, end;     /* start/end of blob */
    ulong       image_start, image_len; /* start of image within blob, len of image */
    ulong       load;           /* load addr for the image */
    uint8_t     comp, type, os;     /* compression, type of image, os type */ //最终uboot是根据image_info中的os来获取linux内核加载函数的(uboot中有一组不同系统的内核加载函数,需要进行选择)
    uint8_t     arch;           /* CPU architecture */
} image_info_t;
do_bootz:(bootz命令会执行这个函数)
int do_bootz(cmd_tbl_t *cmdtp, int flag, int argc, char * const argv[])
{
    int ret;

    /* Consume 'bootz' */
    argc--; argv++;

    if (bootz_start(cmdtp, flag, argc, argv, &images))
        return 1;

    /*
     * We are doing the BOOTM_STATE_LOADOS state ourselves, so must
     * disable interrupts ourselves
     */
    bootm_disable_interrupts();

    images.os.os = IH_OS_LINUX; //写死了选择启动linux
    ret = do_bootm_states(cmdtp, flag, argc, argv,
                  BOOTM_STATE_OS_PREP | BOOTM_STATE_OS_FAKE_GO |
                  BOOTM_STATE_OS_GO,
                  &images, 1);

    return ret;
}
关于选择启动系统,其实在uboot中有一个系统启动函数指针数组,uboot通过images.os.os来判断要启动的是哪一个内核。
static boot_os_fn *boot_os[] = {
    [IH_OS_U_BOOT] = do_bootm_standalone,
#ifdef CONFIG_BOOTM_LINUX
    [IH_OS_LINUX] = do_bootm_linux,//启动linux
#endif
#ifdef CONFIG_BOOTM_NETBSD
    [IH_OS_NETBSD] = do_bootm_netbsd,
#endif
#ifdef CONFIG_LYNXKDI
    [IH_OS_LYNXOS] = do_bootm_lynxkdi,
#endif
#ifdef CONFIG_BOOTM_RTEMS
    [IH_OS_RTEMS] = do_bootm_rtems,
#endif
#if defined(CONFIG_BOOTM_OSE)
    [IH_OS_OSE] = do_bootm_ose,
#endif
#if defined(CONFIG_BOOTM_PLAN9)
    [IH_OS_PLAN9] = do_bootm_plan9,
#endif
#if defined(CONFIG_BOOTM_VXWORKS) && \
    (defined(CONFIG_PPC) || defined(CONFIG_ARM))
    [IH_OS_VXWORKS] = do_bootm_vxworks,
#endif
#if defined(CONFIG_CMD_ELF)
    [IH_OS_QNX] = do_bootm_qnxelf,
#endif
#ifdef CONFIG_INTEGRITY
    [IH_OS_INTEGRITY] = do_bootm_integrity,
#endif
#ifdef CONFIG_BOOTM_OPENRTOS
    [IH_OS_OPENRTOS] = do_bootm_openrtos,
#endif
};
继续分析do_bootz函数:
1. bootz_start
static int bootz_start(cmd_tbl_t *cmdtp, int flag, int argc,
            char * const argv[], bootm_headers_t *images)
{
    int ret;
    ulong zi_start, zi_end;

    ret = do_bootm_states(cmdtp, flag, argc, argv, BOOTM_STATE_START,
                  images, 1); //注意do_bootm_states这个函数很特殊,它是分阶段执行的(通过里面的switch)这里执行的是BOOTM_STATE_START开始阶段

    //设置images的加载起始位置
    /* Setup Linux kernel zImage entry point */
    if (!argc) {
        images->ep = load_addr;
        debug("*  kernel: default image load address = 0x%08lx\n",
                load_addr);
    } else {
        images->ep = simple_strtoul(argv[0], NULL, 16);
        debug("*  kernel: cmdline image address = 0x%08lx\n",
            images->ep);
    }

    //执行bootz_setup,在其中会打印内核启动信息
    ret = bootz_setup(images->ep, &zi_start, &zi_end);
	.....
}
bootz_setup:
int bootz_setup(ulong image, ulong *start, ulong *end)
{
    struct zimage_header *zi;

    zi = (struct zimage_header *)map_sysmem(image, 0);
    if (zi->zi_magic != LINUX_ARM_ZIMAGE_MAGIC) {//如果起始位置没有/不是linux内核
        puts("Bad Linux ARM zImage magic!\n");
        return 1;
    }

    *start = zi->zi_start;
    *end = zi->zi_end;

    printf("Kernel image @ %#08lx [ %#08lx - %#08lx ]\n", image, *start,
          *end);//如果是则打印启动信息

    return 0;
}
bootz_start 主要用于初始化 images 的相关成员变量。
2. do_bootm_states(由于do_bootz函数调用它时只给了BOOTM_STATE_OS_PREP | BOOTM_STATE_OS_FAKE_GO | BOOTM_STATE_OS_GO,三种状态于是我们只需要分析这三就行)
执行do_bootm_states的另外状态。
int do_bootm_states(cmd_tbl_t *cmdtp, int flag, int argc, char * const argv[],
            int states, bootm_headers_t *images, int boot_progress)
{
    boot_os_fn *boot_fn;
    ulong iflag = 0;
    int ret = 0, need_boot_fn;

    images->state |= states;

    /*
     * Work through the states and see how far we get. We stop on
     * any error.
     */
    //bootz_start调用的
    if (states & BOOTM_STATE_START)
        ret = bootm_start(cmdtp, flag, argc, argv);

	.....
	.....

    //根据images->os.os获取启动函数
    /* From now on, we need the OS boot function */
    if (ret)
        return ret;
    boot_fn = bootm_os_get_boot_func(images->os.os);
    need_boot_fn = states & (BOOTM_STATE_OS_CMDLINE |
            BOOTM_STATE_OS_BD_T | BOOTM_STATE_OS_PREP |
            BOOTM_STATE_OS_FAKE_GO | BOOTM_STATE_OS_GO);
    if (boot_fn == NULL && need_boot_fn) {
        if (iflag)
            enable_interrupts();
        printf("ERROR: booting os '%s' (%d) is not supported\n",
               genimg_get_os_name(images->os.os), images->os.os);
        bootstage_error(BOOTSTAGE_ID_CHECK_BOOT_OS);
        return 1;
    }


    //主要用于处理环境变量bootargs,bootargs 保存着传递给 Linux kernel 的参数。
    if (!ret && (states & BOOTM_STATE_OS_PREP))
        ret = boot_fn(BOOTM_STATE_OS_PREP, argc, argv, images);

    //一般不使能它
#ifdef CONFIG_TRACE
    /* Pretend to run the OS, then run a user command */
    if (!ret && (states & BOOTM_STATE_OS_FAKE_GO)) {
        char *cmd_list = getenv("fakegocmd");

        ret = boot_selected_os(argc, argv, BOOTM_STATE_OS_FAKE_GO,
                images, boot_fn);
        if (!ret && cmd_list)
            ret = run_command_list(cmd_list, -1, flag);
    }
#endif

    /* Check for unsupported subcommand. */
    if (ret) {
        puts("subcommand not supported\n");
        return ret;
    }

    //获取到启动函数后启动内核,不再返回
    /* Now run the OS! We hope this doesn't return */
    if (!ret && (states & BOOTM_STATE_OS_GO))
        ret = boot_selected_os(argc, argv, BOOTM_STATE_OS_GO,
                images, boot_fn);

	.....
    return ret;
}
总结一下do_bootz:
1.bootz_start
->do_bootm_states BOOTM_STATE_START 状态,清空images
->bootz_setup 设置images起始地址,判断内核,打印内核信息
2.do_bootm_states BOOTM_STATE_OS_PREP | BOOTM_STATE_OS_FAKE_GO | BOOTM_STATE_OS_GO状态
-> 根据images->os->os获取内核加载函数do_bootm_linux
->BOOTM_STATE_OS_PREP bootargs 保存着传递给 Linux kernel 的参数
-> BOOTM_STATE_OS_FAKE_GO 一般不执行
->BOOTM_STATE_OS_GO 执行内核加载函数do_bootm_linux
do_bootm_linux加载内核:
int do_bootm_linux(int flag, int argc, char * const argv[],
           bootm_headers_t *images)
{
    /* No need for those on ARM */
    if (flag & BOOTM_STATE_OS_BD_T || flag & BOOTM_STATE_OS_CMDLINE)
        return -1;

    if (flag & BOOTM_STATE_OS_PREP) {
        boot_prep_linux(images);
        return 0;
    }

    if (flag & (BOOTM_STATE_OS_GO | BOOTM_STATE_OS_FAKE_GO)) {
        boot_jump_linux(images, flag);
        return 0;
    }

    boot_prep_linux(images);
    boot_jump_linux(images, flag);//goto
    return 0;
}
static void boot_jump_linux(bootm_headers_t *images, int flag)
{
#ifdef CONFIG_ARM64
    void (*kernel_entry)(void *fdt_addr, void *res0, void *res1,
            void *res2);
    int fake = (flag & BOOTM_STATE_OS_FAKE_GO);

    kernel_entry = (void (*)(void *fdt_addr, void *res0, void *res1,
                void *res2))images->ep;

    debug("## Transferring control to Linux (at address %lx)...\n",
        (ulong) kernel_entry);
    bootstage_mark(BOOTSTAGE_ID_RUN_OS);

    announce_and_cleanup(fake);//会打印Starting Kernel.....

    if (!fake) {
        do_nonsec_virt_switch();
        kernel_entry(images->ft_addr, NULL, NULL, NULL);
    }
#else
    unsigned long machid = gd->bd->bi_arch_number;
    char *s;
    void (*kernel_entry)(int zero, int arch, uint params);
    unsigned long r2;
    int fake = (flag & BOOTM_STATE_OS_FAKE_GO);

    kernel_entry = (void (*)(int, int, uint))images->ep;

    s = getenv("machid");
    if (s) {
        if (strict_strtoul(s, 16, &machid) < 0) {
            debug("strict_strtoul failed!\n");
            return;
        }
        printf("Using machid 0x%lx from environment\n", machid);
    }

    debug("## Transferring control to Linux (at address %08lx)" \
        "...\n", (ulong) kernel_entry);
    bootstage_mark(BOOTSTAGE_ID_RUN_OS);
    announce_and_cleanup(fake);//announce_and_cleanup 来打印一些信息并做一些清理工作

    if (IMAGE_ENABLE_OF_LIBFDT && images->ft_len)
        r2 = (unsigned long)images->ft_addr;
    else
        r2 = gd->bd->bi_boot_params;

    if (!fake) {
#ifdef CONFIG_ARMV7_NONSEC
        if (armv7_boot_nonsec()) {
            armv7_init_nonsec();
            secure_ram_addr(_do_nonsec_entry)(kernel_entry,
                              0, machid, r2);
        } else
#endif
            kernel_entry(0, machid, r2);/*跳到内核的第一行代码,kernel_entry就是内核的第一行代码标号,由于第一行代码是汇编,所以传的是r0,r1,r2 其中:
            r1 :machid是机器的id,!如果使用设备树的话这个 machid 就无效了,
            r2: 如果使用设备树的话是设备树地址否则bootargs
            */
    }
#endif
}
其它的问题:
一、uboot重定位:
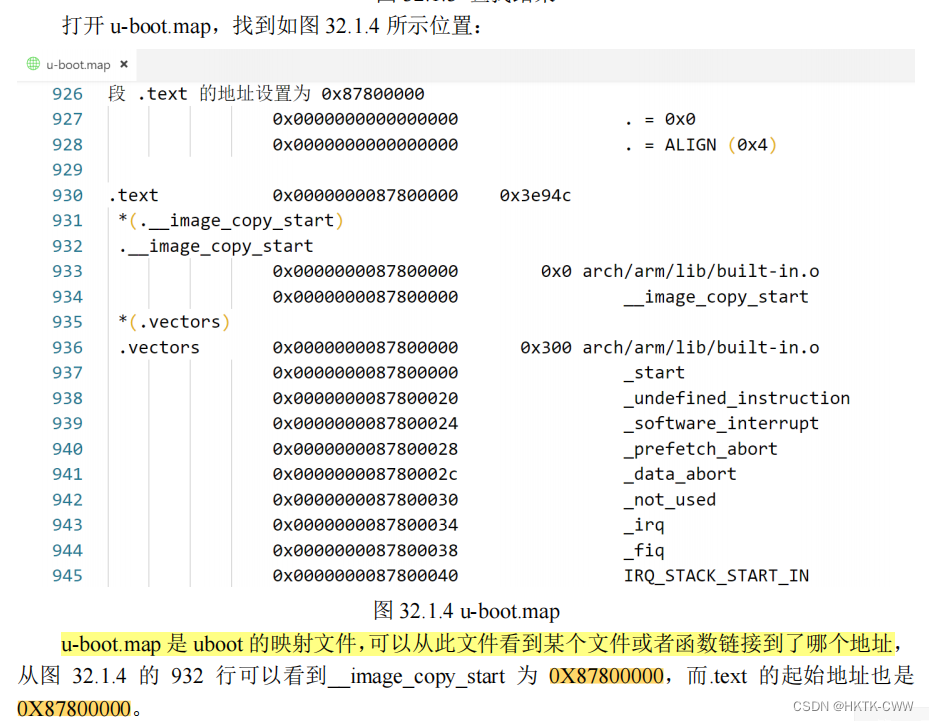
要知道uboot重定位之前的起始地址(重定位之后的起始地址可以从board_init_f中的reserve_uboot找到),可以编译之后在顶层目录下找到u-boot.map文件,可以通过它来查看。
uboot重定位表:
二、如何指定uboot启动时的console?
在启动linux内核的时候会根据bootargs来确定一些信息,比如“console=ttymxc0,115200”,控制console是串口1(ttymxc0-4)这些是串口1-5都是NXP定的好像。
那么在uboot的启动的时候console又是什么?它是由什么来定的呢?
可以通过设置环境变量:
setenv stdin serial
setenv stdout serial
setenv stderr serial
在uboot启动的:
board_init_r
->console_init_r中
console_init_r在common/console.c中。
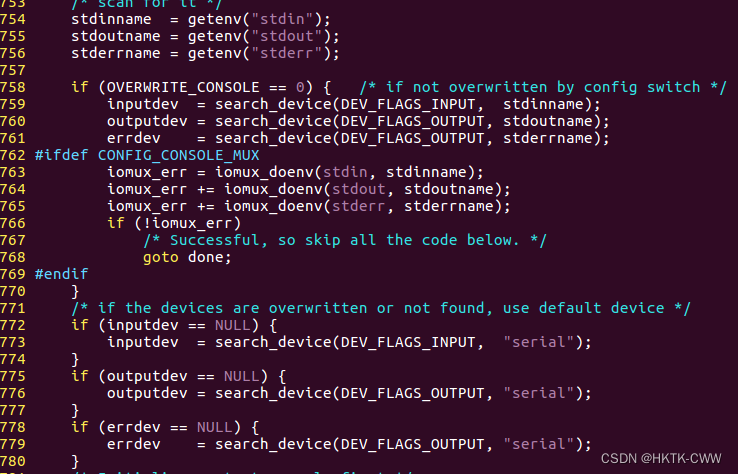
可以看到先是分别获得环境变量,后面是,如果全部为空,默认为serial。
那串口很多,到底是哪一个串口?
这时可以查看include/configs下对应的.h文件了。
宏 CONFIG_MXC_UART_BASE 表示串口寄存器基地址,这里使用的串口 1,基地址为 UART1_BASE,
这个是可以自己配置的,在移植的时候必须在include/configs下添加自己的.h文件。
三、是不是有一些参数是固定的,不能随意给的?
比如:
bootcmd 'tftp 80800000 zImage; tftp 83000000 imx6ull-alientek-emmc.dtb; bootz 80800000 - 83000000'
中的80800000是不是一定要这个,而不能随意的给的?
解答:
在 U-Boot 中,控制内核 zImage 起始位置的是 bootcmd 中 bootz 命令给定的位置。CONFIG_SYS_LOAD_ADDR 变量在 include/configs 目录下的配置文件中定义,是指 U-Boot 加载内核镜像的默认地址。在 bootcmd 中使用 bootz 命令时,可以通过指定 bootz 命令的参数来覆盖 CONFIG_SYS_LOAD_ADDR 的值,从而加载指定位置的内核镜像。
其它配置也一样,比如前面的串口,如果不再参数中配置,那么默认根据include/configs下的配置文件就是serial。
stdin serial
setenv stdout serial
setenv stderr serial
在uboot启动的:
board_init_r
->console_init_r中
console_init_r在common/console.c中。
[外链图片转存中…(img-isEdYMyA-1686573795750)]
可以看到先是分别获得环境变量,后面是,如果全部为空,默认为serial。
四、那串口很多,到底是哪一个串口?
这时可以查看include/configs下对应的.h文件了。
宏 CONFIG_MXC_UART_BASE 表示串口寄存器基地址,这里使用的串口 1,基地址为 UART1_BASE,
这个是可以自己配置的,在移植的时候必须在include/configs下添加自己的.h文件。


 2751
2751


 被折叠的 条评论
为什么被折叠?
被折叠的 条评论
为什么被折叠?
 到【灌水乐园】发言


