


内核双链表在 list.c 和 list.h 中实现,两个文件是林纳斯在linux1.0就写好的,到现在依然常用于Linux系统软件开发。
list 源码:
在开始之前需要先了解一下两个宏:offsetof 和 container_of。
offsetof:计算结构体首地址到成员地址的偏移量
#define offsetof(TYPE, MEMBER) ((size_t) &((TYPE *)0)->MEMBER)
首先,操作系统的 0 地址,也就是 NULL。任何地址存放的数据是可以转换成任意类型的(存放什么类型的数据,就需要用什么类型的指针去读取),但是读写就另说了。这里只要你不去写就好了,读的话肯定是 NULL。
随后,取转换后的数据类型中指定的成员 MEMBER 的地址,好巧不巧,从 0 地址出发到 MEMBER 的步进长度就是 MEMBER 在结构体中的偏移量。
最后,将偏移地址转换为数字格式,这就是 offsetof 宏的输出。
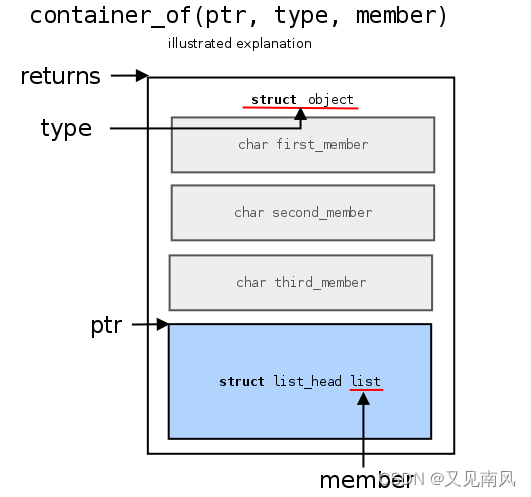
container_of:根据某个结构体的成员变量地址直接获得该结构体的首地址
#define container_of(ptr, type, member) ({            \
        const typeof( ((type *)0)->member ) *__mptr = (ptr);    \
        (type *)( (char *)__mptr - offsetof(type,member) );})
typeof() 宏可以获取参数的类型,所以第一段就是找个安全的地方构建一个 member 的类型的指针指向 ptr 的地址;得到的地址减去它在结构体中的偏移量,就得到了它所属的结构体的首地址。
(为什么 const 的变量可以变化?那要看 const 在谁前面呀,在类型前面,类型不能变,在指针前面,指向的地址不能变,这里明显是在类型前面)
看图了解一下三个参数的关系:
再提一点安全方面的,看下面的图:
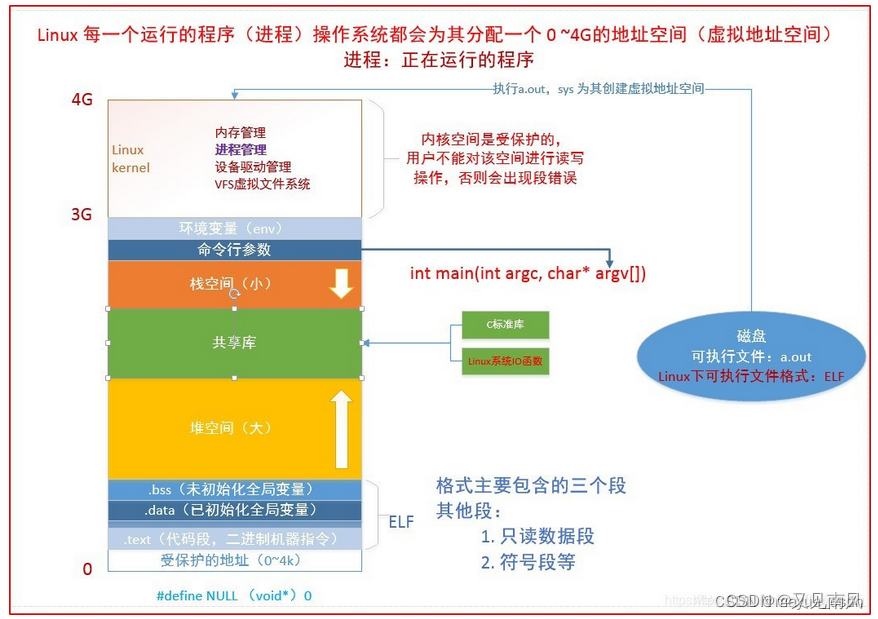
Linux 内存地址分布:https://blog.csdn.net/mayue_web/article/details/128338850
如果你的数据结构大小超出了 4K,那么不可以使用 container_of 宏来获取某个结构体成员变量所在的结构体的地址。
#define LIST_POISON1  ((void *) 0x00100100)
#define LIST_POISON2  ((void *) 0x00200)
这两个地址在Linux内核中是非法地址,就当作是 NULL,看到了也当作没看到就行了。
链表结点结构体
struct list_head {
    struct list_head *next, *prev;
};
在需要用链表连起来的数据结构中直接加入这个结构即可,跟书上的实现不太一样,但是道理是一样的。
初始化结点
#define LIST_HEAD_INIT(name) { &(name), &(name) }
#define LIST_HEAD(name) \
struct list_head name = LIST_HEAD_INIT(name)
其实就把 name 的地址同时分配两个指针,我们只需要在申请一个 list_head 的内存后,对其指针进行 LIST_HEAD。
但是还有另一个方法,效果和上面的一样,如下:
static inline void list_init(struct list_head *list)
{
    list->next = list;
    list->prev = list;
}
list_empty 用于判断链表是否为空,即头尾是否是指向同一个结构体
static inline int list_empty(const struct list_head *head)
{
    return head->next == head;
}
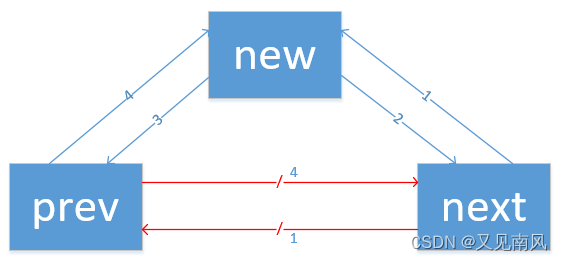
插入结点:在 prev 和 next 之间插入一个 new 结点
static inline void __list_add(  struct list_head *new,
                                struct list_head *prev,
                                struct list_head *next)
{
    next->prev = new;
    new->next = next;
    new->prev = prev;
    prev->next = new;
}
//结点插入在 head 后面
static inline void list_add(struct list_head *new,
                            struct list_head *head)
{
    __list_add(new, head, head->next);
}
//结点插入在 head 前面,别被 tail 误导为尾插法
static inline void
list_add_tail(struct list_head *_new,
                                 struct list_head *head)
{
    __list_add(_new, head->prev, head);
}
删除结点:抓住某个结点,获取它的前后结点,再让其前后结点互相指向
static inline void __list_del(struct list_head *prev,
                              struct list_head *next)
{
    next->prev = prev;
    prev->next = next;
}
static inline void list_del(struct list_head *entry)
{
    __list_del(entry->prev, entry->next);
    entry->next = (void *) 0;
    entry->prev = (void *) 0;
}
这里虽然把删除的结点都置为NULL了,但是在有 malloc 的情况,还需要对该结点进行释放。
移动结点:
//先删除 list 结点,但是又把 list 结点转移到 head 结点后面,相当于将 list 结点的位置变到 head 后面
static inline void list_move(struct list_head *list,
                             struct list_head *head)
{
    __list_del(list->prev, list->next);
    list_add(list, head);
}
//同理,不过把 list 结点转移到 head 结点的前面
static inline void list_move_tail(struct list_head *list,
                                  struct list_head *head)
{
    __list_del(list->prev, list->next);
    list_add_tail(list, head);
}
合并链表:
//合并 prev 和 next 两条链表,list 用于辅助,一般不会用到这个函数的
static inline void
_list_splice(const struct list_head *list,
                                struct list_head *prev,
                                struct list_head *next)
{
    struct list_head *first;
    struct list_head *last;

    if (list_empty(list))
        return;

    first = list->next;
    last = list->prev;
    first->prev = prev;
    prev->next = first;
    last->next = next;
    next->prev = last;
}
按照程序的逻辑获得的图是这样的:
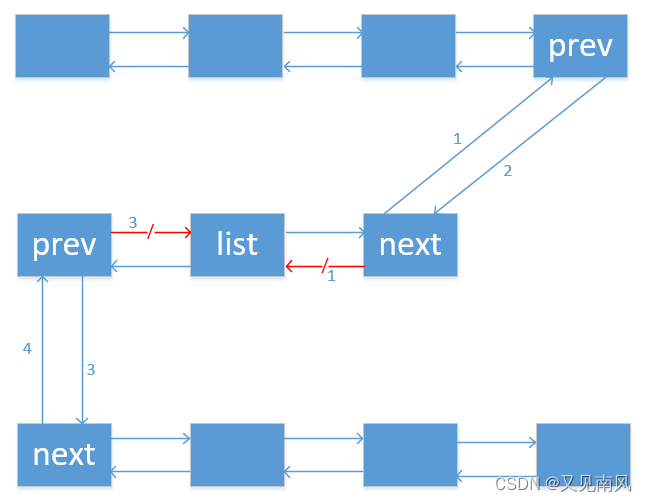
可以看到 list 还是存在,在下认为拼接两个链表并不需要这么麻烦,所以这个函数在实际开发中基本不会用到。
几个重要的宏:
//获取 ptr 成员所属的 type 结构体的首地址
#define    list_entry(ptr, type, field)    container_of(ptr, type, field)
//这两个没什么好说,其实使用 list_entry 就足够了
#define    list_first_entry(ptr, type, field)    list_entry((ptr)->next, type, field)
#define    list_last_entry(ptr, type, field)    list_entry((ptr)->prev, type, field)
#define    list_for_each(p, head)                        \
    for (p = (head)->next; p != (head); p = p->next)
//即从 p 开始遍历到 head 结束,注意这些都是 for 循环,使用时需要在下文中加 { }
#define    list_for_each_safe(p, n, head)                    \
    for (p = (head)->next, n = p->next; p != (head); p = n, n = p->next)
// list_for_each 遍历的安全形式,使用 n 代替直接用 p 指向 head
//获取 h 成员的去头部结点的第一个结点,并获取其结构体首地址赋给 p 并开始遍历,这段代码简直就是整个文件的精华!!!
#define list_for_each_entry(p, h, field)                \
    for (p = list_first_entry(h, __typeof__(*p), field); &p->field != (h); \
        p = list_entry(p->field.next, __typeof__(*p), field))
// list_for_each_entry 的安全遍历形式,依旧是使用一个额外变量来达到 p 指针不直接访问链表的目的
#define list_for_each_entry_safe(p, n, h, field)            \
    for (p = list_first_entry(h, __typeof__(*p), field),        \
        n = list_entry(p->field.next, __typeof__(*p), field); &p->field != (h);\
        p = n, n = list_entry(n->field.next, __typeof__(*n), field))
实战环节
在一个 mac 地址的链表中找到 flag 为 0 的结点,并做某些处理
1、定义数据结构
typedef struct
{
    struct list_head list;          //任何结构体里有 list_head 结构的都可以用于 list_for_each_entry
    char              mac[64];      //保存 mac 地址
    int32_t             flag;       //标记该mac地址是否符合要求
}T_macList;

static T_macList macList = {0};     //静态实例化

T_macList *getMacList(void)
{
    return &macList;                //对外提供一个访问接口
}
2、在需要初始化的函数中初始化
T_macList *pmaclist = getMacList();        //获取头节点
list_init(&pmaclist->list);                //初始化链表
3、添加结点
T_macList *pmaclist = getMacList();        //获取头节点

T_macList *pNode = (T_macList *)malloc(sizeof(T_macList));
if (NULL == pNode)
{
    LOG_INFO("can't memory !\n");
    return -1;
}
list_init(&pNode->list);
memset(pNode, 0, sizeof(T_macList));

/* pNode 内部数据处理 */

list_add_tail(&pNode->list, &pmaclist->list); //将 pNode 添加进链表中
4、遍历链表,找到 flag 为 0 的结点
T_macList *pmaclist = getMacList();
T_macList *pNode = NULL;
list_for_each_entry(pNode, &pmaclist->list, list)
{
    if (pNode->flag == 0)
    {

/* 使用 pNode 指针处理数据 */
    }
}
5、删除 flag 为 0 的结点
T_macList *pmaclist = getMacList();
T_macList *pNode = NULL;
list_for_each_entry(pNode, &pmaclist->list, list)
{
    if (pNode->flag == 0)
        break                //跳出循环后 pNode 依然指向 flag 为 0 的结点
}

list_del(pNode);            //删除结点
free(pNode);                //因为添加进链表的结点都是用 malloc 申请过内存的
其实使用起来就是这么简单,原因还是双链表本身太简单了,操作就那么几个;但是对于内核应用开发,一般都是直接用这个,而不是重写一个双链表文件,林纳斯的 list 实现对内存节省到了极致。


 2369
2369


 被折叠的 条评论
为什么被折叠?
被折叠的 条评论
为什么被折叠?
 到【灌水乐园】发言


