


十一 Spring Boot集成Redis
1.配置文件
redis.conf配置文件,改完后确保生效,记得重启,记得重启
-
默认daemonize no 改为 daemonize yes
-
默认protected-mode yes 改为 protected-mode no
-
默认bind 127.0.0.1 改为 直接注释掉(默认bind 127.0.0.1只能本机访问)或改成本机IP地址,否则影响远程IP连接
-
添加redis密码 改为 requirepass 你自己设置的密码
-
2.防火墙
启动: systemctl start firewalld
关闭: systemctl stop firewalld
查看状态: systemctl status firewalld
开机禁用  : systemctl disable firewalld
开机启用  : systemctl enable firewalld
添加 :firewall-cmd --zone=public --add-port=80/tcp --permanent    (--permanent永久生效,没有此参数重启后失效)
重新载入: firewall-cmd --reload
查看: firewall-cmd --zone= public --query-port=80/tcp
删除: firewall-cmd --zone= public --remove-port=80/tcp --permanent
3.Jedis (一般不用了,了解即可)
1.介绍
Jedis Client 是Redis 官网推荐的一个面向 Java 客户端,库文件实现了对各类API进行封装调用
2.步骤
-
建Moudle redis_7_study
-
改POM
<?xml version="1.0" encoding="UTF-8"?> <project xmlns="http://maven.apache.org/POM/4.0.0" xmlns:xsi="http://www.w3.org/2001/XMLSchema-instance" xsi:schemaLocation="http://maven.apache.org/POM/4.0.0 http://maven.apache.org/xsd/maven-4.0.0.xsd"> <modelVersion>4.0.0</modelVersion> <groupId>com.atguigu.redis7</groupId> <artifactId>redis7_study</artifactId> <version>1.0-SNAPSHOT</version> <parent> <groupId>org.springframework.boot</groupId> <artifactId>spring-boot-starter-parent</artifactId> <version>2.6.10</version> <relativePath/> </parent> <properties> <project.build.sourceEncoding>UTF-8</project.build.sourceEncoding> <maven.compiler.source>1.8</maven.compiler.source> <maven.compiler.target>1.8</maven.compiler.target> <junit.version>4.12</junit.version> <log4j.version>1.2.17</log4j.version> <lombok.version>1.16.18</lombok.version> </properties> <dependencies> <!--SpringBoot通用依赖模块--> <dependency> <groupId>org.springframework.boot</groupId> <artifactId>spring-boot-starter-web</artifactId> </dependency> <!--jedis--> <dependency> <groupId>redis.clients</groupId> <artifactId>jedis</artifactId> <version>4.3.1</version> </dependency> <!--通用基础配置--> <dependency> <groupId>junit</groupId> <artifactId>junit</artifactId> <version>${junit.version}</version> </dependency> <dependency> <groupId>org.springframework.boot</groupId> <artifactId>spring-boot-starter-test</artifactId> <scope>test</scope> </dependency> <dependency> <groupId>log4j</groupId> <artifactId>log4j</artifactId> <version>${log4j.version}</version> </dependency> <dependency> <groupId>org.projectlombok</groupId> <artifactId>lombok</artifactId> <version>${lombok.version}</version> <optional>true</optional> </dependency> </dependencies> <build> <plugins> <plugin> <groupId>org.springframework.boot</groupId> <artifactId>spring-boot-maven-plugin</artifactId> </plugin> </plugins> </build> </project> -
写YML
server.port=7777 spring.application.name=redis7_study -
主启动
import org.springframework.boot.SpringApplication; import org.springframework.boot.autoconfigure.SpringBootApplication; @SpringBootApplication public class Redis7Study01Application { public static void main(String[] args) { SpringApplication.run(Redis7Study01Application.class, args); } } -
业务类
import redis.clients.jedis.Jedis;

import java.util.HashMap;
import java.util.List;
import java.util.Map;
import java.util.Set;

/**
 * @Author:晓风残月Lx
 * @Date: 2023/3/13 21:32
 */
public class JedisDemo {
    public static void main(String[] args) {
        // 1 connection 连接,通过指定ip和端口号
        Jedis jedis = new Jedis("192.168.238.111", 6379);

        // 2 指定访问服务器密码
        jedis.auth("123456");

        //  3 获得了Jedis客户端,可以像jdbc一样访问redis
        System.out.println(jedis.ping());

        // keys
        Set<String> keys = jedis.keys("*");
        System.out.println(keys);

        // string
        jedis.set("k3","hello-jedis");
        System.out.println(jedis.get("k3"));
        System.out.println(jedis.ttl("k3"));

        // list
        jedis.lpush("list","11","22","33");
        List<String> list = jedis.lrange("list", 0, -1);
        for (String s : list) {
            System.out.println(s);
        }
        System.out.println(jedis.rpop("list"));
        System.out.println(jedis.lpop("list"));

        // hash
        jedis.hset("hset1","k1","v1");
        Map<String,String> hash = new HashMap<>();
        hash.put("k1","1");
        hash.put("k2","2");
        hash.put("k3","3");
        jedis.hmset("hset2",hash);
        System.out.println(jedis.hmget("hset2","k1","k3","k2"));
        System.out.println(jedis.hget("hset1", "k1"));
        System.out.println(jedis.hexists("hset2","k2"));
        System.out.println(jedis.hkeys("hset2"));

        // set
        jedis.sadd("set1","1","2","3");
        jedis.sadd("set2","4");
        System.out.println(jedis.smembers("set1"));
        System.out.println(jedis.scard("set1"));
        System.out.println(jedis.spop("set1"));
        jedis.smove("set1","set2","1");
        System.out.println(jedis.smembers("set1"));
        System.out.println(jedis.smembers("set2"));
        System.out.println(jedis.sinter("set1", "set2"));  // 交集
        System.out.println(jedis.sunion("set1","set2"));   // 并集

        // zset
        jedis.zadd("zset1",100,"v1");
        jedis.zadd("zset1",80,"v2");
        jedis.zadd("zset1",60,"v3");

        List<String> zset1 = jedis.zrange("zset1", 0, -1);
        for (String s : zset1) {
            System.out.println(s);
        }
        List<String> zset11 = jedis.zrevrange("zset1", 0, -1);
        for (String s : zset11) {
            System.out.println(s);
        }
    }
}
4.Lettuce
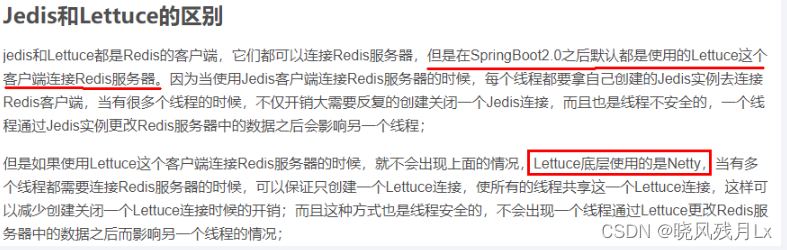
1.介绍以及和Jedis的区别
Lettuce是一个Redis的Java驱动包,Lettuce翻译为生菜,没错,就是吃的那种生菜,所以它的Logo就是生菜
2.步骤
-
改POM(导包)
<!--lettuce--> <dependency> <groupId>io.lettuce</groupId> <artifactId>lettuce-core</artifactId> <version>6.2.1.RELEASE</version> </dependency> -
业务类
import io.lettuce.core.RedisClient;
import io.lettuce.core.RedisURI;
import io.lettuce.core.api.StatefulRedisConnection;
import io.lettuce.core.api.sync.RedisCommands;

import java.util.List;

/**
 * @Author:晓风残月Lx
 * @Date: 2023/3/13 22:13
 */
public class LettuceDemo {

    public static void main(String[] args) {
        // 1 使用构建器链式编程来builder我们的RedisURI
        RedisURI uri = RedisURI.builder()
                .withHost("192.168.238.111")
                .withPort(6379)
                .withAuthentication("default", "123456")
                .build();
        // 2 连接客户端
        RedisClient redisClient = RedisClient.create(uri);
        StatefulRedisConnection<String, String> conn = redisClient.connect();

        // 3 创建操作的command, 通过conn 创建
        RedisCommands<String, String> commands = conn.sync();

        // string
        commands.set("k1","v1");
        System.out.println("==========================="+commands.get("k1"));
        System.out.println("==========================="+commands.mget("k1","k2"));
        List<String> keys = commands.keys("*");
        for (String key : keys) {
            System.out.println("========================="+key);
        }

        // list
        commands.lpush("list01","1","2","3");
        List<String> list01 = commands.lrange("list01", 0, -1);
        for (String s : list01) {
            System.out.println("================"+s);
        }
        System.out.println("===================="+ commands.rpop("list01", 2));

        // hash
        commands.hset("hash","k1","v1");
        commands.hset("hash","k2","v2");
        commands.hset("hash","k3","v3");
        System.out.println("======================="+commands.hgetall("hash"));
        Boolean hexists = commands.hexists("hash", "v2");
        System.out.println("------"+hexists);

        // set
        commands.sadd("s1","1","2");
        System.out.println("=================================" + commands.smembers("s1"));
        System.out.println(commands.sismember("s1", "1"));
        System.out.println(commands.scard("s1"));

        // zset
        commands.zadd("a1",100,"v1");
        commands.zadd("a1",80,"v2");
        System.out.println(commands.zrange("a1", 0, -1));
        System.out.println("======================"+commands.zcount("a1", "90", "100"));

        // 4 各种关闭释放资源  先开后关
        conn.close();
        redisClient.shutdown();

    }
}
PS:这个东西的输出真的很难找到
5.RedisTemplate (推荐)
1.连接单机
ps:Module还是刚刚的,所以省略了建Module
改POM(导包)
<!--SpringBoot与Redis整合依赖-->
        <dependency>
            <groupId>org.springframework.boot</groupId>
            <artifactId>spring-boot-starter-data-redis</artifactId>
        </dependency>
        <dependency>
            <groupId>org.apache.commons</groupId>
            <artifactId>commons-pool2</artifactId>
        </dependency>
        <!--swagger2-->
        <dependency>
            <groupId>io.springfox</groupId>
            <artifactId>springfox-swagger2</artifactId>
            <version>2.9.2</version>
        </dependency>
        <dependency>
            <groupId>io.springfox</groupId>
            <artifactId>springfox-swagger-ui</artifactId>
            <version>2.9.2</version>
        </dependency>
写YML
server.port=7777

spring.application.name=redis7_study

# ========================logging=====================
logging.level.root=info
logging.level.com.atguigu.redis7=info
logging.pattern.console=%d{yyyy-MM-dd HH:mm:ss.SSS} [%thread] %-5level %logger- %msg%n

logging.file.name=D:/mylogs2023/redis7_study.log
logging.pattern.file=%d{yyyy-MM-dd HH:mm:ss.SSS} [%thread] %-5level %logger- %msg%n

# ========================swagger=====================
spring.swagger2.enabled=true
#在springboot2.6.X结合swagger2.9.X会提示documentationPluginsBootstrapper空指针异常,
#原因是在springboot2.6.X中将SpringMVC默认路径匹配策略从AntPathMatcher更改为PathPatternParser,
# 导致出错,解决办法是matching-strategy切换回之前ant_path_matcher
spring.mvc.pathmatch.matching-strategy=ant_path_matcher

# ========================redis单机=====================
spring.redis.database=0
# 修改为自己真实IP
spring.redis.host=192.168.111.185
spring.redis.port=6379
spring.redis.password=111111
spring.redis.lettuce.pool.max-active=8
spring.redis.lettuce.pool.max-wait=-1ms
spring.redis.lettuce.pool.max-idle=8
spring.redis.lettuce.pool.min-idle=0
业务类
-
**配置类 **
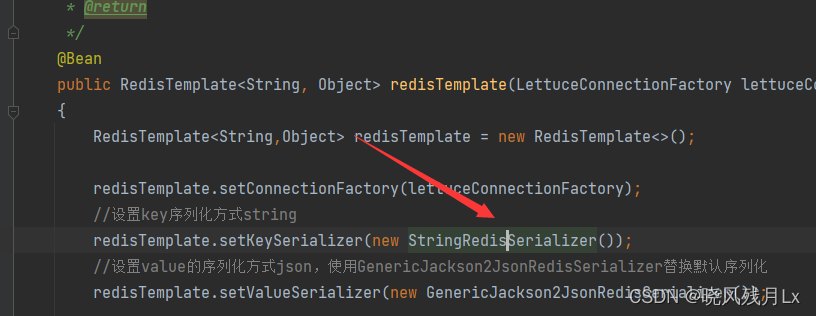
- RedisConfig
import org.springframework.context.annotation.Bean; import org.springframework.context.annotation.Configuration; import org.springframework.data.redis.connection.lettuce.LettuceConnectionFactory; import org.springframework.data.redis.core.RedisTemplate; import org.springframework.data.redis.serializer.GenericJackson2JsonRedisSerializer; import org.springframework.data.redis.serializer.StringRedisSerializer; /** * @auther 晓风残月Lx * @create 2023-03-14 8:11 */ @Configuration public class RedisConfig { /** * redis序列化的工具配置类,下面这个请一定开启配置 * 127.0.0.1:6379> keys * * 1) "ord:102" 序列化过 * 2) "\xac\xed\x00\x05t\x00\aord:102" 野生,没有序列化过 * this.redisTemplate.opsForValue(); //提供了操作string类型的所有方法 * this.redisTemplate.opsForList(); // 提供了操作list类型的所有方法 * this.redisTemplate.opsForSet(); //提供了操作set的所有方法 * this.redisTemplate.opsForHash(); //提供了操作hash表的所有方法 * this.redisTemplate.opsForZSet(); //提供了操作zset的所有方法 * @param lettuceConnectionFactory * @return */ @Bean public RedisTemplate<String, Object> redisTemplate(LettuceConnectionFactory lettuceConnectionFactory) { RedisTemplate<String,Object> redisTemplate = new RedisTemplate<>(); redisTemplate.setConnectionFactory(lettuceConnectionFactory); //设置key序列化方式string redisTemplate.setKeySerializer(new StringRedisSerializer()); //设置value的序列化方式json,使用GenericJackson2JsonRedisSerializer替换默认序列化 redisTemplate.setValueSerializer(new GenericJackson2JsonRedisSerializer()); redisTemplate.setHashKeySerializer(new StringRedisSerializer()); redisTemplate.setHashValueSerializer(new GenericJackson2JsonRedisSerializer()); redisTemplate.afterPropertiesSet(); return redisTemplate; } }- SwaggerConfig
import org.springframework.beans.factory.annotation.Value; import org.springframework.context.annotation.Bean; import org.springframework.context.annotation.Configuration; import springfox.documentation.builders.ApiInfoBuilder; import springfox.documentation.builders.PathSelectors; import springfox.documentation.builders.RequestHandlerSelectors; import springfox.documentation.service.ApiInfo; import springfox.documentation.spi.DocumentationType; import springfox.documentation.spring.web.plugins.Docket; import springfox.documentation.swagger2.annotations.EnableSwagger2; import java.time.LocalDateTime; import java.time.format.DateTimeFormatter; /** * @auther 晓风残月Lx * @create 2023-03-14 8:11 */ @Configuration @EnableSwagger2 public class SwaggerConfig { @Value("${spring.swagger2.enabled}") private Boolean enabled; @Bean public Docket createRestApi() { return new Docket(DocumentationType.SWAGGER_2) .apiInfo(apiInfo()) .enable(enabled) .select() .apis(RequestHandlerSelectors.basePackage("com.lv")) //你自己的package .paths(PathSelectors.any()) .build(); } public ApiInfo apiInfo() { return new ApiInfoBuilder() .title("springboot利用swagger2构建api接口文档 "+"\t"+ DateTimeFormatter.ofPattern("yyyy-MM-dd").format(LocalDateTime.now())) .description("springboot+redis整合,有问题给管理员发邮件:1625378509@qq.com") .version("1.0") .termsOfServiceUrl("https://www.atguigu.com/") .build(); } } -
service
import lombok.extern.slf4j.Slf4j; import org.springframework.data.redis.core.RedisTemplate; import org.springframework.stereotype.Service; import javax.annotation.Resource; import java.util.UUID; import java.util.concurrent.ThreadLocalRandom; /** * @Author:晓风残月Lx * @Date: 2023/3/14 8:10 */ @Service @Slf4j public class OrderService { // RedisTemplate ===> StringRedisTemplate @Resource private RedisTemplate redisTemplate; // private StringRedisTemplate redisTemplate; public static final String ORDER_KEY = "ord:"; public void addOrder(){ int keyId = ThreadLocalRandom.current().nextInt(1000)+1; String serialNo = UUID.randomUUID().toString(); String key = ORDER_KEY+keyId; String value = "京东订单" + serialNo; redisTemplate.opsForValue().set(key,value); log.info("============key:{}",key); log.info("============value:{}",value); } public String getOrderId(Integer keyId){ return (String) redisTemplate.opsForValue().get(ORDER_KEY + keyId); } } -
controller
import com.lv.service.OrderService;
import io.swagger.annotations.Api;
import io.swagger.annotations.ApiOperation;
import lombok.extern.slf4j.Slf4j;
import org.springframework.web.bind.annotation.PathVariable;
import org.springframework.web.bind.annotation.RequestMapping;
import org.springframework.web.bind.annotation.RequestMethod;
import org.springframework.web.bind.annotation.RestController;

import javax.annotation.Resource;

/**
 * @Author:晓风残月Lx
 * @Date: 2023/3/14 8:19
 */
@RestController
@Slf4j
@Api(tags = "订单接口")
public class OrderController {

    @Resource
    private OrderService orderService;

    @ApiOperation("新增订单")
    @RequestMapping(value = "/order/add", method = RequestMethod.POST)
    public void addOrder(){
        orderService.addOrder();
    }

    @ApiOperation("按照keyId 查询订单")
    @RequestMapping(value = "/order/{keyId}", method = RequestMethod.GET)
    public String getOrderId(@PathVariable Integer keyId){
        return orderService.getOrderId(keyId);
    }

}
测试
-
swagger (http://localhost:7070/swagger-ui.html) 测试接口

-
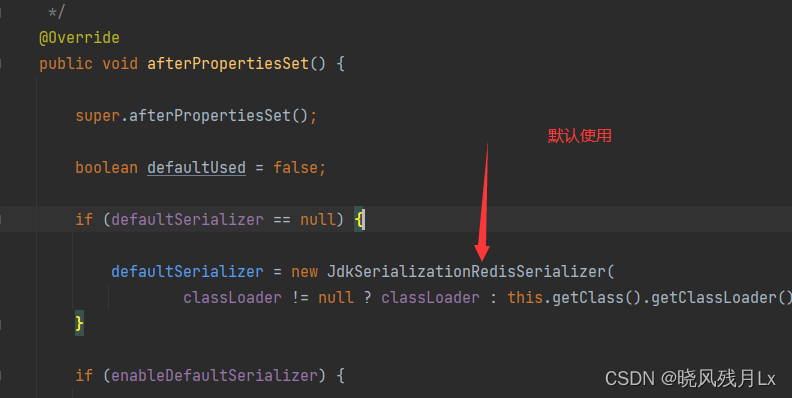
如果使用RedisTemplate,推荐序列化用StringRedisSerializer,默认使用的是JdkSerializationRedisSerializer,存入Redis会出现乱码问题,查询非常不方便
2.连接集群
1.正常启动
-
启动前面配的集群
-
改写YML(注意IP和端口)
server.port= 7070 spring.application.name=redis7_study01 # ========================logging===================== logging.level.root=info logging.level.com.atguigu.redis7=info logging.pattern.console=%d{yyyy-MM-dd HH:mm:ss.SSS} [%thread] %-5level %logger- %msg%n logging.file.name=D:/mylogs2023/redis7_study.log logging.pattern.file=%d{yyyy-MM-dd HH:mm:ss.SSS} [%thread] %-5level %logger- %msg%n # ========================swagger===================== spring.swagger2.enabled=true #在springboot2.6.X结合swagger2.9.X会提示documentationPluginsBootstrapper空指针异常, #原因是在springboot2.6.X中将SpringMVC默认路径匹配策略从AntPathMatcher更改为PathPatternParser, # 导致出错,解决办法是matching-strategy切换回之前ant_path_matcher spring.mvc.pathmatch.matching-strategy=ant_path_matcher # ========================redis单机===================== #spring.redis.database=0 ## 修改为自己真实IP #spring.redis.host=192.168.238.111 #spring.redis.port=6379 #spring.redis.password=123456 #spring.redis.lettuce.pool.max-active=8 #spring.redis.lettuce.pool.max-wait=-1ms #spring.redis.lettuce.pool.max-idle=8 #spring.redis.lettuce.pool.min-idle=0 spring.redis.password=123456 #获取失败,最大重定向次数 spring.redis.clusterspring.redis.cluster.nodes=192.1.max-redirects=3 spring.redis.lettuce.pool.max-active=8 spring.redis.lettuce.pool.max-wait=-1ms spring.redis.lettuce.pool.max-idle=8 spring.redis.lettuce.pool.min-idle=0 68.238.111:6381,192.168.238.111:6382,192.168.238.112:6383,192.168.238.112:6384,192.168.238.113:6385,192.168.238.113:6386 -
Swagger测试接口
2.人为模拟down机
-
让master-6381down机,shutdown
-
查看集群信息 ,看slave是否上位 Cluster nodes
-
我们客户端再次读写
-
直接报Error


-
原因是因为SpringBoot客户端没有动态感知到RedisCluster的最新集群信息
-
导致这个的原因是
- Spring Boot 2,Redis默认的是 Lettuce
- 当Redis集群节点发生变化后,Lettuce默认是不会刷新节点拓扑
-
解决方法:
-
排除Lettuce采用jedis(不了吧最好)

-
重写连接工厂实例(还不如第一种)
// 很不推荐,不用了解 @Bean public DefaultClientResources lettuceClientResources() { return DefaultClientResources.create(); } @Bean public LettuceConnectionFactory lettuceConnectionFactory(RedisProperties redisProperties, ClientResources clientResources) { ClusterTopologyRefreshOptions topologyRefreshOptions = ClusterTopologyRefreshOptions.builder() .enablePeriodicRefresh(Duration.ofSeconds(30)) //按照周期刷新拓扑 .enableAllAdaptiveRefreshTriggers() //根据事件刷新拓扑 .build(); ClusterClientOptions clusterClientOptions = ClusterClientOptions.builder() //redis命令超时时间,超时后才会使用新的拓扑信息重新建立连接 .timeoutOptions(TimeoutOptions.enabled(Duration.ofSeconds(10))) .topologyRefreshOptions(topologyRefreshOptions) .build(); LettuceClientConfiguration clientConfiguration = LettuceClientConfiguration.builder() .clientResources(clientResources) .clientOptions(clusterClientOptions) .build(); RedisClusterConfiguration clusterConfig = new RedisClusterConfiguration(redisProperties.getCluster().getNodes()); clusterConfig.setMaxRedirects(redisProperties.getCluster().getMaxRedirects()); clusterConfig.setPassword(RedisPassword.of(redisProperties.getPassword())); LettuceConnectionFactory lettuceConnectionFactory = new LettuceConnectionFactory(clusterConfig, clientConfiguration); return lettuceConnectionFactory; } -
刷新节点结群拓扑和动态感应(推荐)
-
改YML,一步到位(最后多了两行配置)
server.port= 7070
spring.application.name=redis7_study01
# ========================logging=====================
logging.level.root=info
logging.level.com.atguigu.redis7=info
logging.pattern.console=%d{yyyy-MM-dd HH:mm:ss.SSS} [%thread] %-5level %logger- %msg%n
logging.file.name=D:/mylogs2023/redis7_study.log
logging.pattern.file=%d{yyyy-MM-dd HH:mm:ss.SSS} [%thread] %-5level %logger- %msg%n
# ========================swagger=====================
spring.swagger2.enabled=true
#在springboot2.6.X结合swagger2.9.X会提示documentationPluginsBootstrapper空指针异常,
#原因是在springboot2.6.X中将SpringMVC默认路径匹配策略从AntPathMatcher更改为PathPatternParser,
# 导致出错,解决办法是matching-strategy切换回之前ant_path_matcher
spring.mvc.pathmatch.matching-strategy=ant_path_matcher

# ========================redis单机=====================
#spring.redis.database=0
## 修改为自己真实IP
#spring.redis.host=192.168.238.111
#spring.redis.port=6379
#spring.redis.password=123456
#spring.redis.lettuce.pool.max-active=8
#spring.redis.lettuce.pool.max-wait=-1ms
#spring.redis.lettuce.pool.max-idle=8
#spring.redis.lettuce.pool.min-idle=0

spring.redis.password=123456
#获取失败,最大重定向次数
spring.redis.clusterspring.max-redirects=3
spring.redis.lettuce.pool.max-active=8
spring.redis.lettuce.pool.max-wait=-1ms
spring.redis.lettuce.pool.max-idle=8
spring.redis.lettuce.pool.min-idle=0
redis.cluster.nodes=192.168.238.111:6381,192.168.238.111:6382,192.168.238.112:6383,192.168.238.112:6384,192.168.238.113:6385,192.168.238.113:6386
#支持集群拓扑动态感应刷新,自适应拓扑刷新是否使用所有可用的更新,默认false关闭
spring.redis.lettuce.cluster.refresh.adaptive=true
#定时刷新
spring.redis.lettuce.cluster.refresh.period=2000
-
-
-


 226
226


 被折叠的 条评论
为什么被折叠?
被折叠的 条评论
为什么被折叠?
 到【灌水乐园】发言


