


目的:
通过51单片机串口外设功能,来对一组数据进行处理,新手刚刚入门可能会将串口接收到的一个数据直接赋值给一个变量,然后用这个变量做相应功能,可是这样写的不稳定性太高了,有可能会接收不到你要的那个数据,其次就是接受到错误的数据。
功能:
(判断头,取接收长度,接收有效数据,接收校验位和计算校验)
步骤:
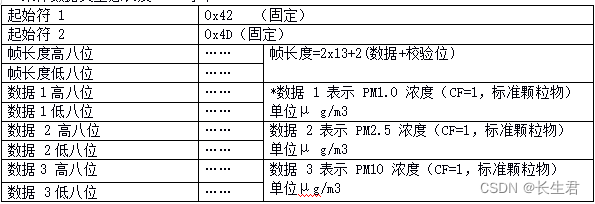
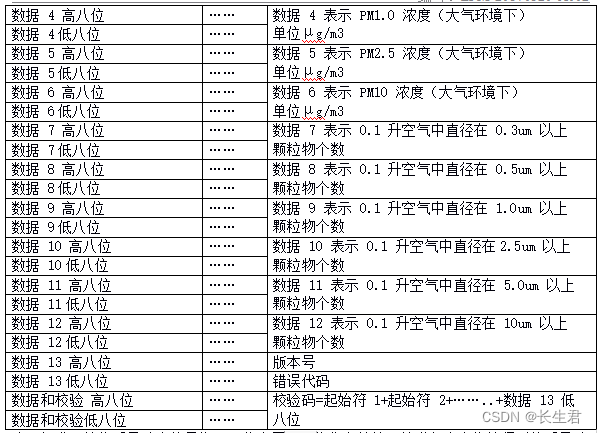
假设串口接收的这样一组数据
假设串口接收到这样一组数据,这个是规格书,实际串口接收到的数据和这个也是一样
代码实现处理
void UART_ISR(void) interrupt 4
{

    UINT8 temp = 0;
    if (RI == 1)
    {
		RI = 0;                         // Clear reception flag for next reception
		temp = SBUF;
		switch(strUart0.status){
//-------------------------判断头字节是否正确----------------------------//
			case 0:
				if(temp == 0x42){
					strUart0.status = 1;
					strUart0.RxdBuf[strUart0.recIndex] = temp;
					strUart0.recIndex ++;
					strUart0.ChkSum += temp;
				}
				else{
					resetUart0();
				}
			break;
			case 1:
				if(temp == 0x4D){
				strUart0.status = 2;
				strUart0.charRxCountLen = 0;
				strUart0.RxdBuf[strUart0.recIndex] = temp;
				strUart0.recIndex ++;
				strUart0.ChkSum += temp;

			  }
				else{
					resetUart0();
				}
			break;
//----------------------------------------------------------------------------

//-----------------------------------取接收长度-----------------------------
			case 2:
				strUart0.status = 3;
				strUart0.RxdBuf[strUart0.recIndex] = temp;
				strUart0.recIndex++;
				strUart0.charRxCountLen = temp;
				strUart0.ChkSum += temp;
			break;

			case 3:
				strUart0.status = 4;
				strUart0.RxdBuf[strUart0.recIndex] = temp;
				strUart0.recIndex++;
				strUart0.charRxCountLen = strUart0.charRxCountLen * 256 + temp;
				strUart0.ChkSum += temp;
			break;
//-------------------------------------------------------------------------------

//-------------------------------------接收有效数据--------------------------------
			case 4:
				strUart0.RxdBuf[strUart0.recIndex] = temp;
				strUart0.recIndex++;
				strUart0.ChkSum += temp;
				if(--strUart0.charRxCountLen == 2){
					strUart0.status = 5;
				}
			break;
//---------------------------------------------------------------------------------

//--------------------------------------接收校验位和计算校验-------------------------
			case 5:
				strUart0.RxdBuf[strUart0.recIndex] = temp;
				strUart0.recIndex++;
				if(strUart0.recIndex > UART1_RXDBUF_MAX){
					strUart0.recIndex = 0;
				}
				if(--strUart0.charRxCountLen ==0){
					if(strUart0.ChkSum == (unsigned short)strUart0.RxdBuf[strUart0.recIndex-2] * 256 + strUart0.RxdBuf[strUart0.recIndex-1]){
						strUart0.recFlagOK = 1;
						strUart0.status = 0;
						strUart0.recIndex = 0;
					}
					else{
						resetUart0();
					}
				}
			break;
//-------------------------------------------------------------------------------------

			default:
				resetUart0();
				break;
		}
    }
}
while (1)
{
// Timer0_Delay1ms(10);
if(strUart0.recFlagOK == 1){
LD15_Dust_Value = (unsigned short)strUart0.RxdBuf[12]*256 + strUart0.RxdBuf[13];
resetUart0();
}
}strUart0.RxdBuf[strUart0.recIndex-2] * 256 + strUart0.RxdBuf
注意:
这里 * 256 相当于 <<8 (左移一位是2^n次方,一共左移8 也就是2的8次方)
这里找到一个很好理解的方法
0x1是16进制整数,等于10进制的1。
0x1<<2表示将1左移两位后的结果。
1左移两位后的2进制表示是100,等于10进制的4。
因为一个整数左移n位的结果就相当于乘以2^n,所以,0x1<<2的结果也可以这样计算得出:1*2^2等于4。
代码及运行结果如下图:


 2718
2718


 被折叠的 条评论
为什么被折叠?
被折叠的 条评论
为什么被折叠?
 到【灌水乐园】发言


