


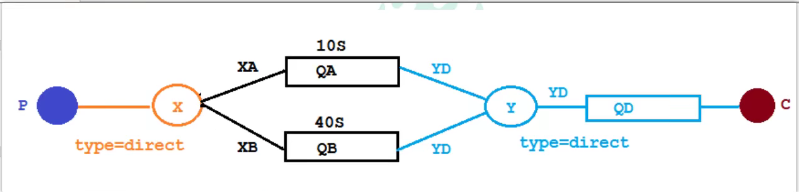
根据原理图写代码
首先创建一个基于MAVEN的springboot工程(另外一篇博客有讲)
以下是此项目所依赖的jar包
 <dependencies>

        <dependency>
            <groupId>org.springframework.boot</groupId>
            <artifactId>spring-boot-starter-amqp</artifactId>
        </dependency>
        <dependency>
            <groupId>org.springframework.boot</groupId>
            <artifactId>spring-boot-starter-web</artifactId>
        </dependency>
        <dependency>
            <groupId>org.springframework.boot</groupId>
            <artifactId>spring-boot-starter-test</artifactId>
            <scope>test</scope>
        </dependency>
        <dependency>
            <groupId>com.alibaba</groupId>
            <artifactId>fastjson</artifactId>
            <version>1.2.47</version>
        </dependency>
        <dependency>
            <groupId>org.projectlombok</groupId>
            <artifactId>lombok</artifactId>
        </dependency>
        <!--swagger-->
        <dependency>
            <groupId>io.springfox</groupId>
            <artifactId>springfox-swagger2</artifactId>
            <version>2.9.2</version>
        </dependency>
        <dependency>
            <groupId>io.springfox</groupId>
            <artifactId>springfox-swagger-ui</artifactId>
            <version>2.9.2</version>
        </dependency>
        <!--RabbitMQ 测试依赖-->
        <dependency>
            <groupId>org.springframework.amqp</groupId>
            <artifactId>spring-rabbit-test</artifactId>
            <scope>test</scope>
        </dependency>
    </dependencies>
以下代码是配置类 在创建之前首先得创建一个config配置类得包
TtlQueueConfig.java
import org.springframework.amqp.core.*;
import org.springframework.beans.factory.annotation.Qualifier;
import org.springframework.context.annotation.Bean;
import org.springframework.context.annotation.Configuration;

import java.util.HashMap;
import java.util.Map;

@Configuration
public class TtlQueueConfig {
    public static final String X_EXCHANGE = "X";
    public static final String DEAD_LETTER_QUEUE = "QD";
    public static final String QUEUE_A = "QA";
    public static final String QUEUE_B = "QB";
    public static final String Y_DEAD_LETTER_EXCHANGE ="Y";
    //声明xExchange
    @Bean("xExchange")
    public DirectExchange xExchange() {
        return new DirectExchange(X_EXCHANGE);
    }
    //声明yExchange
    @Bean("yExchange")
    public DirectExchange yExchange() {
        return new DirectExchange(Y_DEAD_LETTER_EXCHANGE);
    }
    @Bean("queueA")
    public Queue queueA(){
        Map<String, Object> args = new HashMap<>(3);
        //声明当前队列绑定的死信交换机
        args.put("x-dead-letter-exchange", Y_DEAD_LETTER_EXCHANGE);
        //声明当前队列的死信路由 key
        args.put("x-dead-letter-routing-key", "YD");
        //声明队列的 TTL
        args.put("x-message-ttl", 10000);
        return QueueBuilder.durable(QUEUE_A).withArguments(args).build();
    }
    // 声明队列 A 绑定 X 交换机
    @Bean
    public Binding queueaBindingX(@Qualifier("queueA") Queue queueA,
                                  @Qualifier("xExchange") DirectExchange xExchange){
        return BindingBuilder.bind(queueA).to(xExchange).with("XA");
    }
    //声明队列 B ttl 为 40s 并绑定到对应的死信交换机
    @Bean("queueB")
    public Queue queueB(){
        Map<String, Object> args = new HashMap<>(3);
        //声明当前队列绑定的死信交换机
        args.put("x-dead-letter-exchange", Y_DEAD_LETTER_EXCHANGE);
        //声明当前队列的死信路由 key
        args.put("x-dead-letter-routing-key", "YD");
        //声明队列的 TTL
        args.put("x-message-ttl", 40000);
        return QueueBuilder.durable(QUEUE_B).withArguments(args).build();
    }
    //声明队列 B 绑定 X 交换机
    @Bean
    public Binding queuebBindingX(@Qualifier("queueB") Queue queue1B,
                                  @Qualifier("xExchange") DirectExchange xExchange){
        return BindingBuilder.bind(queue1B).to(xExchange).with("XB");
    }
    //声明死信队列 QD
    @Bean("queueD")
    public Queue queueD(){
        return new Queue(DEAD_LETTER_QUEUE);
    }
    //声明死信队列 QD 绑定关系
    @Bean
    public Binding deadLetterBindingQAD(@Qualifier("queueD") Queue queueD,
                                        @Qualifier("yExchange") DirectExchange yExchange){
        return BindingBuilder.bind(queueD).to(yExchange).with("YD");
    }
}
再创建controller层的包 死信队列消费者 DeadLetterQueueConsumer.java
import com.rabbitmq.client.Channel;
import lombok.extern.slf4j.Slf4j;

import org.springframework.amqp.core.Message;
import org.springframework.amqp.rabbit.annotation.RabbitListener;
import org.springframework.stereotype.Component;


import java.io.IOException;
import java.util.Date;

@Slf4j
@Component
public class DeadLetterQueueConsumer {
    @RabbitListener(queues = "QD")
    public void receiveD(Message message, Channel channel) throws IOException {
        String msg = new String(message.getBody());
        log.info("当前时间:{},收到死信队列信息{}", new Date().toString(), msg);
    }
}
最后在controller层创建 发送消息的生产者 SendMsgController.java
import lombok.extern.slf4j.Slf4j;
import org.springframework.amqp.rabbit.core.RabbitTemplate;
import org.springframework.beans.factory.annotation.Autowired;
import org.springframework.web.bind.annotation.GetMapping;
import org.springframework.web.bind.annotation.PathVariable;
import org.springframework.web.bind.annotation.RequestMapping;
import org.springframework.web.bind.annotation.RestController;

import java.util.Date;

@Slf4j
@RequestMapping("ttl")
@RestController
public class SendMsgController {
    @Autowired
    private RabbitTemplate rabbitTemplate;
    @GetMapping("sendMsg/{message}")
    public void sendMsg(@PathVariable String message){
        log.info("当前时间:{},发送一条信息给两个 TTL 队列:{}", new Date(), message);
        rabbitTemplate.convertAndSend("X", "XA", "消息来自 ttl 为 10S 的队列: "+message);
        rabbitTemplate.convertAndSend("X", "XB", "消息来自 ttl 为 40S 的队列: "+message);
    }
}


 1万+
1万+


 被折叠的 条评论
为什么被折叠?
被折叠的 条评论
为什么被折叠?
 到【灌水乐园】发言


