


如何在vue项目中引入并使用高德地图在此就不叙述,有需要的可以自行查阅
最终实现的大致效果就是下方图中
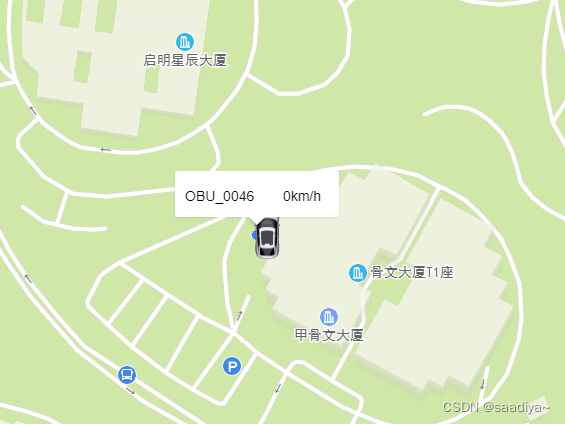
想要实现的小车实时运动并且渲染轨迹,就需要连接后端的websocket,具体代码如下:
//websocket方法
initWebSocket() {
      const socketUrl = `地址`;
      this.socket = new WebSocket(socketUrl);
      let dataWai = {}
      // 监听WebSocket连接打开事件
      this.socket.addEventListener('open', () => {
        console.log('WebSocket connected');
      });

      // 监听WebSocket接收到消息事件
      this.socket.addEventListener('message', (event) => {
        // 处理接收到的消息数据
        const data = JSON.parse(event.data);
        dataWai = data
        //拿到数据之后 在地图上渲染车辆以及车辆的行驶轨迹
        this.handleMessage(data);
        console.log(data, 'WebSocket data');
      });

      // 监听WebSocket连接关闭事件
      this.socket.addEventListener('close', () => {
        console.log('WebSocket disconnected');
      });

      // 监听WebSocket连接错误事件
      this.socket.addEventListener('error', (error) => {
        console.error('WebSocket error:', error);
      });
      // 初始化高德地图  如果获取到车辆轨迹数据 就以车辆的起点为中心,否则就默认中心点
      if (dataWai.nSelfLat) {
        this.initMap(dataWai.nSelfLat, dataWai.nSelfLong)
      }
      else {
        this.initMap(39.9088, 116.3974)
      }
},

//渲染地图方法
 initMap(lat, lng) {
      // 使用高德地图API初始化地图
      this.map = new AMap.Map("container", {
        resizeEnable: true,
        center: [lng, lat],
        zoom: 20,
  });
//渲染车辆以及轨迹
 handleMessage(data) {
      // 处理WebSocket接收到的数据并更新地图轨迹和气泡框
      // 根据数据更新车辆位置、方向等信息
      const { nSelfLat, nSelfLong, nSelfTrack, UEID, nSelfSpeed, vTvInfo, vTiInfo } = data;
      this.nSelfTrack = nSelfTrack
      this.nSelfSpeed = nSelfSpeed
      // 清除之前的车辆标记
      if (this.carMarker) {
        this.carMarker.setMap(null); // 将之前的车辆标记从地图上移除
      }
      // 创建车辆图标
      const carIcon = new AMap.Icon({
        // 车辆图标配置参数
        size: new AMap.Size(38, 58), // 图标尺寸
        image: require("@/assets/images/car.png"),
        imageSize: new AMap.Size(38, 58),
      });
      // 创建车辆标记,并设置位置和图标
      this.carMarker = new AMap.Marker({
        position: [nSelfLong, nSelfLat], // 设置车辆位置
        icon: carIcon, // 设置车辆图标
        angle: nSelfTrack, // 设置车辆方向
      });
      // 在地图上添加车辆标记
      this.carMarker.setMap(this.map);

      const point = new AMap.LngLat(nSelfLong, nSelfLat);
      // // 将地理坐标点添加到轨迹数组中
      this.trackPath.push(point);
      this.polyline = new AMap.Polyline({
        path: this.trackPath,
        isOutline: true,
        outlineColor: "#3d7eff",
        borderWeight: 2,
        strokeWeight: 5,
        strokeColor: "#3d7eff",
        strokeOpacity: 1,
      });
      this.polyline.setOptions({
        lineJoin: "round",
        lineCap: "round",
        dirColor: "#fff",
        showDir: true,
      });
      this.polyline.setMap(this.map); // 将轨迹线添加到地图上
      //下方代码块是 车辆上方的气泡框,可以根据自己需要做修改 ,应该是for循环渲染的,但是有问题
      //目前 先用的死办法 固定写死几个 ,如果有大佬知道为何 for使用不了可以告诉小弟一下
      let vTiInfoData = this.enumerateAdveSafeState1(vTiInfo)
      let vTvInfoData = this.enumerateAdveSafeState(vTvInfo)
      let isVti = vTiInfoData.length
      let isvtv = vTvInfoData.length
      let p1 = null
      let p2 = null
      if (isvtv == 0) {
        p1 = ``
      }
      else if (isvtv == 1) {
        p1 = `
        <div style='width: 136px; height: 22px; opacity: 1;
          background: linear-gradient(270deg, #ffffff 0%, #ff0000 100%);
          font-size: 12px; font-weight: 400; letter-spacing: 0px;
          color: rgba(0, 0, 0, 1); text-align: left; vertical-align: top;
          display: flex; align-items: center; border-left: rgba(255, 0, 0, 0.66) 2px solid;
          padding-left: 10px; margin: auto; margin-top: 5px;'>
          <span style="opacity: 1;  font-size: 12px; font-weight: 400; letter-spacing: 0px;
          line-height: 17.38px; color: rgba(0, 0, 0, 1);
          text-align: left; vertical-align: top;">
             ${vTvInfoData[0].description}
           </span>
        </div>
        `
      }
      else if (isvtv == 2) {
        p1 = `
        <div style='width: 136px; height: 22px; opacity: 1;
          background: linear-gradient(270deg, #ffffff 0%, #ff0000 100%);
          font-size: 12px; font-weight: 400; letter-spacing: 0px;
          color: rgba(0, 0, 0, 1); text-align: left; vertical-align: top;
          display: flex; align-items: center; border-left: rgba(255, 0, 0, 0.66) 2px solid;
          padding-left: 10px; margin: auto; margin-top: 5px;'>
          <span style="opacity: 1;  font-size: 12px; font-weight: 400; letter-spacing: 0px;
          line-height: 17.38px; color: rgba(0, 0, 0, 1);
          text-align: left; vertical-align: top;">
             ${vTvInfoData[0].description}
           </span>
           <span style="opacity: 1;  font-size: 12px; font-weight: 400; letter-spacing: 0px;
          line-height: 17.38px; color: rgba(0, 0, 0, 1);
          text-align: left; vertical-align: top;">
             ${vTvInfoData[1].description}
           </span>
        </div>
        `
      }
      else if (isvtv == 3) {
        p1 = `
        <div style='width: 136px; height: 22px; opacity: 1;
          background: linear-gradient(270deg, #ffffff 0%, #ff0000 100%);
          font-size: 12px; font-weight: 400; letter-spacing: 0px;
          color: rgba(0, 0, 0, 1); text-align: left; vertical-align: top;
          display: flex; align-items: center; border-left: rgba(255, 0, 0, 0.66) 2px solid;
          padding-left: 10px; margin: auto; margin-top: 5px;'>
          <span style="opacity: 1;  font-size: 12px; font-weight: 400; letter-spacing: 0px;
          line-height: 17.38px; color: rgba(0, 0, 0, 1);
          text-align: left; vertical-align: top;">
             ${vTvInfoData[0].description}
           </span>
           <span style="opacity: 1;  font-size: 12px; font-weight: 400; letter-spacing: 0px;
          line-height: 17.38px; color: rgba(0, 0, 0, 1);
          text-align: left; vertical-align: top;">
             ${vTvInfoData[1].description}
           </span>
           <span style="opacity: 1;  font-size: 12px; font-weight: 400; letter-spacing: 0px;
          line-height: 17.38px; color: rgba(0, 0, 0, 1);
          text-align: left; vertical-align: top;">
             ${vTvInfoData[2].description}
           </span>
        </div>
        `
      }

      if (isVti == 0) {
        p2 = ``
      }
      else if (isVti == 1) {
        p2 = `
        <div style='width: 136px; height: 22px; opacity: 1;
          background: linear-gradient(270deg, #ffffff 0%, #ff0000 100%);
          font-size: 12px; font-weight: 400; letter-spacing: 0px;
          color: rgba(0, 0, 0, 1); text-align: left; vertical-align: top;
          display: flex; align-items: center; border-left: rgba(255, 0, 0, 0.66) 2px solid;
          padding-left: 10px; margin: auto; margin-top: 5px;'>
          <span style="opacity: 1;  font-size: 12px; font-weight: 400; letter-spacing: 0px;
          line-height: 17.38px; color: rgba(0, 0, 0, 1);
          text-align: left; vertical-align: top;">
             ${vTiInfoData[0].description}
           </span>
        </div>
        `
      }
      else if (isVti == 2) {
        p2 = `
        <div style='width: 136px; height: 22px; opacity: 1;
          background: linear-gradient(270deg, #ffffff 0%, #ff0000 100%);
          font-size: 12px; font-weight: 400; letter-spacing: 0px;
          color: rgba(0, 0, 0, 1); text-align: left; vertical-align: top;
          display: flex; align-items: center; border-left: rgba(255, 0, 0, 0.66) 2px solid;
          padding-left: 10px; margin: auto; margin-top: 5px;'>
          <span style="opacity: 1;  font-size: 12px; font-weight: 400; letter-spacing: 0px;
          line-height: 17.38px; color: rgba(0, 0, 0, 1);
          text-align: left; vertical-align: top;">
             ${vTiInfoData[0].description}
           </span>
           <span style="opacity: 1;  font-size: 12px; font-weight: 400; letter-spacing: 0px;
          line-height: 17.38px; color: rgba(0, 0, 0, 1);
          text-align: left; vertical-align: top;">
             ${vTiInfoData[1].description}
           </span>
        </div>
        `
      }
      else if (isVti == 3) {
        p2 = `
        <div style='width: 136px; height: 22px; opacity: 1;
          background: linear-gradient(270deg, #ffffff 0%, #ff0000 100%);
          font-size: 12px; font-weight: 400; letter-spacing: 0px;
          color: rgba(0, 0, 0, 1); text-align: left; vertical-align: top;
          display: flex; align-items: center; border-left: rgba(255, 0, 0, 0.66) 2px solid;
          padding-left: 10px; margin: auto; margin-top: 5px;'>
          <span style="opacity: 1;  font-size: 12px; font-weight: 400; letter-spacing: 0px;
          line-height: 17.38px; color: rgba(0, 0, 0, 1);
          text-align: left; vertical-align: top;">
             ${vTiInfoData[0].description}
           </span>
           <span style="opacity: 1;  font-size: 12px; font-weight: 400; letter-spacing: 0px;
          line-height: 17.38px; color: rgba(0, 0, 0, 1);
          text-align: left; vertical-align: top;">
             ${vTiInfoData[1].description}
           </span>
           <span style="opacity: 1;  font-size: 12px; font-weight: 400; letter-spacing: 0px;
          line-height: 17.38px; color: rgba(0, 0, 0, 1);
          text-align: left; vertical-align: top;">
             ${vTiInfoData[2].description}
           </span>
        </div>
        `
      }
      //----------------------------------------------------------------------------
      // 创建气泡框
      const content =
        `<div style=''>
          <div style='display: flex; width: 136px; margin: auto; justify-content: space-between; margin-top: 6px;'>
            <div style='opacity: 1;
                 font-size: 14px;
                 letter-spacing: 0px;
                 color: rgba(0, 0, 0, 1);
                 text-align: left;
                 vertical-align: top;'>
                 ${UEID}
            </div>
            <div style='opacity: 1;font-size: 14px;
            letter-spacing: 0px; color: rgba(0, 0, 0, 1);
            text-align: left; vertical-align: top;'>${nSelfSpeed}km/h</div>
            </div>
              ${p1}
              ${p2}
        </div>`;
      this.infoWindow = new AMap.InfoWindow({
        content: content,
        offset: new AMap.Pixel(0, -10),
        showCloseButton: false, // 设置不显示关闭按钮
      });
      // 显示气泡框
      this.showInfoWindow = function () {
        this.infoWindow.open(this.map, [nSelfLong, nSelfLat]);
      };
      // 调用显示气泡框的方法
      this.showInfoWindow();
    },


 484
484


 被折叠的 条评论
为什么被折叠?
被折叠的 条评论
为什么被折叠?
 到【灌水乐园】发言


