


1. 首先需要在高德地图注册对应的服务,注意绑定服务一定要是`web端`,如下图,我们会拥有对应的key值和安全密钥。

2. npm安装Loader
npm i @amap/amap-jsapi-loader --save3. 创建一个地图容器组件,设置key和安全密钥
初始化时先设置安全密钥
window._AMapSecurityConfig = {
    securityJsCode: "xxxxxxxxxxxxxxxxxxxx",
};
然后初始化地图,定义需要用到的插件
initAMap() {
      let that = this;
      AMapLoader.load({
        key: "xxxxxxxxxxxxxxxxxxxxxxxxxx", // 申请好的Web端开发者Key,首次调用 load 时必填
        version: "2.0", // 指定要加载的 JSAPI 的版本,缺省时默认为 1.4.15
        plugins: [
          "AMap.ToolBar",
          "AMap.Scale",
          "AMap.HawkEye",
          "AMap.MapType",
          "AMap.Geolocation",
          "AMap.ControlBar",
          "AMap.MoveAnimation",
          "AMap.Driving",
          "AMap.Geocoder",
        ], // 需要使用的的插件列表,如比例尺'AMap.Scale'等
      })
        .then((AMap) => {
          that.map = new AMap.Map("container", {
            // 设置地图容器id
            viewMode: "3D", // 是否为3D地图模式
            zooms: [5,14], // 初始化地图级别
            center: [116.397428, 39.90923], // 初始化地图中心点位置
            pitch: 45,
          });
          that.addMarker();
          window.calcDriving = () => {
            that.calcDriving();
          };
        })
        .catch((e) => {
          console.log(e);
        });
    }
然后我们打上初始进入时当前车辆的点位进行信息展示
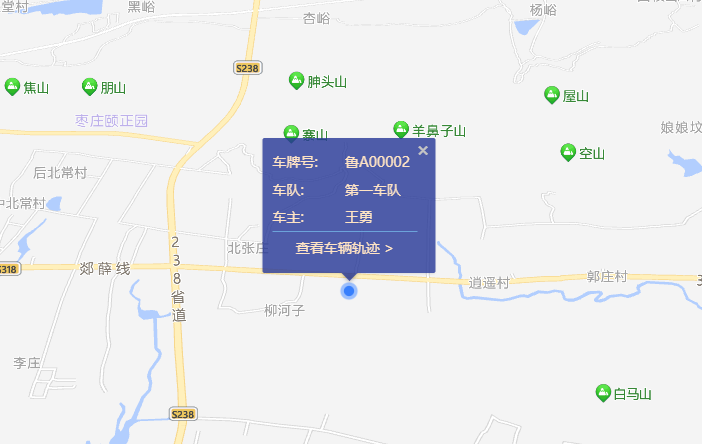
addMarker() {
      this.removeRouteLine();
      let that = this;
      this.mapStatus = 0;
      // 创建 AMap.Icon 实例:
      var icon = new AMap.Icon({
        size: new AMap.Size(20, 20), // 图标尺寸
        image: require("@/assets/mapMarker.png"), // Icon的图像
        imageSize: new AMap.Size(20, 20), // 根据所设置的大小拉伸或压缩图片
      });
      this.marker = new AMap.Marker({
        icon: icon,
        position: this.lntlat[0],
        offset: new AMap.Pixel(-10, -10),
      });
      this.map.add(this.marker);
      this.map.setFitView();

      // infowidnow 的 innerHTML
      var infoWindowContent = `
      <div class="map-info">
        <div class="info-item">
          <span>车牌号:</span>
          <span>${this.carInfo.label || "--"}</span>
        </div>
        <div class="info-item">
          <span>车队:</span>
          <span>${this.carInfo.parentLabel || "--"}</span>
        </div>
        <div class="info-item">
          <span>车主:</span>
          <span>${this.carInfo.driver || "--"}</span>
        </div>
        <div class="line"></div>
        <div class="button" onclick="calcDriving()">查看车辆轨迹 ></div>
      </div>
      `;

      // 创建一个自定义内容的 infowindow 实例
      var infoWindow = new AMap.InfoWindow({
        position: this.lntlat[0],
        offset: new AMap.Pixel(0, -10),
        content: infoWindowContent,
      });
      infoWindow.open(that.map);
      this.marker.on("click", function () {
        infoWindow.open(that.map);
      });
      this.map.setFitView(null, false);
    },
我们每次进入或者切换车辆时,防止信息重叠展示,都是进行点位或者线路的清除
removeMarker() {
    this.marker && this.map.remove(this.marker);
},
removeRouteLine() {
    this.startMarker && this.map.remove(this.startMarker);
    this.endMarker && this.map.remove(this.endMarker);
    this.routeLine && this.map.remove(this.routeLine);
},
当我们要进行车辆轨迹查看时,实际逻辑是传递了两个经纬度点位的数据,我们使用高德api自带的轨迹规划可以实现线路图的展示。
calcDriving() {
      this.removeMarker();
      this.map.clearInfoWindow();
      this.mapStatus = 1;
      this.regeoCode(this.carInfo.rotes.startLocation, 0);
      this.regeoCode(this.carInfo.rotes.endLocation, 1);
      let that = this;
      var drivingOption = {
        policy: AMap.DrivingPolicy.LEAST_TIME, // 其它policy参数请参考 https://lbs.amap.com/api/javascript-api/reference/route-search#m_DrivingPolicy
        ferry: 1, // 是否可以使用轮渡
        province: "鲁", // 车牌省份的汉字缩写
      };

      // 构造路线导航类
      var driving = new AMap.Driving(drivingOption);

      // 根据起终点经纬度规划驾车导航路线
      driving.search(this.lntlat[0], this.lntlat[1], function (status, result) {
        // result即是对应的驾车导航信息,相关数据结构文档请参考 https://lbs.amap.com/api/javascript-api/reference/route-search#m_DrivingResult
        if (status === "complete") {
          if (result.routes && result.routes.length) {
            // 绘制第一条路线,也可以按需求绘制其它几条路线
            that.drawRoute(result.routes[0]);
            // log.success('绘制驾车路线完成')
          }
        } else {
          // log.error('获取驾车数据失败:' + result)
        }
      });
    },
    drawRoute(route) {
      var path = this.parseRouteToPath(route);
      var icon = new AMap.Icon({
        size: new AMap.Size(20, 20), // 图标尺寸
        image: require("@/assets/mapMarker.png"), // Icon的图像
        imageSize: new AMap.Size(20, 20), // 根据所设置的大小拉伸或压缩图片
      });
      this.startMarker = new AMap.Marker({
        position: path[0],
        icon: icon,
        map: this.map,
        offset: new AMap.Pixel(-10, -10),
      });

      this.endMarker = new AMap.Marker({
        position: path[path.length - 1],
        icon: icon,
        map: this.map,
        offset: new AMap.Pixel(-10, -10),
      });

      this.routeLine = new AMap.Polyline({
        path: path,
        isOutline: true,
        outlineColor: "#ffeeee",
        borderWeight: 2,
        strokeWeight: 5,
        strokeOpacity: 0.9,
        strokeColor: "#0091ff",
        lineJoin: "round",
      });

      this.map.add(this.routeLine);

      // 调整视野达到最佳显示区域
      this.map.setFitView([this.startMarker, this.endMarker, this.routeLine]);
    },
    parseRouteToPath(route) {
      var path = [];

      for (var i = 0, l = route.steps.length; i < l; i++) {
        var step = route.steps[i];

        for (var j = 0, n = step.path.length; j < n; j++) {
          path.push(step.path[j]);
        }
      }

      return path;
    },
其中,左上角展示了24小时车辆运行情况的地址,这需要我们使用高德提供的逆地理定位获取地址的信息。
regeoCode(lnglat, id) {
      let that = this;
      var geocoder = new AMap.Geocoder({
        // city: "010", //城市设为北京,默认:“全国”
        radius: 1000, //范围,默认:500
      });
      geocoder.getAddress(lnglat, function (status, result) {
        if (status === "complete" && result.regeocode) {
          var address = result.regeocode.formattedAddress;
          that.activities[id].content = address;
        } else {
          console.log("根据经纬度查询地址失败");
        }
      });
    },
需要注意的是,由于我们的初始化地图是写在methods方法里的,所以调用起来有一定的问题 ,比如车辆轨迹的函数我们绑定在了div元素里,但是如果我们不进行特殊处理,只在methods里定义calcDriving()函数,调用会报AMap的错误;
这还因为我们外层是没有定义过AMap的,只需要在初始化时增加这样一部就可以解决这个问题。
window.calcDriving = () => {
that.calcDriving();
};
最后,附上源码:
1.MapContainer.vue定义地图组件
<template>
  <div class="map-box">
    <div class="carInfoBox" v-if="mapStatus == 1">
      <div class="carInfo">
        <span>车牌号:</span>
        <span class="carNo">鲁A00004</span>
      </div>
      <p class="title">24小时车辆运行情况:</p>
      <div class="rote-box">
        <el-timeline :reverse="true">
          <el-timeline-item
            v-for="(activity, index) in activities"
            :key="index"
            icon="el-icon-coordinate"
            type="primary"
            :color="activity.color"
            size="large"
            :timestamp="activity.timestamp"
          >
            {{ activity.content }}
          </el-timeline-item>
        </el-timeline>
      </div>
    </div>
    <div class="returnBtn" @click="addMarker" v-if="mapStatus == 1">返回</div>
    <div id="container"></div>
  </div>
</template>
<script>
import AMapLoader from "@amap/amap-jsapi-loader";
import moment from "moment";
export default {
  name: "map-view",
  props: ["lntlat", "carInfo"],
  data() {
    return {
      map: "",
      marker: null,
      routeLine: null,
      startMarker: null,
      endMarker: null,
      activities: [
        {
          content: "山东省济南市市中区十六里河街道漫山香墅宸麓6号楼",
          timestamp: "2018-04-12 20:46",
        },
        {
          content: "山东省烟台市莱山区解甲庄街道钟家洼",
          timestamp: "2018-04-03 20:46",
        },
      ],
      mapStatus: 0,
    };
  },
  watch: {
    lntlat: {
      handler: function (newVal, oldVal) {
        this.$nextTick(() => {
          if (this.map) {
            this.removeMarker();
            this.addMarker();
          }
        });
      },
      deep: true,
    },
    carInfo() {
      this.activities[0].timestamp = moment().format("YYYY-MM-DD HH:mm");
      this.activities[1].timestamp =
        moment().subtract(1, "day").format("YYYY-MM-DD HH:mm");
    },
  },
  mounted() {
    window._AMapSecurityConfig = {
      securityJsCode: "xxxxxxxxxxxxxxxxxxxx",//安全秘钥
    };
    this.initAMap();
  },
  unmounted() {
    this.map.destroy();
  },
  methods: {
    initAMap() {
      let that = this;
      AMapLoader.load({
        key: "xxxxxxxxxxxxxxxxxxxxxxx", // 申请好的Web端开发者Key,首次调用 load 时必填
        version: "2.0", // 指定要加载的 JSAPI 的版本,缺省时默认为 1.4.15
        plugins: [
          "AMap.ToolBar",
          "AMap.Scale",
          "AMap.HawkEye",
          "AMap.MapType",
          "AMap.Geolocation",
          "AMap.ControlBar",
          "AMap.MoveAnimation",
          "AMap.Driving",
          "AMap.Geocoder",
        ], // 需要使用的的插件列表,如比例尺'AMap.Scale'等
      })
        .then((AMap) => {
          that.map = new AMap.Map("container", {
            // 设置地图容器id
            viewMode: "3D", // 是否为3D地图模式
            zooms: [5,14], // 初始化地图级别
            center: [116.397428, 39.90923], // 初始化地图中心点位置
            pitch: 45,
          });
          that.addMarker();
          window.calcDriving = () => {
            that.calcDriving();
          };
        })
        .catch((e) => {
          console.log(e);
        });
    },
    removeMarker() {
      this.marker && this.map.remove(this.marker);
    },
    removeRouteLine() {
      this.startMarker && this.map.remove(this.startMarker);
      this.endMarker && this.map.remove(this.endMarker);
      this.routeLine && this.map.remove(this.routeLine);
    },
    addMarker() {
      this.removeRouteLine();
      let that = this;
      this.mapStatus = 0;
      // 创建 AMap.Icon 实例:
      var icon = new AMap.Icon({
        size: new AMap.Size(20, 20), // 图标尺寸
        image: require("@/assets/mapMarker.png"), // Icon的图像
        imageSize: new AMap.Size(20, 20), // 根据所设置的大小拉伸或压缩图片
      });
      this.marker = new AMap.Marker({
        icon: icon,
        position: this.lntlat[0],
        offset: new AMap.Pixel(-10, -10),
      });
      this.map.add(this.marker);
      this.map.setFitView();

      // infowidnow 的 innerHTML
      var infoWindowContent = `
      <div class="map-info">
        <div class="info-item">
          <span>车牌号:</span>
          <span>${this.carInfo.label || "--"}</span>
        </div>
        <div class="info-item">
          <span>车队:</span>
          <span>${this.carInfo.parentLabel || "--"}</span>
        </div>
        <div class="info-item">
          <span>车主:</span>
          <span>${this.carInfo.driver || "--"}</span>
        </div>
        <div class="line"></div>
        <div class="button" onclick="calcDriving()">查看车辆轨迹 ></div>
      </div>
      `;

      // 创建一个自定义内容的 infowindow 实例
      var infoWindow = new AMap.InfoWindow({
        position: this.lntlat[0],
        offset: new AMap.Pixel(0, -10),
        content: infoWindowContent,
      });
      infoWindow.open(that.map);
      this.marker.on("click", function () {
        infoWindow.open(that.map);
      });
      this.map.setFitView(null, false);
    },

    regeoCode(lnglat, id) {
      let that = this;
      var geocoder = new AMap.Geocoder({
        // city: "010", //城市设为北京,默认:“全国”
        radius: 1000, //范围,默认:500
      });
      geocoder.getAddress(lnglat, function (status, result) {
        if (status === "complete" && result.regeocode) {
          var address = result.regeocode.formattedAddress;
          that.activities[id].content = address;
        } else {
          console.log("根据经纬度查询地址失败");
        }
      });
    },
    calcDriving() {
      this.removeMarker();
      this.map.clearInfoWindow();
      this.mapStatus = 1;
      this.regeoCode(this.carInfo.rotes.startLocation, 0);
      this.regeoCode(this.carInfo.rotes.endLocation, 1);
      let that = this;
      var drivingOption = {
        policy: AMap.DrivingPolicy.LEAST_TIME, // 其它policy参数请参考 https://lbs.amap.com/api/javascript-api/reference/route-search#m_DrivingPolicy
        ferry: 1, // 是否可以使用轮渡
        province: "鲁", // 车牌省份的汉字缩写
      };

      // 构造路线导航类
      var driving = new AMap.Driving(drivingOption);

      // 根据起终点经纬度规划驾车导航路线
      driving.search(this.lntlat[0], this.lntlat[1], function (status, result) {
        // result即是对应的驾车导航信息,相关数据结构文档请参考 https://lbs.amap.com/api/javascript-api/reference/route-search#m_DrivingResult
        if (status === "complete") {
          if (result.routes && result.routes.length) {
            // 绘制第一条路线,也可以按需求绘制其它几条路线
            that.drawRoute(result.routes[0]);
            // log.success('绘制驾车路线完成')
          }
        } else {
          // log.error('获取驾车数据失败:' + result)
        }
      });
    },
    drawRoute(route) {
      var path = this.parseRouteToPath(route);
      var icon = new AMap.Icon({
        size: new AMap.Size(20, 20), // 图标尺寸
        image: require("@/assets/mapMarker.png"), // Icon的图像
        imageSize: new AMap.Size(20, 20), // 根据所设置的大小拉伸或压缩图片
      });
      this.startMarker = new AMap.Marker({
        position: path[0],
        icon: icon,
        map: this.map,
        offset: new AMap.Pixel(-10, -10),
      });

      this.endMarker = new AMap.Marker({
        position: path[path.length - 1],
        icon: icon,
        map: this.map,
        offset: new AMap.Pixel(-10, -10),
      });

      this.routeLine = new AMap.Polyline({
        path: path,
        isOutline: true,
        outlineColor: "#ffeeee",
        borderWeight: 2,
        strokeWeight: 5,
        strokeOpacity: 0.9,
        strokeColor: "#0091ff",
        lineJoin: "round",
      });

      this.map.add(this.routeLine);

      // 调整视野达到最佳显示区域
      this.map.setFitView([this.startMarker, this.endMarker, this.routeLine]);
    },
    parseRouteToPath(route) {
      var path = [];

      for (var i = 0, l = route.steps.length; i < l; i++) {
        var step = route.steps[i];

        for (var j = 0, n = step.path.length; j < n; j++) {
          path.push(step.path[j]);
        }
      }

      return path;
    },
  },
};
</script>
<style lang="scss" scoped>
#container {
  width: 100%;
  height: 88vh;
}
.map-box {
  position: relative;
  .returnBtn {
    position: absolute;
    z-index: 999;
    right: 20px;
    top: 20px;
    padding: 10px 30px;
    border: 1px solid #3c9efb;
    background: #1e4bc3;
    color: #f2f2f2;
    cursor: pointer;
  }
  .carInfoBox {
    position: absolute;
    z-index: 999;
    left: 20px;
    top: 20px;
    background: #283997cf;
    color: #fff;
    padding: 20px;
    font-size: 14px;
    .carInfo {
      margin-bottom: 10px;
      font-size: 14px;
    }
    .carNo {
      margin-left: 20px;
    }
    .title {
      margin-bottom: 10px;
    }
    .rote-box {
      padding: 10px;
    }
  }
}
/deep/ {
  .el-timeline-item__node--large {
    left: -5px;
    width: 20px;
    height: 20px;
  }
  .el-timeline-item__wrapper {
    padding-bottom: 20px;
  }
  .el-timeline-item__content {
    color: #fff;
  }
  .el-timeline-item__timestamp {
    color: #bec3cd;
  }
  .el-timeline-item {
    padding-bottom: 0;
  }
  .el-timeline-item:nth-child(2) {
    .el-timeline-item__wrapper {
      padding-bottom: 0px;
    }
  }
  .amap-info-content {
    background: #283997cf;
  }
  .bottom-center .amap-info-sharp {
    border-color: #283997cf;
    border-left: 8px solid transparent;
    border-right: 8px solid transparent;
  }
  .map-info {
    font-size: 14px;
    // padding: 10px 16px 8px;
    // background: #283997cf;
    color: bisque;
  }
  .info-item {
    width: 145px;
    display: flex;
    span {
      display: inline-block;
      width: 50%;
      padding: 4px 0;
    }
  }
  .line {
    width: 100%;
    height: 1px;
    background: #6ca3da;
  }
  .button {
    text-align: center;
    padding: 6px 0;
    cursor: pointer;
  }
}
</style>
2.carMap.vue调用地图组件进行渲染
<template>
  <div class="carMap">
    <div class="carMapRight">
      <Mapview
        ref="carMap"
        :lntlat="checkObj.lnglnt"
        :carInfo="checkObj"
      ></Mapview>
    </div>
  </div>
</template>

<script>
import Mapview from "@/components/MapContainer.vue";
export default {
  name: "carMap",
  components: {
    Mapview,
  },
  props: {},
  data() {
    return {
      checkObj: {
            id: "1-2",
            label: "鲁A00002",
            parentId: 1,
            parentLabel: "第一车队",
            driver: "王勇",
            type: 2,
            rotes: {
              startTime: "2024-01-16 10:44",
              endTime: "2023-01-17 10:44",
              startLocation: [118.46999, 37.520299],
              endLocation: [117.131897, 36.162652],
            },
        },
    };
  },
  watch:{},
  mounted() {},
  computed: {},
  methods: {},
  destroyed() {},
};
</script>
<style lang="scss" scoped>
* {
  margin: 0;
  padding: 0;
}

html,
body {
  width: 100%;
  height: 100%;
}

.carMap {
  padding: 20px;
  width: 100%;
  box-sizing: border-box;
  display: flex;
}

.carMapRight {
  width: 80%;
  height: 88vh;
}
</style>


 4004
4004


 被折叠的 条评论
为什么被折叠?
被折叠的 条评论
为什么被折叠?
 到【灌水乐园】发言


