


安装xLua
插件在GITHUB上进行下载。
下载后的文件目录结构 
- 打开
Assets文件夹将Plugins和XLua这两个文件夹Copy到Unity人更新项目中的Assets文件夹中。

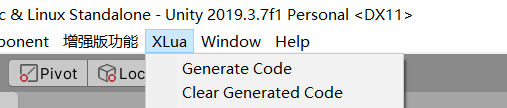
在Unity的IDE出现XLua选项
- 开启宏 HOTFIX_ENABLE
File—>Bulid Setting—>Player Settings—>Player—>Scripting Define Symbols

设置完成后会在出现

- XLua 中的Tools 工具文件夹 复制到热更新工程中Assets同级目录

- xLua在Unity中使用步骤
- 每次修改需要更新的脚本,需要运行
Generate Code。 - 执行
Hotfix Inject In Editor,进行Lua注入。
- 检查Unity 中XLua热更新环境
- 引入命名空间 using XLua。
- 在需要更新的类上方加入标签 [Hotfix] 。
- 在需要更新的方法上方加入 [LuaCallCSharp] 。
- 创建LuaEnv
- 将测试脚本HotfixTest 挂载到场景Manager总控中。
using System.Collections;
using System.Collections.Generic;
using UnityEngine;
using XLua;
using System.IO;
namespace XLuaProject
{
    [Hotfix]
    public class HotfixTest : MonoBehaviour
    {
        public LuaEnv luaEnv;
        // Start is called before the first frame update
        void Start()
        {
            luaEnv = new LuaEnv();
            luaEnv.DoString("CS.UnityEngine.Debug.Log('hello world')");
            luaEnv.Dispose();
        }
    }
}

6. 运行Generate Code。
7. 执行Hotfix Inject In Editor,进行Lua注入。
8. 运行结果,lua虚拟环境搭建完毕。

安装AssetBundles-Browser
插件在GITHUB上进行下载。
1. 将插件下载下来后一定注意放入Unity的目录结构。在Unity的项目目录中装件Editor文件夹。
2.将AssetBundles-Browser解压后的Editor文件夹Copy到Unity的项目中。目录结构如下图所示。

3.在Unity的IDE导航条中的Window就会出现AssetBundles-Browser。

场景构建及描述
未更新前运行后值2s后创建一个sun物体并自转,更新后先创建earth物体并自转2s后创建sun并自转,sun出现后earth围绕sun进行公转。
- 创建预制体:分别创建两个预制体earth,sun并分别设置材质。每个球体放个cube是为了看清自转。

- 创建预制体脚本:自转脚本
Rotation,公转脚本Revolution。并将自转脚本挂载到上述两个预制体上。
using System.Collections;
using System.Collections.Generic;
using UnityEngine;
using XLua;

namespace XLuaProject
{
    public class Rotation : MonoBehaviour
    {
        public static int speed = -50;
        // Start is called before the first frame update
        [LuaCallCSharp]
        void Start()
        {
        }
        // Update is called once per frame
        void Update()
        {
            transform.Rotate(0, speed * Time.deltaTime, 0, Space.Self);
        }
    }
}
using System.Collections;
using System.Collections.Generic;
using UnityEngine;
namespace XLuaProject
{
    public class Revolution : MonoBehaviour
    {
        public GameObject Axis;//轴,用于选择围绕中心
        public float RotateSpeed = 10;//旋转速度// Use this for initialization
        void Start()
        {
        }
        void Update()
        {
            this.transform.RotateAround(Axis.transform.position, Vector3.up, RotateSpeed);
        }
    }
}
- AssetBundle设置打包与加载。
-
预制体设置AssetBundle为`sun`,同样的操作将earth预制体打包命名为`earth`后缀命名为`ab`
-
AssetBundles-Browser进行 AssetBundle资源打包。
点击Build,设置Build Target 及Output Path(输出目录)。

查看生成的ab包。

-
加载生成AssetBundle资源包。使用LoadAB脚本进行资源加载。挂载到场景中的总控Manager中。
using System.Collections;
using System.Collections.Generic;
using UnityEngine;
namespace XLuaProject
{
    public class LoadAB : MonoBehaviour
    {
        public static Dictionary<string, GameObject> prefabDict = new Dictionary<string, GameObject>();
        // Start is called before the first frame update
        void Start()
        {
        }
        /// <summary>
        /// 加载AB资源
        /// </summary>
        /// <param name="resName">字典对象名</param>
        /// <param name="filePath">资源名</param>
        public void LoadResource(string resName, string filePath)
        {
            string path = Application.dataPath + "/AssetBundles/StandaloneWindows/" + filePath;
            AssetBundle ab = AssetBundle.LoadFromFile(path);
            GameObject gameObject = ab.LoadAsset<GameObject>(resName);
            prefabDict.Add(resName, gameObject);
        }
        public GameObject GetGameObject(string objName)
        {
            return prefabDict[objName];
        }

    }
}
-
加载生成AssetBundle资源包脚本的使用。创建CreateObj脚本通过LoadAB脚本进行资源加载。CreateObj脚本也挂载到总控Manager中。
using System.Collections;
using System.Collections.Generic;
using UnityEngine;
using XLua;
namespace XLuaProject
{
    public class CreateObj : MonoBehaviour
    {
        LoadAB loadAB;
        private void Awake()
        {
            loadAB = GetComponent<LoadAB>();
        }
        // Start is called before the first frame update
        void Start()
        {
            Invoke("CreateSun", 2);
        }
        void CreateSun()
        {
            loadAB.LoadResource("sun", "sun.ab");
            GameObject gameObject = loadAB.GetGameObject("sun");
            var tempObj = Instantiate(gameObject);
            tempObj.name = "sun";
            tempObj.transform.position = new Vector3(0f, 0, 0);
        }
    }
}
- 运行结果

由于引入xLua的关系,每次我们修改加上热更新标识的脚本代码都需要执行一遍 ,运行
Generate Code在执行Hotfix Inject In Editor,进行Lua注入。否则运行报错。
编写热更新脚本
官方建议方式二。
和其它配置一样,有两种方式
方式一:直接在类里头打Hotfix标签(不建议,示例只是为了方便演示采取这种方式);
!!注意,方式一在高版本unity不支持
方式二:在一个static类的static字段或者属性里头配置一个列表。属性可以用于实现的比较复杂的配置,比如根据Namespace做白名单。
!!注意,高版本Unity需要把配置文件放Editor目录下
1.在Assets–>Editor文件夹中创建静态类 静态类 静态类 HotficCfg *因为之前忽略静态类的这个注意事项我蹲了好久坑。 *,这个脚本使用的Namespace作为白名单进行筛选的,因此需要热更新的脚本我都会加上命名空间XLuaProject。
using System;
using System.Collections;
using System.Collections.Generic;
using System.IO;
using System.Reflection;
using System.Text;
using UnityEngine;
using XLua;

public static class HotficCfg
{
    [Hotfix]
    public static List<Type> by_property
    {
        get
        {
            //从程序集中获取全部类信息
            var allTypes = Assembly.Load("Assembly-CSharp").GetTypes();
            var nameSpace = new List<string>();
            //遍历所有类筛选符合规则的命名空间
            foreach (var t in allTypes)
            {
                if (t.Namespace != null && (t.Namespace.StartsWith("XLuaProject", StringComparison.CurrentCulture)))
                {
                    if (!nameSpace.Contains(t.Namespace))
                    {
                        nameSpace.Add(t.Namespace);
                    }
                }
            }
            var retList = new List<Type>();
            var sb = new StringBuilder();
            //遍历所有类筛选所有包含该命名空间的Type对象
            foreach (var t in allTypes)
            {
                if (nameSpace.Contains(t.Namespace))
                {
                    retList.Add(t);
                    sb.AppendLine(t.FullName);
                }
            }
            //输出所有Type信息到项目根目录HotTypes.txt文本中
            File.WriteAllText(Path.Combine(Application.dataPath, "../HotTypes.txt"), sb.ToString());
            return retList;
        }
    }
}
2.每次我们在执行Generate Code都会在项目根目录也就是和Assets平级目录下生成一个可以热更新的类的白名单。

3.在Resources创建lua文件夹保存lua脚本,unity中加载lua文件要以.lua.txt结尾。

4.创建LuaEnv 脚本管理LuaManager,自定义加载器MyLoader,lua文件命名以.lua.txt结尾。
using System.IO;
using UnityEngine;
using XLua;
public class LuaManager : MonoBehaviour
{
    public static LuaManager _instance;
    public static LuaManager Instance
    {
        get
        {
            return _instance;
        }
    }
    [CSharpCallLua]
    public delegate void LuaDelegate(string paras);
    /// <summary>
    /// 定义一个Delegate,Lua结果将传参回调给该Delegate
    /// </summary>
    public static LuaDelegate LuaFunc;
    /// <summary>
    /// 定义一个Lua虚拟机,建议全局唯一
    /// </summary>
    public static LuaEnv luaEnv;
    void Awake()
    {

       _instance = this;
       LuaEnvInit();

    }

    public void LuaEnvInit()
    {
        luaEnv = new LuaEnv();
        luaEnv.AddLoader(MyLoader);
        ///lua脚本的主入口
        luaEnv.DoString(@"require 'updateInfo'");
        //获取Lua中全局function,然后映射到delegate
        luaEnv.Global.Get("LuaFunc", out LuaFunc);
    }
    private byte[] MyLoader(ref string filepath)
    {
        string abspath = Application.dataPath + "/Resources/lua/" + filepath + ".lua.txt";
        return System.Text.Encoding.UTF8.GetBytes(File.ReadAllText(abspath));
    }

}
5.在Unity编写xLua脚本的注意事项。

运行Generate Code在执行Hotfix Inject In Editor就OK了。
6.先来个Hello Word!在lua文件夹中创建名为hello.lua.txt
xlua.hotfix(CS.XLuaProject.CreateObj,'Start',function(self)
CS.UnityEngine.Debug.Log("Hello word!")
end)
lua脚本更新CreateObj脚本中的Start方法输出"Hello word!"

运行之后不再创建sun的脚本而是输出Hello Word!
7.热更新变量
xlua.hotfix(CS.XLuaProject.Rotation,'Start',function(self)
   ChangeCode()
end)
function ChangeCode()
   CS.XLuaProject.Rotation.speed=100
   CS.UnityEngine.Debug.Log(CS.XLuaProject.Rotation.speed)
end
8.增量热更新加载earth的AB包,创建earth。
- 在xLua源码中找到util.lua.txt 并copy到Assets\Resources\lua中。
- 创建updateInfo.lua.txt编写脚本引入util,
local util=require 'util'
local util=require 'util'
util.hotfix_ex(CS.XLuaProject.CreateObj,'Start',function(self)
   self.Start(self)
   -- lua 函数更新创建地球预制体
   CreateEarth(self)
end)
function CreateEarth(self)
   self.loadAB:LoadResource("earth", "earth.ab")
   local gameObject=self.loadAB:GetGameObject("earth")
   local tempObj=CS.UnityEngine.GameObject.Instantiate(gameObject)
   tempObj.name="earth"
   tempObj.transform.position = CS.UnityEngine.Vector3(-1.7, 0, 0)
end
- 设置脚本中私有访问
xlua.private_accessible(CS.XLuaProject.CreateObj)
9.更新updateInfo.lua.txt完整脚本
local util=require 'util'

util.hotfix_ex(CS.XLuaProject.CreateObj,'Start',function(self)
   self.Start(self)
   CreateEarth(self)

end)

util.hotfix_ex(CS.XLuaProject.CreateObj,'CreateSun',function(self)
   self.CreateSun(self)
    local earth=CS.UnityEngine.GameObject.Find("earth")
    local sun=CS.UnityEngine.GameObject.Find("sun")
    local dd=earth:AddComponent(typeof(CS.XLuaProject.Revolution))
    dd.Axis =sun
    dd.RotateSpeed = 3

end)

function CreateEarth(self)
   self.loadAB:LoadResource("earth", "earth.ab")
   local gameObject=self.loadAB:GetGameObject("earth")
   local tempObj=CS.UnityEngine.GameObject.Instantiate(gameObject)
   tempObj.name="earth"
   tempObj.transform.position = CS.UnityEngine.Vector3(-1.7, 0, 0)
end

xlua.hotfix(CS.XLuaProject.Rotation,'Start',function(self)
   ChangeCode()
end)
function ChangeCode()
   CS.XLuaProject.Rotation.speed=100
   CS.UnityEngine.Debug.Log(CS.XLuaProject.Rotation.speed)
end

- xLua所有的配置都支持三种方式:打标签;静态列表;动态列表。此项目使用的是动态列表方式,
因此方法无需在打[LuaCallCSharp]的标签。 - 关于AssetBundle打包本篇侧重点在热更新,因此忽略了AssetBundle打包的原则。
- 由于项目开发时间较长开发过程中解决一些坑未及时记录,如果您按照本篇文章做下来出现问题欢迎留言讨论。


 2081
2081


 被折叠的 条评论
为什么被折叠?
被折叠的 条评论
为什么被折叠?
 到【灌水乐园】发言


