目录
一、MySQL的概念和引入
- Python相关:基础、函数、数据类型、面向、模块。
- 前端开发:HTML、CSS、JavaScript、jQuery【静态页面】
Java+前端 ; Python+前端 ; Go+前端 ->【动态页面】
直观:
- 静态页面 = 写死了,页面永远长一个样子。
- 动态页面 = 页面上的数据可以实时修改和展示。
动态:需要Web框架的功能

简单的Flask网页
from flask import Flask, render_template

app = Flask(__name__)


@app.route('/index')
def index():
    # 目前写死:读取文件
    users = ["派大星", "海绵宝宝", "章鱼哥"]
    # 1.找到index.html的文件,读取所有内容
    # 2.找到内容中‘特殊的占位符’,将数据替换
    # 3.将替换完成的字符串返还给用户的浏览器
    return render_template("index.html", title="派大星",data_list = users)


if __name__ == '__main__':
    app.run()
<!DOCTYPE html>
<html lang="en">
<head>
    <meta charset="UTF-8">
    <title>Title</title>

    <link href="/static/plugins/bootstrap-3.3.7-dist/css/bootstrap.css" rel="stylesheet">
</head>
<body>
<nav class="navbar navbar-default">
  <div class="container-fluid">
    <div class="navbar-header">
      <a class="navbar-brand" href="#">
        <img alt="Brand" src="/static/img/img.png">
      </a>
    </div>
  </div>
</nav>
<div class="container">
    <h3>{{title}}</h3>
    <table class="table table-bordered">
        <caption>Optional table caption.</caption>
        <thead>
        <tr>
            <th>#</th>
            <th>First Name</th>
            <th>Last Name</th>
            <th>Username</th>
        </tr>
        </thead>
        <tbody>
        {% for item in data_list %}
        <tr>
            <th scope="row">1</th>
            <td>{{item}}</td>
            <td>Otto</td>
            <td>@mdo</td>
        </tr>
        {% endfor %}
        </tbody>
    </table>
</div>

<script src="static/js/jQuery.js"></script>
<script src="static/plugins/bootstrap-3.3.7-dist/js/bootstrap.js"></script>
</body>
</html>
对于目前的我们来看,什么可以做数据的存储:
- txt文件
- excel文件
- 存储数据地方(专业的软件):数据库管理系统。
MySQL/Oracke/SQLServer/DB2/Access...
二、MySQL指令
在MySQL和我们平时认知不同的概念
| MySQL | 认知 |
| 数据库 | 文件夹 |
| 数据表 | 文件(EXCEL文件) |
1、数据库管理(文件夹)
- 查看已有的数据库(文件夹)
show databases;- 创建数据库(文件夹)
create database 数据库名字 DEFAULT CHARSET utf8 COLLATE utf8_general_ci;
- 删除数据库(文件夹)
drop database 数据库名字;- 进入数据库(进入文件夹)
use 数据库名称;
2、数据表的管理(文件)
- 查看文件夹下所有的数据表(文件)
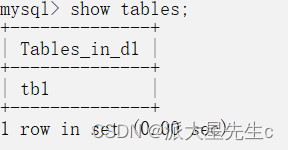
show tables;
- 创建表
create table 表名称(
	列名称 类型,
	列名称 类型,
	列名称 类型
) default charset=utf8;
create table tb1(
	id int,                      -- 允许为空(默认)
	name varchar(16) not null,   -- 不允许为空
	age int default 3            -- 插入数据时,age列的默认值为3
) default charset=utf8;

create table tb1(
	id int primary key,			--主键(不允许为空,不允许重复)
	name varchar(16),
	age int
) default charset=utf8;
主键一般用于表示当前的数据的编号(类似于人的身份证号)
create table tb1(
	id int auto_increment primary key,		--内部维护,自增
	name varchar(16),
	age int
) default charset=utf8;
一般情况下创建表的时候都是这么来写:
create table tb1(
	id int not null auto_increment primary key,
	name varchar(16),
	age int
) default charset=utf8;
- 删除表
drop table 表名称;

3、数据行操作
- 新增数据
insert into 表名称(字段1, 字段2, ...) values(1, "张三", ...);

example

insert into tb1(name,age) values("张三",25);
- 查询数据
select 字段名(或者*) from 表名称;
select 字段名(或者*) from 表名称 where 条件;
mysql> select * from tb1;
+----+--------+------+
| id | name   | age  |
+----+--------+------+
|  1 | 张三   |   25 |
+----+--------+------+

mysql> select name from tb1;
+--------+
| name   |
+--------+
| 张三   |
+--------+

mysql> select * from tb1 where id = 1;
+----+--------+------+
| id | name   | age  |
+----+--------+------+
|  1 | 张三   |   25 |
+----+--------+------+
- 删除数据
delete from 表名称;				--删除所有数据
delete from 表名称 where 条件;	--删除指定数据
delete from tb1 where id = 1;
delete from tb1 where id = 1 and name = "张三";
delete from tb1 where id = 1 or id = 100;
delete from tb1 where id > 100;
delete from tb1 where id != 50;
delete from tb1 where id in (10,15);
- 修改数据
update 表名称 set 列 = 值;				--修改一列
update 表名称 set 列 = 值, 列 = 值;		--修改多列
update 表名称 set 列 = 值 where 条件;		--修改某行某列
update tb1 set name="李四" where id = 1;
update tb1 set age=age+10 where name=""李四;
三、常用的数据类型
- int
有符号, 取值范围: -2147483648 ~ 2147483647(有正有负)
无符号, 取值范围: 0 ~ 4294967295(只有正) 【默认】
- tinyint
有符号, 取值范围: -128 ~ 127(有正有负)
无符号, 取值范围: 0 ~ 255(只有正)
create table tb2(
	id int not null auto_increment primary key,
	age tinyint				--有符号, 取值范围: -128 ~ 127
) default charset=utf8;
create table tb1(
	id int not null auto_increment primary key,
	age tinyint unsigned	--无符号, 取值范围: 0 ~ 255
) default charset=utf8;
- bigint
有符号, 取值范围: -9223372036854775808 ~ 9223372036854775807(有正有负)
无符号, 取值范围: 0 ~ 18446744073709551615(只有正)
练习
# 创建表

create table tb2(
	id bigint not null auto_increment primary key,
    salary int,
	age tinyint
) default charset=utf8;

# 插入数据
insert into tb2(salary,age)values(10000,18);
insert into tb2(salary,age)values(20000,28);
insert into tb2(salary,age)values(30000,38),(40000,40);

# 查看表中的数据
select * from tb2;
- float
- double
- decimal
准确的小数值,m是数字总个数(负号不算),d是小数点后个数,m最大值为65,d的最大值为30
create table tb1(
	id int auto_increment primary key,		--内部维护,自增
	name varchar(16),
	salary decimal(8,2)						--一共8位(整数位数+小数点位数), 保留小数点后2位
) default charset=utf8;
- char
定长字符串, 默认固定用 11 个字符串进行存储,哪怕字符串个数不足,也按照11个字符存储
最多能存储255个字节的数据
查询效率高
- varchar
变长字符串,默认最长 11 个字符,真实数据多长就按多长存储
最多能存储 65535 个字节的数据,中文可存储 65535/3 个汉字
相对 char 类型,查询效率低
- text
保存变长的大字符串,可以最多到 65535 个字符
一般用于文章和新闻
- mediumtext
- longtext
- datatime
YYYY-MM-DD HH:MM:SS (1000-01-01 00:00:00/9999-12-31 23:59:59)
- data
YYYY-MM-DD (1000-01-01/9999-12-31)
四、员工管理案例
1、使用MySQL内置工具(命令)
- 创建数据库:unicom
- 数据一张表:admin
表名:admin
列:
- id 整型 自增 主键
- username: 字符串 不为空
- password: 字符串 不为空
- mobile: 字符串 不为空
mysql> create database unicom DEFAULT CHARSET utf8 COLLATE utf8_general_ci;
Query OK, 1 row affected (0.00 sec)

mysql> use unicom
Database changed
mysql> create table admin(
    -> id int auto_increment primary key,
    -> username varchar(30) not null,
    -> password varchar(30) not null,
    -> mobile varchar(20) not null)default charset=utf8;
Query OK, 0 rows affected (0.02 sec)

mysql> desc admin;
+----------+-------------+------+-----+---------+----------------+
| Field    | Type        | Null | Key | Default | Extra          |
+----------+-------------+------+-----+---------+----------------+
| id       | int(11)     | NO   | PRI | NULL    | auto_increment |
| username | varchar(30) | NO   |     | NULL    |                |
| password | varchar(30) | NO   |     | NULL    |                |
| mobile   | varchar(20) | NO   |     | NULL    |                |
+----------+-------------+------+-----+---------+----------------+
4 rows in set (0.00 sec)
2、Python代码实现
安装pymysql
pip install pymysql
①创建数据
import pymysql

# 1.连接MySQL
conn = pymysql.connect(host="127.0.0.1", port=3306, user='root', password="123123", charset='utf8', db='unicom')
cursor = conn.cursor(cursor=pymysql.cursors.DictCursor)

# 2.发送指令
cursor.execute("insert into admin(username, password, mobile) values('Patrickstar', '123456', '12345678912');")
conn.commit()

# 3.关闭
cursor.close()
conn.close()
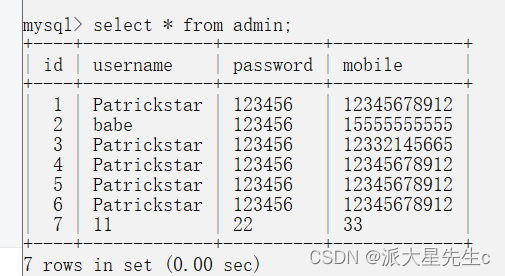
mysql> select * from admin;
+----+-------------+----------+-------------+
| id | username | password | mobile |
+----+-------------+----------+-------------+
| 1 | Patrickstar | 123456 | 12345678912 |
+----+-------------+----------+-------------+
1 row in set (0.00 sec)优化
import pymysql

# 1.连接Mysql
conn = pymysql.connect(host='127.0.0.1', port=3306, user='root', passwd='123123', charset='utf8', db='unicom')
cursor = conn.cursor(cursor=pymysql.cursors.DictCursor)

# 2.发送指令
sql = "insert into admin(username, password, mobile) values(%s, %s, %s);"
cursor.execute(sql, ['babe', '123456', '15555555555'])
conn.commit()

# 3.关闭
cursor.close()
conn.close()
注意: sql语句不要使用字符串格式化,有会SQL注入的风险,需要使用 cursor.execute(sql, [参数1, 参数2, …])
② 动态创建数据
import pymysql

while True:
    user = input("用户名:")
    if user.upper() == 'Q':
        break
    pwd = input("密码:")
    mobile = input("手机号:")

    # 1.连接Mysql
    conn = pymysql.connect(host='127.0.0.1', port=3306, user='root', passwd='123123', charset='utf8', db='unicom')
    cursor = conn.cursor(cursor=pymysql.cursors.DictCursor)

    # 2.发送指令
    sql = "insert into admin(username, password, mobile) values(%s, %s, %s);"
    cursor.execute(sql, [user, pwd, mobile])
    conn.commit()

    # 3.关闭
    cursor.close()
    conn.close()
③查询数据
#!/usr/bin/env python3

import pymysql

# 1.连接Mysql
conn = pymysql.connect(host='127.0.0.1', port=3306, user='root',
                       passwd='123123', charset='utf8', db='unicom')
cursor = conn.cursor(cursor=pymysql.cursors.DictCursor)

# 2.发送指令
sql = "select * from admin where id > %s"
cursor.execute(sql, [2, ])
# data_list = cursor.fetchall()		查询一条数据,为字典
data_list = cursor.fetchall()
# 查询所有符合条件的数据,为列表套多个字典
for row_dict in data_list:
    print(row_dict)

# 3.关闭
cursor.close()
conn.close()
④删除数据
#!/usr/bin/env python3

import pymysql

# 1.连接Mysql
conn = pymysql.connect(host='127.0.0.1', port=3306, user='root',
                       passwd='123123', charset='utf8', db='unicom')
cursor = conn.cursor(cursor=pymysql.cursors.DictCursor)

# 2.发送指令
sql = "delete from admin where id > %s"
cursor.execute(sql, [3, ])
conn.commit()

# 3.关闭
cursor.close()
conn.close()
⑤修改数据
#!/usr/bin/env python3

import pymysql

# 1.连接Mysql
conn = pymysql.connect(host='127.0.0.1', port=3306, user='root',
                       passwd='123123', charset='utf8', db='unicom')
cursor = conn.cursor(cursor=pymysql.cursors.DictCursor)

# 2.发送指令
sql = "update admin set mobile=%s where id = %s"
cursor.execute(sql, ['12332145665', 3])
conn.commit()

# 3.关闭
cursor.close()
conn.close()
五、案例:Flask+MySQL
1、新增用户
html文件
<!DOCTYPE html>
<html lang="en">
<head>
    <meta charset="UTF-8">
    <title>Document</title>
</head>
<body>
    <h1>添加用户</h1>
    <form method="post" action="/add/user">
        <input type="text" name="user" placeholder="用户名">
        <input type="text" name="pwd" placeholder="密码">
        <input type="text" name="mobile" placeholder="手机号">
        <input type="submit" value="提 交">
    </form>
</body>
</html>
app.py
from flask import Flask, render_template, request
import pymysql

app = Flask(__name__)


@app.route("/add/user", methods=["GET", "POST"])
def add_user():
    if request.method == "GET":
        return render_template("add_user.html")

    username = request.form.get("user")
    password = request.form.get("pwd")
    mobile = request.form.get("mobile")

    # 1.连接MySQL
    conn = pymysql.connect(host="127.0.0.1", port=3306, user='root', password="123123", charset='utf8', db='unicom')
    cursor = conn.cursor(cursor=pymysql.cursors.DictCursor)

    # 2.发送指令
    sql = "insert into admin(username, password, mobile) values(%s, %s, %s);"
    cursor.execute(sql, [username, password, mobile])
    conn.commit()

    # 3.关闭
    cursor.close()
    conn.close()

    return "添加成功"


if __name__ == '__main__':
    app.run()


2、查询用户
html文件
<!DOCTYPE html>
<html lang="en">
<head>
    <meta charset="UTF-8">
    <title>Document</title>
</head>
<body>
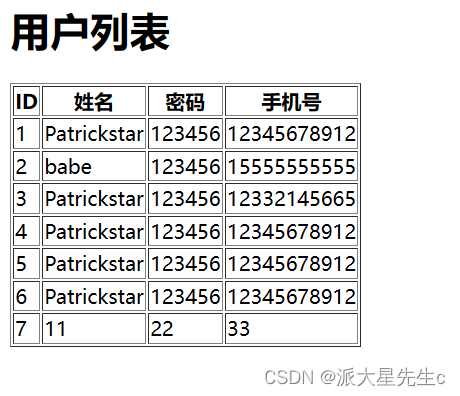
    <h1>用户列表</h1>
    <table border="1">
        <thead>
            <tr>
                <th>ID</th>
                <th>姓名</th>
                <th>密码</th>
                <th>手机号</th>
            </tr>
        </thead>
        <tbody>
            {% for item in data_list %}
            <tr>
                <td>{{ item.id }}</td>
                <td>{{ item.username }}</td>
                <td>{{ item.password }}</td>
                <td>{{ item.mobile }}</td>
            </tr>
            {% endfor %}
        </tbody>
    </table>
</body>
</html>
app.py
from flask import Flask, render_template, request
import pymysql

app = Flask(__name__)


@app.route("/add/user", methods=["GET", "POST"])
def add_user():
    if request.method == "GET":
        return render_template("add_user.html")

    username = request.form.get("user")
    password = request.form.get("pwd")
    mobile = request.form.get("mobile")

    # 1.连接MySQL
    conn = pymysql.connect(host="127.0.0.1", port=3306, user='root', password="123123", charset='utf8', db='unicom')
    cursor = conn.cursor(cursor=pymysql.cursors.DictCursor)

    # 2.发送指令
    sql = "insert into admin(username, password, mobile) values(%s, %s, %s);"
    cursor.execute(sql, [username, password, mobile])
    conn.commit()

    # 3.关闭
    cursor.close()
    conn.close()

    return "添加成功"


@app.route("/show/user", methods=['GET', 'POST'])
def show_user():
    username = request.form.get('user')
    password = request.form.get('pwd')
    mobile = request.form.get('mobile')

    # 1.连接Mysql
    conn = pymysql.connect(host='127.0.0.1', port=3306, user='root', password='123123', charset='utf8', db='unicom')
    cursor = conn.cursor(cursor=pymysql.cursors.DictCursor)

    # 2.发送指令
    sql = "select * from admin"
    cursor.execute(sql)
    data_list = cursor.fetchall()

    # 3.关闭
    cursor.close()
    conn.close()

    return render_template("show_user.html", data_list=data_list)


if __name__ == '__main__':
    app.run()

优化之后
加入
bootstrap.css
<!DOCTYPE html>
<html lang="en">
<head>
    <meta charset="UTF-8">
    <title>Document</title>

    <link rel="stylesheet" href="../static/plugins/bootstrap-3.3.7-dist/css/bootstrap.css">

</head>
<body>
    <div class="container">
        <h1>用户列表</h1>
        <table class="table table-bordered">
            <thead>
                <tr>
                    <th>ID</th>
                    <th>姓名</th>
                    <th>密码</th>
                    <th>手机号</th>
                </tr>
            </thead>
            <tbody>
                {% for item in data_list %}
                <tr>
                    <td>{{ item.id }}</td>
                    <td>{{ item.username }}</td>
                    <td>{{ item.password }}</td>
                    <td>{{ item.mobile }}</td>
                </tr>
                {% endfor %}
            </tbody>
        </table>
    </div>

</body>
</html>


 5万+
5万+


 被折叠的 条评论
为什么被折叠?


