


文章目录
1 什么是MyBatis
-
MyBatis 是一款优秀的持久层框架
-
MyBatis 避免了几乎所有的 JDBC 代码和手动设置参数以及获取结果集的过程
-
MyBatis 可以使用简单的 XML 或注解来配置和映射原生信息,将接口和 Java 的 实体类 【Plain Old Java Objects,普通的 Java对象】映射成数据库中的记录。
-
MyBatis 本是apache的一个开源项目ibatis, 2010年这个项目由apache 迁移到了google code,并且改名为MyBatis 。
-
MyBatis 是一个半自动化的ORM框架 (Object Relationship Mapping) -->对象关系映射
-
2013年11月迁移到Github .
-
Mybatis中文官方文档 : https://mybatis.org/mybatis-3/zh/getting-started.html
-
GitHub : https://github.com/mybatis/mybatis-3
MyBatis的优点
- 简单易学:本身就很小且简单。没有任何第三方依赖,最简单安装只要两个jar文件+配置几个sql映射文件就可以了,易于学习,易于使用,通过文档和源代码,可以比较完全的掌握它的设计思路和实现。
- 灵活:mybatis不会对应用程序或者数据库的现有设计强加任何影响。sql写在xml里,便于统一管理和优化。通过sql语句可以满足操作数据库的所有需求。
- 解除sql与程序代码的耦合:通过提供DAO层,将业务逻辑和数据访问逻辑分离,使系统的设计更清晰,更易维护,更易单元测试。sql和代码的分离,提高了可维护性。
- 提供xml标签,支持编写动态sql。
…
2 持久化与持久层
持久化是将程序数据在持久状态和瞬时状态间转换的机制。
即把数据(如内存中的对象)保存到可永久保存的存储设备中(如磁盘)。持久化的主要应用是将内存中的对象存储在数据库中,或者存储在磁盘文件中、XML数据文件中等等。
JDBC就是一种持久化机制。文件IO也是一种持久化机制。
在生活中 : 将鲜肉冷藏,吃的时候再解冻的方法也是。将水果做成罐头的方法也是。
为什么需要持久化服务呢?那是由于内存本身的缺陷引起的
内存断电后数据会丢失,但有一些对象是无论如何都不能丢失的,比如银行账号等,遗憾的是,人们还无法保证内存永不掉电。
内存过于昂贵,与硬盘、光盘等外存相比,内存的价格要高2~3个数量级,而且维持成本也高,至少需要一直供电吧。所以即使对象不需要永久保存,也会因为内存的容量限制不能一直呆在内存中,需要持久化来缓存到外存。
持久层
完成持久化工作的代码块 . ----> dao层 【DAO (Data Access Object) 数据访问对象】
大多数情况下特别是企业级应用,数据持久化往往也就意味着将内存中的数据保存到磁盘上加以固化,而持久化的实现过程则大多通过各种关系数据库来完成。
不过这里有一个字需要特别强调,也就是所谓的“层”。对于应用系统而言,数据持久功能大多是必不可少的组成部分。也就是说,我们的系统中,已经天然的具备了“持久层”概念?也许是,但也许实际情况并非如此。之所以要独立出一个“持久层”的概念,而不是“持久模块”,“持久单元”,也就意味着,我们的系统架构中,应该有一个相对独立的逻辑层面,专注于数据持久化逻辑的实现.
与系统其他部分相对而言,这个层面应该具有一个较为清晰和严格的逻辑边界。
【说白了就是用来操作数据库存在的!】
3 第一个程序
3.1 搭建环境
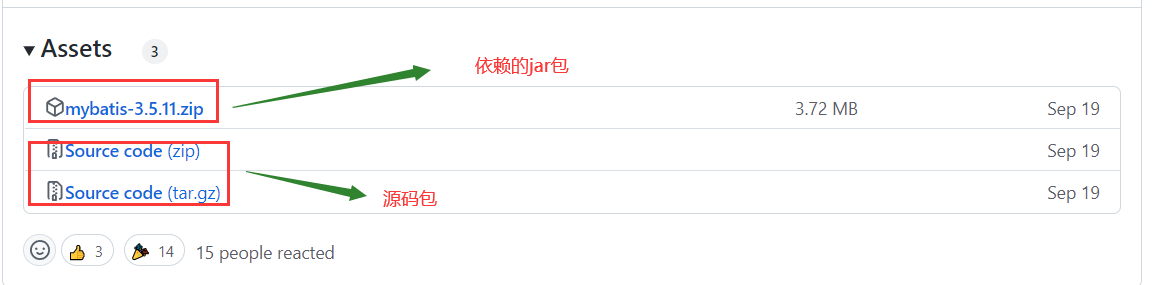
不使用maven,自己去下载的话https://github.com/mybatis/mybatis-3/releases
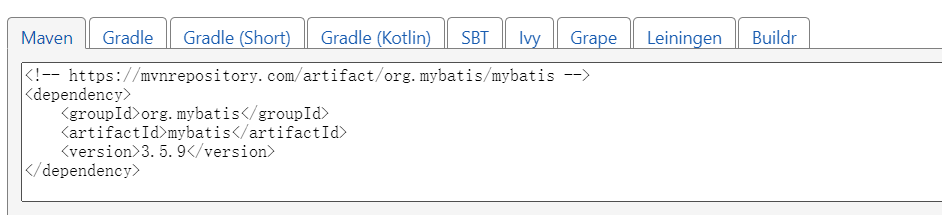
如果使用 Maven 来构建项目,则需将下面的依赖代码置于 pom.xml 文件中:
<dependency>
  <groupId>org.mybatis</groupId>
  <artifactId>mybatis</artifactId>
  <version>x.x.x</version>
</dependency>
可以到在线的maven坐标库中查找https://mvnrepository.com/
下面依照maven工程为例:
导入依赖jar包坐标
<dependencies>
        <dependency>
            <groupId>junit</groupId>
            <artifactId>junit</artifactId>
            <version>4.13.2</version>
           <!--<scope>test</scope>-->
        </dependency>
        <dependency>
            <groupId>org.mybatis</groupId>
            <artifactId>mybatis</artifactId>
            <version>3.4.6</version>
        </dependency>
        <dependency>
            <groupId>mysql</groupId>
            <artifactId>mysql-connector-java</artifactId>
            <version>8.0.26</version>
        </dependency>
    </dependencies>
编写MyBatis核心配置文件
(引入外部文件,动态修改)
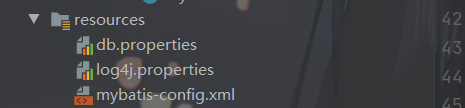
db.properties
driver=com.mysql.cj.jdbc.Driver
url=jdbc:mysql://localhost:3306/table_01
username=root
password=123456
mybatis-config.xml
<?xml version="1.0" encoding="UTF-8" ?>
<!DOCTYPE configuration
        PUBLIC "-//mybatis.org//DTD Config 3.0//EN"
        "https://mybatis.org/dtd/mybatis-3-config.dtd">
<!--核心配置文件-->
<configuration>
    <properties resource="db.properties"/>
<!--  环境(可以嵌套多套环境) default默认选择 -->
    <environments default="development">
<!--   开发环境     -->
        <environment id="development">
<!--    事务属性:JDBC        -->
            <transactionManager type="JDBC"/>
            <dataSource type="POOLED">
                <property name="driver" value="${driver}"/>
                <property name="url" value="${url}"/>
                <property name="username" value="${username}"/>
                <property name="password" value="${password}"/>
            </dataSource>
        </environment>
    </environments>
<!--每一个Mapper.xml都要在当前文件中进行配置注册(写全路径)-->
    <mappers>
        <mapper resource="com/hyl/dao/userMapper.xml"/>
    </mappers>

</configuration>
建库建表(table_01.user)
3.2 编写测试
MyBatis工具类
MyBatisUtil.java
package com.hyl.utils;

import org.apache.ibatis.io.Resources;
import org.apache.ibatis.session.SqlSession;
import org.apache.ibatis.session.SqlSessionFactory;
import org.apache.ibatis.session.SqlSessionFactoryBuilder;

import java.io.IOException;
import java.io.InputStream;

/**
 * @author hyl
 * @version 1.0
 * @date 2022/12/30-14:47
 */

public class MyBatisUtil {
    private static InputStream inputStream=null;
    private static SqlSessionFactory sqlSessionFactory=null;
    /***
     * 静态代码块,类初始化时只加载一次,初始化资源
     */
    static {
        /*官网获取 https://mybatis.org/mybatis-3/zh/getting-started.html*/
        //构建 SqlSessionFactory
        try {
            String resource = "mybatis-config.xml";
            inputStream = Resources.getResourceAsStream(resource);
            sqlSessionFactory = new SqlSessionFactoryBuilder().build(inputStream);
        } catch (IOException e) {
            e.printStackTrace();
        }
    }
    /**
     *获取sqlSession对象
     */
    public static SqlSession getSqlSession(){
        return sqlSessionFactory.openSession();
    }
}
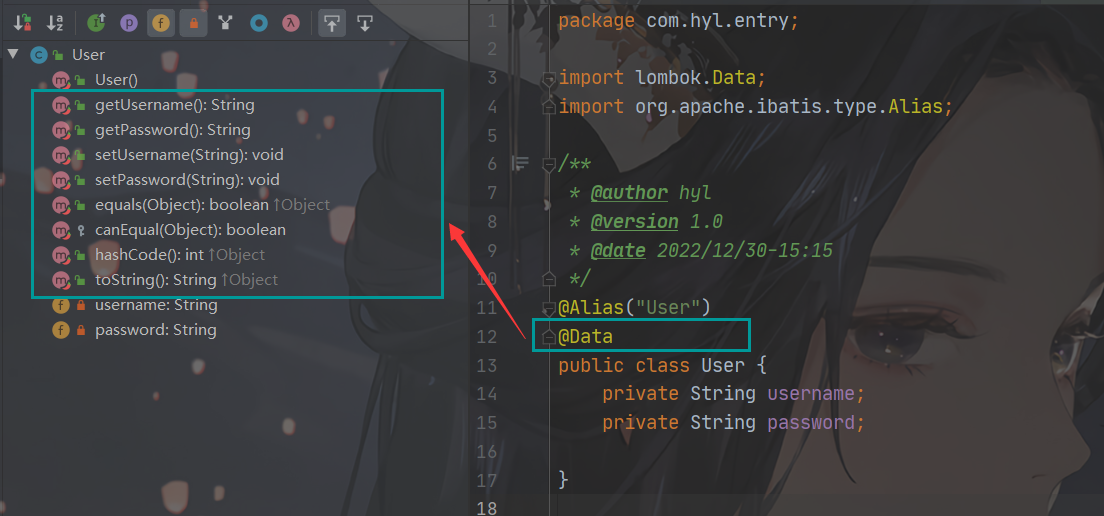
创建实体类
User.java
package com.hyl.entry;

/**
 * @author hyl
 * @version 1.0
 * @date 2022/12/30-15:15
 */

public class User {
    private String username;
    private String password;

    public User(String username, String password) {
        this.username = username;
        this.password = password;
    }

    public User() {
    }

    public String getUsername() {
        return username;
    }

    public void setUsername(String userName) {
        this.username = userName;
    }

    public String getPassword() {
        return password;
    }

    public void setPassword(String password) {
        this.password = password;
    }

    @Override
    public String toString() {
        return "User{" +
                "userName='" + username + '\'' +
                ", password='" + password + '\'' +
                '}';
    }
}
编写Mapper接口类(就是JDBC中的接口Dao)
UserMapper.java
package com.hyl.dao;

import com.hyl.entry.User;

import java.util.List;
import java.util.Map;

/**
 * @author hyl
 * @version 1.0
 * @date 2022/12/30-15:13
 */

public interface UserMapper {
    /**
     * 查询所有用户
     */
    List<User> listAll();
    /**
     * 插入一个新用户
     */
    void insertUser(User user);
    /**
     * 依据用户名删除用户
     */
    void delUser(String name);
    /**
     * 依据用户名修改密码
     */
    void updateUser(Map<String,Object> map);
}
编写Mapper.xml配置文件(就是Dao对应的Impl,就是实现接口的类)
userMapper.xml
<?xml version="1.0" encoding="UTF-8" ?>
<!DOCTYPE mapper
        PUBLIC "-//mybatis.org//DTD Mapper 3.0//EN"
        "https://mybatis.org/dtd/mybatis-3-mapper.dtd">
<!--绑定对应的接口Mapper(也即Dao)-->
<mapper namespace="com.hyl.dao.UserMapper">
<!-- (查)查询   -->
    <select id="listAll" resultType="com.hyl.entry.User">
        select * from user;
    </select>
<!-- (删)删除依据用户名   -->
    <delete id="delUser" parameterType="String">
        delete from User where username=#{name};
    </delete>
<!-- (改)修改   -->
    <update id="updateUser" parameterType="map" >
        update User set password=#{password} where username=#{username};
    </update>
<!-- 传输的bean,可以直接取出具体属性对象   -->
<!-- (增)插入   -->
    <insert id="insertUser" parameterType="com.hyl.entry.User">
        insert into user(username,password) values(#{username},#{password});
    </insert>
</mapper>
总结:
- 增<insert id=“对应的Mapper接口中的方法名” parameterType=“参数类型”>
- 删<delete id=“对应的Mapper接口中的方法名” parameterType=“参数类型”>
- 改<update id=“对应的Mapper接口中的方法名” parameterType=“参数类型”>
- 查<select id=“对应的Mapper接口中的方法名” resultType=“返回值类型” parameterType=“参数类型”>
如果参数有多个的话,可以巧用map
编写测试类
package com.hyl.dao;
import com.hyl.entry.User;
import com.hyl.utils.MyBatisUtil;
import org.apache.ibatis.session.SqlSession;
import org.junit.Test;
import java.util.HashMap;
import java.util.List;
import java.util.Map;
/**
* @author hyl
* @version 1.0
* @date 2022/12/30-15:29
*/
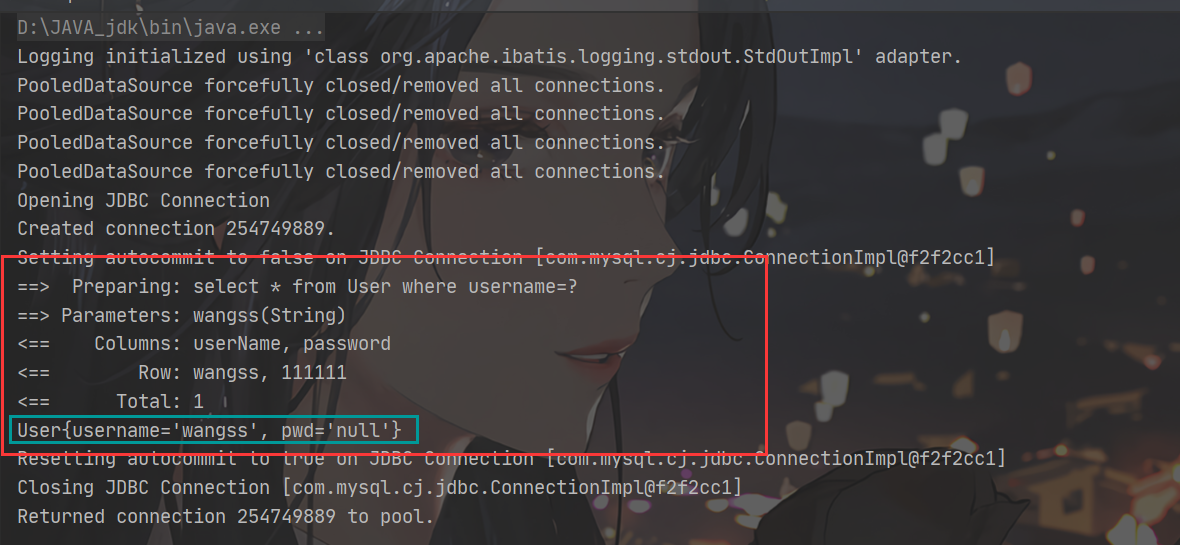
public class TestMapper {
@Test
public void Test01(){
//获得sqlSession对象
SqlSession sqlSession = MyBatisUtil.getSqlSession();
//执行sql
UserMapper mapper = sqlSession.getMapper(UserMapper.class);
// 添加人员
mapper.insertUser(new User("wangss","111111"));
// 修改人员
Map<String, Object> map = new HashMap<String, Object>();
map.put("username","二狗");
map.put("password","33333");
mapper.updateUser(map);
// 删除
mapper.delUser("wangwu");
//提交事务
sqlSession.commit();
// 查询list
List<User> users = mapper.listAll();
for (User user : users) {
System.out.println(user);
}
//关闭资源
sqlSession.close();
}
}
注意点:增、删、改操作需要提交事务!sqlSession.commit()
3.3 mybatis工作流程
通过上述例子,大概可以了解mybatis的工作流程如下:
- 读取主配置文件mybatis-config.xml,获得运行环境和数据库连接。
- 加载映射文件,如UserMapper.xml。
- 根据主配置文件mybatis-config.xml构建会话工厂SqlSessionFactory对象。
- 根据SqlSessionFactory对象创建SQLSession对象,在调用方法获得接口映射(UserMapper.java),调用该映射的各种自定义方法。
- 底层定义的Executor接口操作数据库。
- 底层对输入参数进行映射,在执行sql前将输入的java对象映射到sql中。
- 底层将输出结果映射为java对象。
最后三个步骤,mybatis底层会自动执行。
3.4 模糊查询
//UserMapper.java
     /**
     * 模糊查询
     */
    List<User> selectLike(String name);
<!--  模糊查询  -->
    <select id="selectLike" parameterType="String" resultType="com.hyl.entry.User">
        select * from User where username like "%"#{name}"%";
    </select>
List<User> users = mapper.selectLike("w");
使用注解进行模糊查询
concat('%',#{参数字段名},'%')
@Select("select * from User where username like concat('%',#{name},'%')")
List<User> selectLike(String name);
3.5 Maven静态资源过滤问题
正常情况下resources目录下放置的项目资源,但有时候也都不放在该目录下,所以对应的可能就出现资源的不能正常加载,可能出现问题说明:Maven静态资源过滤问题
<resources>
   <resource>
       <directory>src/main/java</directory>
       <includes>
           <include>**/*.properties</include>
           <include>**/*.xml</include>
       </includes>
       <filtering>false</filtering>
   </resource>
   <resource>
       <directory>src/main/resources</directory>
       <includes>
           <include>**/*.properties</include>
           <include>**/*.xml</include>
       </includes>
       <filtering>false</filtering>
   </resource>
</resources>
4 配置解析
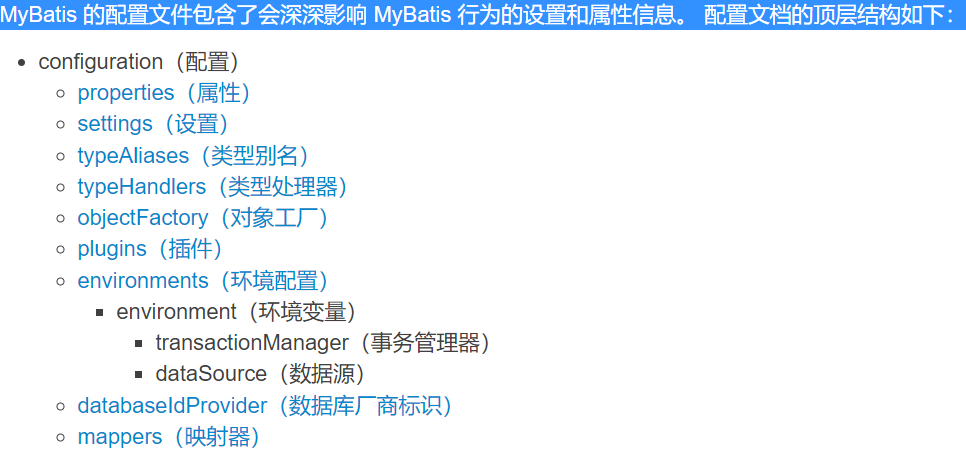
4.1 环境配置(environments)
MyBatis 可以配置成适应多种环境,这种机制有助于将 SQL 映射应用于多种数据库之中。
例如,开发、测试和生产环境需要有不同的配置;或者想在具有相同 Schema 的多个生产数据库中使用相同的 SQL 映射。
尽管可以配置多个环境,但每个 SqlSessionFactory 实例只能选择一种环境。
environments 元素定义了如何配置环境。
<!--当前选中开发环境-->
<environments default="development">
 <!--开发环境-->
  <environment id="development">
    <transactionManager type="JDBC">
      <property name="..." value="..."/>
    </transactionManager>
    <dataSource type="POOLED">
      <property name="driver" value="${driver}"/>
      <property name="url" value="${url}"/>
      <property name="username" value="${username}"/>
      <property name="password" value="${password}"/>
    </dataSource>
  </environment>
  <!--测试环境-->
  <environment id="test">
    ....
    ....
  </environment>
  ....其他环境
</environments>
注意一些关键点:
默认使用的环境 ID(比如:default=“development”)。
每个 environment 元素定义的环境 ID(比如:id=“development”)。
事务管理器的配置(比如:type=“JDBC”)。
数据源的配置(比如:type=“POOLED”)。
事务管理器(transactionManager)
MyBatis 中有两种类型的事务管理器(也就是 type=“[JDBC|MANAGED]”):
JDBC – 这个配置直接使用了 JDBC 的提交和回滚功能,它依赖从数据源获得的连接来管理事务作用域。
默认情况下,为了与某些驱动程序兼容,它在关闭连接时启用自动提交。
从 3.5.10 版本开始,你可以通过将 “skipSetAutoCommitOnClose” 属性设置为 “true” 来跳过这个步骤。例如:<transactionManager type="JDBC"> <property name="skipSetAutoCommitOnClose" value="true"/> </transactionManager>
MANAGED – 这个配置几乎没做什么。它从不提交或回滚一个连接,而是让容器来管理事务的整个生命周期(比如 JEE 应用服务器的上下文)。
默认情况下它会关闭连接。
不需要连接被关闭,将 closeConnection 属性设置为 false 来阻止默认的关闭行为。例如:<transactionManager type="MANAGED"> <property name="closeConnection" value="false"/> </transactionManager>
数据源(dataSource)
dataSource 元素使用标准的 JDBC 数据源接口来配置 JDBC 连接对象的资源。
虽然数据源配置是可选的,但如果要启用延迟加载特性,就必须配置数据源。
有三种内建的数据源类型(也就是 type=“[UNPOOLED|POOLED|JNDI]”):
UNPOOLED:
这个数据源的实现会每次请求时打开和关闭连接。
仅仅需要配置以下 5 种属性:
- driver – 这是 JDBC 驱动的 Java 类全限定名(并不是 JDBC 驱动中可能包含的数据源类)。
- url – 这是数据库的 JDBC URL 地址。
- username – 登录数据库的用户名。
- password – 登录数据库的密码。
- defaultTransactionIsolationLevel – 默认的连接事务隔离级别。
- defaultNetworkTimeout – 等待数据库操作完成的默认网络超时时间(单位:毫秒)
POOLED:
这种数据源的实现==利用“池”==的概念将 JDBC 连接对象组织起来,避免了创建新的连接实例时所必需的初始化和认证时间。 这种处理方式很流行,能使并发 Web 应用快速响应请求。
除了上述提到 UNPOOLED 下的属性外,还有更多属性用来配置 POOLED 的数据源:
- poolMaximumActiveConnections – 在任意时间可存在的活动(正在使用)连接数量,默认值:10
- poolMaximumIdleConnections – 任意时间可能存在的空闲连接数。
- poolMaximumCheckoutTime – 在被强制返回之前,池中连接被检出(checked out)时间,默认值:20000 毫秒(即 20 秒)
- poolTimeToWait – 这是一个底层设置,如果获取连接花费了相当长的时间,连接池会打印状态日志并重新尝试获取一个连接(避免在误配置的情况下一直失败且不打印日志),默认值:20000 毫秒(即 20 秒)。
- poolMaximumLocalBadConnectionTolerance – 这是一个关于坏连接容忍度的底层设置, 作用于每一个尝试从缓存池获取连接的线程。 如果这个线程获取到的是一个坏的连接,那么这个数据源允许这个线程尝试重新获取一个新的连接,但是这个重新尝试的次数不应该超过 poolMaximumIdleConnections 与 poolMaximumLocalBadConnectionTolerance 之和。 默认值:3(新增于 3.4.5)
- poolPingQuery – 发送到数据库的侦测查询,用来检验连接是否正常工作并准备接受请求。默认是“NO PING QUERY SET”,这会导致多数数据库驱动出错时返回恰当的错误消息。
- poolPingEnabled – 是否启用侦测查询。若开启,需要设置 poolPingQuery 属性为一个可执行的 SQL 语句(最好是一个速度非常快的 SQL 语句),默认值:false。
- poolPingConnectionsNotUsedFor – 配置 poolPingQuery 的频率。可以被设置为和数据库连接超时时间一样,来避免不必要的侦测,默认值:0(即所有连接每一时刻都被侦测 — 当然仅当 poolPingEnabled 为 true 时适用)。
JNDI:
这个数据源实现是为了能在如 EJB 或应用服务器这类容器中使用,容器可以集中或在外部配置数据源,然后放置一个 JNDI 上下文的数据源引用。
这种数据源配置只需要两个属性:
- initial_context – 这个属性用来在 InitialContext 中寻找上下文
(即,initialContext.lookup(initial_context))。这是个可选属性,如果忽略,那么将会直接从 InitialContext 中寻找 data_source 属性。- data_source – 这是引用数据源实例位置的上下文路径。提供了 initial_context 配置时会在其返回的上下文中进行查找,没有提供时则直接在 InitialContext 中查找。
4.2 映射器(mappers)
- 映射器 : 定义映射SQL语句文件
- 既然 MyBatis 的行为其他元素已经配置完了,我们现在就要定义 SQL 映射语句了。但是首先我们需要告诉 MyBatis 到哪里去找到这些语句。Java 在自动查找这方面没有提供一个很好的方法,所以最佳的方式是告诉 MyBatis 到哪里去找映射文件。你可以使用相对于类路径的资源引用, 或完全限定资源定位符(包括 file:/// 的 URL),或类名和包名等。
- 映射器是MyBatis中最核心的组件之一,在MyBatis 3之前,只支持xml映射器,即:所有的SQL语句都必须在xml文件中配置。而从MyBatis 3开始,还支持接口映射器,这种映射器方式允许以Java代码的方式注解定义SQL语句,非常简洁。
<!-- 使用相对于类路径的资源引用 推荐!!! -->
<mappers>
  <mapper resource="org/mybatis/builder/AuthorMapper.xml"/>
</mappers>


<!-- 使用完全限定资源定位符(URL)极不推荐!!! -->
<mappers>
  <mapper url="file:///var/mappers/AuthorMapper.xml"/>
</mappers>


<!--
使用映射器接口实现类的完全限定类名
需要配置文件名称和接口名称一致,并且位于同一目录下
-->
<mappers>
  <mapper class="org.mybatis.builder.AuthorMapper"/>
</mappers>


<!--
将包内的映射器接口实现全部注册为映射器
但是需要配置文件名称和接口名称一致,并且位于同一目录下
 -->
<mappers>
  <package name="org.mybatis.builder"/>
</mappers>
Mapper.xml文件
<?xml version="1.0" encoding="UTF-8" ?>
<!DOCTYPE mapper
       PUBLIC "-//mybatis.org//DTD Mapper 3.0//EN"
       "http://mybatis.org/dtd/mybatis-3-mapper.dtd">
<mapper namespace="com.kuang.mapper.UserMapper">

</mapper>
namespace中文意思:命名空间,作用如下:
- namespace的命名必须跟某个接口同名
- 接口中的方法与映射文件中sql语句id应该一一对应
- namespace和子元素的id联合保证唯一 , 区别不同的mapper
- 绑定DAO接口
- namespace命名规则 : 包名+类名
MyBatis 的真正强大在于它的映射语句,这是它的魔力所在。由于它的异常强大,映射器的 XML 文件就显得相对简单。如果拿它跟具有相同功能的 JDBC 代码进行对比,你会立即发现省掉了将近 95% 的代码。MyBatis 为聚焦于 SQL 而构建,以尽可能地为你减少麻烦。
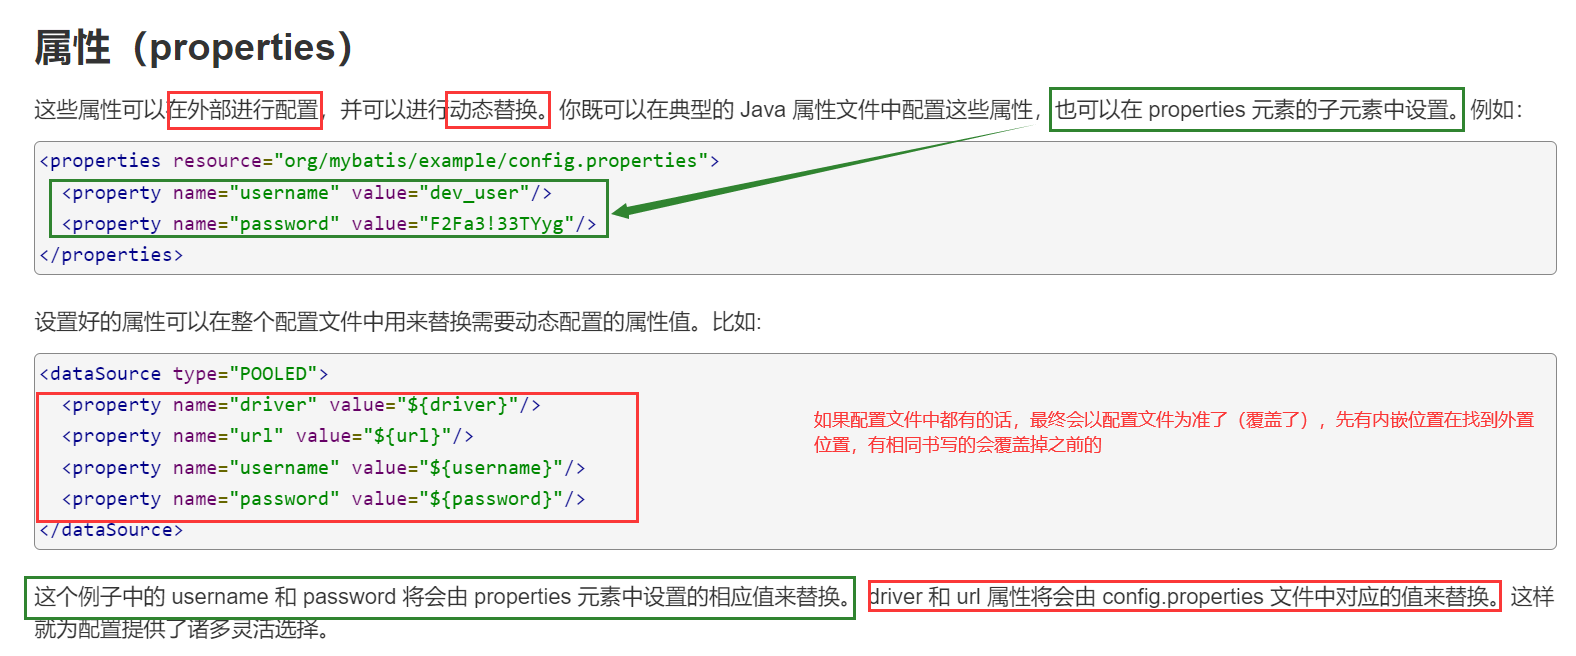
4.3 属性(properties)
属性可以在外部进行配置,并可以进行动态替换。你既可以在典型的 Java 属性文件中配置这些属性,也可以在 properties 元素的子元素中设置。例如:
<!--核心配置文件-->
<configuration>


    <properties resource="org/mybatis/example/config.properties">
  		 <property name="username" value="dev_user"/>
 		 <property name="password" value="F2Fa3!33TYyg"/>
	</properties>


<!--  环境(可以嵌套多套环境) default默认选择 -->
    <environments default="development">
<!--   开发环境     -->
        <environment id="development">
<!--    事务属性:JDBC        -->
            <transactionManager type="JDBC"/>
            <dataSource type="POOLED">
                <property name="driver" value="${driver}"/>
                <property name="url" value="${url}"/>
                <property name="username" value="${username}"/>
                <property name="password" value="${password}"/>
            </dataSource>
        </environment>
    </environments>
<!--每一个Mapper.xml都要在当前文件中进行配置注册(写全路径)-->
    <mappers>
        <mapper resource="com/hyl/dao/userMapper.xml"/>
    </mappers>

</configuration>
这个例子中的 username 和 password 将会由 properties 元素中设置的相应值来替换。 driver 和 url 属性将会由 db.properties 文件中对应的值来替换。
也可以在 SqlSessionFactoryBuilder.build() 方法中传入属性值。例如:
SqlSessionFactory factory = new SqlSessionFactoryBuilder().build(reader, props);

// ... 或者 ...

SqlSessionFactory factory = new SqlSessionFactoryBuilder().build(reader, environment, props);
如果一个属性在不只一个地方进行了配置,那么,MyBatis 将按照下面的顺序来加载:
- 首先读取在 properties 元素体内指定的属性。
- 然后根据 properties 元素中的 resource 属性读取类路径下属性文件,或根据 url 属性指定的路径读取属性文件,并覆盖之前读取过的同名属性。
- 最后读取作为方法参数传递的属性,并覆盖之前读取过的同名属性。
因此,通过方法参数传递的属性具有最高优先级,resource/url 属性中指定的配置文件次之,最低优先级的则是 properties 元素中指定的属性。
4.4 类型别名(typeAliases)
类型别名可为 Java 类型设置一个缩写名字。 它仅用于 XML 配置,意在降低冗余的全限定类名书写。
不指定包名:
例如:
<typeAliases>
  <typeAlias alias="Author" type="domain.blog.Author"/>
  <typeAlias alias="Blog" type="domain.blog.Blog"/>
  ....
</typeAliases>
当这样配置时,Blog 可以用在任何使用 domain.blog.Blog 的地方。
指定包名:
也可以指定一个包名,MyBatis 会在包名下面搜索需要的 Java Bean,比如:
<typeAliases>
  <package name="domain.blog"/>
</typeAliases>
每一个在包 domain.blog 中的 Java Bean,在没有注解的情况下,会使用 Bean 的首字母小写的非限定类名来作为它的别名。 比如 domain.blog.Author 的别名为 author;若有注解,则别名为其注解值。见下面的例子:
@Alias("author")
public class Author {
    ...
}
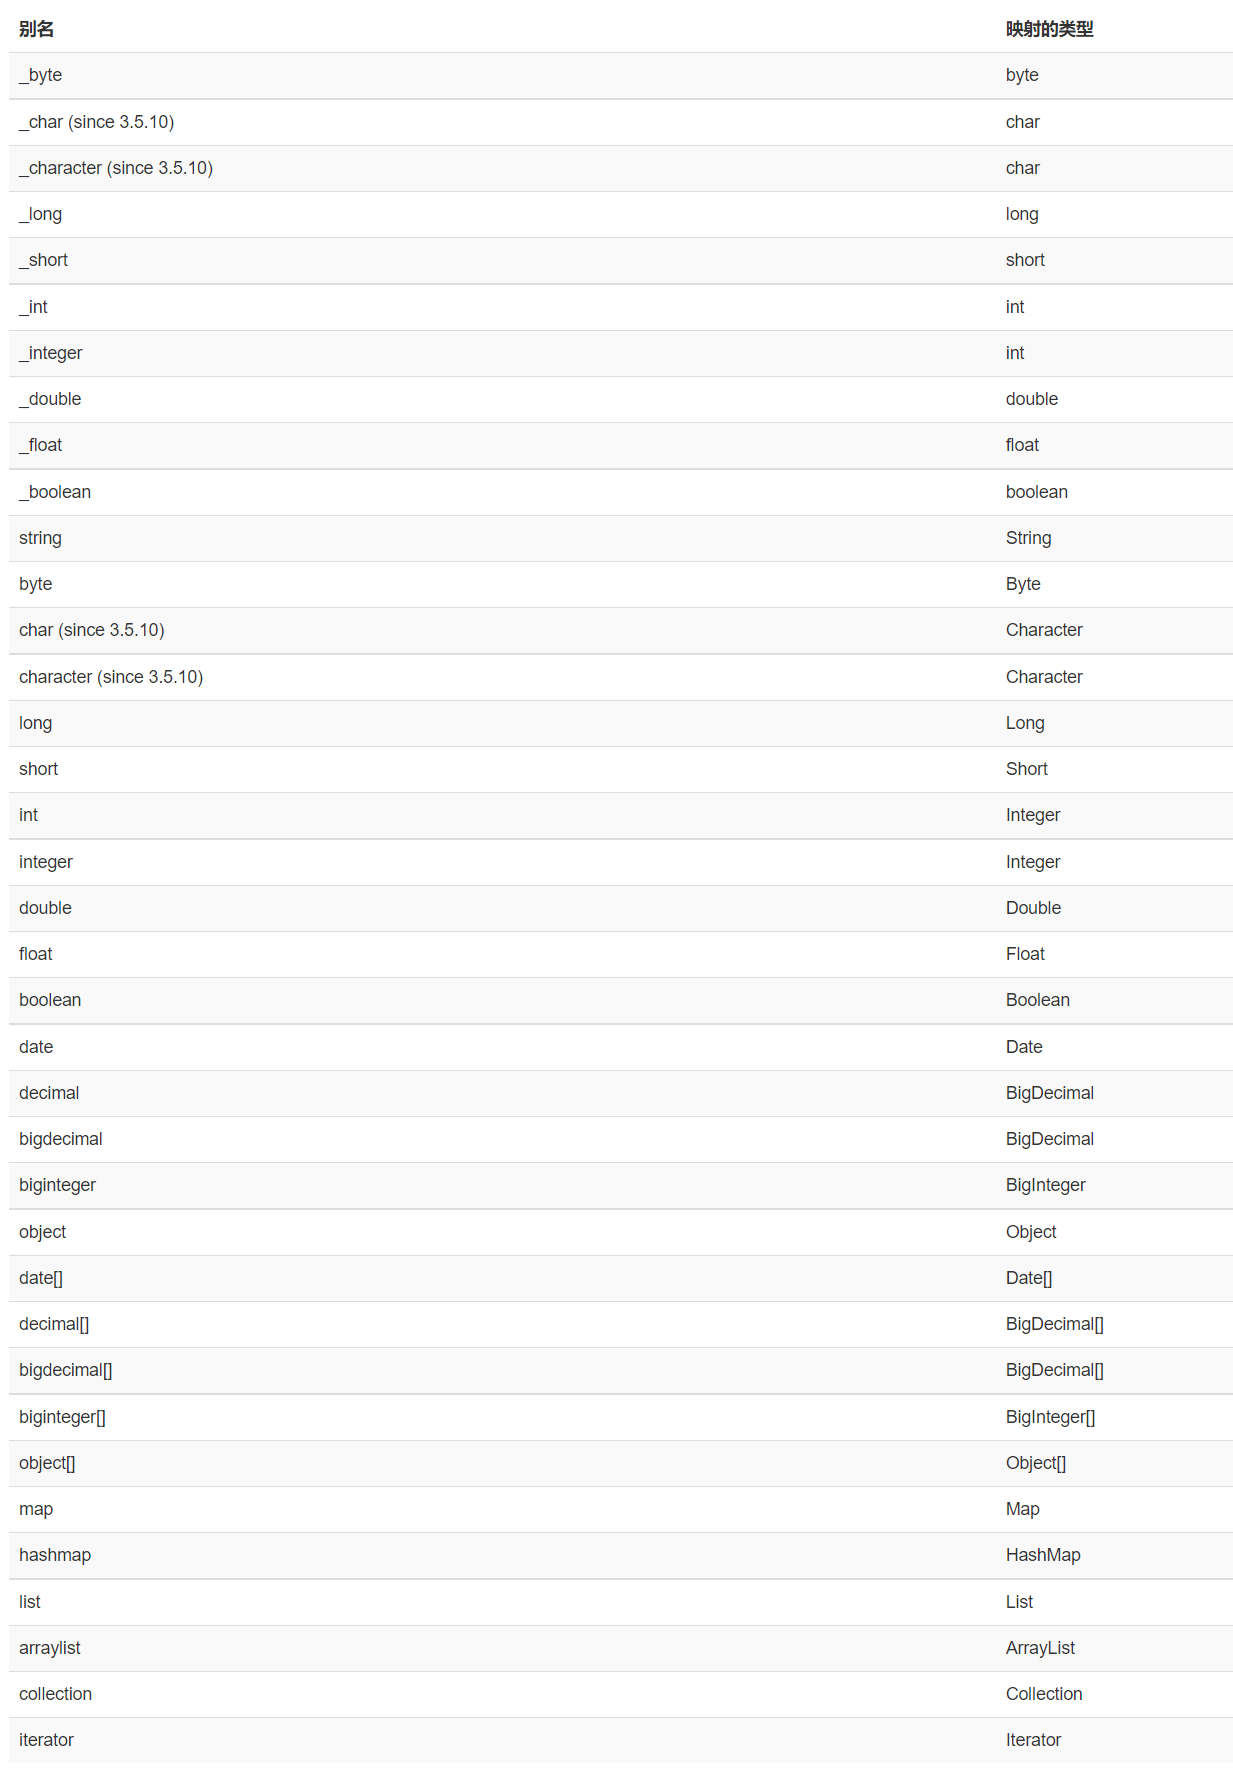
下面是一些为
常见的 Java 类型内建的类型别名。它们都是不区分大小写的,注意,为了应对原始类型的命名重复,采取了特殊的命名风格。
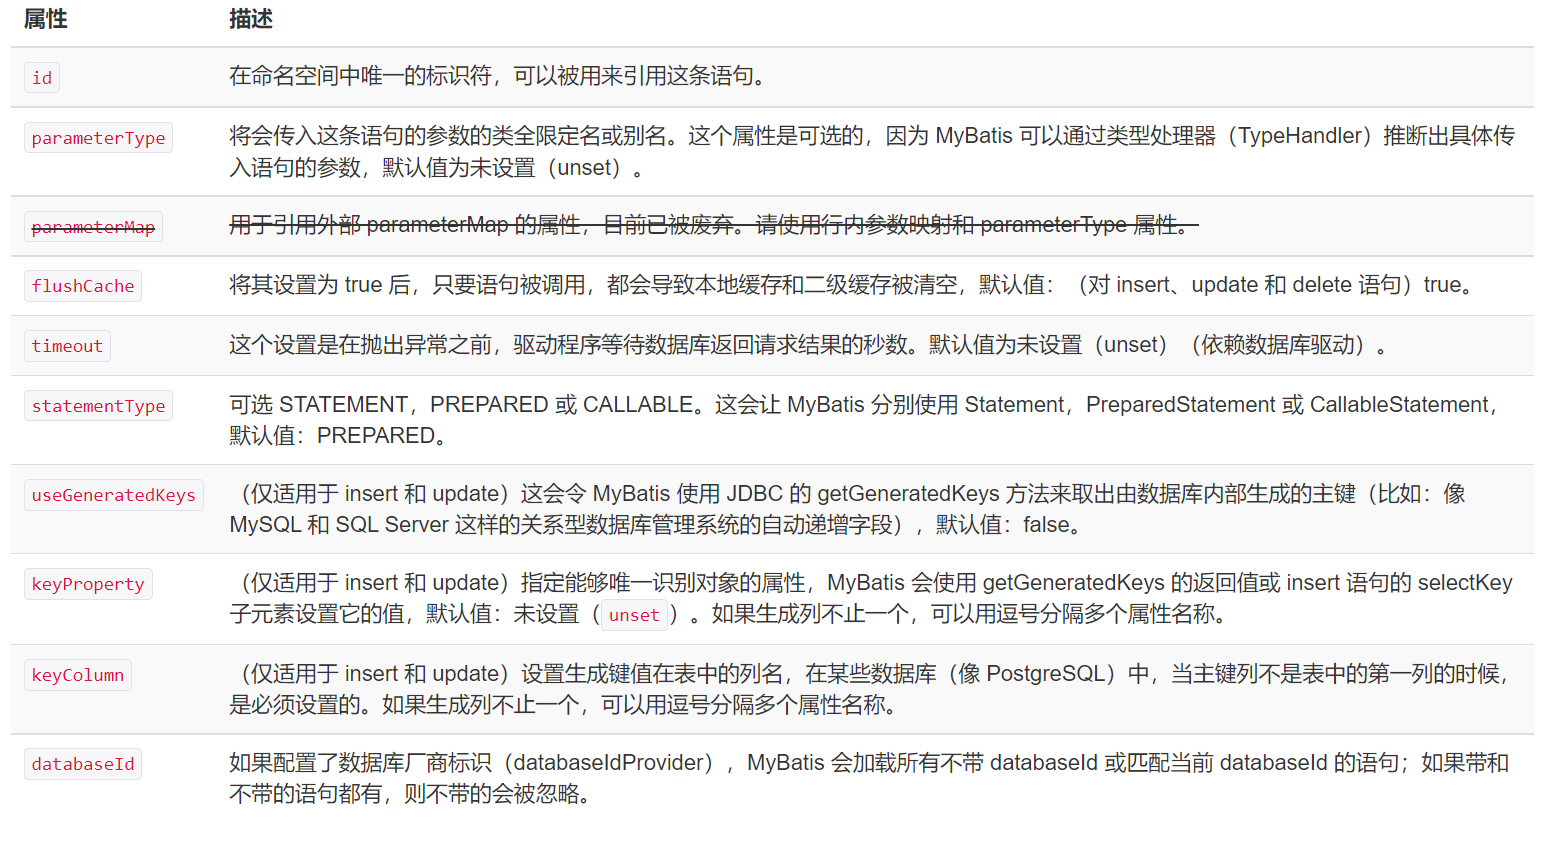
4.5 设置(settings)
| 设置名 | 描述 | 有效值 | 默认值 |
|---|---|---|---|
| cacheEnabled | 全局性地开启或关闭所有映射器配置文件中已配置的任何缓存。 | true false | true |
| lazyLoadingEnabled | 延迟加载的全局开关。当开启时,所有关联对象都会延迟加载。 特定关联关系中可通过设置 fetchType 属性来覆盖该项的开关状态。 | true false | false |
| aggressiveLazyLoading | 开启时,任一方法的调用都会加载该对象的所有延迟加载属性。 否则,每个延迟加载属性会按需加载(参考 lazyLoadTriggerMethods)。 | true false | false (在 3.4.1 及之前的版本中默认为 true) |
| multipleResultSetsEnabled | 是否允许单个语句返回多结果集(需要数据库驱动支持)。 | true false | true |
| useColumnLabel | 使用列标签代替列名。实际表现依赖于数据库驱动,具体可参考数据库驱动的相关文档,或通过对比测试来观察。 | true false | true |
| useGeneratedKeys | 允许 JDBC 支持自动生成主键,需要数据库驱动支持。如果设置为 true,将强制使用自动生成主键。尽管一些数据库驱动不支持此特性,但仍可正常工作(如 Derby)。 | true false | False |
| autoMappingBehavior | 指定 MyBatis 应如何自动映射列到字段或属性。 NONE 表示关闭自动映射;PARTIAL 只会自动映射没有定义嵌套结果映射的字段。 FULL 会自动映射任何复杂的结果集(无论是否嵌套)。 | NONE, PARTIAL, FULL | PARTIAL |
| autoMappingUnknownColumnBehavior | 指定发现自动映射目标未知列(或未知属性类型)的行为。* NONE: 不做任何反应 * WARNING: 输出警告日志(‘org.apache.ibatis.session.AutoMappingUnknownColumnBehavior’ 的日志等级必须设置为 WARN) * FAILING: 映射失败 (抛出 SqlSessionException) | NONE, WARNING, FAILING | NONE |
| defaultExecutorType | 配置默认的执行器。SIMPLE 就是普通的执行器;REUSE 执行器会重用预处理语句(PreparedStatement); BATCH 执行器不仅重用语句还会执行批量更新。 | SIMPLE REUSE BATCH | SIMPLE |
| defaultStatementTimeout | 设置超时时间,它决定数据库驱动等待数据库响应的秒数。 | 任意正整数 | 未设置 (null) |
| defaultFetchSize | 为驱动的结果集获取数量(fetchSize)设置一个建议值。此参数只可以在查询设置中被覆盖。 | 任意正整数 | 未设置 (null) |
| defaultResultSetType | 指定语句默认的滚动策略。(新增于 3.5.2) | FORWARD_ONLY , SCROLL_SENSITIVE ,SCROLL_INSENSITIVE ,DEFAULT(等同于未设置) | 未设置 (null) |
| safeRowBoundsEnabled | 是否允许在嵌套语句中使用分页(RowBounds)。如果允许使用则设置为 false。 | true false | False |
| safeResultHandlerEnabled | 是否允许在嵌套语句中使用结果处理器(ResultHandler)。如果允许使用则设置为 false。 true | false True | |
| mapUnderscoreToCamelCase | 是否开启驼峰命名自动映射,即从经典数据库列名 A_COLUMN 映射到经典 Java 属性名 aColumn。 | true false | False |
| localCacheScope | MyBatis 利用本地缓存机制(Local Cache)防止循环引用和加速重复的嵌套查询。 默认值为 SESSION,会缓存一个会话中执行的所有查询。 若设置值为 STATEMENT,本地缓存将仅用于执行语句,对相同 SqlSession 的不同查询将不会进行缓存。 | SESSION , STATEMENT | SESSION |
| jdbcTypeForNull | 当没有为参数指定特定的 JDBC 类型时,空值的默认 JDBC 类型。 某些数据库驱动需要指定列的 JDBC 类型,多数情况直接用一般类型即可,比如 NULL、VARCHAR 或 OTHER。 | JdbcType 常量,常用值:NULL、VARCHAR 或 OTHER。 | OTHER |
| lazyLoadTriggerMethods | 指定对象的哪些方法触发一次延迟加载。 | 用逗号分隔的方法列表。 | equals,clone,hashCode,toString |
| defaultScriptingLanguage | 指定动态 SQL 生成使用的默认脚本语言。 | 一个类型别名或全限定类名。 | org.apache.ibatis.scripting.xmltags.XMLLanguageDriver |
| defaultEnumTypeHandler | 指定 Enum 使用的默认 TypeHandler 。(新增于 3.4.5) | 一个类型别名或全限定类名。 | org.apache.ibatis.type.EnumTypeHandler |
| callSettersOnNulls | 指定当结果集中值为 null 的时候是否调用映射对象的 setter(map 对象时为 put)方法,这在依赖于 Map.keySet() 或 null 值进行初始化时比较有用。注意基本类型(int、boolean 等)是不能设置成 null 的。 | true false | false |
| returnInstanceForEmptyRow | 当返回行的所有列都是空时,MyBatis默认返回 null。 当开启这个设置时,MyBatis会返回一个空实例。 请注意,它也适用于嵌套的结果集(如集合或关联)。(新增于 3.4.2) | true false | false |
| logPrefix | 指定 MyBatis 增加到日志名称的前缀。 | 任何字符串 | 未设置 |
| logImpl | 指定 MyBatis 所用日志的具体实现,未指定时将自动查找。 | SLF4J , LOG4J(3.5.9 起废弃) ,LOG4J2 ,JDK_LOGGING , COMMONS_LOGGING , STDOUT_LOGGING ,NO_LOGGING | 未设置 |
| proxyFactory | 指定 Mybatis 创建可延迟加载对象所用到的代理工具。 | CGLIB (3.5.10 起废弃) , JAVASSIST | JAVASSIST (MyBatis 3.3 以上) |
| vfsImpl | 指定 VFS 的实现 | 自定义 VFS 的实现的类全限定名,以逗号分隔。 | 未设置 |
| useActualParamName | 允许使用方法签名中的名称作为语句参数名称。 为了使用该特性,你的项目必须采用 Java 8 编译,并且加上 -parameters 选项。(新增于 3.4.1) | true false | true |
| configurationFactory | 指定一个提供 Configuration 实例的类。 这个被返回的 Configuration 实例用来加载被反序列化对象的延迟加载属性值。 这个类必须包含一个签名为static Configuration getConfiguration() 的方法。(新增于 3.2.3) | 一个类型别名或完全限定类名。 | 未设置 |
| shrinkWhitespacesInSql | 从SQL中删除多余的空格字符。请注意,这也会影响SQL中的文字字符串。 (新增于 3.5.5) | true false | false |
| defaultSqlProviderType | 指定一个拥有 provider 方法的 sql provider 类 (新增于 3.5.6). 这个类适用于指定 sql provider 注解上的type(或 value) 属性(当这些属性在注解中被忽略时)。 (e.g. @SelectProvider) | 类型别名或者全限定名 | 未设置 |
| nullableOnForEach | 为 ‘foreach’ 标签的 ‘nullable’ 属性指定默认值。(新增于 3.5.9) | true false | false |
| argNameBasedConstructorAutoMapping | 当应用构造器自动映射时,参数名称被用来搜索要映射的列,而不再依赖列的顺序。(新增于 3.5.10) | true false | false |
一个配置完整的 settings 元素的示例如下:
<settings>
  <setting name="cacheEnabled" value="true"/>
  <setting name="lazyLoadingEnabled" value="true"/>
  <setting name="aggressiveLazyLoading" value="true"/>
  <setting name="multipleResultSetsEnabled" value="true"/>
  <setting name="useColumnLabel" value="true"/>
  <setting name="useGeneratedKeys" value="false"/>
  <setting name="autoMappingBehavior" value="PARTIAL"/>
  <setting name="autoMappingUnknownColumnBehavior" value="WARNING"/>
  <setting name="defaultExecutorType" value="SIMPLE"/>
  <setting name="defaultStatementTimeout" value="25"/>
  <setting name="defaultFetchSize" value="100"/>
  <setting name="safeRowBoundsEnabled" value="false"/>
  <setting name="safeResultHandlerEnabled" value="true"/>
  <setting name="mapUnderscoreToCamelCase" value="false"/>
  <setting name="localCacheScope" value="SESSION"/>
  <setting name="jdbcTypeForNull" value="OTHER"/>
  <setting name="lazyLoadTriggerMethods" value="equals,clone,hashCode,toString"/>
  <setting name="defaultScriptingLanguage" value="org.apache.ibatis.scripting.xmltags.XMLLanguageDriver"/>
  <setting name="defaultEnumTypeHandler" value="org.apache.ibatis.type.EnumTypeHandler"/>
  <setting name="callSettersOnNulls" value="false"/>
  <setting name="returnInstanceForEmptyRow" value="false"/>
  <setting name="logPrefix" value="exampleLogPreFix_"/>
  <setting name="logImpl" value="SLF4J | LOG4J | LOG4J2 | JDK_LOGGING | COMMONS_LOGGING | STDOUT_LOGGING | NO_LOGGING"/>
  <setting name="proxyFactory" value="CGLIB | JAVASSIST"/>
  <setting name="vfsImpl" value="org.mybatis.example.YourselfVfsImpl"/>
  <setting name="useActualParamName" value="true"/>
  <setting name="configurationFactory" value="org.mybatis.example.ConfigurationFactory"/>
</settings>
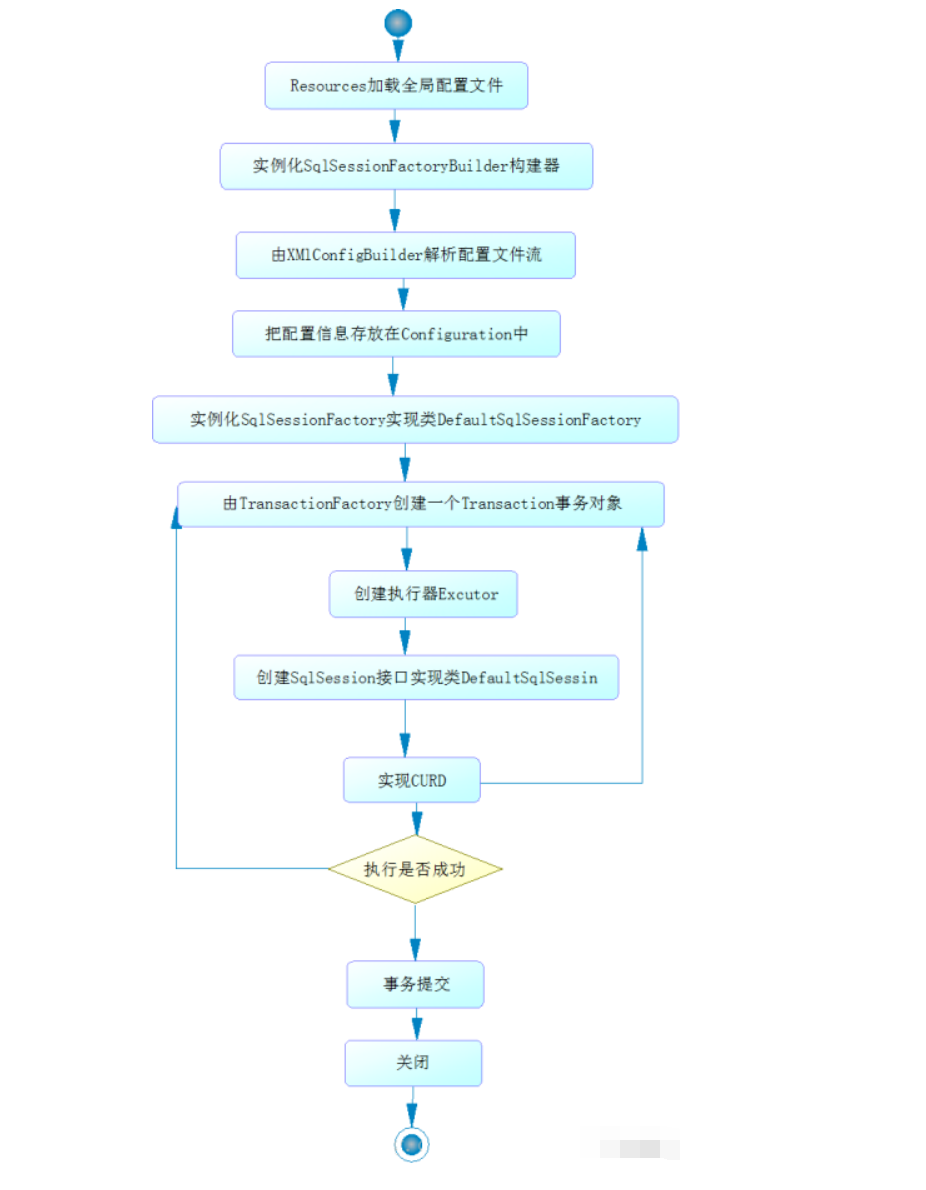
5 作用域和生命周期
理解我们之前讨论过的不同作用域和生命周期类别是至关重要的,因为错误的使用会导致非常严重的并发问题。
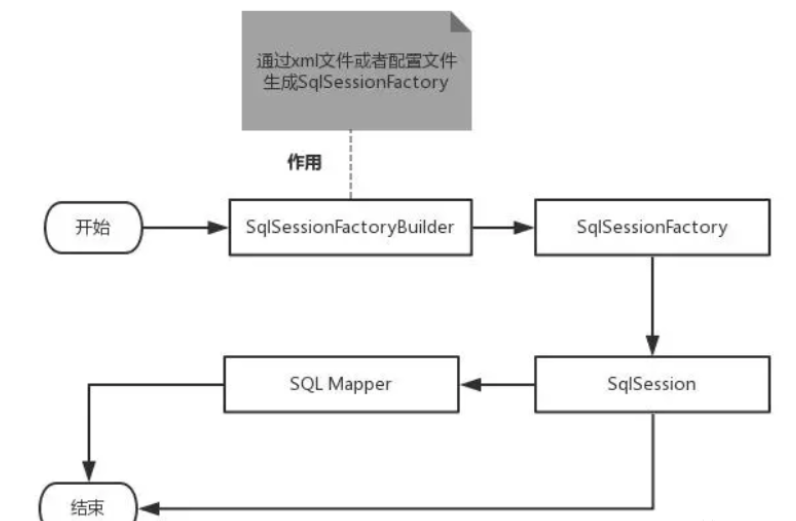
mybatis的执行流程(我们写配置文件写工具类最终是得到了个啥?):
作用域理解
- SqlSessionFactoryBuilder 的作用在于创建 SqlSessionFactory,创建成功后,SqlSessionFactoryBuilder 就失去了作用,所以它只能存在于创建 SqlSessionFactory 的方法中,而不要让其长期存在。因此 SqlSessionFactoryBuilder 实例的最佳作用域是方法作用域(也就是局部方法变量)。
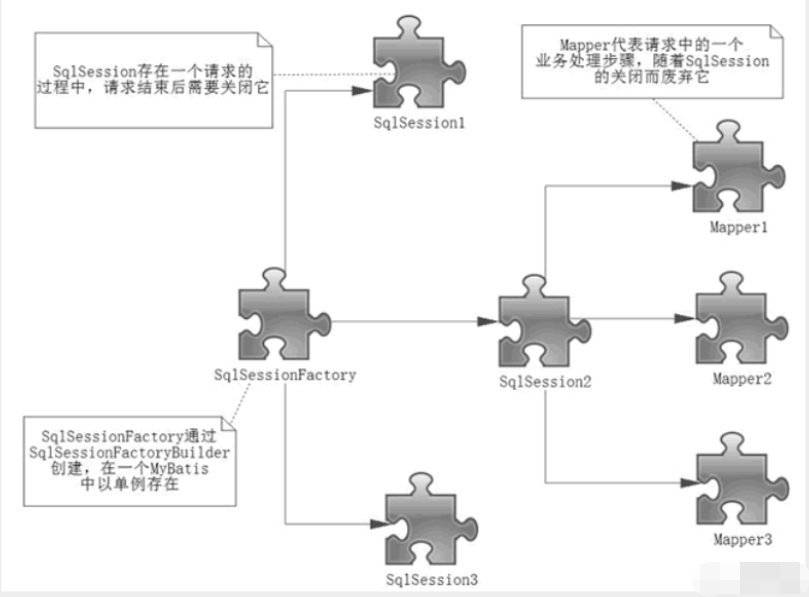
- SqlSessionFactory 可以被认为是一个数据库连接池,它的作用是创建 SqlSession 接口对象。因为 MyBatis 的本质就是 Java 对数据库的操作,所以 SqlSessionFactory 的生命周期存在于整个 MyBatis 的应用之中,所以一旦创建了 SqlSessionFactory,就要长期保存它,直至不再使用 MyBatis 应用,所以可以认为 SqlSessionFactory 的生命周期就等同于 MyBatis 的应用周期。
- 由于 SqlSessionFactory 是一个对数据库的连接池,所以它占据着数据库的连接资源。如果创建多个 SqlSessionFactory,那么就存在多个数据库连接池,这样不利于对数据库资源的控制,也会导致数据库连接资源被消耗光,出现系统宕机等情况,所以尽量避免发生这样的情况。
因此在一般的应用中我们往往希望 SqlSessionFactory 作为一个单例,让它在应用中被共享。所以说 SqlSessionFactory 的最佳作用域是应用作用域。- 如果说 SqlSessionFactory 相当于数据库连接池,那么 SqlSession 就相当于一个数据库连接(Connection 对象),你可以在一个事务里面执行多条 SQL,然后通过它的 commit、rollback 等方法,提交或者回滚事务。所以它应该存活在一个业务请求中,处理完整个请求后,应该关闭这条连接,让它归还给 SqlSessionFactory,否则数据库资源就很快被耗费精光,系统就会瘫痪,所以用 try…catch…finally… 语句来保证其正确关闭。
所以 SqlSession 的最佳的作用域是请求或方法作用域。
6 映射文件
6.1 select
查询语句是 MyBatis 中最常用的元素之一
<select id="selectPerson" parameterType="int" resultType="hashmap">
  SELECT * FROM PERSON WHERE ID = #{id}
</select>
这个语句名为 selectPerson,接受一个 int(或 Integer)类型的参数,并返回一个 HashMap 类型的对象,其中的键是列名,值便是结果行中的对应值。
注意参数符号:#{id}
就是告诉 MyBatis 创建一个预处理语句(PreparedStatement)参数,在 JDBC 中,这样的一个参数在 SQL 中会由一个“?”来标识,并被传递到一个新的预处理语句中
Select 元素的属性

6.2 update、insert、delete
<insert id="insertAuthor">
  insert into Author (id,username,password,email,bio)
  values (#{id},#{username},#{password},#{email},#{bio})
</insert>

<update id="updateAuthor">
  update Author set
    username = #{username},
    password = #{password},
    email = #{email},
    bio = #{bio}
  where id = #{id}
</update>

<delete id="deleteAuthor">
  delete from Author where id = #{id}
</delete>
如果你的数据库支持自动生成主键的字段(比如 MySQL 和 SQL Server),那么你可以设置 useGeneratedKeys=”true”,然后再把 keyProperty 设置为目标属性就 OK 了。例如,如果上面的 Author 表已经在 id 列上使用了自动生成,那么语句可以修改为:
<insert id="insertAuthor" useGeneratedKeys="true"  keyProperty="id">
  insert into Author (username,password,email,bio)
  values (#{username},#{password},#{email},#{bio})
</insert>
还支持多行插入, 你也可以传入一个 Author 数组或集合,并返回自动生成的主键。
<insert id="insertAuthor" useGeneratedKeys="true"  keyProperty="id">
  insert into Author (username, password, email, bio) values
  <foreach item="item" collection="list" separator=",">
    (#{item.username}, #{item.password}, #{item.email}, #{item.bio})
  </foreach>
</insert>
Insert, Update, Delete 元素的属性
6.3 字符串替换
默认情况下,使用
#{}参数语法时,MyBatis会创建 PreparedStatement 参数占位符,并通过占位符安全地设置参数(就像使用 ? 一样)。 这样做更安全,更迅速,通常也是首选做法,不过有时你就是想直接在 SQL 语句中直接插入一个不转义的字符串。 比如 ORDER BY 子句,这时候你可以:ORDER BY ${columnName}这样,MyBatis 就不会修改或转义该字符串了 ${ }。
当 SQL 语句中的元数据(如表名或列名)是动态生成的时候,字符串替换将会非常有用。 举个例子,如果你想 select 一个表任意一列的数据时:
@Select("select * from user where ${column} = #{value}")
User findByColumn(@Param("column") String column, @Param("value") String value);
其中 ${column} 会被直接替换,而 #{value} 会使用 ? 预处理。 这样,就能完成同样的任务:
User userOfId1 = userMapper.findByColumn("id", 1L);
User userOfNameKid = userMapper.findByColumn("name", "kid");
User userOfEmail = userMapper.findByColumn("email", "noone@nowhere.com");
提示:用这种方式接受用户的输入,并用作语句参数是不安全的,会导致潜在的 SQL 注入攻击。因此,要么不允许用户输入这些字段,要么自行转义并检验这些参数。
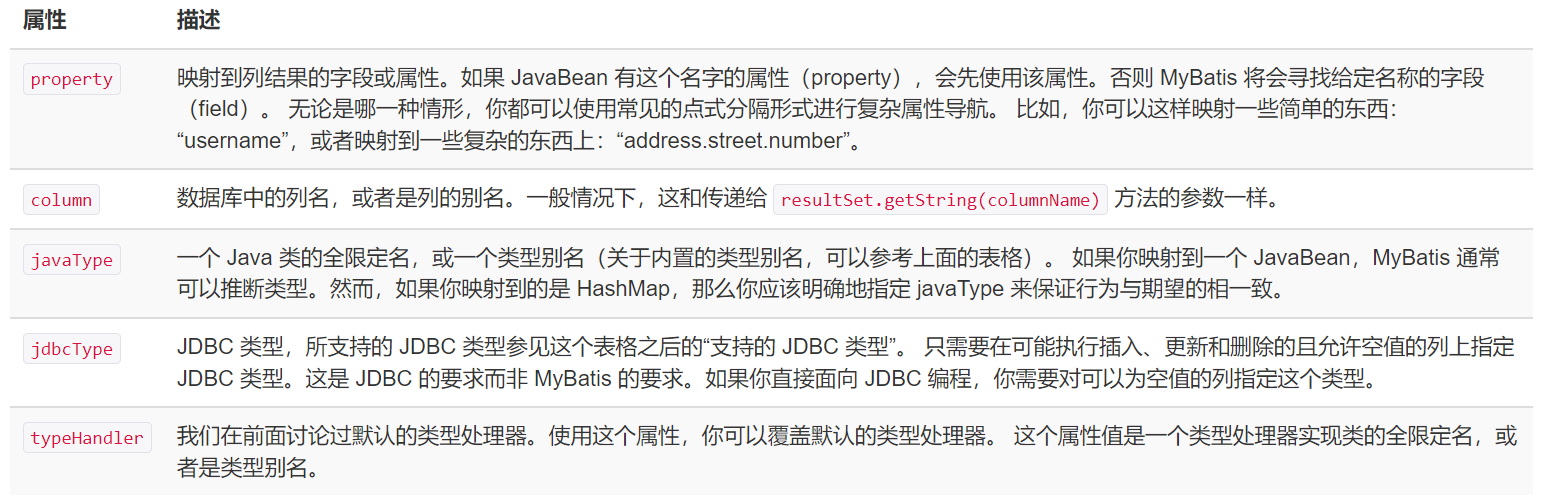
6.4 ResultMap(结果映射)
面临的一个问题:属性名和字段名不一致,,查询为null
有一张user表
Java中的实体类设计
public class User {

   private int id;  //id
   private String name;   //姓名
   private String password;   //密码和数据库不一样!

   //构造
   //set/get
   //toString()
}
接口
//根据id查询用户
User selectUserById(int id);
mapper映射文件
<select id="selectUserById" resultType="user">
  select * from user where id = #{id}
</select>
测试执行
@Test
public void testSelectUserById() {
   SqlSession session = MybatisUtils.getSession();  //获取SqlSession连接
   UserMapper mapper = session.getMapper(UserMapper.class);
   User user = mapper.selectUserById(1);
   System.out.println(user);
   session.close();
}
结果:
User{id=1, name=‘狂神’, password=‘null’}
查询出来发现 password 为空 . 说明出现了问题!
分析原因
select * from user where id = #{id} 可以看做
select id,name,pwd from user where id = #{id}
mybatis会根据这些查询的列名(会将列名转化为小写,数据库不区分大小写) , 去对应的实体类中查找相应列名的setXXX方法设值 , 由于找不到setPwd() , 所以password返回null ; 【自动映射】
怎么解决呢???
方法一:为列名指定别名 , 别名和java实体类的属性名一致
<select id="selectUserById" resultType="User">
  select id , name , pwd as password from user where id = #{id}
</select>
方法二:使用结果集显示映射->ResultMap
column是数据库表的列名 , property是对应实体类的属性名
<resultMap id="UserMap" type="User">
<!--id和name没有错的话,是可以省略不写的,只写不对应的pwd-->
   <!-- id为主键 -->
   <id column="id" property="id"/>
   <!-- column是数据库表的列名 , property是对应实体类的属性名 -->
   <result column="name" property="name"/>
   <result column="pwd" property="password"/>
</resultMap>

<select id="selectUserById" resultMap="UserMap">
  select id , name , pwd from user where id = #{id}
</select>
总结:
方法一:没有显式配置 ResultMap,但是MyBatis 会在幕后自动创建一个 ResultMap,再根据属性名来映射列到 JavaBean 的属性上。 如果列名和属性名不能匹配上,就出现了值为null的情况,所以才有了方法一和方法二来解决问题。
方法二:就是显示的使用了resultMap。
Id 和 Result 的属性
- id 和 result 元素都将一个列的值映射到一个简单数据类型(String, int, double, Date 等)的属性或字段。
- 两者之间的唯一不同是,id 元素对应的属性会被标记为对象的标识符 (主键),在比较对象实例时使用。 这样可以提高整体的性能,尤其是进行缓存和嵌套结果映射(也就是连接映射)的时候
(property是自定义的JavaBean中的属性名,column是数据库表中的字段名)
6.5 参数
一个非常简单的命名参数映射
<select id="selectUsers" resultType="User">
  select id, username, password
  from users
  where id = #{id}
</select>
resultType="User"指明了返回值是一个JavaBean实体对象,但是#{id}是接受的参数值,却并没有对应的parameterType指明参数类型(鉴于参数类型(parameterType)会被自动设置为 int,这个参数可以随意命名。)
如果传入一个复杂的对象,行为就会有点不一样了
<insert id="insertUser" parameterType="User">
  insert into users (id, username, password)
  values (#{id}, #{username}, #{password})
</insert>
如果 User 类型的参数对象传递到了语句中,会查找 id、username 和 password 属性,然后将它们的值传入预处理语句的参数中。
7 注解开发
sql 类型主要分成 :
@select ()
@update ()
@Insert ()
@delete ()
注意:利用注解开发就不需要mapper.xml映射文件了 .
Select
在我们的接口中添加注解
定义一个UserMapper接口类
public interface UserMapper {
	//查询全部用户
	@Select("select id,name,pwd password from user")
	public List<User> getAllUser();

	//根据id查询用户
	@Select("select * from user where id = #{id}")
	User selectUserById(@Param("id") int id);
}
在mybatis的核心配置文件(mybatis-config.xml)中注入
<mappers>
   <mapper class="com.kuang.mapper.UserMapper"/>
</mappers>
进行测试
@Test
public void testGetAllUser() {
   SqlSession session = MybatisUtils.getSession();
   //本质上利用了jvm的动态代理机制
   UserMapper mapper = session.getMapper(UserMapper.class);

   List<User> users = mapper.getAllUser();
   for (User user : users){
       System.out.println(user);
  }


   User user = mapper.selectUserById(1);
   System.out.println(user);

   session.close();
}
Insert
编写接口方法注解
//添加一个用户
@Insert("insert into user (id,name,pwd) values (#{id},#{name},#{pwd})")
int addUser(User user);
在mybatis的核心配置文件(mybatis-config.xml)中注入,上面select已经注册过。
测试
@Test
public void testAddUser() {
   SqlSession session = MybatisUtils.getSession();
   UserMapper mapper = session.getMapper(UserMapper.class);

   User user = new User(6, "秦疆", "123456");
   mapper.addUser(user);

   session.close();
}
Update
编写接口方法注解
//修改一个用户
@Update("update user set name=#{name},pwd=#{pwd} where id = #{id}")
int updateUser(User user);
在mybatis的核心配置文件(mybatis-config.xml)中注入,上面select已经注册过。
测试
@Test
public void testUpdateUser() {
   SqlSession session = MybatisUtils.getSession();
   UserMapper mapper = session.getMapper(UserMapper.class);

   User user = new User(6, "秦疆", "zxcvbn");
   mapper.updateUser(user);

   session.close();
}
Delete
编写接口方法注解
//根据id删除用
@Delete("delete from user where id = #{id}")
int deleteUser(@Param("id")int id);
在mybatis的核心配置文件(mybatis-config.xml)中注入,上面select已经注册过。
测试
@Test
public void testDeleteUser() {
   SqlSession session = MybatisUtils.getSession();
   UserMapper mapper = session.getMapper(UserMapper.class);

   mapper.deleteUser(6);

   session.close();
}
注:上述的事务均已设置为自动提交
  //获取SqlSession连接
  public static SqlSession getSession(){
      return getSession(true); //事务自动提交
  }

  public static SqlSession getSession(boolean flag){
      return sqlSessionFactory.openSession(flag);
  }
关于@Param
@Param注解用于给方法参数起一个名字。以下是总结的使用原则:
在方法只接受一个参数的情况下,可以不使用@Param。
在方法接受多个参数的情况下,建议一定要使用@Param注解给参数命名。
如果参数是 JavaBean , 则不能使用@Param。
不使用@Param注解时,参数只能有一个,并且是Javabean。
#与$的区别
#{} 的作用主要是替换预编译语句(PrepareStatement)中的占位符? 【推荐使用】
INSERT INTO user (name) VALUES (#{name});
INSERT INTO user (name) VALUES (?);
${} 的作用是直接进行字符串替换
INSERT INTO user (name) VALUES (‘${name}’);
INSERT INTO user (name) VALUES (‘kuangshen’);
使用注解和配置文件协同开发,才是MyBatis的最佳实践!
SQL
这个元素可以用来定义可重用的 SQL 代码片段,以便在其它语句中使用。 参数可以静态地(在加载的时候)确定下来,并且可以在不同的 include 元素中定义不同的参数值。
比如:
<sql id="userColumns"> ${alias}.id,${alias}.username,${alias}.password </sql>
这个 SQL 片段可以在其它语句中使用
例如:
CROSS JOIN连接用于生成两张表的笛卡尔集。
在sql中cross join的使用:
- 返回的记录数为两个表的记录数乘积。
- 将t1表的所有行分别与t2表的所有行进行连接。
<select id="selectUsers" resultType="map">
  select
    <include refid="userColumns"><property name="alias" value="t1"/></include>,
    <include refid="userColumns"><property name="alias" value="t2"/></include>
  from some_table t1
    cross join some_table t2
</select>

<!--  相当于  -->
<select id="selectUsers" resultType="map">
	select
	    t1.id,t1.username,t1.password,
	    t2.id,t2.username,t2.password
	  from some_table t1
	    cross join some_table t2
</select>
也可以在 include 元素的 refid 属性或内部语句中使用属性值
例如:
<sql id="sometable">
  ${prefix}Table
</sql>

<sql id="someinclude">
  from
    <include refid="${include_target}"/>
</sql>

<select id="select" resultType="map">
  select
    field1, field2, field3
  <include refid="someinclude">
    <property name="prefix" value="Some"/>
    <property name="include_target" value="sometable"/>
  </include>
</select>

<!--相当于-->
<select id="select" resultType="map">
  select
    field1, field2, field3
  from
    SomeTable
</select>
mybatis的详细执行流程
8 分页查询
使用limit实现分页
基本语法:
SELECT * FROM table LIMIT stratIndex,pageSize#如果只给定一个参数,它表示返回最大的记录行数目:
SELECT * FROM table LIMIT 5; --检索前 5 个记录行
#换句话说,LIMIT n 等价于 LIMIT 0,n。
为什么需要分页?
在学习mybatis等持久层框架的时候,会经常对数据进行增删改查操作,使用最多的是对数据库进行查询操作,如果查询大量数据的时候,我们往往使用分页进行查询,也就是每次处理小部分数据,这样对数据库压力就在可控范围内。
如何实现分页查询
编写对应的接口和接口方法
//选择全部用户实现分页
List<User> selectUser(Map<String,Integer> map);
编写对应的Mapper.xml文件
<select id="selectUser" parameterType="map" resultType="user">
  select * from user limit #{startIndex},#{pageSize}
</select>
编写测试类,在测试类中传入参数测试
//分页查询 , 两个参数startIndex , pageSize
@Test
public void testSelectUser() {
   SqlSession session = MybatisUtils.getSession();
   UserMapper mapper = session.getMapper(UserMapper.class);

   int currentPage = 1;  //第几页
   int pageSize = 2;  //每页显示几个
   Map<String,Integer> map = new HashMap<String,Integer>();
   map.put("startIndex",(currentPage-1)*pageSize);
   map.put("pageSize",pageSize);

   List<User> users = mapper.selectUser(map);

   for (User user: users){
       System.out.println(user);
  }

   session.close();
}
使用RowBounds实现分页
编写对应的mapper接口和方法
//选择全部用户RowBounds实现分页
List<User> getUserByRowBounds();
编写对应的Mapper.xml文件
<select id="getUserByRowBounds" resultType="user">
select * from user
</select>
编写测试类
@Test
public void testUserByRowBounds() {
   SqlSession session = MybatisUtils.getSession();

   int currentPage = 2;  //第几页
   int pageSize = 2;  //每页显示几个
   RowBounds rowBounds = new RowBounds((currentPage-1)*pageSize,pageSize);

   //通过session.**方法进行传递rowBounds,[此种方式现在已经不推荐使用了]
   List<User> users = session.selectList("com.hyl.mapper.UserMapper.getUserByRowBounds", null, rowBounds);

   for (User user: users){
       System.out.println(user);
  }
   session.close();
}
9 日志工厂

Mybatis内置的日志工厂提供日志功能,具体的日志实现有以下几种工具:
- SLF4J
- Apache Commons Logging
- Log4j 2
- Log4j
- JDK logging
具体选择哪个日志实现工具由MyBatis的内置日志工厂确定。它会使用最先找到的(按上文列举的顺序查找)。如果一个都未找到,日志功能就会被禁用。
标准日志实现(STDOUT_LOGGING)
指定 MyBatis 应该使用哪个日志记录实现。如果此设置不存在,则会自动发现日志记录实现。
<settings>
       <setting name="logImpl" value="STDOUT_LOGGING"/>
</settings>
添加日志后的mybatis-config.xml配置文件
<?xml version="1.0" encoding="UTF-8" ?>
<!DOCTYPE configuration
        PUBLIC "-//mybatis.org//DTD Config 3.0//EN"
        "https://mybatis.org/dtd/mybatis-3-config.dtd">
<!--核心配置文件-->
<configuration>
<!--  引入外部配置文件  -->
    <properties resource="db.properties"/>
<!--  日志设置  -->
    <settings>
        <setting name="logImpl" value="STDOUT_LOGGING"/>
    </settings>
<!-- 起别名   -->
    <typeAliases>
<!--        <typeAlias type="com.hyl.entry.User" alias="User"/>-->
        <package name="com.hyl.entry"/>
    </typeAliases>

<!--  环境(可以嵌套多套环境) default默认选择 -->
    <environments default="development">
<!--   开发环境     -->
        <environment id="development">
<!--    事务属性:JDBC        -->
            <transactionManager type="JDBC"/>
            <dataSource type="POOLED">
                <property name="driver" value="${driver}"/>
                <property name="url" value="${url}"/>
                <property name="username" value="${username}"/>
                <property name="password" value="${password}"/>
            </dataSource>
        </environment>
    </environments>
<!--每一个Mapper.xml都要在当前文件中进行配置注册(写全路径)-->
    <mappers>
<!--        <mapper resource="com/hyl/dao/userMapper.xml"/>-->
        <mapper class="com.hyl.dao.MyTestMapper"/>
    </mappers>

</configuration>
添加日志后的执行结果:
Log4j
简介:
Log4j是Apache的一个开源项目
通过使用Log4j,我们可以控制日志信息输送的目的地:控制台,文本,GUI组件…
我们也可以控制每一条日志的输出格式;
通过定义每一条日志信息的级别,我们能够更加细致地控制日志的生成过程。最令人感兴趣的就是,这些可以通过一个配置文件来灵活地进行配置,而不需要修改应用的代码。
使用步骤:
导入log4j的包
<dependency>
   <groupId>log4j</groupId>
   <artifactId>log4j</artifactId>
   <version>1.2.17</version>
</dependency>
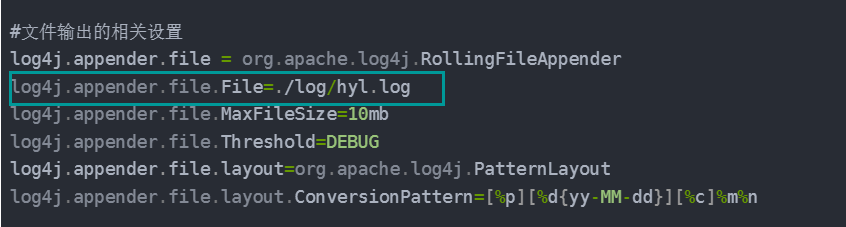
配置文件编写log4j.properties
#将等级为DEBUG的日志信息输出到console和file这两个目的地,console和file的定义在下面的代码
log4j.rootLogger=DEBUG,console,file

#控制台输出的相关设置
log4j.appender.console = org.apache.log4j.ConsoleAppender
log4j.appender.console.Target = System.out
log4j.appender.console.Threshold=DEBUG
log4j.appender.console.layout = org.apache.log4j.PatternLayout
log4j.appender.console.layout.ConversionPattern=[%c]-%m%n

#文件输出的相关设置
log4j.appender.file = org.apache.log4j.RollingFileAppender
log4j.appender.file.File=./log/hyl.log
log4j.appender.file.MaxFileSize=10mb
log4j.appender.file.Threshold=DEBUG
log4j.appender.file.layout=org.apache.log4j.PatternLayout
log4j.appender.file.layout.ConversionPattern=[%p][%d{yy-MM-dd}][%c]%m%n

#日志输出级别
log4j.logger.org.mybatis=DEBUG
log4j.logger.java.sql=DEBUG
log4j.logger.java.sql.Statement=DEBUG
log4j.logger.java.sql.ResultSet=DEBUG
log4j.logger.java.sql.PreparedStatement=DEBUG
setting设置日志实现
<settings>
   <setting name="logImpl" value="LOG4J"/>
</settings>
在程序中使用Log4j
//注意导包:org.apache.log4j.Logger
public class MyTest{
// getLogger加载的是当前类的.class文件
	static Logger logger = Logger.getLogger(MyTest.class);

	@Test
	public void selectUser() {
	   logger.info("info:进入selectUser方法");
	   logger.debug("debug:进入selectUser方法");
	   logger.error("error: 进入selectUser方法");
	   SqlSession session = MybatisUtils.getSession();
	   UserMapper mapper = session.getMapper(UserMapper.class);
	   List<User> users = mapper.selectUser();
	   for (User user: users){
	       System.out.println(user);
	  }
	   session.close();
	}

}
添加日志后的结果:
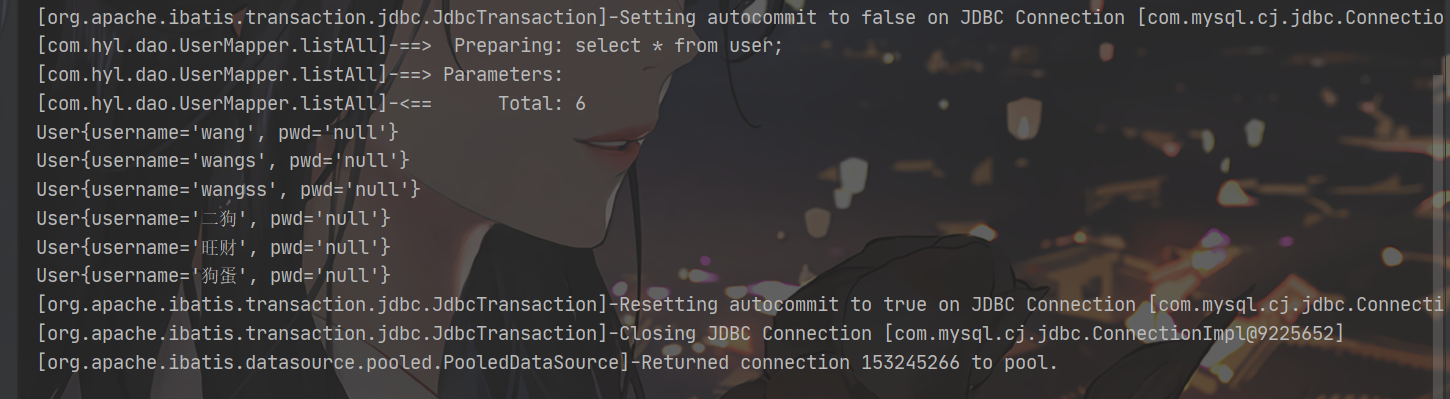

上述文件的配置,会在本地生成log/hyl.log文件,里面是日志信息和控制台输出信息一致。
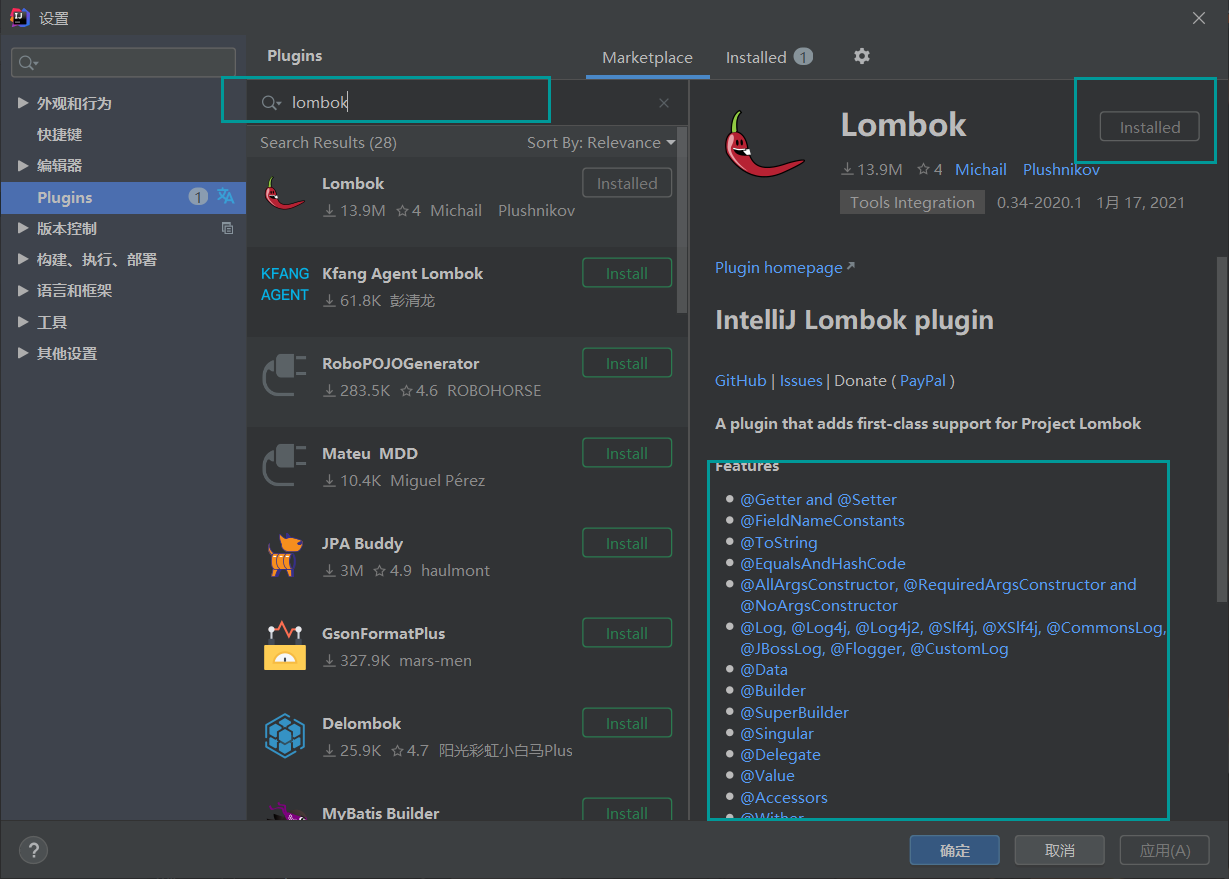
10 IDEA安装Lombok插件
Lombok项目是一个java库,它可以自动插入到编辑器和构建工具中,增强java的性能。不需要再写getter、setter或equals方法,只要有一个注解,你的类就有一个功能齐全的构建器、自动记录变量等等。
Lombok常用注解
▪ Data
▪ Getter
▪ Setter
▪ ToString
▪ EqualsAndHashCode
▪ NonNull
Data
整合了Getter、Setter、ToString、EqualsAndHashCode、RequiredArgsConstructor注解。
Getter
快速构建Getter方法。
Setter
快速构建Setter方法。
ToString
快速将当前对象转换成字符串类型,便于log。
EqualsAndHashCode
快速进行相等判断。
NonNull
判断变量(对象)是否为空。
第一步:安装插件
第二步:引入Maven依赖
<!-- https://mvnrepository.com/artifact/org.projectlombok/lombok -->
<dependency>
    <groupId>org.projectlombok</groupId>
    <artifactId>lombok</artifactId>
    <version>1.18.24</version>
    <scope>provided</scope>
</dependency>
第三步:在代码中增加注解
11 一对多、多对一、多对多(高级结果映射)
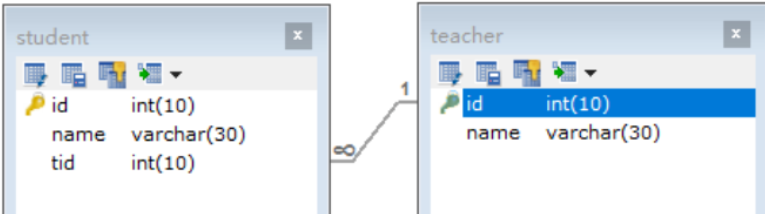
基础环境搭建
建库建表语句:
CREATE TABLE `teacher` (
`id` INT(10) NOT NULL,
`name` VARCHAR(30) DEFAULT NULL,
PRIMARY KEY (`id`)
) ENGINE=INNODB DEFAULT CHARSET=utf8

INSERT INTO teacher(`id`, `name`) VALUES (1, '秦老师');

CREATE TABLE `student` (
`id` INT(10) NOT NULL,
`name` VARCHAR(30) DEFAULT NULL,
`tid` INT(10) DEFAULT NULL,
PRIMARY KEY (`id`),
KEY `fktid` (`tid`),
CONSTRAINT `fktid` FOREIGN KEY (`tid`) REFERENCES `teacher` (`id`)
) ENGINE=INNODB DEFAULT CHARSET=utf8


INSERT INTO `student` (`id`, `name`, `tid`) VALUES ('1', '小明', '1');
INSERT INTO `student` (`id`, `name`, `tid`) VALUES ('2', '小红', '1');
INSERT INTO `student` (`id`, `name`, `tid`) VALUES ('3', '小张', '1');
INSERT INTO `student` (`id`, `name`, `tid`) VALUES ('4', '小李', '1');
INSERT INTO `student` (`id`, `name`, `tid`) VALUES ('5', '小王', '1');
引入Maven依赖 使用lombok简化了bean的编写
<!-- https://mvnrepository.com/artifact/org.projectlombok/lombok -->
<dependency>
 <groupId>org.projectlombok</groupId>
 <artifactId>lombok</artifactId>
 <version>1.16.10</version>
</dependency>
mybatis-config.xml配置文件
<?xml version="1.0" encoding="UTF-8" ?>
<!DOCTYPE configuration
        PUBLIC "-//mybatis.org//DTD Config 3.0//EN"
        "https://mybatis.org/dtd/mybatis-3-config.dtd">
<configuration>
<!--  引入外部资源  -->
    <properties resource="db.properties"/>
<!--  注册日志  -->
    <settings>
        <setting name="logImpl" value="STDOUT_LOGGING"/>
    </settings>
<!--  起别名  -->
    <typeAliases>
        <typeAlias type="com.hyl.pojo.Teacher"  alias="Teacher"/>
        <typeAlias type="com.hyl.pojo.Student"  alias="Student"/>
    </typeAliases>
<!--  配置环境  -->
    <environments default="development">
        <environment id="development">
            <transactionManager type="JDBC"/>
            <dataSource type="POOLED">
                <property name="driver" value="${driver}"/>
                <property name="url" value="${url}"/>
                <property name="username" value="${username}"/>
                <property name="password" value="${password}"/>
            </dataSource>
        </environment>
    </environments>
    <mappers>
        <mapper class="com.hyl.mapper.StudentMapper"/>
        <mapper class="com.hyl.mapper.TeacherMapper"/>
    </mappers>
</configuration>
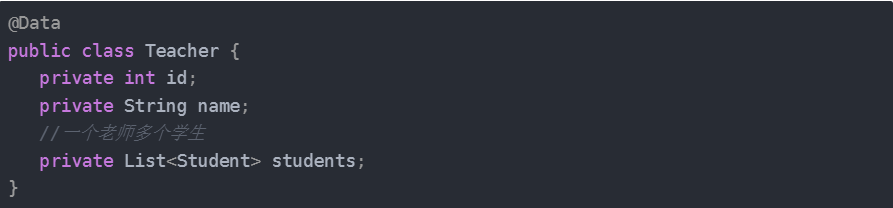
多对一
情况说明:
多个学生对应一个老师
如果对于学生这边,就是一个多对一的现象,即从学生这边关联一个老师!
编写对应的bean实体类
@Data //GET,SET,ToString,有参,无参构造
public class Teacher {
   private int id;
   private String name;
}
@Data
public class Student {
   private int id;
   private String name;
   //多个学生可以是同一个老师,即多对一
   private Teacher teacher;
}
编写实体类对应的Mapper接口
public interface TeacherMapper {
}
public interface StudentMapper {
}
编写Mapper接口对应的 mapper.xml配置文件
<?xml version="1.0" encoding="UTF-8" ?>
<!DOCTYPE mapper
       PUBLIC "-//mybatis.org//DTD Mapper 3.0//EN"
       "http://mybatis.org/dtd/mybatis-3-mapper.dtd">
<mapper namespace="com.hyl.mapper.StudentMapper">

</mapper>
<?xml version="1.0" encoding="UTF-8" ?>
<!DOCTYPE mapper
       PUBLIC "-//mybatis.org//DTD Mapper 3.0//EN"
       "http://mybatis.org/dtd/mybatis-3-mapper.dtd">
<mapper namespace="com.hyl.mapper.TeacherMapper">

</mapper>
按查询嵌套处理
给StudentMapper接口增加方法
//获取所有学生及对应老师的信息
public List<Student> getStudents();
编写对应的Mapper文件
<?xml version="1.0" encoding="UTF-8" ?>
<!DOCTYPE mapper
       PUBLIC "-//mybatis.org//DTD Mapper 3.0//EN"
       "http://mybatis.org/dtd/mybatis-3-mapper.dtd">
<mapper namespace="com.hyl.mapper.StudentMapper">

   <!--
   需求:获取所有学生及对应老师的信息
   思路:
       1. 获取所有学生的信息
       2. 根据获取的学生信息的老师ID->获取该老师的信息
       3. 思考问题,这样学生的结果集中应该包含老师,该如何处理呢,数据库中我们一般使用关联查询?
           1. 做一个结果集映射:StudentTeacher
           2. StudentTeacher结果集的类型为 Student
           3. 学生中老师的属性为teacher,对应数据库中为tid。
           4. 查看官网找到:association – 一个复杂类型的关联;使用它来处理关联查询
   -->
   <select id="getStudents" resultMap="StudentTeacher">
    select * from student
   </select>
   <resultMap id="StudentTeacher" type="Student">
   	   <result property="tid" column="tid"/>
       <!--association关联属性 property属性名 javaType属性类型 column在多的一方的表中的列名-->
       <association property="teacher"  column="tid" javaType="Teacher" select="getTeacher"/>
   </resultMap>
   <!--
   这里传递过来的id,只有一个属性的时候,下面可以写任何值
   association中column多参数配置:
       column="{key=value,key=value}"
       其实就是键值对的形式,key是传给下个sql的取值名称,value是片段一中sql查询的字段名。
   -->
   <select id="getTeacher" resultType="teacher">
      select * from teacher where id = #{id}
   </select>

</mapper>
出现的问题:
我们有两个 select 查询语句:一个用来加载学生(Student),另外一个用来加载老师(Teacher),而且学生的结果映射描述了应该使用 getTeacher语句加载它的 teacher 属性。
其它所有的属性将会被自动加载,只要它们的列名和属性名相匹配。
这种方式虽然很简单,但在大型数据集或大型数据表上表现不佳。这个问题被称为 “N+1 查询问题”。
概括地讲,N+1 查询问题是这样子的:你执行了一个单独的 SQL 语句来获取结果的一个列表(就是“+1”)。
对列表返回的每条记录,你执行一个 select 查询语句来为每条记录加载详细信息(就是“N”)。
这个问题会导致成百上千的 SQL 语句被执行。有时候,我们不希望产生这样的后果。
好消息是,MyBatis 能够对这样的查询进行延迟加载,因此可以将大量语句同时运行的开销分散开来。 然而,如果你加载记录列表之后立刻就遍历列表以获取嵌套的数据,就会触发所有的延迟加载查询,性能可能会变得很糟糕。
按结果嵌套处理
接口方法编写
public List<Student> getStudents2();
编写对应的mapper文件
<!--
按查询结果嵌套处理
思路:
   1. 直接查询出结果,进行结果集的映射
-->
<select id="getStudents2" resultMap="StudentTeacher2" >
  select s.id sid, s.name sname , t.name tname,t.id
  from student s,teacher t
  where s.tid = t.id
</select>

<resultMap id="StudentTeacher2" type="Student">
   <id property="id" column="sid"/>
   <result property="name" column="sname"/>
   <!--关联对象property 关联对象在Student实体类中的属性-->
   <association property="teacher" javaType="Teacher">
       <result property="name" column="tname"/>
       <result property="id" column="tid"/>
   </association>
</resultMap>
上面的resultMap中的association还可以在拆成另外一个resultMap,写法如下:
<resultMap id="StudentTeacher2" type="Student">
     <id property="id" column="sid"/>
     <result property="name" column="sname"/>
     <!--关联对象property 关联对象在Student实体类中的属性-->
     <association property="teacher" column="sid" javaType="Teacher" resultMap="teacherResult"/>
</resultMap>


<resultMap id="teacherResult" type="Teacher">
    <result property="name" column="tname"/>
    <result property="id" column="tid"/>
</resultMap>
官网中的例子:
下面的例子则是一个非常简单的例子,用于演示嵌套结果映射如何工作。 现在我们将博客表和作者表连接在一起,而不是执行一个独立的查询语句,就像这样:
<select id="selectBlog" resultMap="blogResult">
  select
    B.id            as blog_id,
    B.title         as blog_title,
    B.author_id     as blog_author_id,
    A.id            as author_id,
    A.username      as author_username,
    A.password      as author_password,
    A.email         as author_email,
    A.bio           as author_bio
  from Blog B left outer join Author A on B.author_id = A.id
  where B.id = #{id}
</select>
注意查询中的连接,以及为确保结果能够拥有唯一且清晰的名字,我们设置的别名。 这使得进行映射非常简单。现在我们可以映射这个结果:
<resultMap id="blogResult" type="Blog">
  <id property="id" column="blog_id" />
  <result property="title" column="blog_title"/>
  <association property="author" column="blog_author_id" javaType="Author" resultMap="authorResult"/>
</resultMap>

<resultMap id="authorResult" type="Author">
  <id property="id" column="author_id"/>
  <result property="username" column="author_username"/>
  <result property="password" column="author_password"/>
  <result property="email" column="author_email"/>
  <result property="bio" column="author_bio"/>
</resultMap>
在上面的例子中,你可以看到,博客(Blog)作者(author)的关联元素委托名为 “authorResult” 的结果映射来加载作者对象的实例。
非常重要: id 元素在嵌套结果映射中扮演着非常重要的角色。你应该总是指定一个或多个可以唯一标识结果的属性。 虽然,即使不指定这个属性,MyBatis 仍然可以工作,但是会产生严重的性能问题。 只需要指定可以唯一标识结果的最少属性。显然,你可以选择主键(复合主键也可以)。
现在,上面的示例使用了外部的结果映射元素来映射关联。这使得 Author 的结果映射可以被重用。 然而,如果你不打算重用它,或者你更喜欢将你所有的结果映射放在一个具有描述性的结果映射元素中。 你可以直接将结果映射作为子元素嵌套在内。这里给出使用这种方式的等效例子:
<resultMap id="blogResult" type="Blog">
  <id property="id" column="blog_id" />
  <result property="title" column="blog_title"/>
  <association property="author" javaType="Author">
    <id property="id" column="author_id"/>
    <result property="username" column="author_username"/>
    <result property="password" column="author_password"/>
    <result property="email" column="author_email"/>
    <result property="bio" column="author_bio"/>
  </association>
</resultMap>
一对多
情况说明:
一个老师拥有多个学生
如果对于老师这边,就是一个一对多的现象,即从一个老师下面拥有一群学生(集合)!
编写对应的bean实体类
@Data
public class Student {
   private int id;
   private String name;
   private int tid;
}
@Data
public class Teacher {
   private int id;
   private String name;
   //一个老师多个学生
   private List<Student> students;
}
编写实体类对应的Mapper接口 (StudentMapper.java 和TeacherMapper.java同上),略
编写Mapper接口对应的 mapper.xml配置文件(StudentMapper.xml 和TeacherMapper.xml同上),略
按结果嵌套处理
TeacherMapper接口编写方法
//获取指定老师,及老师下的所有学生
public Teacher getTeacher(int id);
编写接口对应的Mapper配置文件
<mapper namespace="com.hyl.mapper.TeacherMapper">

   <!--
   思路:
       1. 从学生表和老师表中查出学生id,学生姓名,老师姓名
       2. 对查询出来的操作做结果集映射
           1. 集合的话,使用collection!
               JavaType和ofType都是用来指定对象类型的
               JavaType是用来指定pojo中属性的类型
               ofType指定的是映射到list集合属性中pojo的类型。
   -->
   <select id="getTeacher" resultMap="TeacherStudent">
      select s.id sid, s.name sname , t.name tname, t.id tid
      from student s,teacher t
      where s.tid = t.id and t.id=#{id}
   </select>

   <resultMap id="TeacherStudent" type="Teacher">
       <result  property="name" column="tname"/>
       <collection property="students" ofType="Student">
           <result property="id" column="sid" />
           <result property="name" column="sname" />
           <result property="tid" column="tid" />
       </collection>
   </resultMap>
</mapper>
上面的resultMap中的collection还可以在拆成另外一个resultMap,写法如下:
   <resultMap id="TeacherStudent" type="Teacher">
       <result  property="name" column="tname"/>
       <collection property="students" ofType="Student" resultMap="StudentResult">

       </collection>
   </resultMap>
   <resultMap id="StudentResult" type="Student">
   		<id property="id" column="sid" />
        <result property="name" column="sname" />
        <result property="tid" column="tid" />
   </resultMap>
官网中的例子:
现在你可能已经猜到了集合的嵌套结果映射是怎样工作的——除了新增的 “ofType” 属性,它和关联的完全相同。
<select id="selectBlog" resultMap="blogResult">
  select
  B.id as blog_id,
  B.title as blog_title,
  B.author_id as blog_author_id,
  P.id as post_id,
  P.subject as post_subject,
  P.body as post_body,
  from Blog B
  left outer join Post P on B.id = P.blog_id
  where B.id = #{id}
</select>
我们再次连接了博客表和文章表,并且为每一列都赋予了一个有意义的别名,以便映射保持简单。 要映射博客里面的文章集合,就这么简单:
<resultMap id="blogResult" type="Blog">
  <id property="id" column="blog_id" />
  <result property="title" column="blog_title"/>
  <collection property="posts" ofType="Post">
    <id property="id" column="post_id"/>
    <result property="subject" column="post_subject"/>
    <result property="body" column="post_body"/>
  </collection>
</resultMap>
如果你喜欢更详略的、可重用的结果映射,你可以使用下面的等价形式:
<resultMap id="blogResult" type="Blog">
  <id property="id" column="blog_id" />
  <result property="title" column="blog_title"/>
  <collection property="posts" ofType="Post" resultMap="blogPostResult" columnPrefix="post_"/>
</resultMap>

<resultMap id="blogPostResult" type="Post">
  <id property="id" column="id"/>
  <result property="subject" column="subject"/>
  <result property="body" column="body"/>
</resultMap
columnPrefix说明:
| 属性 | 描述 |
|---|---|
| columnPrefix | 当连接多个表时,你可能会不得不使用列别名来避免在 ResultSet 中产生重复的列名。指定 columnPrefix 列名前缀允许你将带有这些前缀的列映射到一个外部的结果映射中。 |
| ofType | 这个属性非常重要,它用来将 JavaBean(或字段)属性的类型和集合存储的类型区分开来。 |
按查询嵌套处理
TeacherMapper接口编写方法
public Teacher getTeacher2(int id);
编写接口对应的Mapper配置文件
<select id="getTeacher2" resultMap="TeacherStudent2">
select * from teacher where id = #{id}
</select>
<resultMap id="TeacherStudent2" type="Teacher">
   <result property="id" column="id"/>
   <!--column是一对多的外键 , 写的是一的主键的列名-->
   <collection property="students" javaType="ArrayList" ofType="Student" column="id" select="getStudentByTeacherId"/>
</resultMap>
<select id="getStudentByTeacherId" resultType="Student">
  select * from student where tid = #{id}
</select>
首先,你会注意到我们使用的是集合元素。 接下来你会注意到有一个新的
“ofType”属性。这个属性非常重要,它用来将 JavaBean(或字段)属性的类型和集合存储的类型区分开来。<collection property="students" javaType="ArrayList" ofType="Student" column="id" select="getStudentByTeacherId"/>读作: “students 是一个存储Student 的 ArrayList 集合”
在一般情况下,MyBatis 可以推断 javaType 属性,因此并不需要填写。所以很多时候你可以简略成:<collection property="students" column="id" ofType="Student" select="getStudentByTeacherId"/>
多对多
用‘梨子’说明
搭建环境
有三张表:商品表、订单表、订单明细表
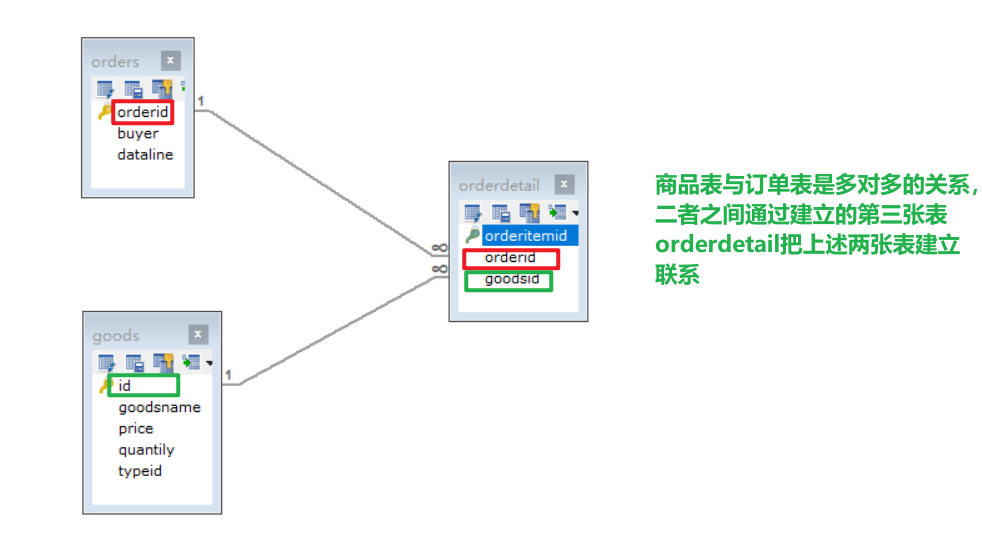
其中商品表与订单表的关系是多对多的关系。
-- 商品表
CREATE TABLE `goods` (
  `id` INT(11) NOT NULL AUTO_INCREMENT,
  `goodsname` VARCHAR(30) DEFAULT NULL,
  `price` INT(11) DEFAULT NULL,
  `quantily` INT(11) DEFAULT NULL,
  `typeid` INT,
  PRIMARY KEY (`id`)
) ENGINE=INNODB AUTO_INCREMENT=9 DEFAULT CHARSET=utf8

INSERT INTO goods VALUES(1,'电视机',5000,100,1);
INSERT INTO goods VALUES(2,'电冰箱',4000,1200,2);
INSERT INTO goods VALUES(3,'空调',3000,300,2);
INSERT INTO goods VALUES(4,'洗衣机',3500,400,2);
-- 订单表
CREATE TABLE orders(
	orderid INT PRIMARY KEY,
	buyer VARCHAR(20),
	dataline DATE
);

INSERT INTO orders VALUES(1,'公司A','2019-10-1');
INSERT INTO orders VALUES(2,'公司B','2019-10-2');
INSERT INTO orders VALUES(3,'公司C','2019-10-3');
INSERT INTO orders VALUES(4,'公司D','2018-10-4');

-- 订单明细表
CREATE TABLE orderdetail(
	orderitemid INT PRIMARY KEY,
	orderid INT ,
	goodsid INT
	FOREIGN KEY (orderid) REFERENCES orders(orderid),
	FOREIGN KEY (goodsid) REFERENCES goods(id)
);

-- drop table orderdetail

INSERT INTO orderdetail VALUES(1,1,1);
INSERT INTO orderdetail VALUES(2,1,2);
INSERT INTO orderdetail VALUES(3,2,2);
INSERT INTO orderdetail VALUES(4,2,3);
编写对应的实体bean
public class Goods {
    private Integer id;
    private String goodsname;
    private Integer price;
    private Integer quantily;
    private GoodsType goodsType;
    private List<Orders> ordersList;
    //省略get,set
}
/********************************************************/
public class Orders {
    private Integer orderid;
    private String buyer;
    private Date dataline;
    private List<Goods> goodsList;
     //省略get,set
}
/********************************************************/
public class OrderDetail {
    private String orderitemid;
    private String orderid;
    private String goodsid;
     //省略get,set
}
/********************************************************/
public interface OrderMapper {

	/**
	*查询id号订单对应有哪些商品
	*/
    public Orders quearyAllGoods(int id);
	/**
	*查询在那些订单里有id号商品
	*/
    public Goods quearyAllOrders(int id);
}
需求1:
查询1号订单有哪些商品
编写mapper.xml
<?xml version="1.0" encoding="UTF-8"?>
<!DOCTYPE mapper
        PUBLIC "-//mybatis.org//DTD Mapper 3.0//EN"
        "https://mybatis.org/dtd/mybatis-3-mapper.dtd">
<mapper namespace="com.hyl.mapper.OrderMapper">

    <select id="quearyAllGoods" resultMap="orderGoodsMap">
        SELECT a.orderid, c.id ,c.`goodsname`,c.price,c.quantily
        FROM orders a
        LEFT JOIN orderdetail b ON a.orderid = b.orderid
        LEFT JOIN  goods c ON b.goodsid = c.id
        WHERE a.orderid =#{id}
    </select>
    <resultMap id="orderGoodsMap" type="com.hyl.po.Orders">
        <result column="orderid" property="orderid" />
        <collection property="goodsList" ofType="com.hyl.po.Goods">
            <result column="id" property="id" />
            <result column="goodsname" property="goodsname" />
            <result column="price" property="price" />
            <result column="quantily" property="quantily" />
        </collection>
    </resultMap>
</mapper>
需求2:
查询在那些订单里有2号商品
编写mapper.xml
<?xml version="1.0" encoding="UTF-8"?>
<!DOCTYPE mapper
        PUBLIC "-//mybatis.org//DTD Mapper 3.0//EN"
        "https://mybatis.org/dtd/mybatis-3-mapper.dtd">
<mapper namespace="com.hyl.mapper.OrderMapper">

   <select id="quearyAllOrders" resultMap="goodsOrderMap">
        SELECT c.orderid,c.buyer,c.dataline, a.`goodsname`,a.id
        FROM goods a
        LEFT JOIN orderdetail b ON a.id = b.goodsid
        LEFT JOIN  orders c ON b.orderid = c.orderid
        WHERE a.id = #{id}
    </select>
    <resultMap id="goodsOrderMap" type="com.hyl.po.Goods">
        <result column="id" property="id" />
        <result column="goodsname" property="goodsname" />
        <collection property="ordersList" ofType="com.hyl.po.Orders">
            <result column="orderid" property="orderid" />
            <result column="buyer" property="buyer" />
            <result column="dataline" property="dataline" />
        </collection>
    </resultMap>
</mapper>
编写测试
public class test {
    public static void main(String[] args) {
        ApplicationContext ap=new ClassPathXmlApplicationContext("applicationContext.xml");
        OrderMapper bean = ap.getBean(OrderMapper.class);

        //查询1号订单有哪些商品
        Orders orders = bean.quearyAllGoods(1);
        List<Goods> list1 = orders.getGoodsList();
        System.out.println("订单号:"+orders.getOrderid());
        System.out.println(list1);

        //查询在那些订单里有2号商品
        Goods goods = bean.quearyAllOrders(2);
        System.out.println(goods.getId()+"  "+goods.getGoodsname()+":");
        List<Orders> ordersList = goods.getOrdersList();
        System.out.println(ordersList);
    }
}
小结
1、关联-association
2、集合-collection
3、所以association是用于一对一和多对一,而collection是用于一对多和多对多的关系
4、JavaType和ofType都是用来指定对象类型的
- JavaType是用来指定pojo中属性的类型
- ofType指定的是映射到list集合属性中pojo的类型。
12 动态SQL
动态 SQL 是 MyBatis 的强大特性之一。
动态 SQL简单理解:就根据不同的查询条件 , 生成不同的Sql语句。
要学习的标签:
- if
- choose (when, otherwise)
- trim (where, set)
- foreach
if
使用动态 SQL 最常见情景是根据条件包含 where 子句的一部分。比如:
<select id="findActiveBlogWithTitleLike"
     resultType="Blog">
  SELECT * FROM BLOG
  WHERE state = ‘ACTIVE’
  <if test="title != null">
    AND title like #{title}
  </if>
</select>
这条语句提供了可选的查找文本功能。如果不传入 “title”,那么所有处于 “ACTIVE” 状态的 BLOG 都会返回;如果传入了 “title” 参数,那么就会对 “title” 一列进行模糊查找并返回对应的 BLOG 结果
如果希望通过 “title” 和 “author” 两个参数进行可选搜索该怎么办呢?
<select id="findActiveBlogLike"
     resultType="Blog">
  SELECT * FROM BLOG WHERE state = ‘ACTIVE’
  <if test="title != null">
    AND title like #{title}
  </if>
  <if test="author != null and author.name != null">
    AND author_name like #{author.name}
  </if>
</select>
choose、when、otherwise
有时候,我们不想使用所有的条件,而只是想从多个条件中选择一个使用。针对这种情况,MyBatis 提供了choose 元素,它有点像 Java 中的 switch 语句。
还是上面的例子,但是策略变为:传入了 “title” 就按 “title” 查找,传入了 “author” 就按 “author” 查找的情形。若两者都没有传入,就返回标记为 featured 的 BLOG。
<select id="findActiveBlogLike"
     resultType="Blog">
  SELECT * FROM BLOG WHERE state = ‘ACTIVE’
  <choose>
    <when test="title != null">
      AND title like #{title}
    </when>
    <when test="author != null and author.name != null">
      AND author_name like #{author.name}
    </when>
    <otherwise>
      AND featured = 1
    </otherwise>
  </choose>
</select>
trim、where、set
where
where 元素只会在子元素返回任何内容的情况下才插入 “WHERE” 子句。而且,若子句的开头为 “AND” 或 “OR”,where 元素也会将它们去除。
<select id="findActiveBlogLike"
     resultType="Blog">
  SELECT * FROM BLOG
  <where>
    <if test="state != null">
         state = #{state}
    </if>
    <if test="title != null">
        AND title like #{title}
    </if>
    <if test="author != null and author.name != null">
        AND author_name like #{author.name}
    </if>
  </where>
</select>
trim
如果 where 元素与你期望的不太一样,你也可以通过自定义 trim 元素来定制 where 元素的功能。
prefixOverrides 属性会忽略通过管道符分隔的文本序列(注意此例中的空格是必要的)。下述例子会移除所有 prefixOverrides 属性中指定的内容,并且插入 prefix 属性中指定的内容。
where 元素等价的自定义 trim 元素为:<trim prefix="WHERE" prefixOverrides="AND |OR "> ... </trim>
set
set 元素可以用于动态包含需要
更新的列,忽略其它不更新的列。比如:
<update id="updateAuthorIfNecessary">
  update Author
    <set>
      <if test="username != null">username=#{username},</if>
      <if test="password != null">password=#{password},</if>
      <if test="email != null">email=#{email},</if>
      <if test="bio != null">bio=#{bio}</if>
    </set>
  where id=#{id}
</update>
这个例子中,set 元素会动态地在行首插入 SET 关键字,并会删掉额外的逗号(这些逗号是在使用条件语句给列赋值时引入的)。
使用trim实现该效果:我们覆盖了后缀值设置,并且自定义了前缀值。<trim prefix="SET" suffixOverrides=","> ... </trim>
foreach
动态 SQL 的另一个常见使用场景是对集合进行遍历(尤其是在构建 IN 条件语句的时候)。比如:
<select id="selectPostIn" resultType="domain.blog.Post">
  SELECT *
  FROM POST P
  <where>
    <foreach item="item" index="index" collection="list"
        open="ID in (" separator="," close=")" nullable="true">
          #{item}
    </foreach>
  </where>
</select>
foreach 元素的功能非常强大,它允许你指定一个集合,声明可以在元素体内使用的
集合项(item)和索引(index)变量。它也允许你指定开头(open)与结尾(close)的字符串以及集合项迭代之间的分隔符(separator)。
当使用可迭代对象或者数组时,index 是当前迭代的序号,item的值是本次迭代获取到的元素。当使用Map对象(或者 Map.Entry 对象的集合)时,index 是键,item 是值。
案例演示
搭建环境
新建一个数据库表:blog
CREATE TABLE `blog` (
`id` varchar(50) NOT NULL COMMENT '博客id',
`title` varchar(100) NOT NULL COMMENT '博客标题',
`author` varchar(30) NOT NULL COMMENT '博客作者',
`create_time` datetime NOT NULL COMMENT '创建时间',
`views` int(30) NOT NULL COMMENT '浏览量'
) ENGINE=InnoDB DEFAULT CHARSET=utf8
构建IDUtil工具类
public class IDUtil {
   public static String genId(){
       return UUID.randomUUID().toString().replaceAll("-","");
  }
}
实体类编写
import java.util.Date;

public class Blog {

   private String id;
   private String title;
   private String author;
   private Date createTime;
   private int views;
   //set,get....
}
编写接口和对应的xml文件
public interface BlogMapper {
}
<?xml version="1.0" encoding="UTF-8" ?>
<!DOCTYPE mapper
       PUBLIC "-//mybatis.org//DTD Mapper 3.0//EN"
       "http://mybatis.org/dtd/mybatis-3-mapper.dtd">
<mapper namespace="com.kuang.mapper.BlogMapper">

</mapper>
注册Mapper.xml
<mappers>
 <mapper resource="mapper/BlogMapper.xml"/>
</mappers>
编写接口方法和方法实现
//新增一个博客
int addBlog(Blog blog);
<insert id="addBlog" parameterType="blog">
  insert into blog (id, title, author, create_time, views)
  values (#{id},#{title},#{author},#{createTime},#{views});
</insert>
初始化博客
@Test
public void addInitBlog(){
   SqlSession session = MybatisUtils.getSession();
   BlogMapper mapper = session.getMapper(BlogMapper.class);

   Blog blog = new Blog();
   blog.setId(IDUtil.genId());
   blog.setTitle("Mybatis如此简单");
   blog.setAuthor("狂神说");
   blog.setCreateTime(new Date());
   blog.setViews(9999);

   mapper.addBlog(blog);

   blog.setId(IDUtil.genId());
   blog.setTitle("Java如此简单");
   mapper.addBlog(blog);

   blog.setId(IDUtil.genId());
   blog.setTitle("Spring如此简单");
   mapper.addBlog(blog);

   blog.setId(IDUtil.genId());
   blog.setTitle("微服务如此简单");
   mapper.addBlog(blog);

   session.close();
}
需求1 --->if,where的使用:根据作者名字和博客名字来查询博客!如果作者名字为空,那么只根据博客名字查询,反之,则根据作者名来查询
编写接口:
//需求1
List<Blog> queryBlogIf(Map map);
编写SQL语句
<!--需求1:
根据作者名字和博客名字来查询博客!
如果作者名字为空,那么只根据博客名字查询,反之,则根据作者名来查询
select * from blog where title = #{title} and author = #{author}
-->
<select id="queryBlogIf" parameterType="map" resultType="blog">
  select * from blog where
   <if test="title != null">
      title = #{title}
   </if>
   <if test="author != null">
      and author = #{author}
   </if>
</select>
但是如果title为空,那么查询语句为 select * from user where and author=#{author},这是错误的 SQL 语句,如何解决呢?
引入where,修改上面的sql
<select id="queryBlogIf" parameterType="map" resultType="blog">
  select * from blog
   <where>
       <if test="title != null">
          title = #{title}
       </if>
       <if test="author != null">
          and author = #{author}
       </if>
   </where>
</select>
需求2 ---> set,choose的使用进行更新操作
编写接口
int updateBlog(Map map);
sql配置文件
<!--注意set是用的逗号隔开-->
<update id="updateBlog" parameterType="map">
  update blog
     <set>
         <if test="title != null">
            title = #{title},
         </if>
         <if test="author != null">
            author = #{author}
         </if>
     </set>
  where id = #{id};
</update>
有时候,我们不想用到所有的查询条件,只想选择其中的一个,查询条件有一个满足即可,使用 choose 标签可以解决此类问题,类似于 Java 的 switch 语句
编写接口
List<Blog> queryBlogChoose(Map map);
sql配置文件
<select id="queryBlogChoose" parameterType="map" resultType="blog">
  select * from blog
   <where>
       <choose>
           <when test="title != null">
                title = #{title}
           </when>
           <when test="author != null">
              and author = #{author}
           </when>
           <otherwise>
              and views = #{views}
           </otherwise>
       </choose>
   </where>
</select>
需求3 --->foreach的使用我们需要查询 blog 表中 id 分别为1,2,3的博客信息
编写接口
List<Blog> queryBlogForeach(Map map);
编写SQL语句
<select id="queryBlogForeach" parameterType="map" resultType="blog">
  select * from blog
   <where>
       <!--
       collection:指定输入对象中的集合属性
       item:每次遍历生成的对象
       open:开始遍历时的拼接字符串
       close:结束时拼接的字符串
       separator:遍历对象之间需要拼接的字符串
       select * from blog where 1=1 and (id=1 or id=2 or id=3)
     -->
       <foreach collection="ids"  item="id" open="and (" close=")" separator="or">
          id=#{id}
       </foreach>
   </where>
</select>
测试
@Test
public void testQueryBlogForeach(){
   SqlSession session = MybatisUtils.getSession();
   BlogMapper mapper = session.getMapper(BlogMapper.class);

   HashMap map = new HashMap();
   List<Integer> ids = new ArrayList<Integer>();
   ids.add(1);
   ids.add(2);
   ids.add(3);
   map.put("ids",ids);

   List<Blog> blogs = mapper.queryBlogForeach(map);

   System.out.println(blogs);

   session.close();
}
13 缓存
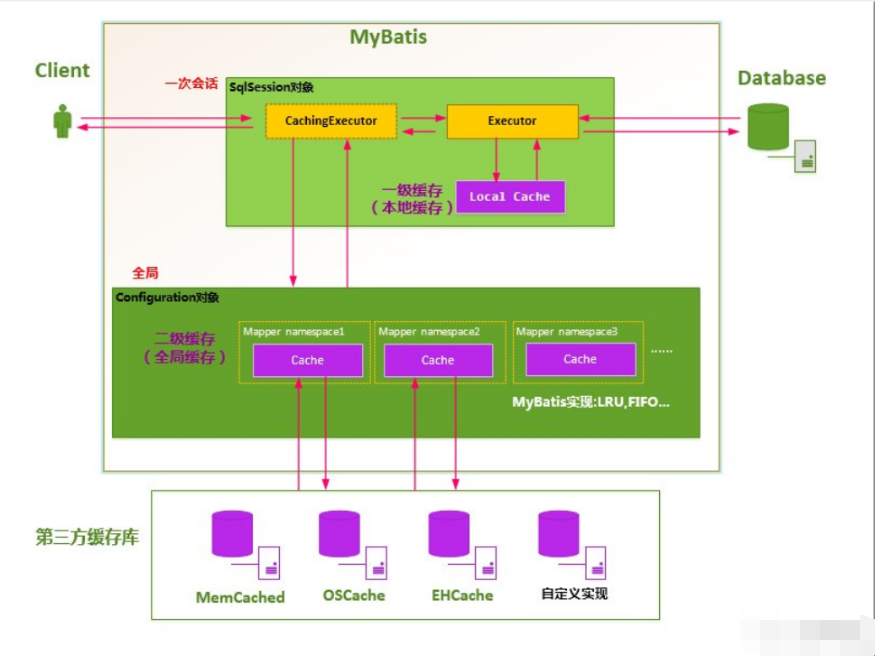
MyBatis 内置了一个强大的事务性查询缓存机制,它可以非常方便地配置和定制。
默认情况下,只启用了本地的会话缓存(一级缓存),它仅仅对一个会话中的数据进行缓存。
要启用全局的二级缓存,只需要在你的 SQL 映射文件中添加一行:<cache/>
1、什么是缓存 [ Cache ]?
存在内存中的临时数据。
将用户经常查询的数据放在缓存(内存)中,用户去查询数据就不用从磁盘上(关系型数据库数据文件)查询,从缓存中查询,从而提高查询效率,解决了高并发系统的性能问题。
2、为什么使用缓存?
减少和数据库的交互次数,减少系统开销,提高系统效率。
3、什么样的数据能使用缓存?
经常查询并且不经常改变的数据。
4、MyBatis系统中默认定义了两级缓存:一级缓存和二级缓存
默认情况下,只有一级缓存开启。(SqlSession级别的缓存,也称为本地缓存)
二级缓存需要手动开启和配置,他是基于namespace级别的缓存。
为了提高扩展性,MyBatis定义了缓存接口Cache。我们可以通过实现Cache接口来自定义二级缓存
一级缓存
一级缓存也叫本地缓存:(自己开启)
与数据库同一次会话期间(从SQLSession的创建到SQLSession的归还(close))查询到的数据会放在本地缓存中。以后如果需要获取相同的数据,直接从缓存中拿,没必须再去查询数据库;
测试
编写接口
//根据id查询用户
User queryUserById(@Param("id") int id);
接口对应的Mapper文件
<select id="queryUserById" resultType="user">
  select * from user where id = #{id}
</select>
编写测试(查询同一人员)
@Test
public void testQueryUserById(){
   SqlSession session = MybatisUtils.getSession();
   UserMapper mapper = session.getMapper(UserMapper.class);

   User user = mapper.queryUserById(1);
   System.out.println(user);
   User user2 = mapper.queryUserById(1);
   System.out.println(user2);
   System.out.println(user==user2);

   session.close();
}
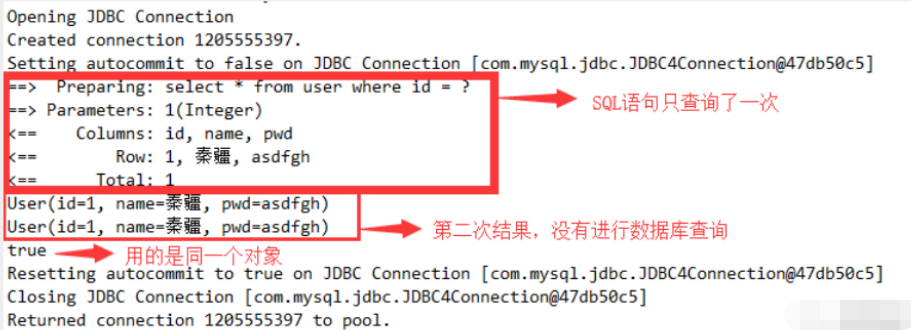
一级缓存失效的四种情况
一级缓存是SqlSession级别的缓存,是一直开启的,我们关闭不了它;
失效情况:没有使用到当前的一级缓存,效果就是,还需要再向数据库中发起一次查询请求!
1、sqlSession不同(session和session2)
每个sqlSession中的缓存相互独立
@Test
public void testQueryUserById(){
   SqlSession session = MybatisUtils.getSession();
   SqlSession session2 = MybatisUtils.getSession();
   UserMapper mapper = session.getMapper(UserMapper.class);
   UserMapper mapper2 = session2.getMapper(UserMapper.class);

   User user = mapper.queryUserById(1);
   System.out.println(user);
   User user2 = mapper2.queryUserById(1);
   System.out.println(user2);
   System.out.println(user==user2);

   session.close();
   session2.close();
}
2、sqlSession相同,查询条件不同
当前缓存中,不存在这个数据
@Test
public void testQueryUserById(){
   SqlSession session = MybatisUtils.getSession();
   UserMapper mapper = session.getMapper(UserMapper.class);
   UserMapper mapper2 = session.getMapper(UserMapper.class);

   User user = mapper.queryUserById(1);
   System.out.println(user);
   User user2 = mapper2.queryUserById(2);
   System.out.println(user2);
   System.out.println(user==user2);

   session.close();
}
3、sqlSession相同,两次查询之间执行了增删改操作!
因为增删改操作可能会对当前数据产生影响
编写新的方法
//修改用户
int updateUser(Map map);
编写SQL
<update id="updateUser" parameterType="map">
  update user set name = #{name} where id = #{id}
</update>
编写测试
@Test
public void testQueryUserById(){
   SqlSession session = MybatisUtils.getSession();
   UserMapper mapper = session.getMapper(UserMapper.class);

   User user = mapper.queryUserById(1);
   System.out.println(user);

   HashMap map = new HashMap();
   map.put("name","lisi");
   map.put("id",4);
   mapper.updateUser(map);

   User user2 = mapper.queryUserById(1);
   System.out.println(user2);

   System.out.println(user==user2);

   session.close();
}
4、sqlSession相同,手动清除一级缓存
@Test
public void testQueryUserById(){
   SqlSession session = MybatisUtils.getSession();
   UserMapper mapper = session.getMapper(UserMapper.class);

   User user = mapper.queryUserById(1);
   System.out.println(user);

   session.clearCache();//手动清除缓存

   User user2 = mapper.queryUserById(1);
   System.out.println(user2);

   System.out.println(user==user2);

   session.close();
}
二级缓存
二级缓存也叫全局缓存,一级缓存作用域太低了,所以诞生了二级缓存 (需手动开启)
基于namespace级别的缓存,一个名称空间,对应一个二级缓存;
工作机制一个会话查询一条数据,这个数据就会被放在当前会话的一级缓存中;
如果当前会话关闭了,这个会话对应的一级缓存就没了;
但是我们想要的是,会话关闭了,一级缓存中的数据被保存到二级缓存中;
新的会话查询信息,就可以从二级缓存中获取内容;
不同的mapper查出的数据会放在自己对应的缓存(map)中;
使用步骤
1、开启全局缓存 【mybatis-config.xml】
<setting name="cacheEnabled" value="true"/>
2、去每个mapper.xml中配置使用二级缓存【xxxMapper.xml】
<?xml version="1.0" encoding="UTF-8" ?>
<!DOCTYPE mapper
        PUBLIC "-//mybatis.org//DTD Config 3.0//EN"
        "https://mybatis.org/dtd/mybatis-3-mapper.dtd">
<mapper namespace="com.hyl.mapper.TeacherMapper">
<!-- 在当前Mapper中开启二级缓存   -->
    <cache/>

    <insert id="addTeacher" parameterType="Teacher">
        insert into teacher(id,name) values(#{id},#{name});
    </insert>
</mapper>
这个简单语句的效果如下:(
<cache/>)
- 映射语句文件中的所有 select 语句的结果将会被缓存。
- 映射语句文件中的所有 insert、update 和 delete 语句会刷新缓存。
- 缓存会使用最近最少使用算法(LRU, Least Recently Used)算法来清除不需要的缓存。
- 缓存不会定时进行刷新(也就是说,没有刷新间隔)。
- 缓存会保存列表或对象(无论查询方法返回哪种)的 1024 个引用。
- 缓存会被视为读/写缓存,这意味着获取到的对象并不是共享的,可以安全地被调用者修改,而不干扰其他调用者或线程所做的潜在修改。
这些属性可以通过 cache 元素的属性来修改。比如:
官方示例:
<cache
 eviction="FIFO"
 flushInterval="60000"
 size="512"
 readOnly="true"/>
这个更高级的配置创建了一个 FIFO 缓存,每隔 60 秒刷新,最多可以存储结果对象或列表的 512 个引用,而且返回的对象被认为是只读的,因此对它们进行修改可能会在不同线程中的调用者产生冲突。
| 属性 | 作用 |
|---|---|
| eviction(清除策略) | LRU – 最近最少使用:移除最长时间不被使用的对象。FIFO – 先进先出:按对象进入缓存的顺序来移除它们。SOFT – 软引用:基于垃圾回收器状态和软引用规则移除对象。WEAK – 弱引用:更积极地基于垃圾收集器状态和弱引用规则移除对象。默认的清除策略是 LRU。 |
| flushInterval(刷新间隔) | 属性可以被设置为任意的正整数,设置的值应该是一个以毫秒为单位的合理时间量。 默认情况是不设置,也就是没有刷新间隔,缓存仅仅会在调用语句时刷新。 |
| size(引用数目) | 属性可以被设置为任意正整数,要注意欲缓存对象的大小和运行环境中可用的内存资源。默认值是 1024。 |
| readOnly(只读) | 属性可以被设置为 true 或 false。只读的缓存会给所有调用者返回缓存对象的相同实例。 因此这些对象不能被修改。这就提供了可观的性能提升。而可读写的缓存会(通过序列化)返回缓存对象的拷贝。 速度上会慢一些,但是更安全,因此默认值是 false。 |
注意:
- 二级缓存是事务性的。这意味着,当 SqlSession 完成并提交时,或是完成并回滚,但没有执行 flushCache=true 的 insert/delete/update 语句时,缓存会获得更新。
(我的理解: 执行insert/delete/update 语句会刷新缓存,也就是更新,但是我们不执行这些语句,只是SqlSession 完成并提交时,或是完成并回滚,也会对应的更新缓存)- 缓存只作用于 cache 标签所在的映射文件中的语句。如果你混合使用 Java API 和 XML 映射文件,在共用接口中的语句将不会被默认缓存。你需要使用 @CacheNamespaceRef 注解指定缓存作用域。
代码测试:
@Test
public void testQueryUserById(){
   SqlSession session = MybatisUtils.getSession();
   SqlSession session2 = MybatisUtils.getSession();

   UserMapper mapper = session.getMapper(UserMapper.class);
   UserMapper mapper2 = session2.getMapper(UserMapper.class);

   User user = mapper.queryUserById(1);
   System.out.println(user);
   //关闭第一个session
   session.close();
  //用第二个session去查询同一个对象
   User user2 = mapper2.queryUserById(1);
   System.out.println(user2);
   System.out.println(user==user2);

   session2.close();
}
小结:
只要开启了二级缓存,我们在同一个Mapper中的查询,可以在二级缓存中拿到数据。
查出的数据都会被默认先放在一级缓存中,只有会话提交或者关闭以后,一级缓存中的数据才会转到二级缓存中。
缓存原理图
EhCache
EhCache 是一个纯Java的进程内缓存框架,具有快速、精干等特点,是Hibernate中默认的CacheProvider。
主要的特性有:
- 快速
- 简单
- 多种缓存策略
- 缓存数据有两级:内存和磁盘,因此无需担心容量问题
- 缓存数据会在虚拟机重启的过程中写入磁盘
- 可以通过RMI、可插入API等方式进行分布式缓存
- 具有缓存和缓存管理器的侦听接口
- 支持多缓存管理器实例,以及一个实例的多个缓存区域
- 提供Hibernate的缓存实现
EhCache使用步骤:
引入依赖的jar包
<!-- https://mvnrepository.com/artifact/org.mybatis.caches/mybatis-ehcache -->
<dependency>
    <groupId>org.mybatis.caches</groupId>
    <artifactId>mybatis-ehcache</artifactId>
    <version>1.2.3</version>
</dependency>
在mapper.xml中使用对应的缓存
<mapper namespace = “org.acme.FooMapper” >
   <cache type = “org.mybatis.caches.ehcache.EhcacheCache” />
</mapper>
编写ehcache.xml文件,如果在加载时未找到ehcache.xml资源或出现问题,则将使用默认配置。
<?xml version="1.0" encoding="UTF-8"?>
<ehcache xmlns:xsi="http://www.w3.org/2001/XMLSchema-instance"
        xsi:noNamespaceSchemaLocation="http://ehcache.org/ehcache.xsd"
        updateCheck="false">
   <!--
      diskStore:为缓存路径,ehcache分为内存和磁盘两级,此属性定义磁盘的缓存位置。参数解释如下:
      user.home – 用户主目录
      user.dir – 用户当前工作目录
      java.io.tmpdir – 默认临时文件路径
    -->
   <diskStore path="./tmpdir/Tmp_EhCache"/>

   <defaultCache
           eternal="false"
           maxElementsInMemory="10000"
           overflowToDisk="false"
           diskPersistent="false"
           timeToIdleSeconds="1800"
           timeToLiveSeconds="259200"
           memoryStoreEvictionPolicy="LRU"/>

   <cache
           name="cloud_user"
           eternal="false"
           maxElementsInMemory="5000"
           overflowToDisk="false"
           diskPersistent="false"
           timeToIdleSeconds="1800"
           timeToLiveSeconds="1800"
           memoryStoreEvictionPolicy="LRU"/>
</ehcache>
| 属性 | 作用 |
|---|---|
| defaultCache: | 默认缓存策略,当ehcache找不到定义的缓存时,则使用这个缓存策略。只能定义一个。 |
| name: | 缓存名称。 |
| maxElementsInMemory: | 缓存最大数目 |
| maxElementsOnDisk: | 硬盘最大缓存个数。 |
| eternal: | 对象是否永久有效,一但设置了,timeout将不起作用。 |
| overflowToDisk: | 是否保存到磁盘,当系统当机时 |
| timeToIdleSeconds: | 设置对象在失效前的允许闲置时间(单位:秒)。仅当eternal=false对象不是永久有效时使用,可选属性,默认值是0,也就是可闲置时间无穷大。 |
| timeToLiveSeconds: | 设置对象在失效前允许存活时间(单位:秒)。最大时间介于创建时间和失效时间之间。仅当eternal=false对象不是永久有效时使用,默认是0.,也就是对象存活时间无穷大。 |
| diskPersistent: | 是否缓存虚拟机重启期数据 Whether the disk store persists between restarts of the Virtual Machine. The default value is false. |
| diskSpoolBufferSizeMB: | 这个参数设置DiskStore(磁盘缓存)的缓存区大小。默认是30MB。每个Cache都应该有自己的一个缓冲区。 |
| diskExpiryThreadIntervalSeconds: | 磁盘失效线程运行时间间隔,默认是120秒。 |
| memoryStoreEvictionPolicy: | 当达到maxElementsInMemory限制时,Ehcache将会根据指定的策略去清理内存。默认策略是LRU(最近最少使用)。你可以设置为FIFO(先进先出)或是LFU(较少使用)。 |
| clearOnFlush: | 内存数量最大时是否清除。 |
| memoryStoreEvictionPolicy: | 可选策略有:LRU(最近最少使用,默认策略)、FIFO(先进先出)、LFU(最少访问次数)。FIFO,first in first out,这个是大家最熟的,先进先出。LFU, Less Frequently Used,就是上面例子中使用的策略,直白一点就是讲一直以来最少被使用的。如上面所讲,缓存的元素有一个hit属性,hit值最小的将会被清出缓存。 LRU,Least Recently Used,最近最少使用的,缓存的元素有一个时间戳,当缓存容量满了,而又需要腾出地方来缓存新的元素的时候,那么现有缓存元素中时间戳离当前时间最远的元素将被清出缓存。 |


 597
597


 被折叠的 条评论
为什么被折叠?
被折叠的 条评论
为什么被折叠?
 到【灌水乐园】发言


