


把下面的ts脚步拖拽到canvas节点上(并把目标3d节点拖拽到SlideSideToSide装饰器上)
 然后添加widget组件,并设置成如下参数
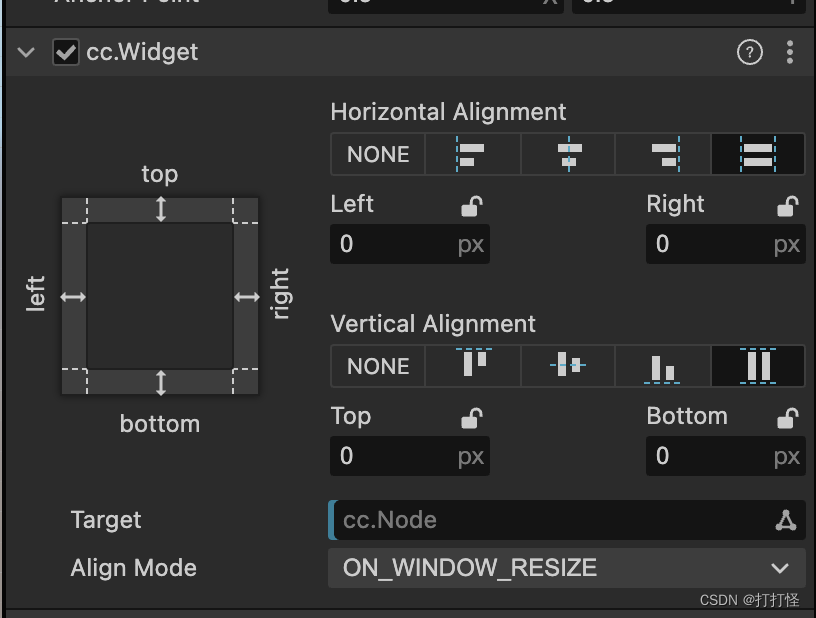
然后保存场景即可预览
import { _decorator, Component, Touch, find, Node, NodeEventType, Vec2, Vec3 } from 'cc';
const { ccclass, property } = _decorator;
@ccclass('SlideSideToSide')
export class SlideSideToSide extends Component {
//第 0 步 以下
@property({ displayName: '目标节点', tooltip: "旋转中心点", type: Node })
targetPositionNode: Node;
//第 0 步 以上是最开始
//下面的属性是用到的时候才声明
public static Instance: SlideSideToSide = null;
private theta: number = 0;
private curTheta: number = 0;
private phi: number = 0;
private curPhi: number = 0;
private rotateSpeedHorizontal = 0.001;
private rotateSpeedVertical = 0.001;
private camera: Node;
private distance: number;
private cameWorldPos: Vec3;
private x: number;
private y: number;
private z: number;
private num = 0.08;
private namePos: string;
private angleStart: number;
private deltaStart: Vec2;
private deltaMove: Vec2;
private initCameraPos: Vec3;
private isRotate = false;
private targetPosition: Vec3;
//第(8)步
constructor() {
super();
if (SlideSideToSide.Instance === null) {
SlideSideToSide.Instance = this;
} else {
this.destroy;
return;
}
}
onLoad() {
//第(6)步
this.camera = find("Main Camera");
//第(5)步
this.updateTargetCenter(this.targetPositionNode);
}
//第(1)步
protected start(): void {
this.registerTouchEvent();
}
updateTargetCenter(targetCenter: Node) {
this.initCameraPos = this.camera.getWorldPosition();
this.cameWorldPos = this.camera.getWorldPosition();
const delta = targetCenter.getWorldPosition().subtract(this.camera.getWorldPosition());
this.distance = delta.length();
this.theta = Math.atan2(-delta.z, -delta.x);
this.phi = Math.acos(-delta.y / this.distance);
this.camera.lookAt(targetCenter.getWorldPosition());
this.targetPosition = targetCenter.getWorldPosition();
this.updateRotation(0, 0);
}
//第(4)步
updateRotation(deltaTheta: number, deltaPhi: number) {
// 根据 delta 增量计算水平和垂直角度变化量
deltaTheta = deltaTheta * this.rotateSpeedHorizontal;
deltaPhi = deltaPhi * this.rotateSpeedVertical;
// 更新水平和垂直旋转角度
this.curTheta = this.theta + deltaTheta;
this.curPhi = Math.max(0, Math.min(Math.PI, this.phi + deltaPhi));
// 根据距离和当前水平与垂直夹角更新摄像机位置和朝向
this.updateObjectRotation();
// 更新摄像机水平和垂直旋转角度
this.theta = this.curTheta;
this.phi = this.curPhi;
}
//第(4)步
updateObjectRotation() {
const delta = this.camera.getWorldPosition().subtract(this.targetPosition);
this.distance = delta.length();
if (this.phi > Math.PI / 2.001) this.phi = Math.PI / 2.001; //水平旋转删除这两行
else if (this.phi < 0.001) //水平旋转删除这两行
this.phi = 0.001;
this.x = this.distance * Math.sin(this.phi) * Math.cos(this.theta);
this.y = this.distance * Math.cos(this.phi);
this.z = this.distance * Math.sin(this.phi) * Math.sin(this.theta);
this.camera.setWorldPosition(this.targetPosition.x + this.x, this.targetPosition.y + this.y, this.targetPosition.z + this.z);
this.camera.lookAt(this.targetPosition);
}
//第(3)步
onTouch_Start(event: Touch) {
this.targetPosition = this.targetPositionNode.getWorldPosition();
}
// 移动Node
onTouch_Move(event: Touch) {
const delta = event.getDelta();
this.updateRotation(delta.x, delta.y);
}
onTouch_Cancel() {
}
//第(2)步
registerTouchEvent() {
this.node.on(NodeEventType.TOUCH_START, this.onTouch_Start, this);
this.node.on(NodeEventType.TOUCH_MOVE, this.onTouch_Move, this);
this.node.on(NodeEventType.TOUCH_END, this.onTouch_Cancel, this);
this.node.on(NodeEventType.TOUCH_CANCEL, this.onTouch_Cancel, this);
}
//第(7)步
onDestroy() {
this.node.on(NodeEventType.TOUCH_START, this.onTouch_Start, this);
this.node.on(NodeEventType.TOUCH_END, this.onTouch_Cancel, this);
this.node.on(NodeEventType.TOUCH_CANCEL, this.onTouch_Cancel, this);
}
}
//当按我的步骤打的时候会爆红,是因为相关的变量没声明,或者没在cc里面倒入;如果遇到不懂//的可以问一下gtp或者文心一言
//温馨提示:有时候它给的说法并不一定准确,大家要有辨别是非的能力,包括gtp。


 9387
9387


 被折叠的 条评论
为什么被折叠?
被折叠的 条评论
为什么被折叠?
 到【灌水乐园】发言


