


一、个人任务
本周我的任务主要有以下两个
- 实现系统语音识别任务
- 初步建立系统数据库
二、任务1——实现系统语音识别任务
在进行语音识别任务前,我先对语音识别的原理以及常见的简单实现进行了初步了解。
2.1 关于语音识别
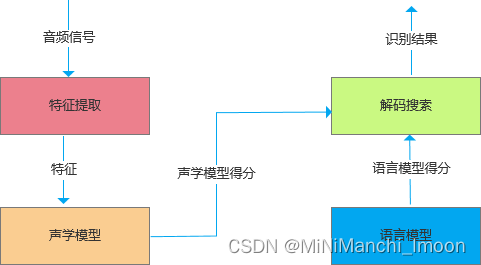
语音识别的最主要过程是:
- 特征提取:从声音波形中提取声学特征;
- 声学模型(语音模型):将声学特征转换成发音的音素;
- 语言模型使用语言模型等解码技术转变成我们能读懂的文本。
- 语音识别系统的典型结构如图1所示:
声音实际上一种波,原始的音频文件叫WAV文件,WAV文件中存储的除了一个文件头以外,就是声音波形的一个个点。如图2所示:

要对声音进行分析,首先对声音进行分帧,把声音切分成很多小的片段,帧与帧之间有一定的交叠,如图3,每一帧长度是25ms,帧移是10ms,两帧之间有25-10=15ms的交叠。
分帧后,音频数据就变成了很多小的片段,然后针对小片段进行特征提取,常见的提取特征的方法有:线性预测编码(Linear Predictive Coding,LPC),梅尔频率倒谱系数(Mel-frequency Cepstrum),把一帧波形变成一个多维向量的过程就是声学特征提取。
音素是人发音的基本单位。对于英文,常用的音素是一套39个音素组成的集合。对于汉语,基本就是汉语拼音的生母和韵母组成的音素集合,大概200多个。得到声音的音素序列后,就可以使用语言模型等解码技术将音素序列转换成我们可以读懂的文本。解码过程对给定的音素序列和若干假设词序列计算声学模型和语言模型分数,将总体输出分数最高的序列作为识别的结果。
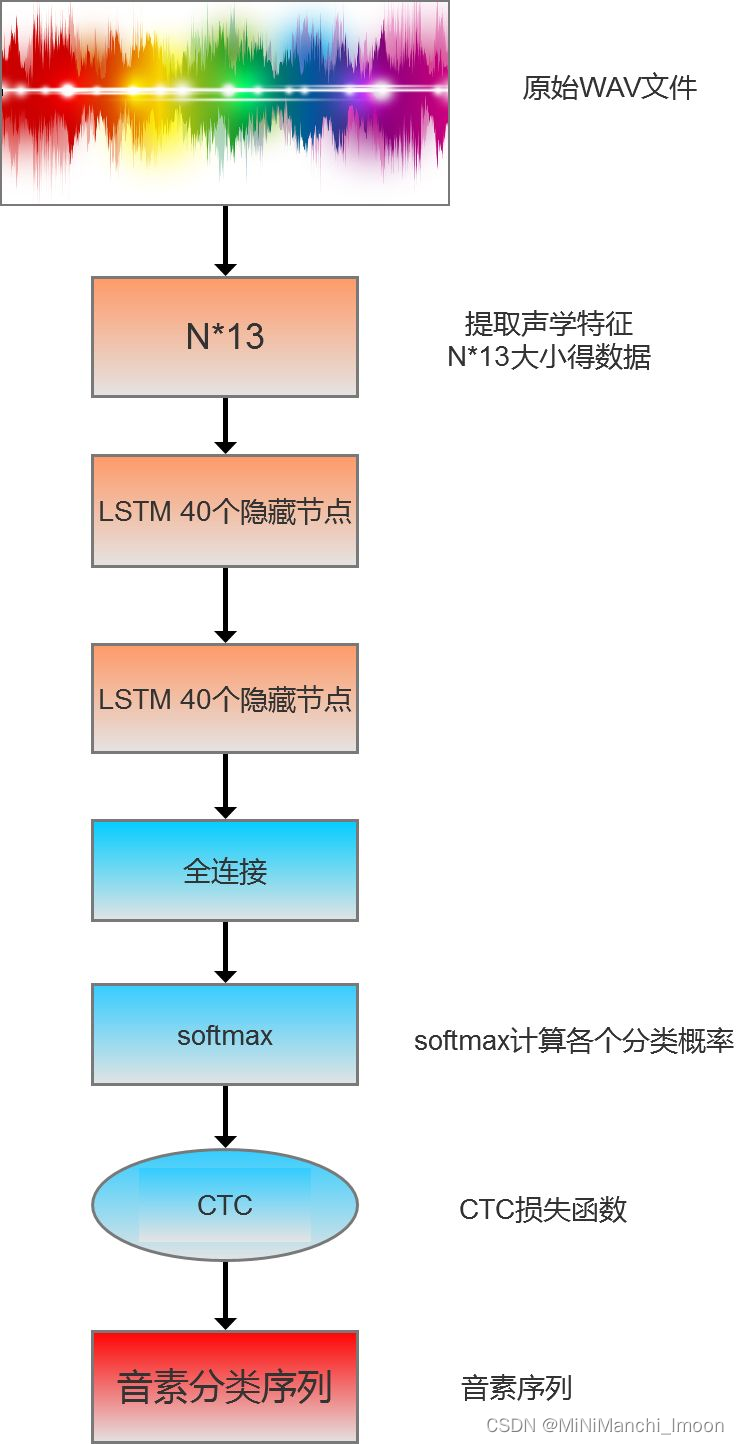
如何用tensorflow的LSTM+CTC完成一个端到端的语音识别,为了简化操作,本例子中的语音识别只训练一句话,这句话中的音素分类也简化成对应的字母(与真实因素的训练过程原理一致)。计算过程如下图所示
下面介绍关键的LSTM,定义双向LSTM及LSTM之后的特征映射
def inference(inputs, seq_len):
      #定义一个向前计算的LSTM单元,40个隐藏单元
      cell_fw = tf.contrib.rnn.LSTMCell(num_hidden,
                        initializer=tf.random_normal_initializer(
                                        mean=0.0, stddev=0.1),
                        state_is_tuple=True)

      # 组成一个有2个cell的list
      cells_fw = [cell_fw] * num_layers
      # 定义一个向后计算的LSTM单元,40个隐藏单元
      cell_bw = tf.contrib.rnn.LSTMCell(num_hidden,
                                    initializer=tf.random_normal_initializer(
                                                       mean=0.0, stddev=0.1),
                                                       state_is_tuple=True)
      # 组成一个有2个cell的list
      cells_bw = [cell_bw] * num_layers
      outputs, _, _ = tf.contrib.rnn.stack_bidirectional_dynamic_rnn(cells_fw, cells_bw, inputs,
                                                               dtype=tf.float32,
                                                                 sequence_length=seq_len)

      shape = tf.shape(inputs)
      batch_s, max_timesteps = shape[0], shape[1]
      outputs = tf.reshape(outputs, [-1, num_hidden])

      W = tf.Variable(tf.truncated_normal([num_hidden,
                                         num_classes],
                                        stddev=0.1))

      b = tf.Variable(tf.constant(0., shape=[num_classes]))
      # 进行全连接线性计算
      logits = tf.matmul(outputs, W) + b
      # 将全连接计算的结果,由宽度40变成宽度80,
      # 即最后的输入给CTC的数据宽度必须是26+2的宽度
      logits = tf.reshape(logits, [batch_s, -1, num_classes])
      # 转置,将第一维和第二维交换。
      # 变成序列的长度放第一维,batch_size放第二维。
      # 也是为了适应Tensorflow的CTC的输入格式
      logits = tf.transpose(logits, (1, 0, 2))
      return logits
2.2 语音识别实践
1.创建语音识别对象:
如果浏览器支持语音识别,则创建一个新的SpeechRecognition对象。这个对象将用于控制语音识别的各个方面。
2.配置语音识别对象:
你可以配置SpeechRecognition对象的各种属性,如:
- continuous:是否连续识别用户的语音输入。
- interimResults:是否返回中间结果,即用户还在说话时返回的部分识别结果。
- lang:设置识别语言,如'zh-CN'代表简体中文。
3.添加事件监听器:
为SpeechRecognition对象添加事件监听器以处理各种情况:
- onstart:当语音识别开始时触发。
- onresult:当语音识别结果可用时触发。你可以在这个事件处理函数中更新UI以显示识别到的文本。
- onerror:当语音识别发生错误时触发。你可以在这里处理错误情况或向用户显示错误信息。
- onend:当语音识别结束时触发。你可以在这里重置UI或执行其他必要的操作。
- 开始和停止语音识别:
- 提供用户界面元素(如按钮)来允许用户开始和停止语音识别。当用户点击“开始”按钮时,调用SpeechRecognition对象的start()方法;当用户点击“停止”按钮时,调用stop()方法。
4.处理识别结果:
在onresult事件处理函数中,可以通过遍历event.results数组并访问每个SpeechRecognitionResult对象的transcript属性来完成的。
- UI反馈:提供清晰的UI反馈,告诉用户语音识别是否正在运行、是否已识别到文本等。
- 其他功能:根据需要添加其他功能,如语音转文本后的进一步处理(如搜索、翻译等)或语音识别的其他选项(如选择不同的识别语言)。
具体代码如下
<template>
  <div class="hea1" style="padding: 20px;">
    <h3>录音上传</h3>

    <div style="font-size: 14px">
      <h3>录音时长:{{ recorder && recorder.duration.toFixed(4) }}</h3>
      <el-button type="primary" @click="handleStart">开始录音</el-button>
      <el-button type="info" @click="handlePause">暂停录音</el-button>
      <el-button type="success" @click="handleResume">继续录音</el-button>
      <el-button type="warning" @click="handleStop">停止录音</el-button>
      <br><br>
      <h3>
        播放时长:{{
          recorder &&
          (playTime > recorder.duration
            ? recorder.duration.toFixed(4)
            : playTime.toFixed(4))
        }}
      </h3>
      <audio ref="audios" :src="this.audio" controls ></audio>
      <br />
      <div class="bo">
      <!-- <el-button type="primary" @click="handlePlay">播放录音</el-button>
      <el-button type="info" @click="handlePausePlay">暂停播放</el-button>
      <el-button type="success" @click="handleResumePlay">继续播放</el-button>
      <el-button type="warning" @click="handleStopPlay">停止播放</el-button> -->

      <el-button type="error" @click="handleDestroy">销毁录音</el-button>
      <el-button type="info" @click="downWAV">下载WAV</el-button>
      <el-button type="info" @click="downPCM">下载pcm</el-button>
      <el-button type="primary" @click="uploadRecord">上传</el-button>
      <el-button type="success" @click="getResults">识别结果</el-button>
      </div>

      <br />
      <br />
      <textarea
        name=""
        id="textarea"
        style="width: 100%; height: 100px"
        cols="30"
        rows="10"
        v-model="result"
      />
    </div>
  </div>
</template>

<script>
import Recorder from "js-audio-recorder";
//import MyRecorder from '../js/MyRecorder'
import { v4 as uuidv4 } from "uuid";
import axios from 'axios';
uuidv4();
//const baseURL = "http://10.34.23.133:8899/asr/non_real";

export default {
  data() {
    return {
      recorder: null,
      playTime: 0,
      timer: null,
      src: null,
      sessionId: "",
      audio: "",
      data: "",
      result: "",
    };
  },
  created() {},
  mounted() {
    this.dataRecorder = this.data;
  },
  methods: {
    // 开始录音
    handleStart() {
      const uuid = require("uuid");
      this.sessionId = uuid.v4();
      console.log(this.sessionId);

      this.recorder = new Recorder({
        sampleBits: 16, // 采样位数,支持 8 或 16,默认是16
        sampleRate: 16000, // 采样率,支持 11025、16000、22050、24000、44100、48000,根据浏览器默认值,我的chrome是48000
        numChannels: 1, // 声道,支持 1 或 2, 默认是1
        // compiling: false,(0.x版本中生效,1.x增加中)  // 是否边录边转换,默认是false
      });
      console.log(this.recorder)
      Recorder.getPermission().then(
        () => {
          console.log("开始录音");

          this.recorder.start(); // 开始录音
        },
        (error) => {
          this.$message({
            message: "请先允许该网页使用麦克风",
            type: "info",
          });
          console.log(`${error.name} : ${error.message}`);
        }
      );
    },
    handlePause() {
      console.log("暂停录音");
      this.recorder.pause(); // 暂停录音
    },
    handleResume() {
      console.log("恢复录音");
      this.recorder.resume(); // 恢复录音
    },
    handleStop() {
      console.log("停止录音");
      this.recorder.stop(); // 停止录音
      this.handlePlay();  //
    },


    handlePlay() {
      console.log("播放录音");
      console.log(this.recorder);
      const bl=this.recorder.getWAVBlob()
      const r = new FileReader();
      r.readAsArrayBuffer(bl);
      r.onload = (e) => {
        const bufer = e.srcElement.result;
        const b = this.addWavHeader(bufer, 16000, 16, 1);
        this.audio = window.URL.createObjectURL(b);
};


    console.log(this.$refs.audios);
    //  this.recorder.play(); // 播放录音

      // 播放时长
      this.timer = setInterval(() => {
        try {
          this.playTime = this.recorder.getPlayTime();
        } catch (error) {
          this.timer = null;
        }
      }, 100);
    },
addWavHeader(samples, sampleRateTmp, sampleBits, channelCount) {
      const dataLength = samples.byteLength;
      /* 新的buffer类,预留44bytes的heaer空间 */
      const buffer = new ArrayBuffer(44 + dataLength);
      /* 转为 Dataview, 利用API来填充字节 */
      const view = new DataView(buffer);
      let offset = 0;
      /* ChunkID, 4 bytes,  资源交换文件标识符 */
      this.writeString(view, offset, 'RIFF'); offset += 4;
      /* ChunkSize, 4 bytes, 下个地址开始到文件尾总字节数,即文件大小-8 */
      view.setUint32(offset, /* 32 */ 36 + dataLength, true); offset += 4;
      /* Format, 4 bytes, WAV文件标志 */
      this.writeString(view, offset, 'WAVE'); offset += 4;
      /* Subchunk1 ID, 4 bytes, 波形格式标志 */
      this.writeString(view, offset, 'fmt '); offset += 4;
      /* Subchunk1 Size, 4 bytes, 过滤字节,一般为 0x10 = 16 */
      view.setUint32(offset, 16, true); offset += 4;
      /* Audio Format, 2 bytes, 格式类别 (PCM形式采样数据) */
      view.setUint16(offset, 1, true); offset += 2;
      /* Num Channels, 2 bytes,  通道数 */
      view.setUint16(offset, channelCount, true); offset += 2;
      /* SampleRate, 4 bytes, 采样率,每秒样本数,表示每个通道的播放速度 */
      view.setUint32(offset, sampleRateTmp, true); offset += 4;
      /* ByteRate, 4 bytes, 波形数据传输率 (每秒平均字节数) 通道数×每秒数据位数×每样本数据位/8 */
      view.setUint32(offset, sampleRateTmp * channelCount * (sampleBits / 8), true); offset += 4;
      /* BlockAlign, 2 bytes, 快数据调整数 采样一次占用字节数 通道数×每样本的数据位数/8 */
      view.setUint16(offset, channelCount * (sampleBits / 8), true); offset += 2;
      /* BitsPerSample, 2 bytes, 每样本数据位数 */
      view.setUint16(offset, sampleBits, true); offset += 2;
      /* Subchunk2 ID, 4 bytes, 数据标识符 */
      this.writeString(view, offset, 'data'); offset += 4;
      /* Subchunk2 Size, 4 bytes, 采样数据总数,即数据总大小-44 */
      view.setUint32(offset, dataLength, true); offset += 4;
      if (sampleBits === 16) {
        this.floatTo16BitPCM(view, samples);
      } else if (sampleBits === 8) {
        this.floatTo8BitPCM(view, samples);
      } else {
        this.floatTo32BitPCM(view, samples);
      }
      return new Blob([view], { type: 'audio/wav' });
    },
writeString(view, offset, string) {
      for (let i = 0; i < string.length; i += 1) {
        view.setUint8(offset + i, string.charCodeAt(i));
      }
    },
floatTo32BitPCM(output, input) {
      const oinput = new Int32Array(input);
      let newoffset = 44;
      for (let i = 0; i < oinput.length; i += 1, newoffset += 4) {
        output.setInt32(newoffset, oinput[i], true);
      }
    },
floatTo16BitPCM(output, input) {
      const oinput = new Int16Array(input);
      let newoffset = 44;
      for (let i = 0; i < oinput.length; i += 1, newoffset += 2) {
        output.setInt16(newoffset, oinput[i], true);
      }
    },
floatTo8BitPCM(output, input) {
      const oinput = new Int8Array(input);
      let newoffset = 44;
      for (let i = 0; i < oinput.length; i += 1, newoffset += 1) {
        output.setInt8(newoffset, oinput[i], true);
      }
    },


    handlePausePlay() {
      console.log("暂停播放");
      this.recorder.pausePlay(); // 暂停播放

      // 播放时长
      this.playTime = this.recorder.getPlayTime();
      this.time = null;
    },
    handleResumePlay() {
      console.log("恢复播放");
      this.recorder.resumePlay(); // 恢复播放

      // 播放时长
      this.timer = setInterval(() => {
        try {
          this.playTime = this.recorder.getPlayTime();
        } catch (error) {
          this.timer = null;
        }
      }, 100);
    },
    handleStopPlay() {
      console.log("停止播放");
      this.recorder.stopPlay(); // 停止播放

      // 播放时长
      this.playTime = this.recorder.getPlayTime();
      this.timer = null;
    },
    handleDestroy() {
      console.log("销毁实例");
      this.recorder.destroy(); // 毁实例
      this.timer = null;
    },
    downWAV() {
      this.recorder.downloadWAV("下载wav");
    },
    downPCM() {
      this.recorder.downloadPCM("下载pcm");
    },
    uploadRecord() {
      if (this.recorder == null || this.recorder.duration === 0) {
        this.$message({
          message: "请先录音",
          type: "error",
        });
        return false;
      }
      this.recorder.pause(); // 暂停录音
      this.timer = null;
      console.log("上传录音"); // 上传录音

      const formData = new FormData();
      const blob = this.recorder.getWAVBlob(); // 获取wav格式音频数据
      console.log(blob);
      // 此处获取到blob对象后需要设置fileName满足当前项目上传需求,可直接传把blob作为file塞入formData
      const newbolb = new Blob([blob], { type: "audio/wav" });
      const fileOfBlob = new File([newbolb], new Date().getTime() + ".wav");
      console.log(fileOfBlob);
      formData.append("file", blob);
      console.log(formData);
      const url = window.URL.createObjectURL(fileOfBlob);
      this.src = url;
      console.log(url);
      this.$axios({
        url:'https://10.45.192.42:8899/asr/non_real/putAudio?asrType=non_real&sessionId=' + this.sessionId ,
        //url: this.baseURL + '/putAudio?asrType=non_real&sessionId=' + this.sessionID,
        method: "post",
        headers: {
          "Content-Type": "multipart/form-data",
        },
        data: formData,
      }).then(function (res) {
        if (res.data == 200) {
          alert("上传完成可以识别");
        } else {
          alert("上传失败请重试");
        }
      });
    },
    //识别结果
    getResults() {
      console.log("识别结果");
      this.$axios({
         url:"https://10.85.134.230:8899/asr/non_real/getResult",
        method: "get",
        params: {
          sessionId: this.sessionId,
        }
      }).then((response) => (this.result = response.data));

    },
  },
};
</script>
<style scoped>
.hea1 {
  line-height: 20px;
}
.bo {
  display: flex;
  justify-content: space-between;
  flex:1
}
</style>
后端主要通过调用科大讯飞的语音处理接口,最后可成功实现语音识别任务。
三、任务2——初步建立系统数据库
经过小组讨论,我们初步确定了四个基本的表,如下

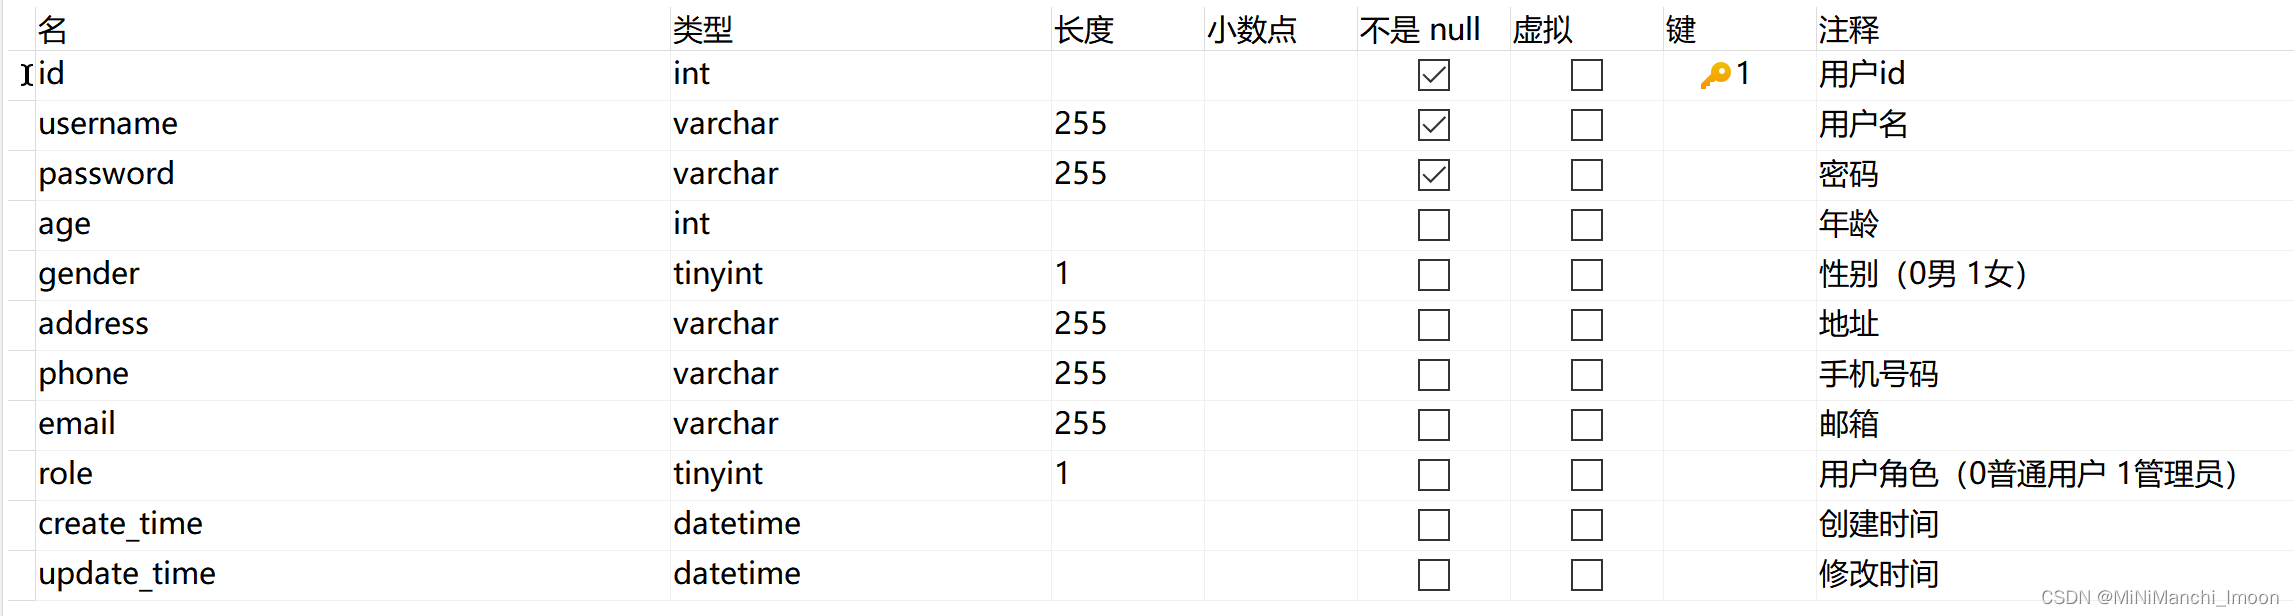
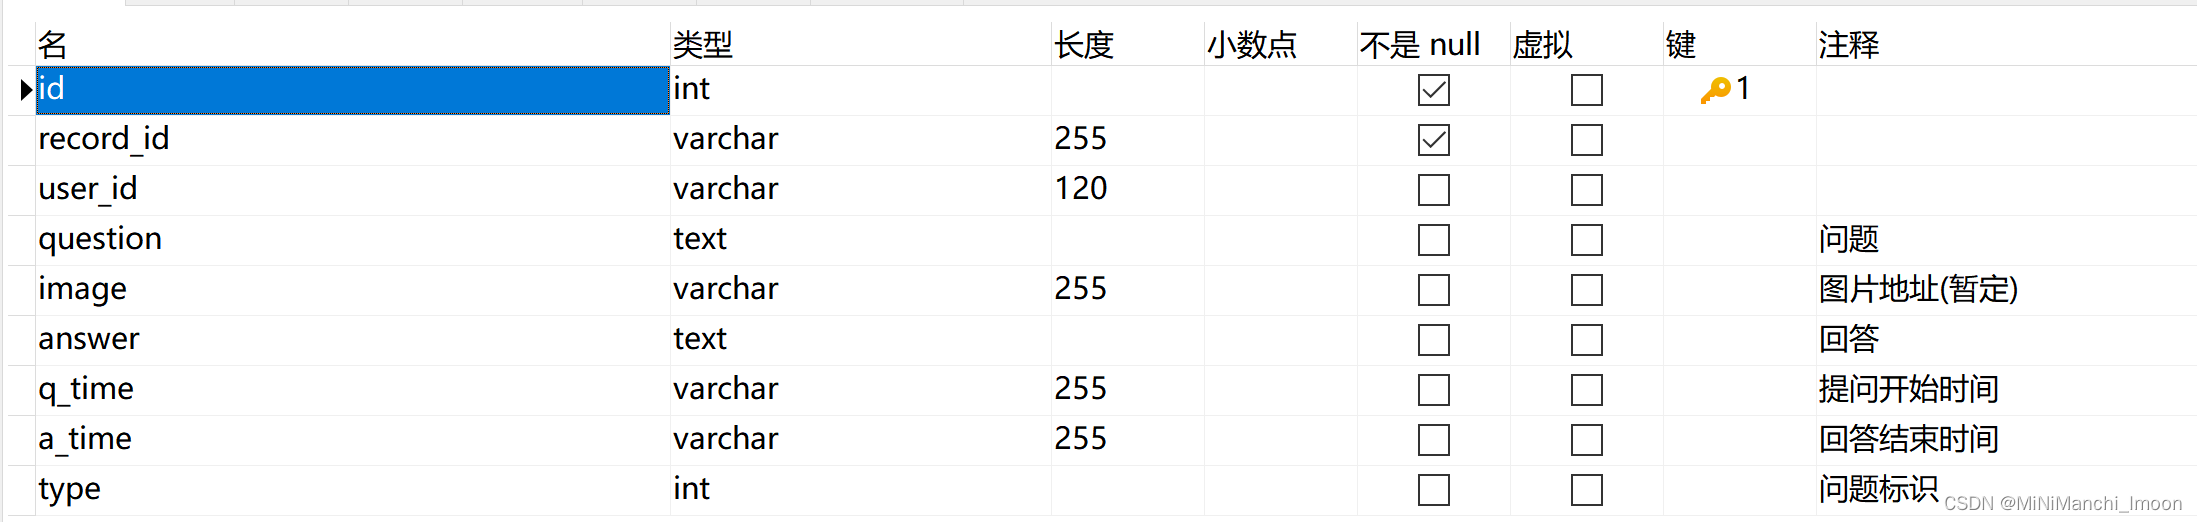
其中user_info记录用户的基本信息,user_record记录用户的对话历史记录,records记录系统中每一个对话,user_feedback记录用户的反馈信息
它们具体的内容如下
user_info
user_record

user_feedback

records
四、总结
1.系统语音识别任务实现
本周我专注于实现系统的语音识别功能。通过深入研究Web Speech API中的SpeechRecognition接口,我成功在前端集成了语音识别能力。该功能允许用户通过语音输入与系统交互,而无需手动输入文本。为了确保系统的兼容性和鲁棒性,我测试了多种浏览器环境,并对识别结果进行了优化处理。目前,系统能够准确识别用户的语音指令,并做出相应响应,为后续的交互体验打下了坚实的基础。
2.初步建立系统数据库
在系统开发过程中,数据库的设计和管理是至关重要的一环。本周我初步建立了系统的数据库架构,并完成了部分基础数据的录入。根据系统的业务需求,我设计了合理的数据库表结构,并定义了数据之间的关系。同时,我还编写了相应的数据操作逻辑,确保数据的准确性和一致性。通过建立数据库,我们能够更加高效地存储和管理系统数据,为后续的功能开发和数据分析提供有力支持。


 461
461


 被折叠的 条评论
为什么被折叠?
被折叠的 条评论
为什么被折叠?
 到【灌水乐园】发言


