


一、个人任务
在本次任务中,我主要负责了两个关键部分:
一是微调XrayGLM模型以提高其在胸部X光片图像识别上的准确性,并对比微调前后的输出效果;二是设计与实现一个用户友好的前端页面,特别是侧边栏的设计,让用户能够方便地与模型进行交流对话。
二、任务1——效果对比
为了提升XrayGLM模型在胸部X光片图像识别上的准确性,我们对其进行了微调。微调模型涉及对预训练模型进行参数调整,以使其更好地适应特定的数据集和任务。
-
1. 实现过程
数据准备:收集并整理了胸部X光片图像数据集,包括正常图像和各类异常图像。
数据集分割:将原始的JSON文件(openi-zh.json)分割为两个新的JSON文件(train_data.json和test_data.json文件):一个用于训练,一个用于测试,用于模型的训练和评估。
import json
import random

# 假设json_file_path是JSON文件的路径
json_file_path = './data/Xray/openi-zh.json'

# 读取JSON文件并加载数据
with open(json_file_path, 'r', encoding='utf-8') as file:
    data = json.load(file)

# 假设annotations是我们要分割的键
annotations = data['annotations']

# 设定训练集和测试集的比例
train_ratio = 0.8
test_ratio = 0.2

# 计算训练集和测试集的大小
train_size = int(len(annotations) * train_ratio)
test_size = len(annotations) - train_size

# 打乱annotations列表的顺序
random.shuffle(annotations)

# 分割annotations为训练集和测试集
train_annotations = annotations[:train_size]
test_annotations = annotations[train_size:]

# 创建新的训练集和测试集字典
train_data = {'annotations': train_annotations}
test_data = {'annotations': test_annotations}

# 将训练集和测试集写入新的JSON文件,确保Unicode编码不被解码
with open('train_data.json', 'w', encoding='utf-8') as train_file:
    json.dump(train_data, train_file, ensure_ascii=True)  # 使用ensure_ascii=True来保留Unicode编码

with open('test_data.json', 'w', encoding='utf-8') as test_file:
    json.dump(test_data, test_file, ensure_ascii=True)  # 使用ensure_ascii=True来保留Unicode编码
模型微调:加载预训练的XrayGLM模型,并在新的数据集上进行微调。通过调整学习率、批次大小等超参数,确保模型能够有效学习新数据的特征。
gpt_options=" \
       --experiment-name finetune-$MODEL_TYPE \
       --model-parallel-size ${MP_SIZE} \
       --mode finetune \
       --train-iters 4000 \
       --resume-dataloader \
       $MODEL_ARGS \
       --train-data ${train_data} \
       --valid-data ${eval_data} \
       --distributed-backend nccl \
       --lr-decay-style cosine \
       --warmup .02 \
       --checkpoint-activations \
       --save-interval 400 \
       --eval-interval 400 \
       --save "./checkpoints" \
       --split 1 \
       --eval-iters 8 \
       --eval-batch-size 10 \
       --zero-stage 1 \
       --lr 0.00012 \
       --batch-size 10 \
       --skip-init \
       --fp16 \
       --use_lora
"
效果评估:对比微调前后的模型输出与数据集原回答,评估模型在识别准确性、召回率、F1值等指标上的提升。
-
2. 对比结果
微调前:模型在某些复杂病例上的识别准确率较低,容易将某些异常图像误判为正常图像。
微调后:模型在识别准确率、召回率和F1值上均有所提升,尤其是在复杂病例上的识别效果明显改善。
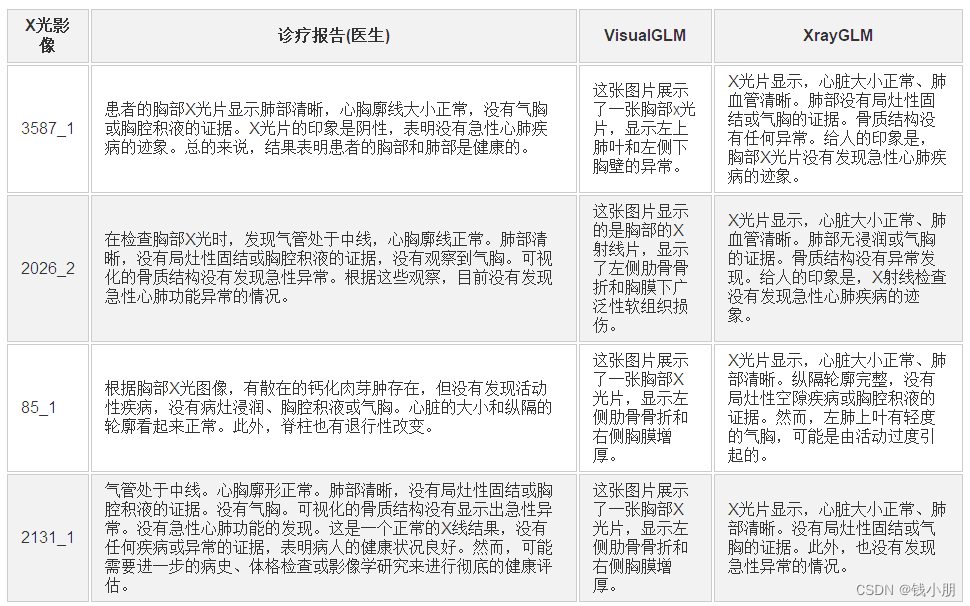
通过对比微调前后模型在测试集上的表现,我们发现微调后的模型在胸部X光片图像识别和诊断报告生成方面取得了显著的改进。其准确性和可靠性得到了提高,为医生提供了更可靠的诊断参考。
三、任务2——前端的设计与实现
在本项目中,我们不仅仅关注于模型的性能提升,还着重于为用户提供友好的交互界面,以便他们能够轻松地与模型进行交流和互动。以下是主要内容:
按照原型图进行编码 :
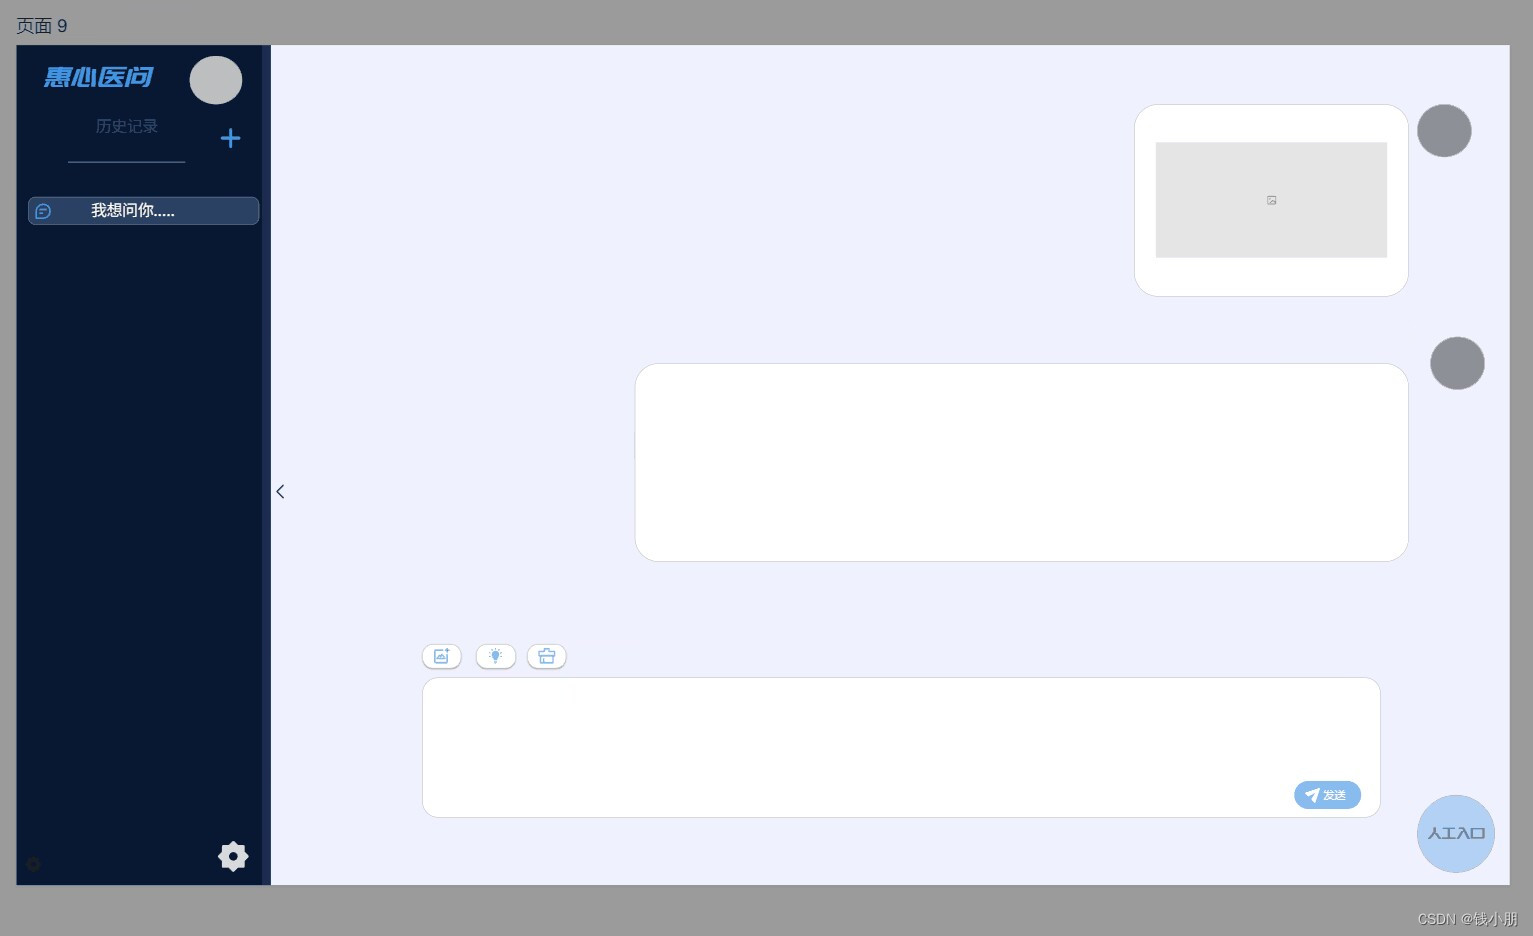
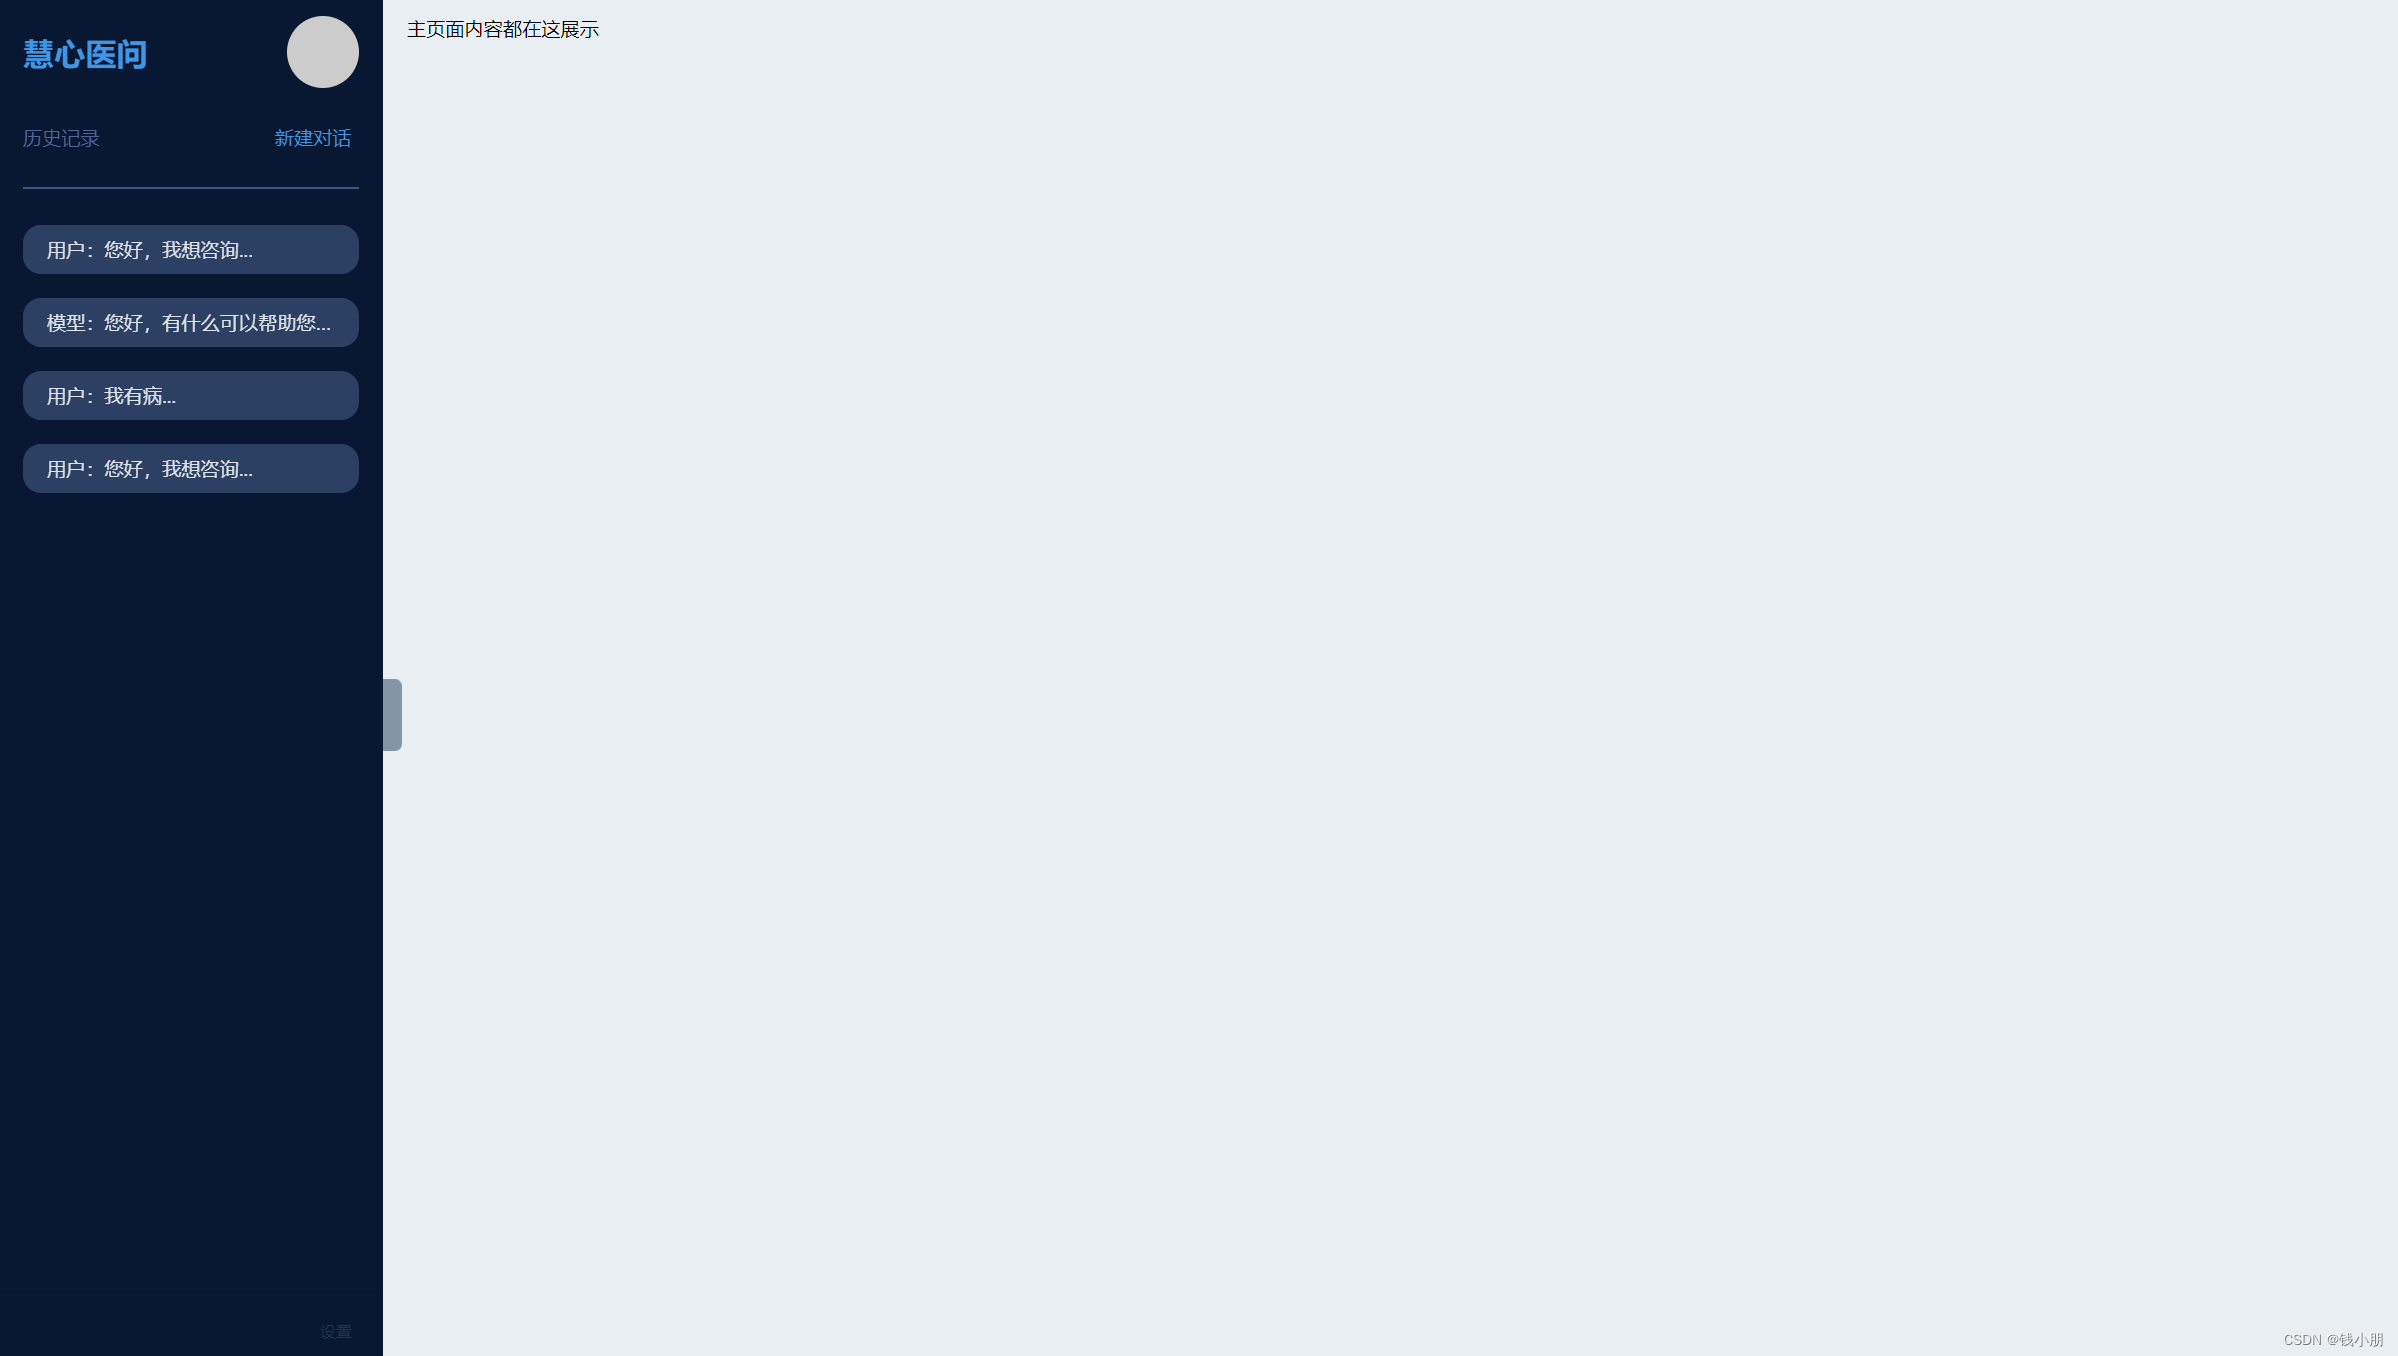
3.1 侧边栏设计
侧边栏作为整个应用的主要导航和操作入口,需要设计简洁清晰,方便用户快速找到需要的功能和信息。
(1)设计要点:
Logo:突出项目的名称和标识,使用户能够快速识别。
-用户头像:提供用户个性化操作入口,如个人主页等。
-历史记录和新建对话:方便用户查看历史对话记录和创建新的对话。
-设置按钮:提供设置页面入口,方便用户进行个性化设置。
(2)样式设计
侧边栏样式设计需要考虑用户体验和界面美观度,使用户感到舒适和愉悦。
设计要点:
色彩搭配:选用清爽的颜色搭配,符合医疗应用的专业性和清晰度。
图标设计:选用直观的图标,方便用户理解和操作。
文字样式:字体大小、颜色等要与整体风格协调一致,保证信息清晰可读。
3.2 响应式设计
考虑到用户可能在不同设备上使用应用,需要保证界面在不同分辨率下的适配性和可用性。
(1)设计要点:
弹性布局:使用弹性布局实现页面元素的自适应排列,保证在不同分辨率下页面布局合理。
响应式字体:根据设备屏幕大小调整字体大小,保证文字清晰可读。
通过以上设计与实现,能够为用户提供一个相对直观、友好的前端界面,使其能够方便地与XrayGLM模型进行交流和互动,从而更好地利用模型的诊断能力。
代码实现:
<template>
  <aside class="aside-container">
    <!-- Logo 部分 -->
    <div class="logo-container">
      <div class="logo" style="font-family: '庞门正道标题体', sans-serif;">慧心医问</div> <!-- Apply the font here -->
      <div>
        <button class="avatar" @click="goToProfile">
          <img class="avatar" src="@/assets/avatar.png" alt="病人的头像">
        </button>
      </div>
    </div>

    <!-- 历史记录和新建对话部分 -->
    <div class="chat-controls" style="margin-top: 20px;">
      <div class="chat-controls-text">历史记录</div>
      <button class="new-chat-btn" @click="createNewChat">
        <el-icon size="24px" color="rgb(140,186,230)"><Plus /></el-icon>
      </button>
    </div>
    <div class="section-separator" style="margin-top: 20px;"></div>

    <!-- 历史记录气泡列表 -->
    <div class="chat-history" style="margin-top: 20px;">
      <div class="chat-bubble" v-for="(bubble, index) in chatHistory" :key="index" @click="goToChat(bubble)" @mouseenter="showDeleteIcon = index" @mouseleave="showDeleteIcon = null">
        <el-icon size="20px" color="#4095E5"><ChatDotRound /></el-icon>
        <div class="bubble-text">{{ bubble.text }}</div>
        <i v-if="showDeleteIcon === index" class="delete-icon" @click="deleteRecord(bubble)"><el-icon size="20px" color="rgb(238,238,238)"><Delete /></el-icon></i>
      </div>
    </div>
  </aside>

  <!-- 底部设置部分 -->
  <footer class="aside-footer">
    <button class="settings-btn" @click="goToSettings">
      <el-icon size="28px" color="rgb(140,186,230)"><Setting /></el-icon>
    </button>
  </footer>
</template>

<script>
export default {
  data() {
    return {
      // 静态数据用于测试
      chatHistory: [
        { text: '用户:您好,我想咨询...' },
        { text: '模型:您好,有什么可以帮助您的吗?' },
        { text: '用户:我有病...' },
        { text: '用户:您好,我想咨询...' },
        // 更多历史记录数据
      ],
      showDeleteIcon: null,
    };
  },
  methods: {
    goToProfile() {
      console.log('go to profile');

      this.$router.push({ name: 'profile' })
    },

    createNewChat() {
      console.log('Create New Chat');
      this.$router.push({ name: 'home' }); // 跳转到chat-main.vue页面
    },
    goToChat(bubble) {
      // 路由跳转到历史对话页面
      console.log('Go to Chat', bubble);
      this.$router.push({ name: 'home' }); // 跳转到chat-main.vue页面
      // this.$router.push('/chat-details'); // 根据你的路由配置和气泡数据使用
    },
    goToSettings() {
      this.$router.push({ name: 'Settings' }); // 跳转到setting.vue页面
    },
    deleteRecord(record) {
      const index = this.chatHistory.indexOf(record);
      if (index !== -1) {
        this.chatHistory.splice(index, 1);
      }
    },
  },
};
</script>

<style scoped>
.aside-container {
  width: 320px; /* 根据你的需求调整侧边栏宽度 */
  height: 100vh; /* 使侧边栏占满视口高度 */
  position: fixed;
  left: 0;
  top: 0;
  padding: 20px;
  box-sizing: border-box;
  overflow-y: auto; /* 允许侧边栏内容滚动 */
}

.logo-container {
  display: flex;
  justify-content: space-between;
  align-items: center;
  margin-bottom: 30px;
}

@font-face {
  font-family: '庞门正道标题体';
  src: url('src/views/庞门正道标题体.ttf') format('truetype');
}

.logo {
  font-size: 28px;
  font-weight: normal;
  color: #4095E5;
  font-family: '庞门正道标题体', sans-serif; /* Apply the font family */
  font-style: italic;
}

.avatar {
  cursor: pointer;
  display: flex;
  justify-content: center;
  align-items: center;
  width: 60px; /* 增大头像框大小 */
  height: 60px; /* 增大头像框大小 */
  border-radius: 50%;
  background-color: #ccc; /* 头像背景 */
}

.avatar-icon {
  color: #fff;
  background-color: #ccc; /* 头像图标背景色 */
}

.chat-controls {
  display: flex;
  justify-content: space-between;
  align-items: center;
  margin-bottom: 30px;
}

.chat-controls-text {
  font-size: 16px; /* 增大字体大小 */
  color: #536598;
}

.new-chat-btn {
  display: flex;
  align-items: center;
  cursor: pointer;
  font-size: 16px;
  color: #4095E5;
  background-color: transparent;
  border: none;
  outline: none;
  padding-left: 10px;
}

.new-chat-btn i {
  margin-right: 5px;
}

.section-separator {
  height: 1px; /* 增大分割线高度 */
  background-color: rgba(147, 184, 247, 0.4);
  margin-bottom: 30px;
}

.chat-history {
  /* 添加样式以确保气泡框与设置按钮分开 */
  padding-bottom: 60px; /* 确保底部留出空间 */
}

.chat-bubble {
  display: flex;
  align-items: center;
  margin-bottom: 20px;
  padding: 10px;
  border-radius: 15px;
  background-color: rgba(147, 184, 247, 0.25);
  position: relative; /* 添加相对定位 */
}

.bubble-icon {
  margin-right: 10px;
  color: #fff;
}

.bubble-text {
  flex: 1;
  color: rgba(255, 255, 255, 0.85);
  font-size: 16px;
  overflow: hidden;
  text-overflow: ellipsis;
  white-space: nowrap;
  margin-left: 10px; /* 调整文本的左边距,根据需要调整具体数值 */
}

.aside-footer {
  position: fixed;
  bottom: 0;
  width: 280px; /* 与 aside-container 一致 */
  background-color: #081832; /* 设置按钮背景色 */
  text-align: right;
  padding: 20px;
  box-shadow: 0 -1px 5px rgba(0, 0, 0, 0.1); /* 添加上方的阴影效果 */
}

.settings-btn {
  background-color: transparent;
  border: none;
  outline: none;
  cursor: pointer;
  color: #173b56;
}

.settings-btn i {
  font-size: 20px;
}

.delete-icon {
  display: flex;
  position: absolute;
  right: 0; /* 调整图标位置 */
  top: 0;
  padding: 10px; /* 增加图标的点击区域 */
  cursor: pointer;
  background-color: rgb(46, 67, 104); /* 设置与气泡框相同的背景色 */
  border-radius: 50%; /* 圆角 */
}

/* 添加悬停样式 */
.delete-icon:hover {
  display: flex;
  background-color: rgb(46, 67, 104); /* 设置与气泡框相同的背景色 */
  border-radius: 50%; /* 圆角 */
}

</style>
效果:
四、总结
通过本次任务,我成功地对XrayGLM模型进行了微调,并提高了其在胸部X光片图像识别上的准确性。同时,我初步实现了一个用户友好的前端页面,特别是侧边栏的设计,使用户能够方便地与模型进行交流对话。这次经历不仅锻炼了我的模型微调能力,还提升了我的前端设计与实现技能。未来,我将继续优化模型性能并改进前端页面设计,为用户提供更好的体验。


 150
150

 被折叠的 条评论
为什么被折叠?
被折叠的 条评论
为什么被折叠?
 到【灌水乐园】发言


