


一、按键简介
(1)
按键:常见的输入设备,按下导通,松手断开
(2)
按键抖动:由于按键内部使用的是机械式弹簧片来进行通断的,所以在按下和松手的瞬间会伴随有一连串的抖动


二、按键控制LED函数代码
#include "stm32f10x.h" // Device header
//变量声明
u8 Key=0;
typedef enum {
on=1,
off=0
}State;
//函数声明
u8 KeyNum(void);
void LedInit(void);
void LedCtl(u8 num,State state);
void KeyInit(void);
int main(void)
{
LedInit();
KeyInit();
while(1)
{
Key=KeyNum();
if(Key==1)
{
LedCtl(1,on);
}
if(Key==2)
{
LedCtl(2,on);
}
}
}
/*
*函数名:u8 KeyNum();
*类型:unsigned char
*返回值:u8 num
*功能:读取按键值
*参数:void
*/
u8 KeyNum(void)
{
u8 num=0;
if(GPIO_ReadInputDataBit(GPIOB,GPIO_Pin_1)==0)
{
while(GPIO_ReadInputDataBit(GPIOB,GPIO_Pin_1)==0);
num=1;
}
if(GPIO_ReadInputDataBit(GPIOB,GPIO_Pin_11)==0)
{
while(GPIO_ReadInputDataBit(GPIOB,GPIO_Pin_1)==0);
num=2;
}
return num;
}
/*
*函数名:void LedInit()
*类型:void
*返回值:无
*功能:初始化led引脚
*参数:void
*/
void LedInit(void)
{
GPIO_InitTypeDef GPIO_InitStruct;
RCC_APB2PeriphClockCmd(RCC_APB2Periph_GPIOB|RCC_APB2Periph_GPIOA,ENABLE);
GPIO_InitStruct.GPIO_Mode=GPIO_Mode_Out_PP;
GPIO_InitStruct.GPIO_Pin=GPIO_Pin_1|GPIO_Pin_2;
GPIO_InitStruct.GPIO_Speed=GPIO_Speed_50MHz;
GPIO_Init(GPIOA,&GPIO_InitStruct);
}
/*
*函数名:void LedCtl(u8 num,State state)
*类型:void
*返回值:无
*功能:控制led亮灭
*参数:序号:u8 num 状态:State state
*/
void LedCtl(u8 num,State state)
{
if(state){
switch(num){
case 1: GPIO_ResetBits(GPIOA,GPIO_Pin_1);break;
case 2: GPIO_ResetBits(GPIOA,GPIO_Pin_2);break;
default:break;
}
}
else{
switch(num){
case 1: GPIO_SetBits(GPIOA,GPIO_Pin_1);break;
case 2: GPIO_SetBits(GPIOA,GPIO_Pin_2);break;
default:break;
}
}
}
/*
*函数名:void KeyInit()
*类型:void
*返回值:无
*功能:初始化按键引脚
*参数:无
*/
void KeyInit(void)
{
GPIO_InitTypeDef GPIO_InitStruct;
RCC_APB2PeriphClockCmd(RCC_APB2Periph_GPIOB|RCC_APB2Periph_GPIOA,ENABLE);
GPIO_InitStruct.GPIO_Mode=GPIO_Mode_IPU;
GPIO_InitStruct.GPIO_Pin=GPIO_Pin_1|GPIO_Pin_11;
GPIO_InitStruct.GPIO_Speed=GPIO_Speed_50MHz;
GPIO_Init(GPIOB,&GPIO_InitStruct);
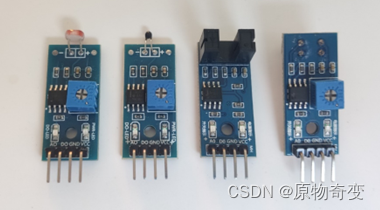
}三、光敏传感器简介
(1)
传感器模块:传感器元件(光敏电阻
/
热敏电阻
/
红外接收管等)的电阻会随外界模拟量的变化而变化,通过与定值电阻分压即可得到模拟电压输出,再通过电压比较器进行二值化即可得到数字电压输出

四、光敏传感器控制LED代码
#include "stm32f10x.h"                  // Device header

#define  off 0
#define  on  1
//函数声明
void BuzzerInit(void);
void BuzzerCtl(_Bool state);
u8 LightSensorGet(void);
void LightSensorInit(void);


int main(void)
{
  while(1)
	{
		if(LightSensorGet())
		{
     BuzzerCtl(on);
		}
		else
		 BuzzerCtl(off);
	}

}


/***************************************************************
  *  @brief  void BuzzerInit(void);
  *  @param  void
  *  @note   初始化蜂鸣器且无返回值
  *  @Sample BuzzerInit();
 **************************************************************/
void BuzzerInit(void)
{
	GPIO_InitTypeDef GPIO_InitStruct;

	RCC_APB2PeriphClockCmd(RCC_APB2Periph_GPIOB,ENABLE);

	GPIO_InitStruct.GPIO_Mode=GPIO_Mode_Out_PP;
	GPIO_InitStruct.GPIO_Pin=GPIO_Pin_12;
	GPIO_InitStruct.GPIO_Speed=GPIO_Speed_50MHz;

	GPIO_Init(GPIOB,&GPIO_InitStruct);

}

/***************************************************************
  *  @brief  void BuzzerCtl(_Bool state);
  *  @param  _Bool state
  *  @note   蜂鸣器控制函数
  *  @Sample BuzzerCtl(state);
 **************************************************************/
void BuzzerCtl(_Bool state)
{
	if(state)
	{
		GPIO_WriteBit(GPIOB,GPIO_Pin_12,Bit_RESET);
	}
	else GPIO_WriteBit(GPIOB,GPIO_Pin_12,Bit_SET);
}

/***************************************************************
  *  @brief   void LightSensorInit(void);
  *  @param   void
  *  @note    传感器初始化
  *  @Sample  LightSensorInit(void);
 **************************************************************/
void LightSensorInit(void)
{
		GPIO_InitTypeDef GPIO_InitStruct;

	RCC_APB2PeriphClockCmd(RCC_APB2Periph_GPIOB,ENABLE);

	GPIO_InitStruct.GPIO_Mode=GPIO_Mode_IPU;
	GPIO_InitStruct.GPIO_Pin=GPIO_Pin_13;
	GPIO_InitStruct.GPIO_Speed=GPIO_Speed_50MHz;

	GPIO_Init(GPIOB,&GPIO_InitStruct);
}

/***************************************************************
  *  @brief  u8 LightSensorGet(void);
  *  @param  void
  *  @note   获取光敏传感器数字量
  *  @Sample LightSensorGet(void);
 **************************************************************/
u8 LightSensorGet(void)
{
	u8 LightSensorDate=0;
	LightSensorDate=GPIO_ReadInputDataBit(GPIOB,GPIO_Pin_13);
	return LightSensorDate;
}


 471
471


 被折叠的 条评论
为什么被折叠?
被折叠的 条评论
为什么被折叠?
 到【灌水乐园】发言


