


 本文描述了一个Android应用的开发过程,包括主界面的天气显示、颜色和样式设置、布局代码(LinearLayout和RelativeLayout的使用)、以及下拉菜单的实现。开发者介绍了如何在MainActivity中集成这些组件和设置事件监听。
一、效果展示
如图所示

主界面显示天气、温度、日期、风力等内容,左上角下拉框显示不同城市。空着的部分本来打算显示往后几天的天气,但是调用RecyclerView出了错,尚未解决,故先记录前部分内容。
二、前期准备
在app_src_main_res_values文件下的colors.xml主要负责颜色设置,strings.xml负责字符串设置,styles.xml负责全局样式或控件样式。
在colors.xml设置一些颜色以备使用:
<?xml version="1.0" encoding="utf-8"?>
<resources>
    <color name="colorPrimary">@color/green_500 </color>
    <color name="colorPrimaryDark">@color/green_700 </color>
    <color name="colorAccent">#F4511E</color>
    <color name="green_200">#C5E1A5</color>
    <color name="green_500">#8BC34A</color>
    <color name="green_700">#689F38</color>
    <color name="white">#FFFFFF</color>
    <color name="black">#000000</color>
    <color name="purple_200">#CE93D8</color>
    <color name="trans">#00000000</color>

</resources>strings.xml中存放城市名称,
<resources>
    <string name="app_name">天气预报</string>
    <string-array name="cities">
    <item>北京</item>
    <item>天津</item>
    <item>哈尔滨</item>
    <item>沈阳</item>
    <item>石家庄</item>
    <item>西安</item>
    <item>郑州</item>
    </string-array>
</resources>styles.xml设置全局样式:
<resources>
    <!-- Base application theme. -->
    <style name="AppTheme" parent="Theme.AppCompat.Light.NoActionBar">
        <!-- Customize your theme here. -->
        <item name="colorPrimary">@color/colorPrimary</item> //使用name为colorPrimary的颜色-green_500,作为colorPrimary—导航栏颜色
        <item name="colorPrimaryDark">@color/colorPrimaryDark</item> //colorPrimaryDark—通知栏颜色
        <item name="colorAccent">@color/colorAccent</item> //
colorAccent—控件选中后颜色
        <item name="android:windowFullscreen">true</item>//实现全屏显示
    </style>

</resources>
三、布局代码
在layout文件下的activity_main.xml为布局文件,在此文件中编写主界面布局代码。
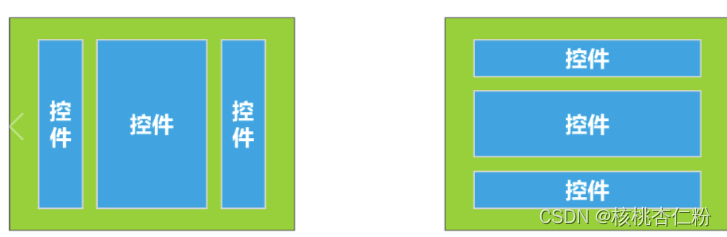
1、主界面我们使用线性布局
线性布局(LinearLayout):主要以水平或垂直方式来排列界面中的控件。并将控件排列到一条直线上。在线性布局中,如果水平排列,垂直方向上只能有一个控件;如果垂直排列,水平方向上也只能放置一个控件。
使用线性布局,需要将布局节点改成LinearLayout,基本格式如下:
<LinearLayout xmlns:android="http://schemas.android.com/apk/res/android"
xmlns:app="http://schemas.android.com/apk/res-auto"
xmlns:tools="http://schemas.android.com/tools"
android:layout_width="match_parent"
android:layout_height="match_parent"
tools:context=".MainActivity">
....
</LinearLayout>
线性布局中android:orientation="horizontal"表示此时的排列方式为水平方向。
android:orientation="vertical"时,表示此时的排列方式为垂直方向。
此处我们选择垂直方向,位置居中。代码如下:
<LinearLayout xmlns:android="http://schemas.android.com/apk/res/android"
    xmlns:app="http://schemas.android.com/apk/res-auto"
    xmlns:tools="http://schemas.android.com/tools"
    android:layout_width="match_parent" //match_parent表示让当前控件的大小和父布局的大小一样,也就是由父布局来决定当前控件的大小
    android:layout_height="match_parent"
    android:orientation="vertical" //垂直分布
    android:gravity="center_horizontal" //位置居中
    android:background="@drawable/bai3" //将drawable名为bai3的图片作为背景
    tools:context=".MainActivity">
2、对于左上角下拉框,我们使用相对布局。
相对布局(RelativeLayout):是一种根据父容器和兄弟控件作为参照来确定控件位置的布局方式。
使用相对布局,需要将布局节点改成RelativeLayout,基本格式如下:
<RelativeLayout xmlns:android="http://schemas.android.com/apk/res/android"
xmlns:app="http://schemas.android.com/apk/res-auto"
xmlns:tools="http://schemas.android.com/tools"
android:layout_width="match_parent"
android:layout_height="match_parent"
tools:context=".MainActivity">
....
</RelativeLayout>
    <RelativeLayout
        android:layout_width="match_parent"
        android:layout_height="wrap_content"
        >
    <androidx.appcompat.widget.AppCompatSpinner  //使用spinner实现下拉菜单
        android:id="@+id/sp_city"  //设置一个名为sp_city的id
        android:layout_width="130dp" //下拉菜单宽为130dp
        android:layout_height="48dp" //高为48dp
        android:entries="@array/cities" //将之前string.xml中设置的城市信息提取出来
        android:spinnerMode="dropdown"  //选择列表框的模式,dropdown:下拉菜单风格的窗口
        android:popupBackground="@color/trans" //弹出框背景色选择透明
        android:overlapAnchor="false" //使下拉框不遮挡Spinner的显示
        android:dropDownVerticalOffset="48dp" //调整下拉列表与箭头的距离,向下移动48dp,防止滚动过程中遮挡第一行
        android:backgroundTint="@color/black"//使用黑色
        />
    </RelativeLayout>
3、图标、温度、天气、日期等,需要用到以下两个控件:
ImageView :用于展示图片。
一些相关属性:
android:src:设置 ImageView 的图片内容
android:background:设置背景样式(同其他控件类似)
android:scaleType:控制图片的缩放模式
android:maxHeight:设置 ImageView 的最大高度
android:maxWidth:设置ImageView的最大宽度
android:tint:图片的色彩
TextView:用来展示文本。
一些相关属性:
id:为TextView设置一个组件id,根据id,我们可以在Java代码中通过findViewById()的方法获取到该对象
text:设置显示的文本内容
textColor:设置字体颜色
textSize:字体大小,单位一般是用sp
textStyle:设置字体风格,三个可选值:**normal**(无效果),**bold**(加粗),**italic**(斜体)
代码如下:
    </RelativeLayout>
    <ImageView
        android:layout_width="65dp"
        android:layout_height="65dp"
        android:id="@+id/iv_weather"
        android:src="@drawable/daxue"
        />
    <TextView
        android:layout_width="wrap_content"
        android:layout_height="wrap_content"
        android:id="@+id/tv_tem"
        android:textSize="50sp"
        android:text="3°C"
        android:textColor="@color/black"
    />
    <TextView
        android:layout_width="wrap_content"
        android:layout_height="wrap_content"
        android:id="@+id/tv_weather"
        android:textSize="20sp"
        android:text="大雪(2023-01-02星期二)"
        android:textColor="@color/black"
        android:layout_marginTop="10dp" //增加行间距
        />
    <TextView
        android:layout_width="wrap_content"
        android:layout_height="wrap_content"
        android:id="@+id/tv_tem_low_high"
        android:textSize="20sp"
        android:text="-1°C~4°C"
        android:textColor="@color/black"
        android:layout_marginTop="10dp"
        />
    <TextView
        android:layout_width="wrap_content"
        android:layout_height="wrap_content"
        android:id="@+id/tv_win"
        android:textSize="20sp"
        android:text="南风3~4级"
        android:textColor="@color/black"
        android:layout_marginTop="10dp"
        />
    <TextView
        android:layout_width="wrap_content"
        android:layout_height="wrap_content"
        android:id="@+id/tv_air"
        android:textSize="20sp"
        android:text="空气:53·良\n天气寒冷,建议穿着羽绒服、棉衣。"
        android:textColor="@color/black"
        android:gravity="center"
        android:layout_marginTop="10dp"
        />
</LinearLayout>
四、下拉菜单布局
在layout文件右键,新建一个Layout XML File文件,命名为sp_item_layout.xml用来编写下拉菜单的布局。

布局节点使用TextView,id命名为text1,以使其能与主函数链接上。
<?xml version="1.0" encoding="utf-8"?>
<TextView  xmlns:android="http://schemas.android.com/apk/res/android"
    xmlns:tools="http://schemas.android.com/tools"
    android:layout_width="match_parent"
    android:layout_height="48dp"
    android:id="@android:id/text1"
    android:textColor="@color/black"
    android:text="郑州"
    android:textSize="20sp"
    android:gravity="center_vertical"
    android:paddingLeft="10dp" //元素在内边距区域(padding area)中左边的宽度。
   >
</TextView>
五、主函数
package com.example.androidtwo;

import androidx.appcompat.app.AppCompatActivity;
import androidx.appcompat.widget.AppCompatSpinner;

import android.content.Context;
import android.os.Bundle;
import android.view.View;
import android.widget.AdapterView;
import android.widget.ArrayAdapter;
import android.widget.ImageView;
import android.widget.TextView;

public class MainActivity extends AppCompatActivity {

    private AppCompatSpinner mSpinner;
    private ArrayAdapter<String> mSpAdapter;
    private String[] mCities;

    private TextView  tvWeather,tvTem,tvTemLowHigh,tvWin,tvAir;
    private ImageView ivWeather;


    @Override
    protected void onCreate(Bundle savedInstanceState) {
        super.onCreate(savedInstanceState);
        setContentView(R.layout.activity_main);

        initView();
    }

    private void initView()
    {
        mSpinner = findViewById(R.id.sp_city ) ;
        mCities =getResources().getStringArray(R.array.cities) ;
        mSpAdapter =new ArrayAdapter<>(this,R.layout.sp_item_layout,mCities);
        mSpinner.setAdapter(mSpAdapter);
        mSpinner.setOnItemSelectedListener(new AdapterView.OnItemSelectedListener() {
            @Override
            public void onItemSelected(AdapterView<?> parent, View view, int position, long id) {

            }

            @Override
            public void onNothingSelected(AdapterView<?> parent) {

            }
        });

        tvWeather = findViewById(R.id.tv_weather);
        tvAir = findViewById(R.id.tv_air );
        tvTem = findViewById(R.id.tv_tem  );
        tvTemLowHigh = findViewById(R.id.tv_tem_low_high  );
        tvWin  = findViewById(R.id.tv_win );
        ivWeather   = findViewById(R.id.iv_weather );

    }
}
三、关于软件背景
背景部分我导入了几张图片作为选择。
导入步骤:将本地照片拖拽到项目的res_drawable文件中。
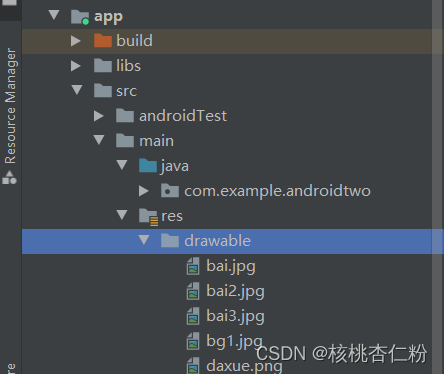
然后用android:background="@drawable/照片名字"导入。


 2万+
2万+


 被折叠的 条评论
为什么被折叠?
被折叠的 条评论
为什么被折叠?
 到【灌水乐园】发言


