


摘要:本文介绍如何在ubuntu下,使用idf编写mqtt通信程序,以及通过mqtt通信程序连接阿里云,使设备在线。
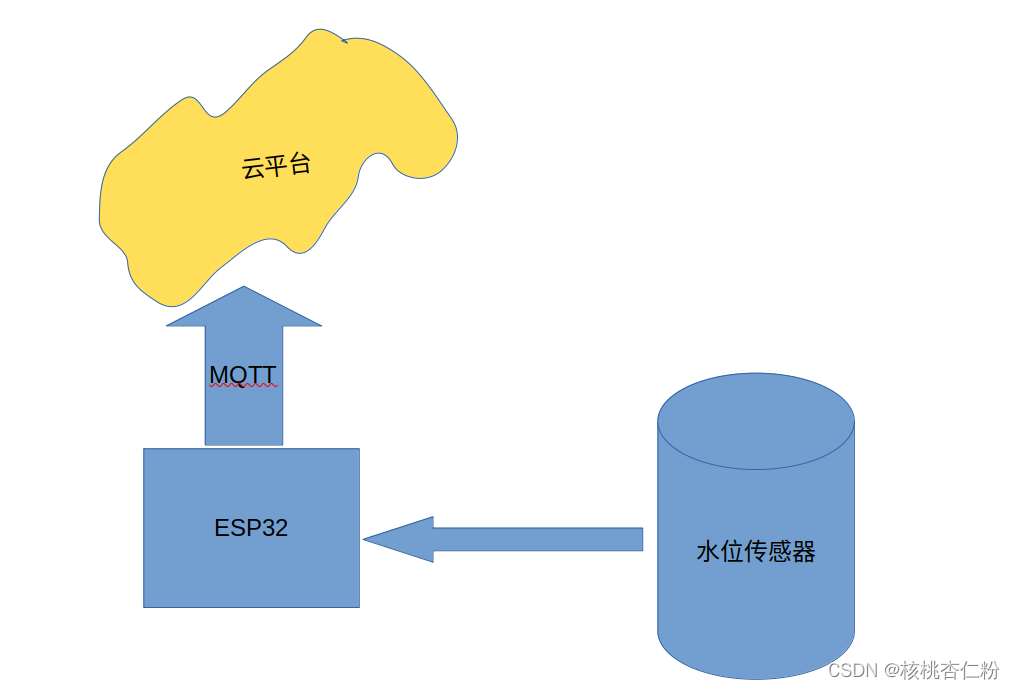
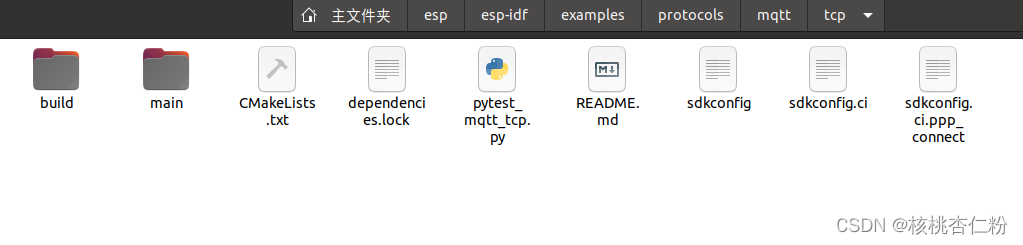
1.idf编程框架包括了mqtt例程
和阿里云进行通信是通过mqtt进行的,但是mqtt上层又添加了数字签名安全机制。
我们基于idf例程中的mqtt例程来编写。注意还有其他版本,例如ssl,ws,wss等,有些区别。
这个程序怎么运行呢?
当然是编译,烧录才运行
. $HOME/esp/esp-idf/export.shidf.py buildidf.py flashsudo chmod 777 /dev/ttyUSB0通过串口观察
idf.py monitor 如果想退出运行,可以用下面的组合键
Ctrl+]成功运行的日志如下
| Supported Targets | ESP32 | ESP32-C2 | ESP32-C3 | ESP32-C6 | ESP32-H2 | ESP32-S2 | ESP32-S3 |
| ----------------- | ----- | -------- | -------- | -------- | -------- | -------- | -------- |# ESP-MQTT sample application
(See the README.md file in the upper level 'examples' directory for more information about examples.)This example connects to the broker URI selected using `idf.py menuconfig` (using mqtt tcp transport) and as a demonstration subscribes/unsubscribes and send a message on certain topic.
(Please note that the public broker is maintained by the community so may not be always available, for details please see this [disclaimer](https://iot.eclipse.org/getting-started/#sandboxes))Note: If the URI equals `FROM_STDIN` then the broker address is read from stdin upon application startup (used for testing)
It uses ESP-MQTT library which implements mqtt client to connect to mqtt broker.
## How to use example
### Hardware Required
This example can be executed on any ESP32 board, the only required interface is WiFi and connection to internet.
### Configure the project
* Open the project configuration menu (`idf.py menuconfig`)
* Configure Wi-Fi or Ethernet under "Example Connection Configuration" menu. See "Establishing Wi-Fi or Ethernet Connection" section in [examples/protocols/README.md](../../README.md) for more details.### Build and Flash
Build the project and flash it to the board, then run monitor tool to view serial output:
```
idf.py -p PORT flash monitor
```(To exit the serial monitor, type ``Ctrl-]``.)
See the Getting Started Guide for full steps to configure and use ESP-IDF to build projects.
## Example Output
```
I (3714) event: sta ip: 192.168.0.139, mask: 255.255.255.0, gw: 192.168.0.2
I (3714) system_api: Base MAC address is not set, read default base MAC address from BLK0 of EFUSE
I (3964) MQTT_CLIENT: Sending MQTT CONNECT message, type: 1, id: 0000
I (4164) MQTT_EXAMPLE: MQTT_EVENT_CONNECTED
I (4174) MQTT_EXAMPLE: sent publish successful, msg_id=41464
I (4174) MQTT_EXAMPLE: sent subscribe successful, msg_id=17886
I (4174) MQTT_EXAMPLE: sent subscribe successful, msg_id=42970
I (4184) MQTT_EXAMPLE: sent unsubscribe successful, msg_id=50241
I (4314) MQTT_EXAMPLE: MQTT_EVENT_PUBLISHED, msg_id=41464
I (4484) MQTT_EXAMPLE: MQTT_EVENT_SUBSCRIBED, msg_id=17886
I (4484) MQTT_EXAMPLE: sent publish successful, msg_id=0
I (4684) MQTT_EXAMPLE: MQTT_EVENT_SUBSCRIBED, msg_id=42970
I (4684) MQTT_EXAMPLE: sent publish successful, msg_id=0
I (4884) MQTT_CLIENT: deliver_publish, message_length_read=19, message_length=19
I (4884) MQTT_EXAMPLE: MQTT_EVENT_DATA
TOPIC=/topic/qos0
DATA=data
I (5194) MQTT_CLIENT: deliver_publish, message_length_read=19, message_length=19
I (5194) MQTT_EXAMPLE: MQTT_EVENT_DATA
TOPIC=/topic/qos0
DATA=data
```
2.我们修改哪些地方
首先需要修改的是wifi信息
新建一个ap文件,然后将wifi信息写进去,本文不讲配网,那是另一个技术。
#define EXAMPLE_ESP_WIFI_SSID      "Z4XXXXX"
#define EXAMPLE_ESP_WIFI_PASS      "XXXXXXX6"
#define EXAMPLE_ESP_MAXIMUM_RETRY  CONFIG_ESP_MAXIMUM_RETRY


static void event_handler(void* arg, esp_event_base_t event_base,
                                int32_t event_id, void* event_data)
{
    if (event_base == WIFI_EVENT && event_id == WIFI_EVENT_STA_START) {
        esp_wifi_connect();
    } else if (event_base == WIFI_EVENT && event_id == WIFI_EVENT_STA_DISCONNECTED) {
        if (s_retry_num < EXAMPLE_ESP_MAXIMUM_RETRY) {
            esp_wifi_connect();
            s_retry_num++;
            ESP_LOGI(TAG, "retry to connect to the AP");
        } else {
            xEventGroupSetBits(s_wifi_event_group, WIFI_FAIL_BIT);
        }
        ESP_LOGI(TAG,"connect to the AP fail");
    } else if (event_base == IP_EVENT && event_id == IP_EVENT_STA_GOT_IP) {
        ip_event_got_ip_t* event = (ip_event_got_ip_t*) event_data;
        ESP_LOGI(TAG, "got ip:" IPSTR, IP2STR(&event->ip_info.ip));
        s_retry_num = 0;
        xEventGroupSetBits(s_wifi_event_group, WIFI_CONNECTED_BIT);
    }
}

void wifi_init_sta(void)
{
    s_wifi_event_group = xEventGroupCreate();

    /*Initialize the underlying TCP/IP stack.
    NOTE:This function should be called exactly once from application code, when the application starts up. */
    ESP_ERROR_CHECK(esp_netif_init());

    /*Create default event loop. */
    ESP_ERROR_CHECK(esp_event_loop_create_default());

	/*Creates default WIFI STA. In case of any init error this API aborts. */
    esp_netif_create_default_wifi_sta();

    /*Init WiFi Alloc resource for WiFi driver, such as WiFi control structure, RX/TX buffer, WiFi NVS structure etc,
    this WiFi also start WiFi task. */
    wifi_init_config_t cfg = WIFI_INIT_CONFIG_DEFAULT();
    ESP_ERROR_CHECK(esp_wifi_init(&cfg));

    esp_event_handler_instance_t instance_any_id;
    esp_event_handler_instance_t instance_got_ip;
    ESP_ERROR_CHECK(esp_event_handler_instance_register(WIFI_EVENT,
                                                        ESP_EVENT_ANY_ID,
                                                        &event_handler,
                                                        NULL,
                                                        &instance_any_id));
    ESP_ERROR_CHECK(esp_event_handler_instance_register(IP_EVENT,
                                                        IP_EVENT_STA_GOT_IP,
                                                        &event_handler,
                                                        NULL,
                                                        &instance_got_ip));

    wifi_config_t wifi_config = {
        .sta = {
            .ssid = EXAMPLE_ESP_WIFI_SSID,
            .password = EXAMPLE_ESP_WIFI_PASS,
            /* Setting a password implies station will connect to all security modes including WEP/WPA.
             * However these modes are deprecated and not advisable to be used. Incase your Access point
             * doesn't support WPA2, these mode can be enabled by commenting below line */
	     .threshold.authmode = WIFI_AUTH_WPA2_PSK,

            .pmf_cfg = {
                .capable = true,
                .required = false
            },
        },
    };
    ESP_ERROR_CHECK(esp_wifi_set_mode(WIFI_MODE_STA) );
    ESP_ERROR_CHECK(esp_wifi_set_config(ESP_IF_WIFI_STA, &wifi_config) );
    ESP_ERROR_CHECK(esp_wifi_start() );

    ESP_LOGI(TAG, "wifi_init_sta finished.");

    /* Waiting until either the connection is established (WIFI_CONNECTED_BIT) or connection failed for the maximum
     * number of re-tries (WIFI_FAIL_BIT). The bits are set by event_handler() (see above) */
    EventBits_t bits = xEventGroupWaitBits(s_wifi_event_group,
            WIFI_CONNECTED_BIT | WIFI_FAIL_BIT,
            pdFALSE,
            pdFALSE,
            portMAX_DELAY);

    /* xEventGroupWaitBits() returns the bits before the call returned, hence we can test which event actually
     * happened. */
    if (bits & WIFI_CONNECTED_BIT) {
        ESP_LOGI(TAG, "connected to ap SSID:%s password:%s",
                 EXAMPLE_ESP_WIFI_SSID, EXAMPLE_ESP_WIFI_PASS);
    } else if (bits & WIFI_FAIL_BIT) {
        ESP_LOGI(TAG, "Failed to connect to SSID:%s, password:%s",
                 EXAMPLE_ESP_WIFI_SSID, EXAMPLE_ESP_WIFI_PASS);
    } else {
        ESP_LOGE(TAG, "UNEXPECTED EVENT");
    }

    /* The event will not be processed after unregister */
    ESP_ERROR_CHECK(esp_event_handler_instance_unregister(IP_EVENT, IP_EVENT_STA_GOT_IP, instance_got_ip));
    ESP_ERROR_CHECK(esp_event_handler_instance_unregister(WIFI_EVENT, ESP_EVENT_ANY_ID, instance_any_id));
    vEventGroupDelete(s_wifi_event_group);
}

void app_main(void)
{
    //Initialize NVS
    esp_err_t ret = nvs_flash_init();  /*闈炴槗澶辨€у瓨鍌?(NVS) Initialize the default NVS partition. */
    if (ret == ESP_ERR_NVS_NO_FREE_PAGES || ret == ESP_ERR_NVS_NEW_VERSION_FOUND) {
      ESP_ERROR_CHECK(nvs_flash_erase());
      ret = nvs_flash_init();
    }
    ESP_ERROR_CHECK(ret);

    ESP_LOGI(TAG, "ESP_WIFI_MODE_STA");
    wifi_init_sta();
	user_mqtt_app_start();
}
将wifi信息固定在程序中后,就该进行mqtt的连接了。
首先需要知道阿里云mqtt连接的信息
上一篇文章已经写过了,这里不再重复
主要是建立一个mqtt客户端,根据这些加密的信息获得阿里云的授权并连接
#define   Aliyun_host       "iot-06zXXXXokayhlh.mqtt.iothub.aliyuncs.com"   /*或称mqttHostUrl、Broker Address*/
#define   Aliyun_port       1883
#define   Aliyun_client_id  "gc4XXXXXuXi.jsl1|securemode=2,signmethod=hmacsha256,timestamp=1713966095110|"
#define   Aliyun_username   "jsl1&gcXXXXXi"
#define   Aliyun_password   "f30129124fae2dad6bd8XXXXXXXXXXXXXXc19284d0b72a4e3aa4"

#define   AliyunSubscribeTopic_user_get     "/sys/gc4XXXXXuXi/jsl1/thing/service/property/set"
#define   AliyunPublishTopic_user_update    "/sys/gc4XXXXXXXXi/jsl1/thing/event/property/post"
然后创建客户端。
这里需要特别注意,不同版本的idf,语句格式是不同的。一定要按照最新的格式来。我的版本是ESP-IDF v5.4-dev-12-g3d813afa01
void user_mqtt_app_start(void)
{
    esp_mqtt_client_config_t mqtt_cfg = {
        //下面的几个关键参数都需要用新的idf的格式来重新写
		// .host = Aliyun_host,
        .broker.address.hostname = Aliyun_host,
        .broker.address.transport = MQTT_TRANSPORT_OVER_TCP,
		// .port = Aliyun_port,
        .broker.address.port = Aliyun_port,
		// .client_id = Aliyun_client_id,
        .credentials.client_id = Aliyun_client_id,
		// .username = Aliyun_username,
        .credentials.username = Aliyun_username,
		// .password = Aliyun_password,
        .credentials.authentication.password = Aliyun_password,

    };

    client = esp_mqtt_client_init(&mqtt_cfg);
    esp_mqtt_client_register_event(client, ESP_EVENT_ANY_ID, mqtt_event_handler, client);
    esp_mqtt_client_start(client);


	xTaskCreate(&mqtt_test_task, "mqtt_test_task", 4096, NULL, 5, NULL);
}
发布消息调用下面的语句
esp_mqtt_client_publish(client, AliyunPublishTopic_user_update, output, strlen(output), 1, 0);程序实现的结果可以通过idf.py monitor来观察
lulu@lulu-HP-Notebook:~/esp/app-MqttToAliyun$ idf.py monitor
Executing action: monitor
Serial port /dev/ttyUSB0
Connecting....
Detecting chip type... Unsupported detection protocol, switching and trying again...
Connecting....
Detecting chip type... ESP32
Running idf_monitor in directory /home/lulu/esp/app-MqttToAliyun
Executing "/home/lulu/.espressif/python_env/idf5.4_py3.8_env/bin/python /home/lulu/esp/esp-idf/tools/idf_monitor.py -p /dev/ttyUSB0 -b 115200 --toolchain-prefix xtensa-esp32-elf- --target esp32 --revision 0 /home/lulu/esp/app-MqttToAliyun/build/app-MqttToAliyun.elf -m '/home/lulu/.espressif/python_env/idf5.4_py3.8_env/bin/python' '/home/lulu/esp/esp-idf/tools/idf.py'"...
--- esp-idf-monitor 1.4.0 on /dev/ttyUSB0 115200 ---
--- Quit: Ctrl+] | Menu: Ctrl+T | Help: Ctrl+T followed by Ctrl+H ---
ets Jul 29 2019 12:21:46rst:0x1 (POWERON_RESET),boot:0x13 (SPI_FAST_FLASH_BOOT)
configsip: 0, SPIWP:0xee
clk_drv:0x00,q_drv:0x00,d_drv:0x00,cs0_drv:0x00,hd_drv:0x00,wp_drv:0x00
mode:DIO, clock div:2
load:0x3fff0030,len:7176
load:0x40078000,len:15564
ho 0 tail 12 room 4
load:0x40080400,len:4
0x40080400: _init at ??:?load:0x40080404,len:3904
entry 0x40080640
I (31) boot: ESP-IDF v5.4-dev-12-g3d813afa01 2nd stage bootloader
I (31) boot: compile time Apr 25 2024 07:37:54
I (33) boot: Multicore bootloader
I (37) boot: chip revision: v3.0
I (41) boot.esp32: SPI Speed : 40MHz
I (45) boot.esp32: SPI Mode : DIO
I (50) boot.esp32: SPI Flash Size : 2MB
I (54) boot: Enabling RNG early entropy source...
I (60) boot: Partition Table:
I (63) boot: ## Label Usage Type ST Offset Length
I (71) boot: 0 nvs WiFi data 01 02 00009000 00006000
I (78) boot: 1 phy_init RF data 01 01 0000f000 00001000
I (86) boot: 2 factory factory app 00 00 00010000 00100000
I (93) boot: End of partition table
I (97) esp_image: segment 0: paddr=00010020 vaddr=3f400020 size=285d8h (165336) map
I (162) esp_image: segment 1: paddr=00038600 vaddr=3ff80000 size=00004h ( 4) load
I (163) esp_image: segment 2: paddr=0003860c vaddr=3ffb0000 size=03df4h ( 15860) load
I (174) esp_image: segment 3: paddr=0003c408 vaddr=40080000 size=03c10h ( 15376) load
I (183) esp_image: segment 4: paddr=00040020 vaddr=400d0020 size=a44b0h (672944) map
I (416) esp_image: segment 5: paddr=000e44d8 vaddr=40083c10 size=12bf8h ( 76792) load
I (457) boot: Loaded app from partition at offset 0x10000
I (457) boot: Disabling RNG early entropy source...
I (469) cpu_start: Multicore app
I (478) cpu_start: Pro cpu start user code
I (478) cpu_start: cpu freq: 160000000 Hz
I (478) app_init: Application information:
I (481) app_init: Project name: app-MqttToAliyun
I (486) app_init: App version: 1
I (491) app_init: Compile time: Apr 25 2024 07:46:58
I (497) app_init: ELF file SHA256: d0411feec...
I (502) app_init: ESP-IDF: v5.4-dev-12-g3d813afa01
I (508) efuse_init: Min chip rev: v0.0
I (513) efuse_init: Max chip rev: v3.99
I (518) efuse_init: Chip rev: v3.0
I (523) heap_init: Initializing. RAM available for dynamic allocation:
I (530) heap_init: At 3FFAE6E0 len 00001920 (6 KiB): DRAM
I (536) heap_init: At 3FFB86F8 len 00027908 (158 KiB): DRAM
I (542) heap_init: At 3FFE0440 len 00003AE0 (14 KiB): D/IRAM
I (549) heap_init: At 3FFE4350 len 0001BCB0 (111 KiB): D/IRAM
I (555) heap_init: At 40096808 len 000097F8 (37 KiB): IRAM
I (563) spi_flash: detected chip: generic
I (566) spi_flash: flash io: dio
W (570) spi_flash: Detected size(4096k) larger than the size in the binary image header(2048k). Using the size in the binary image header.
I (585) main_task: Started on CPU0
I (595) main_task: Calling app_main()
I (615) wifi station: ESP_WIFI_MODE_STA
I (625) wifi:wifi driver task: 3ffc06b8, prio:23, stack:6656, core=0
I (635) wifi:wifi firmware version: 34d9141e9
I (635) wifi:wifi certification version: v7.0
I (635) wifi:config NVS flash: enabled
I (635) wifi:config nano formating: disabled
I (635) wifi:Init data frame dynamic rx buffer num: 32
I (645) wifi:Init static rx mgmt buffer num: 5
I (645) wifi:Init management short buffer num: 32
I (655) wifi:Init dynamic tx buffer num: 32
I (655) wifi:Init static rx buffer size: 1600
I (655) wifi:Init static rx buffer num: 10
I (665) wifi:Init dynamic rx buffer num: 32
I (665) wifi_init: rx ba win: 6
I (675) wifi_init: accept mbox: 6
I (675) wifi_init: tcpip mbox: 32
I (675) wifi_init: udp mbox: 6
I (685) wifi_init: tcp mbox: 6
I (685) wifi_init: tcp tx win: 5760
I (695) wifi_init: tcp rx win: 5760
I (695) wifi_init: tcp mss: 1440
I (695) wifi_init: WiFi IRAM OP enabled
I (705) wifi_init: WiFi RX IRAM OP enabled
I (715) phy_init: phy_version 4791,2c4672b,Dec 20 2023,16:06:06
I (795) wifi:mode : sta (c0:49:ef:f1:8a:00)
I (795) wifi:enable tsf
I (805) wifi station: wifi_init_sta finished.
I (825) wifi:new:<1,1>, old:<1,0>, ap:<255,255>, sta:<1,1>, prof:1, snd_ch_cfg:0x0
I (825) wifi:state: init -> auth (0xb0)
I (825) wifi:state: auth -> assoc (0x0)
I (835) wifi:state: assoc -> run (0x10)
I (1035) wifi:[ADDBA]RX DELBA, reason:39, delete tid:0, initiator:1(originator)
I (1035) wifi:[ADDBA]RX DELBA, reason:39, delete tid:0, initiator:0(recipient)
I (1035) wifi:[ADDBA]RX DELBA, reason:39, delete tid:1, initiator:1(originator)
I (1055) wifi:connected with Z4309, aid = 3, channel 1, 40U, bssid = 6c:b1:58:2a:35:1e
I (1055) wifi:security: WPA2-PSK, phy: bgn, rssi: -49
I (1055) wifi:pm start, type: 1I (1065) wifi:dp: 1, bi: 102400, li: 3, scale listen interval from 307200 us to 307200 us
I (1095) wifi:AP's beacon interval = 102400 us, DTIM period = 1
I (1105) wifi:<ba-add>idx:0 (ifx:0, 6c:b1:58:2a:35:1e), tid:0, ssn:673, winSize:64
I (2075) esp_netif_handlers: sta ip: 192.168.1.102, mask: 255.255.255.0, gw: 192.168.1.1
I (2075) wifi station: got ip:192.168.1.102
I (2075) wifi station: connected to ap SSID:Z4309 password:62262466
I (2085) MQTT_EXAMPLE: Other event id:7
I (2095) MQTT_EXAMPLE: calibration scheme version is Line Fitting
I (2095) MQTT_EXAMPLE: Calibration Success
I (2095) MQTT_EXAMPLE: calibration scheme version is Line Fitting
I (2105) MQTT_EXAMPLE: Calibration Success
I (2105) main_task: Returned from app_main()
I (2115) MQTT_EXAMPLE: calibration scheme version is Line Fitting
I (2125) MQTT_EXAMPLE: Calibration Success
I (2125) MQTT_EXAMPLE: ADC1 Channel[4] Raw Data: 1630
I (2135) MQTT_EXAMPLE: ADC1 Channel[4] Cali Voltage: 1489 mV
I (2145) wifi:<ba-add>idx:1 (ifx:0, 6c:b1:58:2a:35:1e), tid:1, ssn:14, winSize:64
I (2195) MQTT_EXAMPLE: MQTT_EVENT_CONNECTED
I (2205) MQTT_EXAMPLE: sent publish successful, msg_id=60130
I (2205) MQTT_EXAMPLE: sent subscribe successful, msg_id=32048
I (2245) MQTT_EXAMPLE: MQTT_EVENT_PUBLISHED, msg_id=60130
I (2285) MQTT_EXAMPLE: MQTT_EVENT_SUBSCRIBED, msg_id=32048
I (2295) MQTT_EXAMPLE: sent publish successful, msg_id=0
I (3135) MQTT_EXAMPLE: voltage[0][0] is 1489
I (3135) MQTT_EXAMPLE: mqtt_publish_data2 is {
"method": "thing.event.property.post",
"params": {
"OF": 0,
"waterml": 1489
}
}
I (3175) MQTT_EXAMPLE: MQTT_EVENT_PUBLISHED, msg_id=63520
I (5145) MQTT_EXAMPLE: ADC1 Channel[4] Raw Data: 1631
I (5145) MQTT_EXAMPLE: ADC1 Channel[4] Cali Voltage: 1489 mV
I (6145) MQTT_EXAMPLE: voltage[0][0] is 1489
I (6145) MQTT_EXAMPLE: mqtt_publish_data2 is {
"method": "thing.event.property.post",
"params": {
"OF": 0,
"waterml": 1489
}
}
I (6185) MQTT_EXAMPLE: MQTT_EVENT_PUBLISHED, msg_id=55202
I (8155) MQTT_EXAMPLE: ADC1 Channel[4] Raw Data: 1626
I (8155) MQTT_EXAMPLE: ADC1 Channel[4] Cali Voltage: 1485 mV
I (9155) MQTT_EXAMPLE: voltage[0][0] is 1485
I (9155) MQTT_EXAMPLE: mqtt_publish_data2 is {
"method": "thing.event.property.post",
"params": {
"OF": 0,
"waterml": 1485
}
}
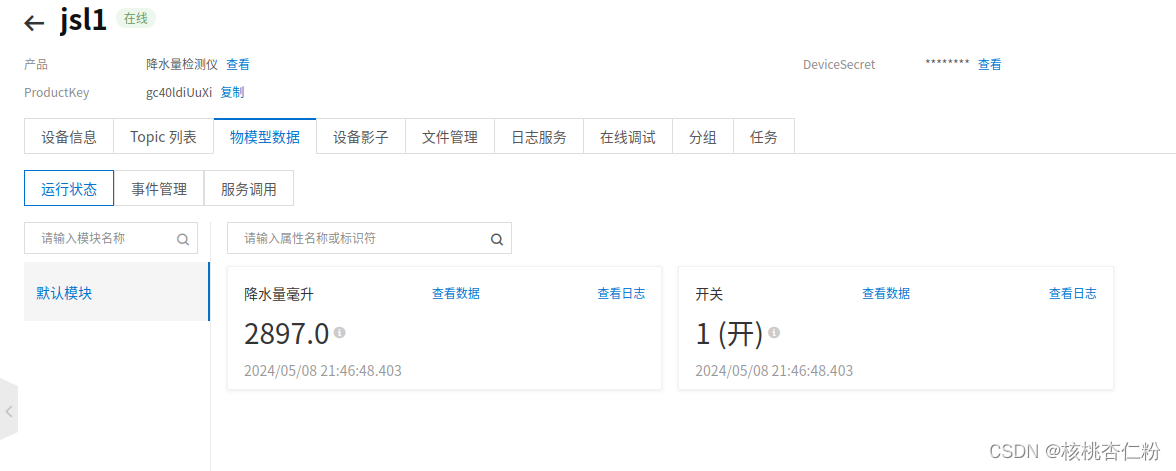
OF是BOOL类型,waterml是int类型,云平台收到设备上报的消息之后,就会相应显示。
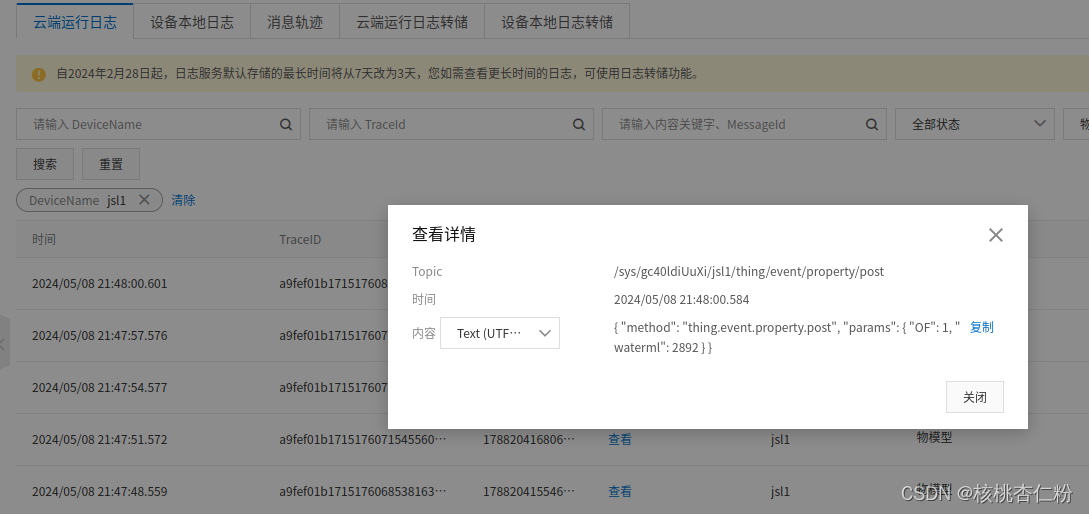
还可以通过日志来查看发送的信息,可以看到发送到云端的实际上是json语句。云平台通过解析达到数据显示的作用。


 4199
4199

 被折叠的 条评论
为什么被折叠?
被折叠的 条评论
为什么被折叠?
 到【灌水乐园】发言


