


MobileNetv2模型原理介绍
相比于传统的卷积神经网络,MobileNet网络使用深度可分离卷积(Depthwise Separable Convolution)的思想在准确率小幅度降低的前提下,大大减小了模型参数与运算量。并引入宽度系数α和分辨率系数β使模型满足不同应用场景的需求。
由于MobileNet网络中Relu激活函数处理低维特征信息时会存在大量的丢失,所以MobileNetV2网络提出使用倒残差结构(Inverted residual block)和Linear Bottlenecks来设计网络,以提高模型的准确率,且优化后的模型更小。
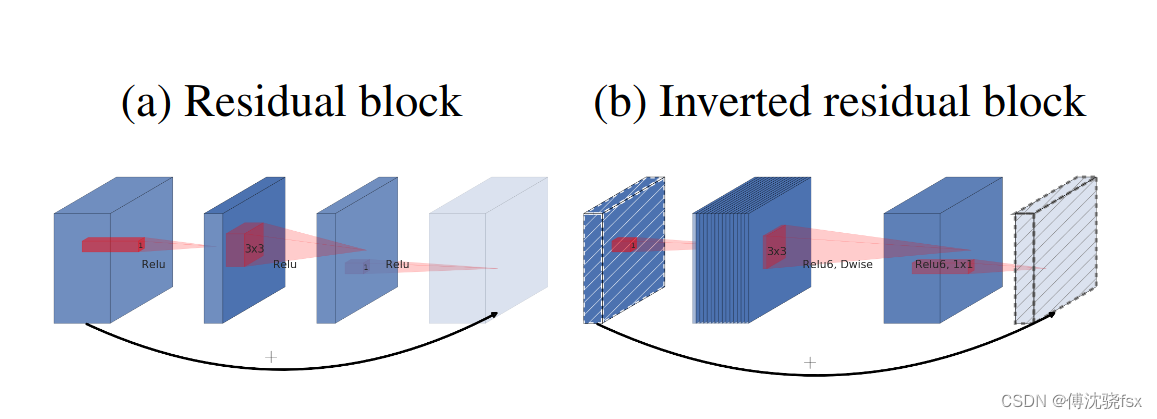
图中Inverted residual block结构是先使用1x1卷积进行升维,然后使用3x3的DepthWise卷积,最后使用1x1的卷积进行降维。
数据处理
数据准备
from download import download

# 下载data_en数据集
url = "https://ascend-professional-construction-dataset.obs.cn-north-4.myhuaweicloud.com:443/MindStudio-pc/data_en.zip"
path = download(url, "./", kind="zip", replace=True)
数据加载
import math
import numpy as np
import os
import random

from matplotlib import pyplot as plt
from easydict import EasyDict
from PIL import Image
import numpy as np
import mindspore.nn as nn
from mindspore import ops as P
from mindspore.ops import add
from mindspore import Tensor
import mindspore.common.dtype as mstype
import mindspore.dataset as de
import mindspore.dataset.vision as C
import mindspore.dataset.transforms as C2
import mindspore as ms
from mindspore import set_context, nn, Tensor, load_checkpoint, save_checkpoint, export
from mindspore.train import Model
from mindspore.train import Callback, LossMonitor, ModelCheckpoint, CheckpointConfig

os.environ['GLOG_v'] = '3' # Log level includes 3(ERROR), 2(WARNING), 1(INFO), 0(DEBUG).
os.environ['GLOG_logtostderr'] = '0' # 0:输出到文件,1:输出到屏幕
os.environ['GLOG_log_dir'] = '../../log' # 日志目录
os.environ['GLOG_stderrthreshold'] = '2' # 输出到目录也输出到屏幕:3(ERROR), 2(WARNING), 1(INFO), 0(DEBUG).
set_context(mode=ms.GRAPH_MODE, device_target="CPU", device_id=0) # 设置采用图模式执行,设备为Ascend#
配置后续训练、验证、推理用到的参数:
# 垃圾分类数据集标签,以及用于标签映射的字典。
garbage_classes = {
    '干垃圾': ['贝壳', '打火机', '旧镜子', '扫把', '陶瓷碗', '牙刷', '一次性筷子', '脏污衣服'],
    '可回收物': ['报纸', '玻璃制品', '篮球', '塑料瓶', '硬纸板', '玻璃瓶', '金属制品', '帽子', '易拉罐', '纸张'],
    '湿垃圾': ['菜叶', '橙皮', '蛋壳', '香蕉皮'],
    '有害垃圾': ['电池', '药片胶囊', '荧光灯', '油漆桶']
}

class_cn = ['贝壳', '打火机', '旧镜子', '扫把', '陶瓷碗', '牙刷', '一次性筷子', '脏污衣服',
            '报纸', '玻璃制品', '篮球', '塑料瓶', '硬纸板', '玻璃瓶', '金属制品', '帽子', '易拉罐', '纸张',
            '菜叶', '橙皮', '蛋壳', '香蕉皮',
            '电池', '药片胶囊', '荧光灯', '油漆桶']
class_en = ['Seashell', 'Lighter','Old Mirror', 'Broom','Ceramic Bowl', 'Toothbrush','Disposable Chopsticks','Dirty Cloth',
            'Newspaper', 'Glassware', 'Basketball', 'Plastic Bottle', 'Cardboard','Glass Bottle', 'Metalware', 'Hats', 'Cans', 'Paper',
            'Vegetable Leaf','Orange Peel', 'Eggshell','Banana Peel',
            'Battery', 'Tablet capsules','Fluorescent lamp', 'Paint bucket']

index_en = {'Seashell': 0, 'Lighter': 1, 'Old Mirror': 2, 'Broom': 3, 'Ceramic Bowl': 4, 'Toothbrush': 5, 'Disposable Chopsticks': 6, 'Dirty Cloth': 7,
            'Newspaper': 8, 'Glassware': 9, 'Basketball': 10, 'Plastic Bottle': 11, 'Cardboard': 12, 'Glass Bottle': 13, 'Metalware': 14, 'Hats': 15, 'Cans': 16, 'Paper': 17,
            'Vegetable Leaf': 18, 'Orange Peel': 19, 'Eggshell': 20, 'Banana Peel': 21,
            'Battery': 22, 'Tablet capsules': 23, 'Fluorescent lamp': 24, 'Paint bucket': 25}

# 训练超参
config = EasyDict({
    "num_classes": 26,
    "image_height": 224,
    "image_width": 224,
    #"data_split": [0.9, 0.1],
    "backbone_out_channels":1280,
    "batch_size": 16,
    "eval_batch_size": 8,
    "epochs": 10,
    "lr_max": 0.05,
    "momentum": 0.9,
    "weight_decay": 1e-4,
    "save_ckpt_epochs": 1,
    "dataset_path": "./data_en",
    "class_index": index_en,
    "pretrained_ckpt": "./mobilenetV2-200_1067.ckpt" # mobilenetV2-200_1067.ckpt
})
进行数据预处理:
def create_dataset(dataset_path, config, training=True, buffer_size=1000):
    """
    create a train or eval dataset

    Args:
        dataset_path(string): the path of dataset.
        config(struct): the config of train and eval in diffirent platform.

    Returns:
        train_dataset, val_dataset
    """
    data_path = os.path.join(dataset_path, 'train' if training else 'test')
    ds = de.ImageFolderDataset(data_path, num_parallel_workers=4, class_indexing=config.class_index)
    resize_height = config.image_height
    resize_width = config.image_width

    normalize_op = C.Normalize(mean=[0.485*255, 0.456*255, 0.406*255], std=[0.229*255, 0.224*255, 0.225*255])
    change_swap_op = C.HWC2CHW()
    type_cast_op = C2.TypeCast(mstype.int32)

    if training:
        crop_decode_resize = C.RandomCropDecodeResize(resize_height, scale=(0.08, 1.0), ratio=(0.75, 1.333))
        horizontal_flip_op = C.RandomHorizontalFlip(prob=0.5)
        color_adjust = C.RandomColorAdjust(brightness=0.4, contrast=0.4, saturation=0.4)

        train_trans = [crop_decode_resize, horizontal_flip_op, color_adjust, normalize_op, change_swap_op]
        train_ds = ds.map(input_columns="image", operations=train_trans, num_parallel_workers=4)
        train_ds = train_ds.map(input_columns="label", operations=type_cast_op, num_parallel_workers=4)

        train_ds = train_ds.shuffle(buffer_size=buffer_size)
        ds = train_ds.batch(config.batch_size, drop_remainder=True)
    else:
        decode_op = C.Decode()
        resize_op = C.Resize((int(resize_width/0.875), int(resize_width/0.875)))
        center_crop = C.CenterCrop(resize_width)

        eval_trans = [decode_op, resize_op, center_crop, normalize_op, change_swap_op]
        eval_ds = ds.map(input_columns="image", operations=eval_trans, num_parallel_workers=4)
        eval_ds = eval_ds.map(input_columns="label", operations=type_cast_op, num_parallel_workers=4)
        ds = eval_ds.batch(config.eval_batch_size, drop_remainder=True)

    return ds
MobileNetV2模型搭建
__all__ = ['MobileNetV2', 'MobileNetV2Backbone', 'MobileNetV2Head', 'mobilenet_v2']

def _make_divisible(v, divisor, min_value=None):
    if min_value is None:
        min_value = divisor
    new_v = max(min_value, int(v + divisor / 2) // divisor * divisor)
    if new_v < 0.9 * v:
        new_v += divisor
    return new_v

class GlobalAvgPooling(nn.Cell):
    """
    Global avg pooling definition.

    Args:

    Returns:
        Tensor, output tensor.

    Examples:
        >>> GlobalAvgPooling()
    """

    def __init__(self):
        super(GlobalAvgPooling, self).__init__()

    def construct(self, x):
        x = P.mean(x, (2, 3))
        return x

class ConvBNReLU(nn.Cell):
    """
    Convolution/Depthwise fused with Batchnorm and ReLU block definition.

    Args:
        in_planes (int): Input channel.
        out_planes (int): Output channel.
        kernel_size (int): Input kernel size.
        stride (int): Stride size for the first convolutional layer. Default: 1.
        groups (int): channel group. Convolution is 1 while Depthiwse is input channel. Default: 1.

    Returns:
        Tensor, output tensor.

    Examples:
        >>> ConvBNReLU(16, 256, kernel_size=1, stride=1, groups=1)
    """

    def __init__(self, in_planes, out_planes, kernel_size=3, stride=1, groups=1):
        super(ConvBNReLU, self).__init__()
        padding = (kernel_size - 1) // 2
        in_channels = in_planes
        out_channels = out_planes
        if groups == 1:
            conv = nn.Conv2d(in_channels, out_channels, kernel_size, stride, pad_mode='pad', padding=padding)
        else:
            out_channels = in_planes
            conv = nn.Conv2d(in_channels, out_channels, kernel_size, stride, pad_mode='pad',
                             padding=padding, group=in_channels)

        layers = [conv, nn.BatchNorm2d(out_planes), nn.ReLU6()]
        self.features = nn.SequentialCell(layers)

    def construct(self, x):
        output = self.features(x)
        return output

class InvertedResidual(nn.Cell):
    """
    Mobilenetv2 residual block definition.

    Args:
        inp (int): Input channel.
        oup (int): Output channel.
        stride (int): Stride size for the first convolutional layer. Default: 1.
        expand_ratio (int): expand ration of input channel

    Returns:
        Tensor, output tensor.

    Examples:
        >>> ResidualBlock(3, 256, 1, 1)
    """

    def __init__(self, inp, oup, stride, expand_ratio):
        super(InvertedResidual, self).__init__()
        assert stride in [1, 2]

        hidden_dim = int(round(inp * expand_ratio))
        self.use_res_connect = stride == 1 and inp == oup

        layers = []
        if expand_ratio != 1:
            layers.append(ConvBNReLU(inp, hidden_dim, kernel_size=1))
        layers.extend([
            ConvBNReLU(hidden_dim, hidden_dim,
                       stride=stride, groups=hidden_dim),
            nn.Conv2d(hidden_dim, oup, kernel_size=1,
                      stride=1, has_bias=False),
            nn.BatchNorm2d(oup),
        ])
        self.conv = nn.SequentialCell(layers)
        self.cast = P.Cast()

    def construct(self, x):
        identity = x
        x = self.conv(x)
        if self.use_res_connect:
            return P.add(identity, x)
        return x

class MobileNetV2Backbone(nn.Cell):
    """
    MobileNetV2 architecture.

    Args:
        class_num (int): number of classes.
        width_mult (int): Channels multiplier for round to 8/16 and others. Default is 1.
        has_dropout (bool): Is dropout used. Default is false
        inverted_residual_setting (list): Inverted residual settings. Default is None
        round_nearest (list): Channel round to . Default is 8
    Returns:
        Tensor, output tensor.

    Examples:
        >>> MobileNetV2(num_classes=1000)
    """

    def __init__(self, width_mult=1., inverted_residual_setting=None, round_nearest=8,
                 input_channel=32, last_channel=1280):
        super(MobileNetV2Backbone, self).__init__()
        block = InvertedResidual
        # setting of inverted residual blocks
        self.cfgs = inverted_residual_setting
        if inverted_residual_setting is None:
            self.cfgs = [
                # t, c, n, s
                [1, 16, 1, 1],
                [6, 24, 2, 2],
                [6, 32, 3, 2],
                [6, 64, 4, 2],
                [6, 96, 3, 1],
                [6, 160, 3, 2],
                [6, 320, 1, 1],
            ]

        # building first layer
        input_channel = _make_divisible(input_channel * width_mult, round_nearest)
        self.out_channels = _make_divisible(last_channel * max(1.0, width_mult), round_nearest)
        features = [ConvBNReLU(3, input_channel, stride=2)]
        # building inverted residual blocks
        for t, c, n, s in self.cfgs:
            output_channel = _make_divisible(c * width_mult, round_nearest)
            for i in range(n):
                stride = s if i == 0 else 1
                features.append(block(input_channel, output_channel, stride, expand_ratio=t))
                input_channel = output_channel
        features.append(ConvBNReLU(input_channel, self.out_channels, kernel_size=1))
        self.features = nn.SequentialCell(features)
        self._initialize_weights()

    def construct(self, x):
        x = self.features(x)
        return x

    def _initialize_weights(self):
        """
        Initialize weights.

        Args:

        Returns:
            None.

        Examples:
            >>> _initialize_weights()
        """
        self.init_parameters_data()
        for _, m in self.cells_and_names():
            if isinstance(m, nn.Conv2d):
                n = m.kernel_size[0] * m.kernel_size[1] * m.out_channels
                m.weight.set_data(Tensor(np.random.normal(0, np.sqrt(2. / n),
                                                          m.weight.data.shape).astype("float32")))
                if m.bias is not None:
                    m.bias.set_data(
                        Tensor(np.zeros(m.bias.data.shape, dtype="float32")))
            elif isinstance(m, nn.BatchNorm2d):
                m.gamma.set_data(
                    Tensor(np.ones(m.gamma.data.shape, dtype="float32")))
                m.beta.set_data(
                    Tensor(np.zeros(m.beta.data.shape, dtype="float32")))

    @property
    def get_features(self):
        return self.features

class MobileNetV2Head(nn.Cell):
    """
    MobileNetV2 architecture.

    Args:
        class_num (int): Number of classes. Default is 1000.
        has_dropout (bool): Is dropout used. Default is false
    Returns:
        Tensor, output tensor.

    Examples:
        >>> MobileNetV2(num_classes=1000)
    """

    def __init__(self, input_channel=1280, num_classes=1000, has_dropout=False, activation="None"):
        super(MobileNetV2Head, self).__init__()
        # mobilenet head
        head = ([GlobalAvgPooling(), nn.Dense(input_channel, num_classes, has_bias=True)] if not has_dropout else
                [GlobalAvgPooling(), nn.Dropout(0.2), nn.Dense(input_channel, num_classes, has_bias=True)])
        self.head = nn.SequentialCell(head)
        self.need_activation = True
        if activation == "Sigmoid":
            self.activation = nn.Sigmoid()
        elif activation == "Softmax":
            self.activation = nn.Softmax()
        else:
            self.need_activation = False
        self._initialize_weights()

    def construct(self, x):
        x = self.head(x)
        if self.need_activation:
            x = self.activation(x)
        return x

    def _initialize_weights(self):
        """
        Initialize weights.

        Args:

        Returns:
            None.

        Examples:
            >>> _initialize_weights()
        """
        self.init_parameters_data()
        for _, m in self.cells_and_names():
            if isinstance(m, nn.Dense):
                m.weight.set_data(Tensor(np.random.normal(
                    0, 0.01, m.weight.data.shape).astype("float32")))
                if m.bias is not None:
                    m.bias.set_data(
                        Tensor(np.zeros(m.bias.data.shape, dtype="float32")))
    @property
    def get_head(self):
        return self.head

class MobileNetV2(nn.Cell):
    """
    MobileNetV2 architecture.

    Args:
        class_num (int): number of classes.
        width_mult (int): Channels multiplier for round to 8/16 and others. Default is 1.
        has_dropout (bool): Is dropout used. Default is false
        inverted_residual_setting (list): Inverted residual settings. Default is None
        round_nearest (list): Channel round to . Default is 8
    Returns:
        Tensor, output tensor.

    Examples:
        >>> MobileNetV2(backbone, head)
    """

    def __init__(self, num_classes=1000, width_mult=1., has_dropout=False, inverted_residual_setting=None, \
        round_nearest=8, input_channel=32, last_channel=1280):
        super(MobileNetV2, self).__init__()
        self.backbone = MobileNetV2Backbone(width_mult=width_mult, \
            inverted_residual_setting=inverted_residual_setting, \
            round_nearest=round_nearest, input_channel=input_channel, last_channel=last_channel).get_features
        self.head = MobileNetV2Head(input_channel=self.backbone.out_channel, num_classes=num_classes, \
            has_dropout=has_dropout).get_head

    def construct(self, x):
        x = self.backbone(x)
        x = self.head(x)
        return x

class MobileNetV2Combine(nn.Cell):
    """
    MobileNetV2Combine architecture.

    Args:
        backbone (Cell): the features extract layers.
        head (Cell):  the fully connected layers.
    Returns:
        Tensor, output tensor.

    Examples:
        >>> MobileNetV2(num_classes=1000)
    """

    def __init__(self, backbone, head):
        super(MobileNetV2Combine, self).__init__(auto_prefix=False)
        self.backbone = backbone
        self.head = head

    def construct(self, x):
        x = self.backbone(x)
        x = self.head(x)
        return x

def mobilenet_v2(backbone, head):
    return MobileNetV2Combine(backbone, head)
MobileNetV2模型的训练与测试
训练策略
采用cosine decay下降策略作为模型训练学习率下降策略
def cosine_decay(total_steps, lr_init=0.0, lr_end=0.0, lr_max=0.1, warmup_steps=0):
    """
    Applies cosine decay to generate learning rate array.

    Args:
       total_steps(int): all steps in training.
       lr_init(float): init learning rate.
       lr_end(float): end learning rate
       lr_max(float): max learning rate.
       warmup_steps(int): all steps in warmup epochs.

    Returns:
       list, learning rate array.
    """
    lr_init, lr_end, lr_max = float(lr_init), float(lr_end), float(lr_max)
    decay_steps = total_steps - warmup_steps
    lr_all_steps = []
    inc_per_step = (lr_max - lr_init) / warmup_steps if warmup_steps else 0
    for i in range(total_steps):
        if i < warmup_steps:
            lr = lr_init + inc_per_step * (i + 1)
        else:
            cosine_decay = 0.5 * (1 + math.cos(math.pi * (i - warmup_steps) / decay_steps))
            lr = (lr_max - lr_end) * cosine_decay + lr_end
        lr_all_steps.append(lr)

    return lr_all_steps
加载ImageNet数据上预训练的MobileNetv2进行Fine-tuning,只训练最后修改的FC层,并在训练过程中保存Checkpoint。
def switch_precision(net, data_type):
    if ms.get_context('device_target') == "Ascend":
        net.to_float(data_type)
        for _, cell in net.cells_and_names():
            if isinstance(cell, nn.Dense):
                cell.to_float(ms.float32)
模型训练与测试
在训练MobileNetV2之前对MobileNetV2Backbone层的参数进行了固定,使其在训练过程中对该模块的权重参数不进行更新;只对MobileNetV2Head模块的参数进行更新。
损失函数采用SoftmaxCrossEntropyWithLogits损失函数。
from mindspore.amp import FixedLossScaleManager
import time
LOSS_SCALE = 1024

train_dataset = create_dataset(dataset_path=config.dataset_path, config=config)
eval_dataset = create_dataset(dataset_path=config.dataset_path, config=config)
step_size = train_dataset.get_dataset_size()

backbone = MobileNetV2Backbone() #last_channel=config.backbone_out_channels
# Freeze parameters of backbone. You can comment these two lines.
for param in backbone.get_parameters():
    param.requires_grad = False
# load parameters from pretrained model
load_checkpoint(config.pretrained_ckpt, backbone)

head = MobileNetV2Head(input_channel=backbone.out_channels, num_classes=config.num_classes)
network = mobilenet_v2(backbone, head)

# define loss, optimizer, and model
loss = nn.SoftmaxCrossEntropyWithLogits(sparse=True, reduction='mean')
loss_scale = FixedLossScaleManager(LOSS_SCALE, drop_overflow_update=False)
lrs = cosine_decay(config.epochs * step_size, lr_max=config.lr_max)
opt = nn.Momentum(network.trainable_params(), lrs, config.momentum, config.weight_decay, loss_scale=LOSS_SCALE)

# 定义用于训练的train_loop函数。
def train_loop(model, dataset, loss_fn, optimizer):
    # 定义正向计算函数
    def forward_fn(data, label):
        logits = model(data)
        loss = loss_fn(logits, label)
        return loss

    # 定义微分函数,使用mindspore.value_and_grad获得微分函数grad_fn,输出loss和梯度。
    # 由于是对模型参数求导,grad_position 配置为None,传入可训练参数。
    grad_fn = ms.value_and_grad(forward_fn, None, optimizer.parameters)

    # 定义 one-step training函数
    def train_step(data, label):
        loss, grads = grad_fn(data, label)
        optimizer(grads)
        return loss

    size = dataset.get_dataset_size()
    model.set_train()
    for batch, (data, label) in enumerate(dataset.create_tuple_iterator()):
        loss = train_step(data, label)

        if batch % 10 == 0:
            loss, current = loss.asnumpy(), batch
            print(f"loss: {loss:>7f}  [{current:>3d}/{size:>3d}]")

# 定义用于测试的test_loop函数。
def test_loop(model, dataset, loss_fn):
    num_batches = dataset.get_dataset_size()
    model.set_train(False)
    total, test_loss, correct = 0, 0, 0
    for data, label in dataset.create_tuple_iterator():
        pred = model(data)
        total += len(data)
        test_loss += loss_fn(pred, label).asnumpy()
        correct += (pred.argmax(1) == label).asnumpy().sum()
    test_loss /= num_batches
    correct /= total
    print(f"Test: \n Accuracy: {(100*correct):>0.1f}%, Avg loss: {test_loss:>8f} \n")

print("============== Starting Training ==============")
# 由于时间问题,训练过程只进行了2个epoch ,可以根据需求调整。
epoch_begin_time = time.time()
epochs = 2
for t in range(epochs):
    begin_time = time.time()
    print(f"Epoch {t+1}\n-------------------------------")
    train_loop(network, train_dataset, loss, opt)
    ms.save_checkpoint(network, "save_mobilenetV2_model.ckpt")
    end_time = time.time()
    times = end_time - begin_time
    print(f"per epoch time: {times}s")
    test_loop(network, eval_dataset, loss)
epoch_end_time = time.time()
times = epoch_end_time - epoch_begin_time
print(f"total time:  {times}s")
print("============== Training Success ==============")
模型推理
加载模型,使用load_checkpoint接口加载数据时,需要把数据传入给原始网络,而不能传递给带有优化器和损失函数的训练网络。
CKPT="save_mobilenetV2_model.ckpt"

def image_process(image):
    """Precess one image per time.

    Args:
        image: shape (H, W, C)
    """
    mean=[0.485*255, 0.456*255, 0.406*255]
    std=[0.229*255, 0.224*255, 0.225*255]
    image = (np.array(image) - mean) / std
    image = image.transpose((2,0,1))
    img_tensor = Tensor(np.array([image], np.float32))
    return img_tensor

def infer_one(network, image_path):
    image = Image.open(image_path).resize((config.image_height, config.image_width))
    logits = network(image_process(image))
    pred = np.argmax(logits.asnumpy(), axis=1)[0]
    print(image_path, class_en[pred])

def infer():
    backbone = MobileNetV2Backbone(last_channel=config.backbone_out_channels)
    head = MobileNetV2Head(input_channel=backbone.out_channels, num_classes=config.num_classes)
    network = mobilenet_v2(backbone, head)
    load_checkpoint(CKPT, network)
    for i in range(91, 100):
        infer_one(network, f'data_en/test/Cardboard/000{i}.jpg')
infer()
导出AIR/GEIR/ONNX模型文件
backbone = MobileNetV2Backbone(last_channel=config.backbone_out_channels)
head = MobileNetV2Head(input_channel=backbone.out_channels, num_classes=config.num_classes)
network = mobilenet_v2(backbone, head)
load_checkpoint(CKPT, network)

input = np.random.uniform(0.0, 1.0, size=[1, 3, 224, 224]).astype(np.float32)
# export(network, Tensor(input), file_name='mobilenetv2.air', file_format='AIR')
# export(network, Tensor(input), file_name='mobilenetv2.pb', file_format='GEIR')
export(network, Tensor(input), file_name='mobilenetv2.onnx', file_format='ONNX')
总结
MovileNetV2网络使用深度可分离卷积的思想在准确率小幅度降低的前提下,大大减小了模型参数与运算量,同时还突出使用倒残差结构和Linear Bottlenecks来设计网络,以提高模型准确率并使优化后的模型更小。


 3万+
3万+


 被折叠的 条评论
为什么被折叠?
被折叠的 条评论
为什么被折叠?
 到【灌水乐园】发言


