


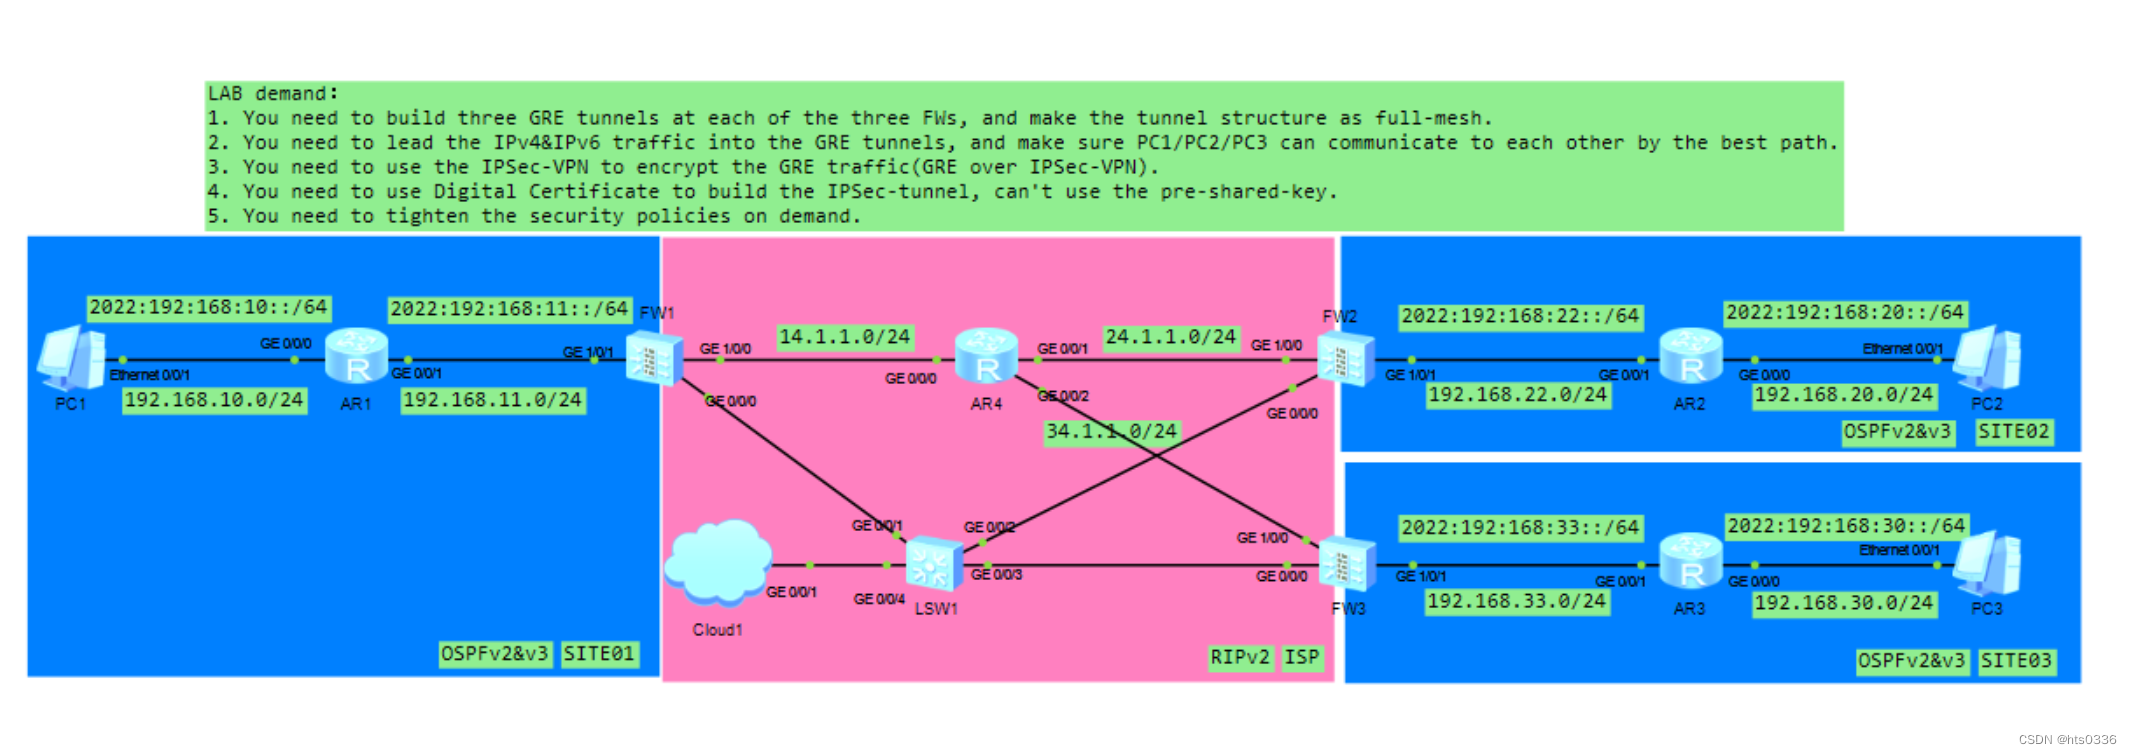
配置好IPv4与IPv6地址 配置好底层路由
中间ISP配置RIP路由协议并下发默认路由
AR4配置
rip 1
 undo summary
 default-route originate  #下发默认路由
 version 2
 network 14.0.0.0
 network 24.0.0.0
 network 34.0.0.0
三台边界防火墙分别为IPV4和IPV6下发缺省路由
防火墙上如果有缺省路由则会下发成功,如果没有则不会下发成功,而这里IP v4显然是有的,因为AR4给三台防火墙下发缺省路由了,所以ipv4的缺省可以下发成功,而ipv6则需要强制下发,命令如下(三台一样的配置)
IPV4的
[FW1]ospf 100
[FW1-ospf-100]dis this
2022-10-17 03:06:34.520
#
ospf 100 router-id 11.11.11.11
 default-route-advertise
 area 0.0.0.0
  network 192.168.11.1 0.0.0.0
#


IPV6的
#
ospfv3 100
 router-id 11.11.11.11
 default-route-advertise always
#
return
然后现在所需的路由齐全,需要配置TUNNEL隧道建立链接(三台防火墙效仿类似)
去往site2 的隧道

[FW1-Tunnel2]di this
2022-10-17 03:08:31.000
#
interface Tunnel2
 ipv6 enable
 ip address 12.1.1.1 255.255.255.0
 ipv6 address auto link-local
 tunnel-protocol gre
 source 14.1.1.2
 destination 24.1.1.2
#


去往site3的隧道
[FW1-Tunnel3]di thi
2022-10-17 03:09:08.700
#
interface Tunnel3
 ipv6 enable
 ip address 13.1.1.1 255.255.255.0
 ipv6 address auto link-local
 tunnel-protocol gre
 source 14.1.1.2
 destination 34.1.1.2
#
然后配置了Tunnel 一定记得加到防火墙的安全区域内,否则不会有流量放出去
#
untrust
priority is 5
interface of the zone is (3):
GigabitEthernet1/0/0
Tunnel2
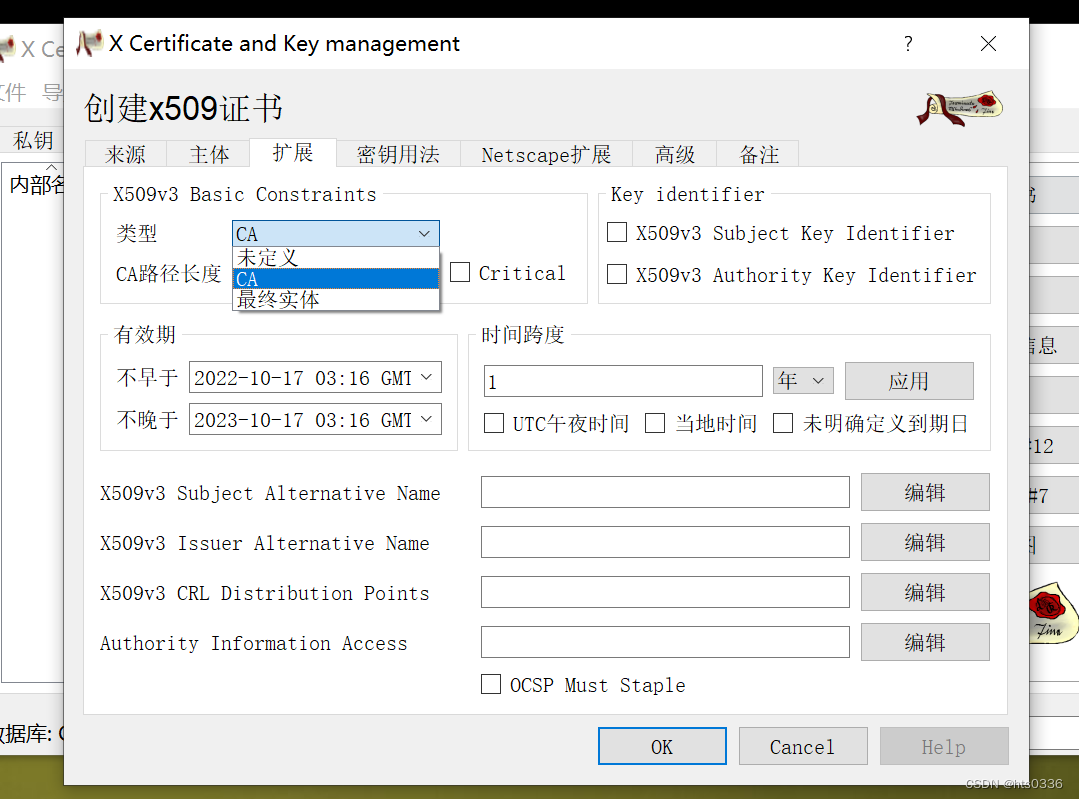
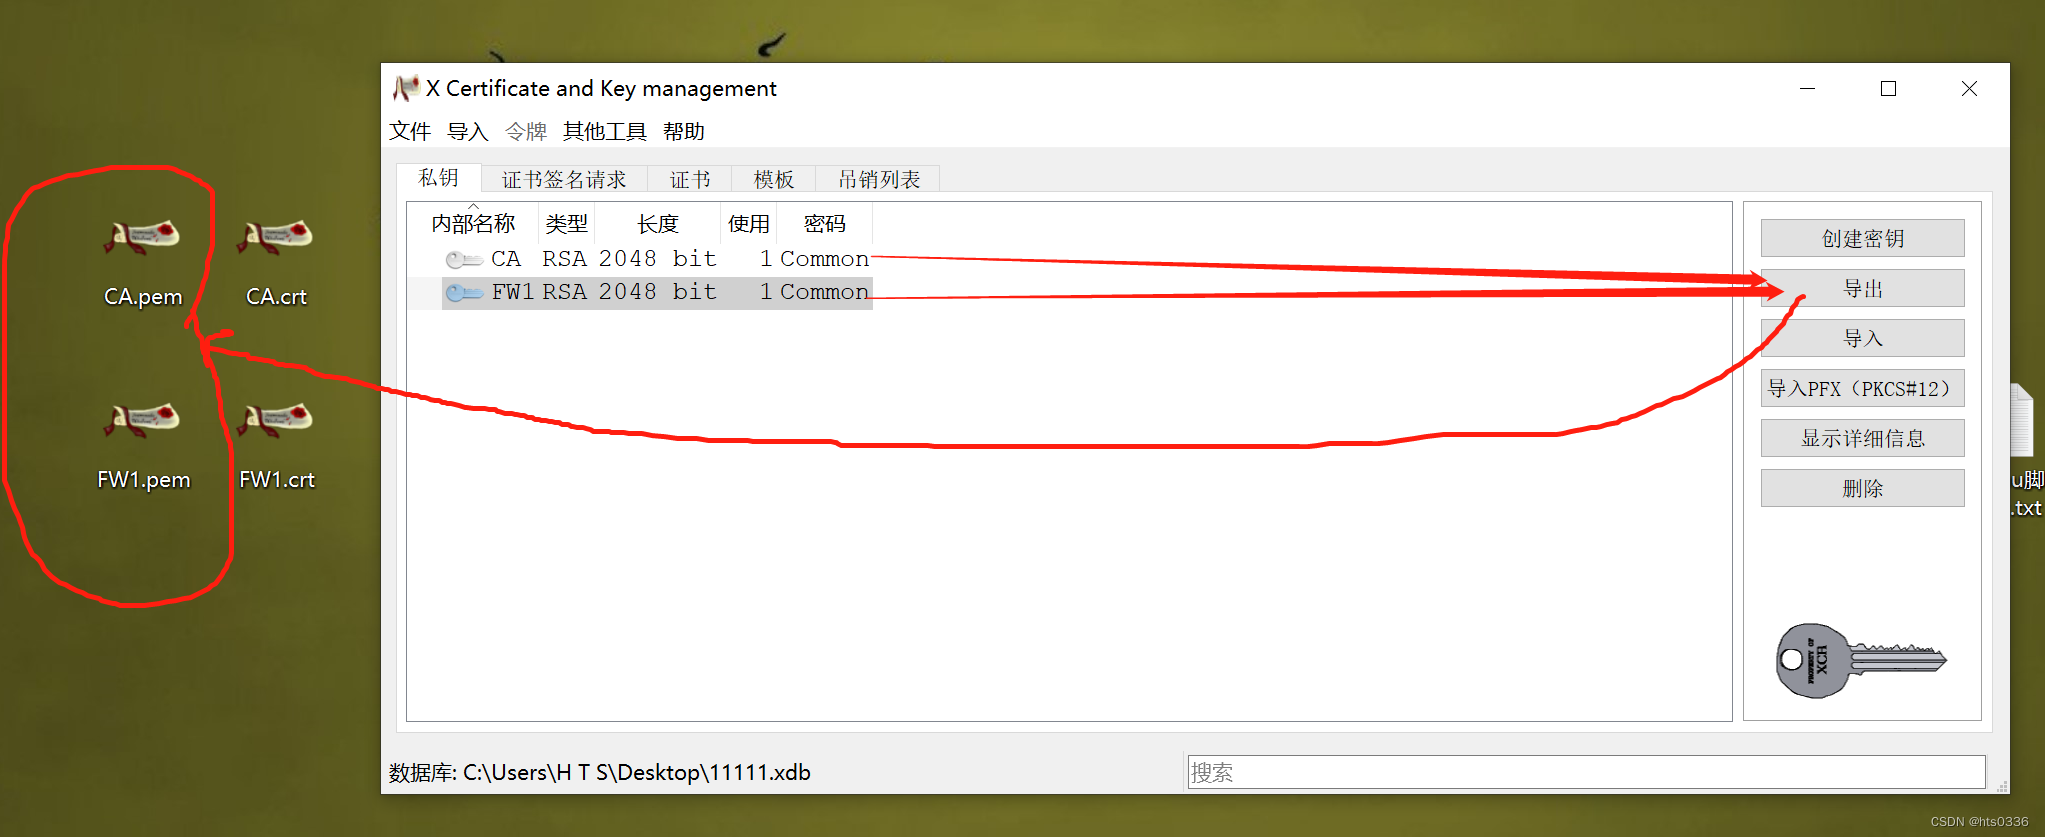
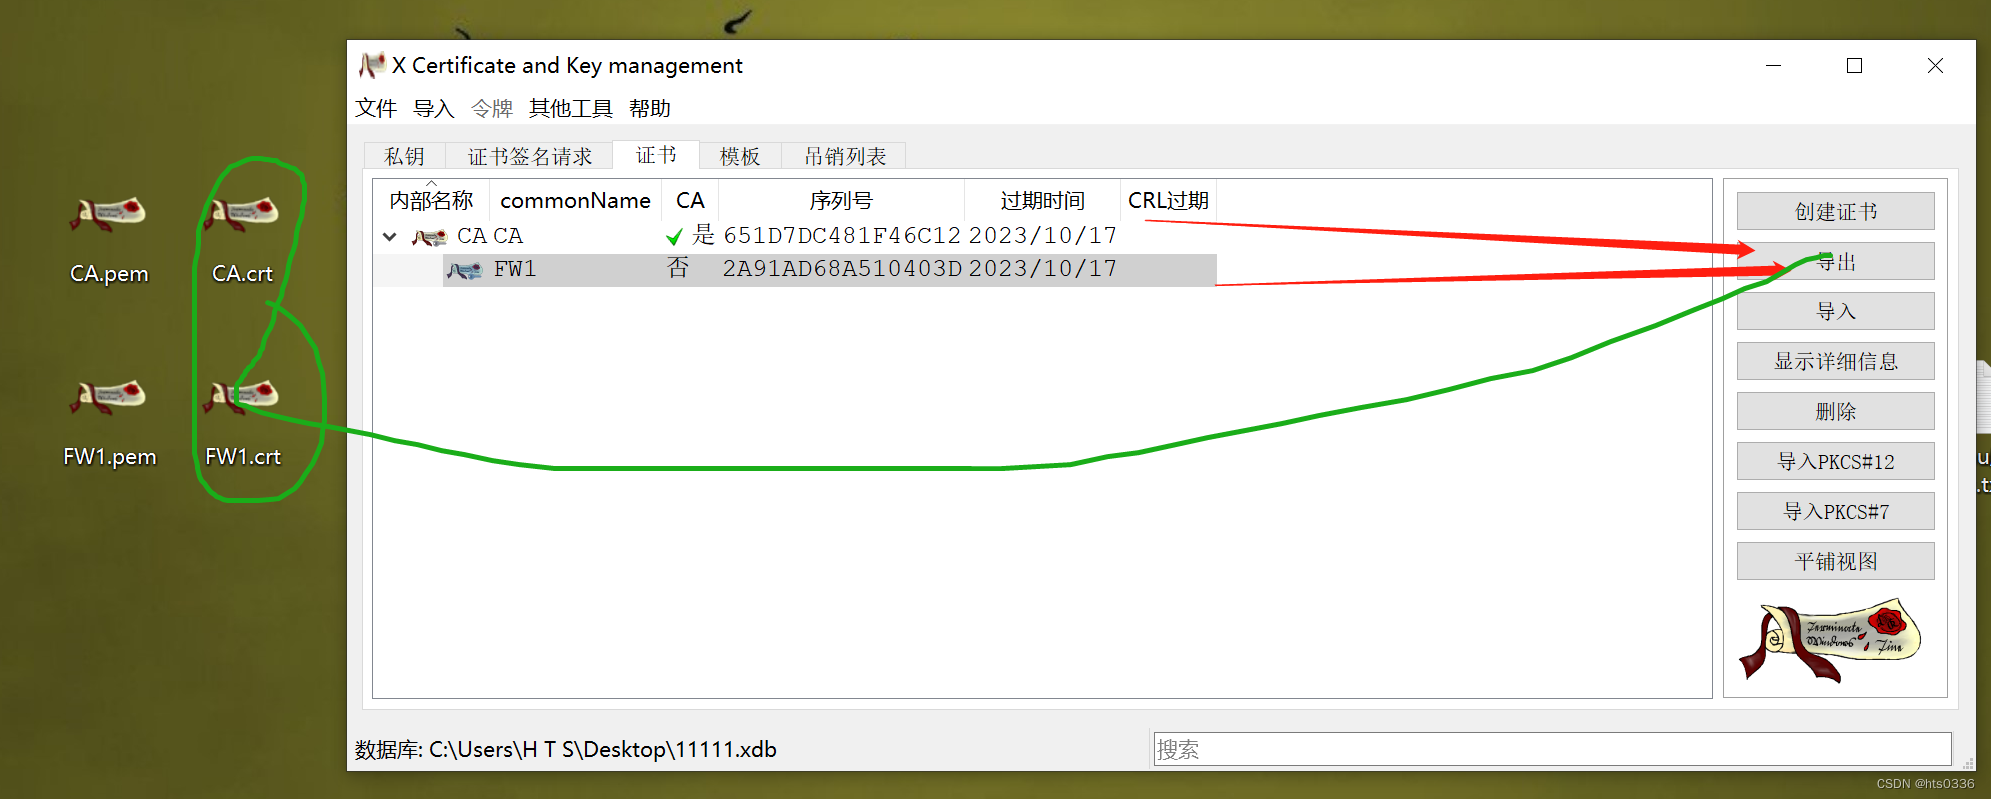
Tunnel3三台防火墙g0/0/0口要与主机联通然后将咱们用xca建立的各种密钥和证书导入进去
xca是个可以创建密钥和数字证书的软件

记住这个密码,这是你模拟的CA数据库的密码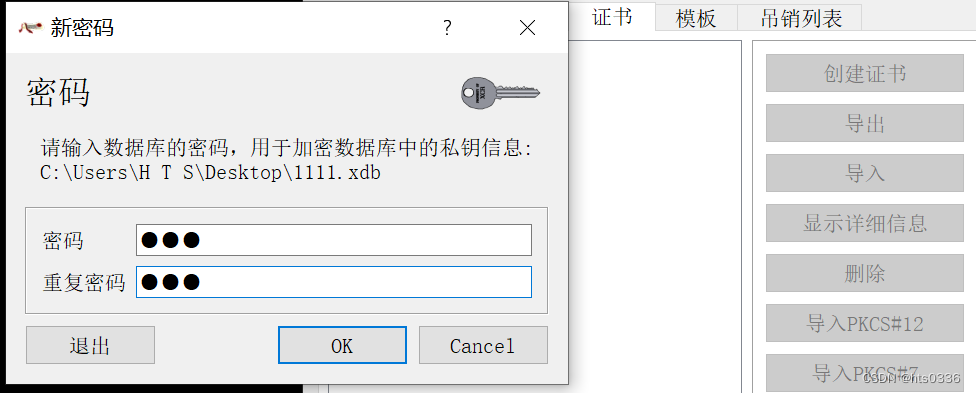
创建一个CA的私钥
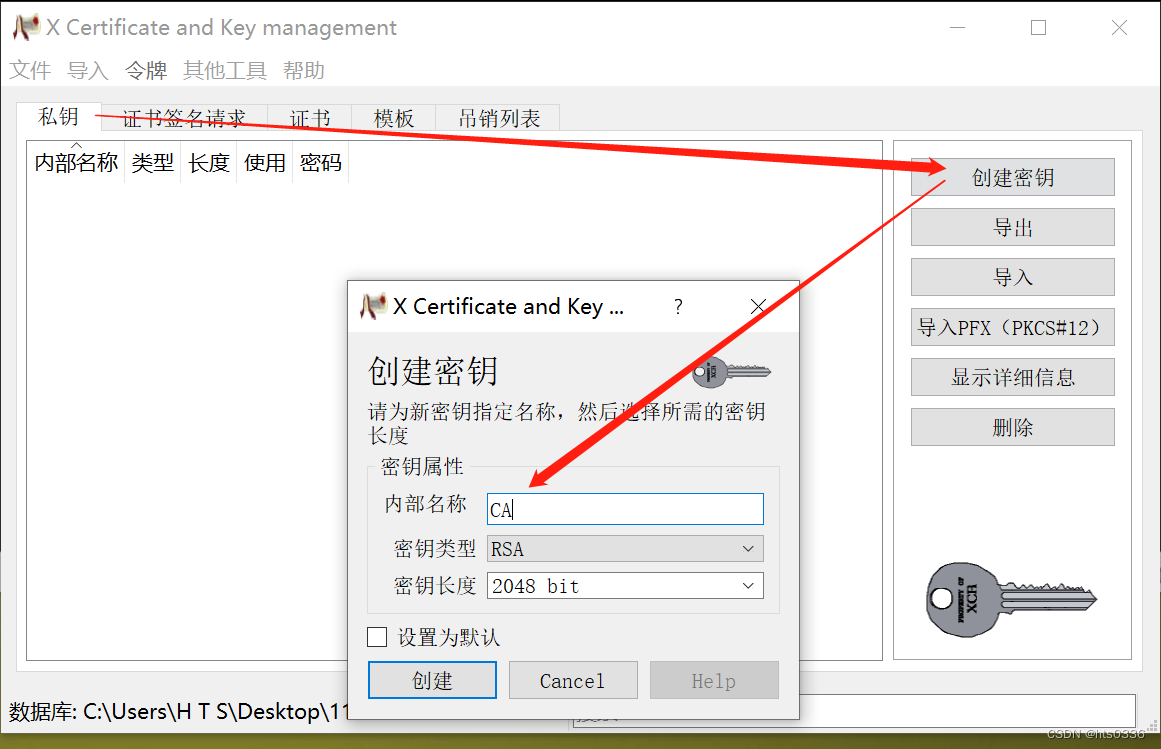
继而创建证书
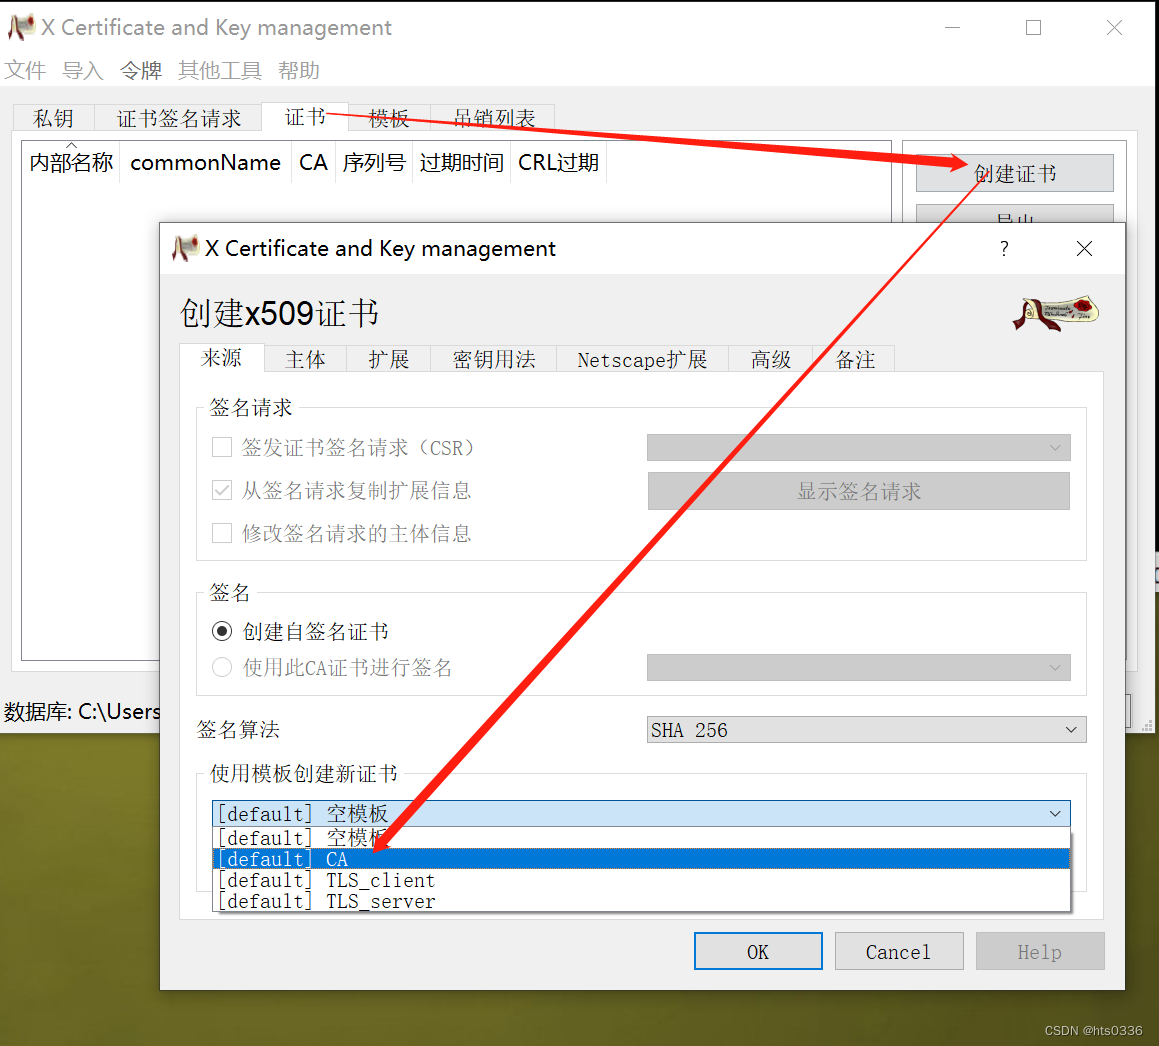

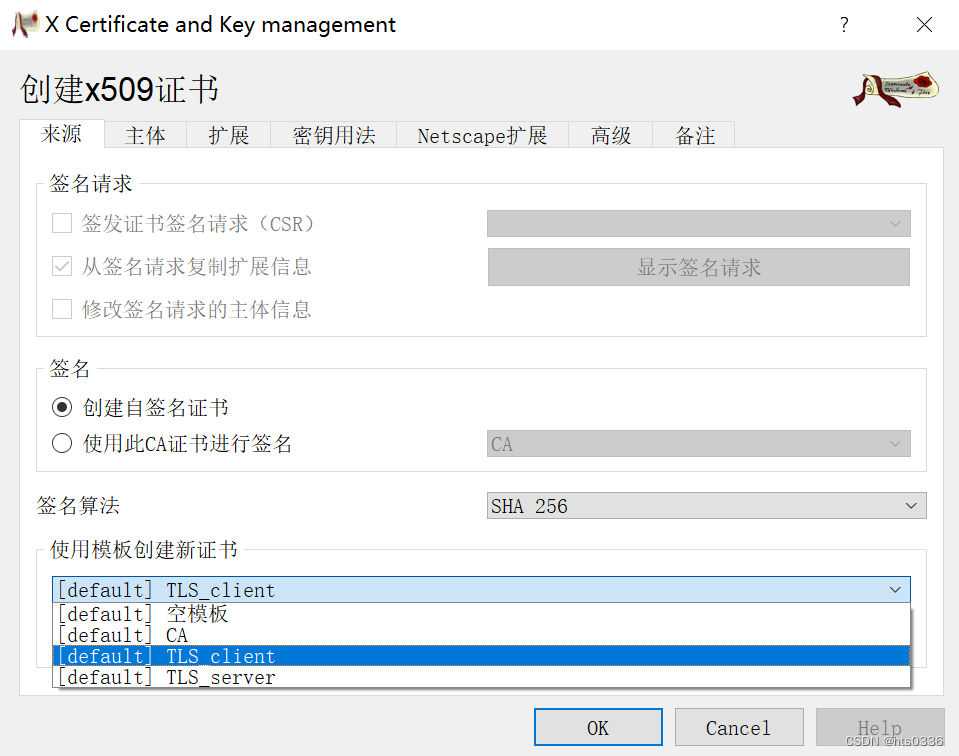
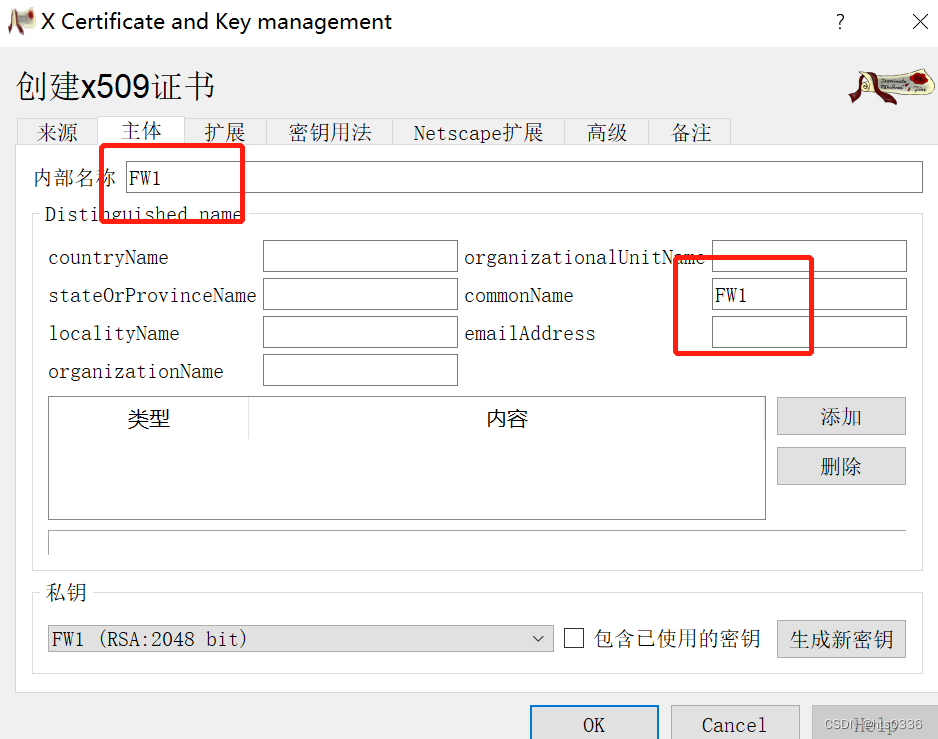
 然后继而为FW123配置证书和密钥,步骤一样这里只演示FW1
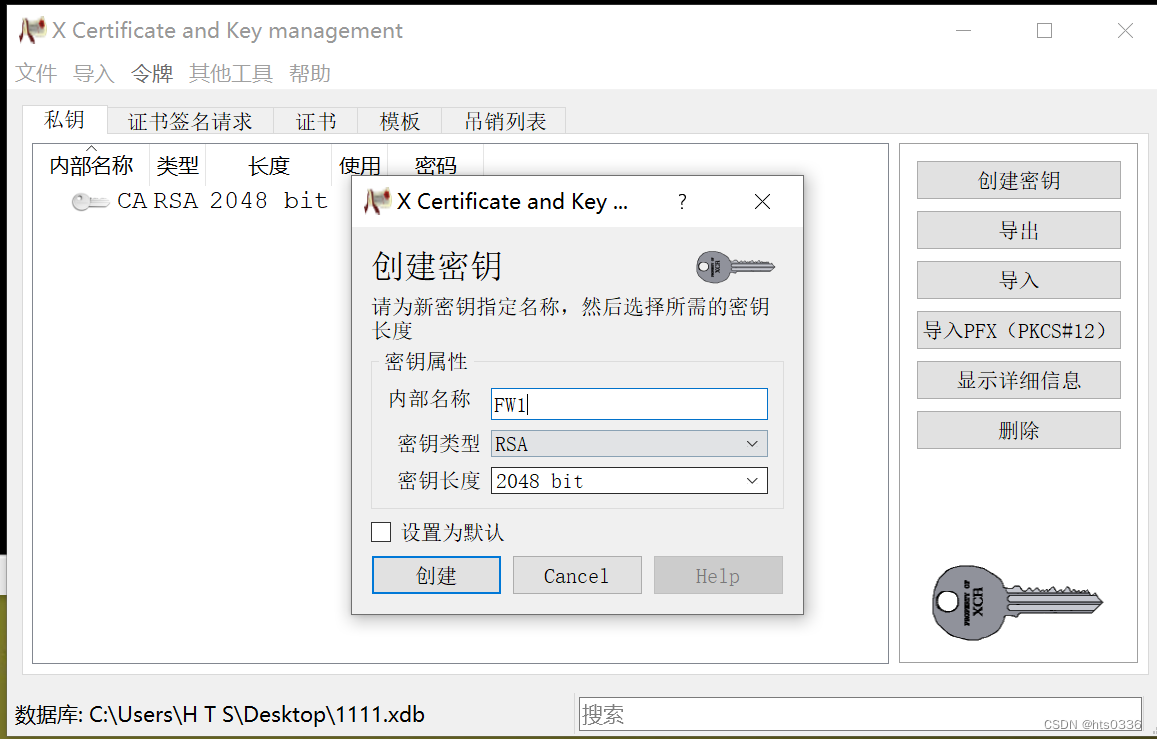
最后挨个全部导出到你的电脑里就行
 三台防火墙分别创建g0/0/0并和自己的主机联通 用cmd测试ping服务
FW123 都要开启ping服务
#

interface GigabitEthernet0/0/0
 ip address 192.168.153.11 255.255.255.0
 service-manage ping permit
在三台防火墙上都开启FTP的服务,三台防火墙一样的配置
ftp server enable
manager-user ftpuser
  password cipher Huawei@123
  service-type ftp
  level 15
  ftp-directory hda1:/pki/public/

#
aaa

 manager-user ftpuser
  password cipher Huawei@123
  service-type ftp
  level 15
  ftp-directory hda1:/pki/public/

#
防火墙安全策略也要放行ftp的流量
 rule name ftp
  source-zone trust   //g0/0/0默认放到trust内
  destination-zone local
  source-address 192.168.153.1 mask 255.255.255.255
  destination-address 192.168.153.22 mask 255.255.255.255
  service ftp
  action permit
然后利用本地电脑上传证书和密钥,三台一样的配置


上传到防护墙本地完成后要安装到本地防火墙内(每台防火墙在sy 试图下直接输入一下命令即可,注意FW1只能安装FW1.crt和FW1.pem,FW23同理,FW123共同安装CA.crt)
安装一下认证证书
pki import rsa-key-pair FW3 pem FW3.pem
hts       //刚刚创建xca时让你记住的数据库密码输入进来
pki import-certificate ca filename ca.crt

pki import-certificate local  filename FW3.crt
ok万事具备,开始配置ipsec VPN(FW23同理,需要改一下源和目的地址)
先配置感兴趣流
[FW1]dis acl all

ACL 3000  //控制去往site2的感兴趣流,其实就是上面配置的FW的g1/0/0接口地址
 rule 5 permit ip source 14.1.1.2 0 destination 24.1.1.2 0

ACL 3001  //控制去往site3的感兴趣流,
 rule 5 permit ip source 14.1.1.2 0 destination 34.1.1.2 0 (0 times matched)
第二部配置ike (防火墙23同理,注意修改ip地址即可)
ike proposal 10
 encryption-algorithm aes-256
 dh group14
 authentication-algorithm sha2-256
 authentication-method rsa-signature   //这里需要修改成rsa的其他地方时默认的
 integrity-algorithm hmac-sha2-256
 prf hmac-sha2-256


ike peer S01_S02  //配置site1去往site2的
 undo version 2
 ike-proposal 10
 remote-address 24.1.1.2
 certificate local-filename fw1.crt
ike peer S01_S03 //配置site1去往site3的
 undo version 2
 ike-proposal 10
 remote-address 34.1.1.2
 certificate local-filename fw1.crt
第三配置ipsec策略(防火墙23同理)
ipsec proposal 10   //只需要输入此行即可,其内部都是默认的不用修改


ipsec policy S01 2 isakmp //配置好去往site2的ipsec策略
 security acl 3000
 ike-peer S01_S02
 proposal 10
ipsec policy S01 3 isakmp //配置好去往site3的ipsec策略
 security acl 3001
 ike-peer S01_S03
 proposal 10
最后一步,应用到接口下,(防火墙23同理)
2022-10-17 03:48:01.230
#
interface GigabitEthernet1/0/0
 undo shutdown
 ip address 14.1.1.2 255.255.255.0
 service-manage ping permit
 ipsec policy S01
这里偷懒把防护墙安全策略修改为全部放行(FW23 同理)
[FW1-policy-security]dis this
security-policy
 default action permit
至此大功告成,你可以去抓包测试联通性了,后续你可以继续配置安全策略细节方面,注意放行esp 和端口即可,下面仅供参考,并不是本实验的,但你动动脑袋瓜,想想该修改什么即可
security-policy
 rule name LOCAL_TO_UNTRUST
  source-zone local
  destination-zone untrust
  source-address 14.1.1.2 mask 255.255.255.255
  destination-address 24.1.1.2 mask 255.255.255.255
  service esp
  service protocol udp source-port 500 destination-port 500
  action permit
 rule name UNTRUST_TO_LOCAL
  source-zone untrust
  destination-zone local
  source-address 24.1.1.2 mask 255.255.255.255
  destination-address 14.1.1.2 mask 255.255.255.255
  service esp
  service protocol udp source-port 500 destination-port 500
  action permit
 rule name TRUST_TO_UNTRUST
  source-zone trust
  destination-zone untrust
  source-address 192.168.10.0 mask 255.255.255.0
  destination-address 192.168.20.0 mask 255.255.255.0
  service icmp
  action permit
 rule name UNTRUST_TO_TRUST
  source-zone untrust
  destination-zone trust
  source-address 192.168.20.0 mask 255.255.255.0
  destination-address 192.168.10.0 mask 255.255.255.0
  service icmp
  action permit


 118
118


 被折叠的 条评论
为什么被折叠?
被折叠的 条评论
为什么被折叠?
 到【灌水乐园】发言


