


1.pytest-html⽣成报告
Pytest-HTML 是⼀个插件,它可以⽣成漂亮且易于阅读的 HTML 测试报告。下⾯是使⽤ pytest-html ⽣成报告的步骤:
1. 安装 pytest-html 插件:
pip install pytest-html2. 运⾏测试并⽣成报告
pytest --html=report.html使⽤ --html 选项指定报告⽂件的名称和路径。在上述示例中,报告将⽣成为report.html ⽂件。
3. 查看⽣成的报告:
打开⽣成的 HTML 报告⽂件,你将看到测试结果的摘要、详细的测试⽤例执⾏信息、失败⽤ 例的堆栈跟踪等。报告通常包括以下内容
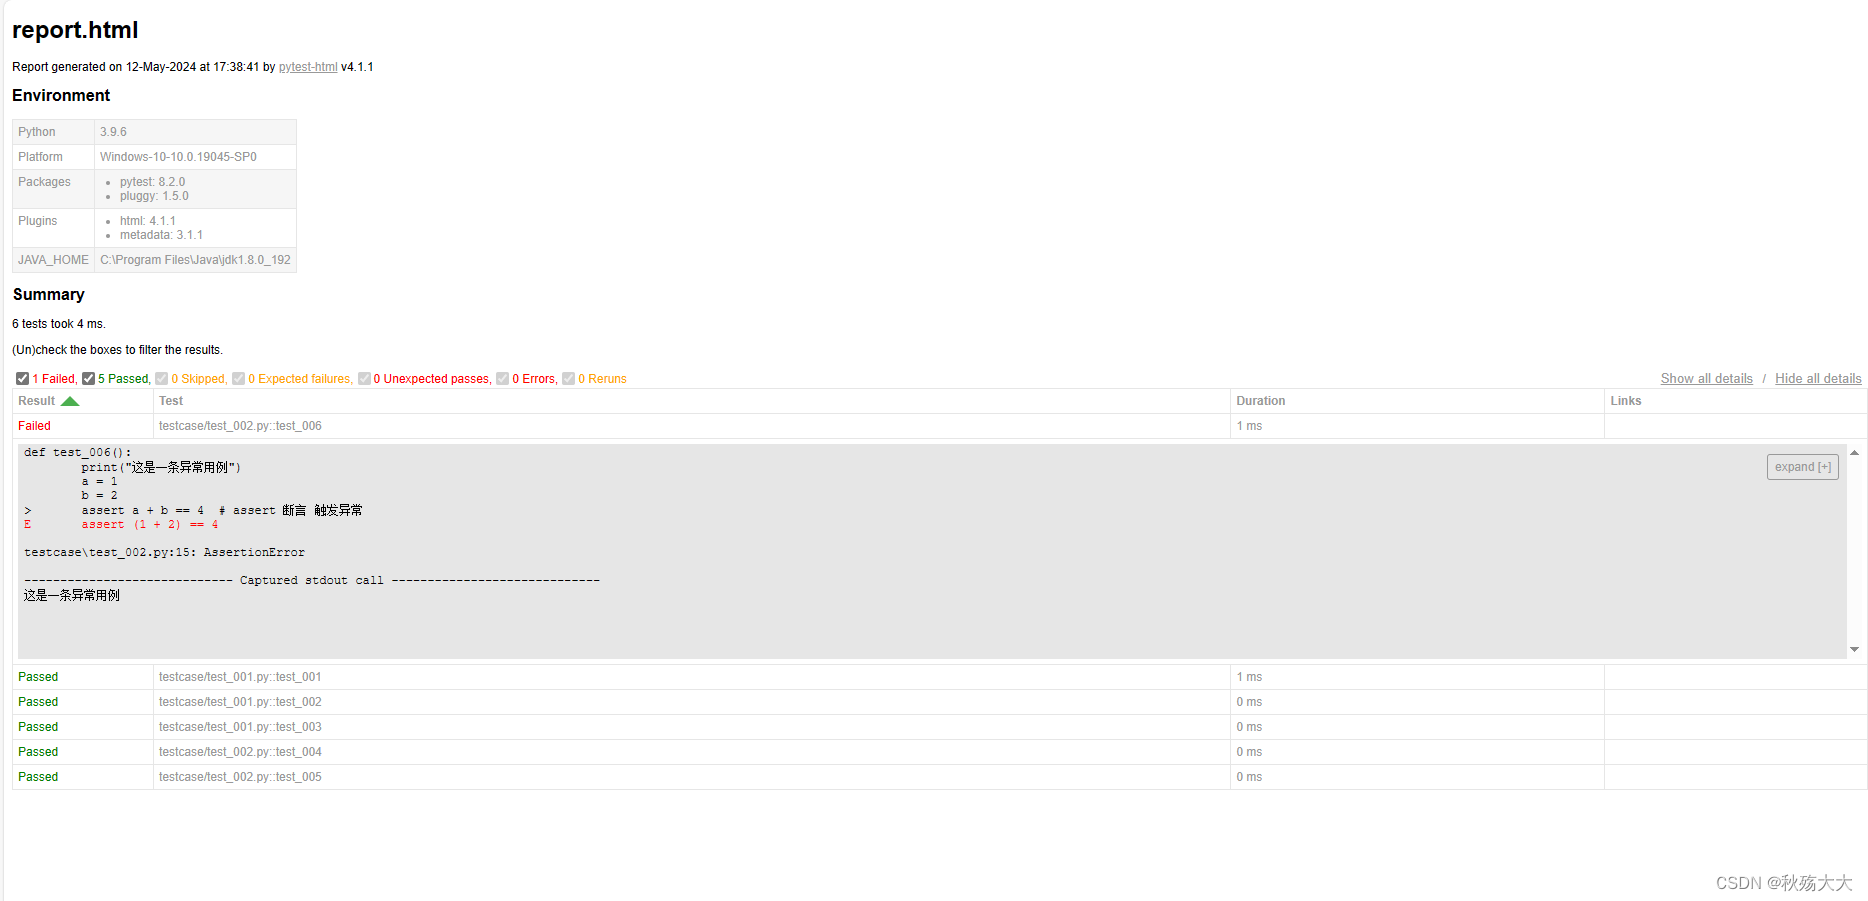
概述信息:显示运⾏的测试数量、通过的测试数量、失败的测试数量等概览信息。
测试⽤例列表:列出每个测试⽤例的名称、状态(通过、失败、跳过等)、执⾏时间等信息。
错误和失败详情:提供失败⽤例的详细信息、堆栈跟踪等,帮助你快速定位和解决问题。
图表和图形化统计信息:可视化展示测试结果、⽤例通过率、执⾏时间等数据。
4. ⾃定义报告的样式和配置:
pytest-html 提供了许多配置选项,你可以在 pytest.ini ⽂件中添加如下配置来⾃定义报告的样式和⾏为:
[pytest] [pytest]
addopts = --html=report.html --self-contained-html
html_title = My Test Repor
addopts :设置⽣成报告的选项,包括报告⽂件的名称和路径。
html_title :设置报告的标题
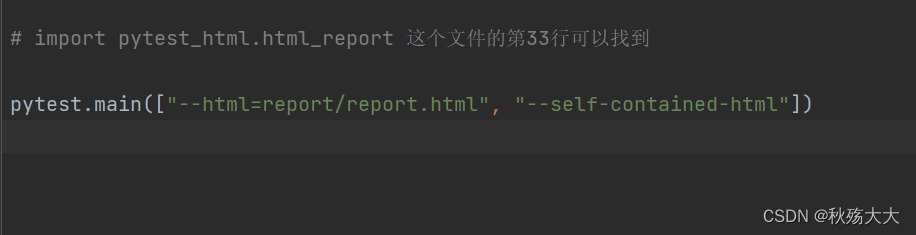
也可以直接在main上进行设置
2.pytest-html在报告中添加图⽚
在 pytest 中,你可以使⽤ extra 参数和 extras 参数来向 pytest-html 报告添加⾃定义的额外信息,包括图⽚。
from pytest_html import extras


def test_add_img(extra):  # extra ---》 pytest的默认的外部数据列表
    def image_to_base64(image_path):
        import base64
        """这个函数是将图片转化为base64数据"""
        with open(image_path, "rb") as image_file:
            encoded_string = base64.b64encode(image_file.read())
            return encoded_string.decode('utf-8')

    # # 添加图片文件
    image_path = "E:\Python\资料\QQ浏览器截图20240303180637.jpg"  # 这里你可以换成你的图片路径
    extra.append(extras.jpg(image_path))  # 添加图片

    # 添加base64格式的图片
    base64_data = image_to_base64(image_path)
    extra.append(extras.image(base64_data))
3.Pytest获取⽤例结果流程
pytest_runtest_makereport 是 pytest 的钩⼦函数之⼀。它在每个测试⽤例运⾏完成后被调⽤,并提供了测试结果的详细信息。通过使⽤这个钩⼦函数,你可以⾃定义测试报告的输出,包括添加截图、⽇志等附加信息。
# file name: conftest.py
import pytest
@pytest.hookimpl(hookwrapper=True) # 写死的
def pytest_runtest_makereport(item, call): # 写死的
outcome = yield
report = outcome.get_result()
if report.when == "call": # 过滤 前置,和后置,只保留运⾏中的状态
print("⽤例执⾏结果:", report.outcome) # ⽤例执⾏结果
4.pytest-html的异常时添加图⽚实现
import pytest
from pytest_html import extras


@pytest.hookimpl(hookwrapper=True)  # 写死的
def pytest_runtest_makereport(item, call):  # 写死的
    def image_to_base64(image_path):
        import base64
        """这个函数是将图片转化为base64数据"""
        with open(image_path, "rb") as image_file:
            encoded_string = base64.b64encode(image_file.read())
            return encoded_string.decode('utf-8')

    outcome = yield
    report = outcome.get_result()
    extra = getattr(report, "extra", [])
    if report.when == "call":  # 过滤 前置,和后置,只保留运行中的状态
        print("用例执行结果:", report.outcome)  # 用例执行结果
        if report.outcome != "passed":
            """失败截图数据"""
            image_path = "E:\Python\资料\QQ浏览器截图20240303180637.jpg"  # 这里你可以换成你的图片路径
            base64_data = image_to_base64(image_path)
            extra.append(extras.image(base64_data))
    report.extra = extra  # 替换数据中的 extra 对象
5.allure-pytest⽣成测试报告
在官网下载allure
Central Repository: io/qameta/allure/allure-commandline (apache.org)
配置环境
下载allure-pytest插件
pip install allure-pytest
环节⼀,得到测试结果数据:
import pytest
pytest.main(["--alluredir","./allure_results"])
--alluredir : ⽤于指定⽣成 Allure 报告所需的数据⽂件的存储⽬录。 -- alluredir 后⾯的参数 ./allure_results 指定了存储⽬录的路径。你可以根据需要更改为其他⽬录路径。
环节⼆,根据结果数据⽣成测试报告:
import os
os.system(r"allure generate --clean ./allure_results -o
./allure_report")
allure generate : 是 Allure 命令⾏⼯具的命令,⽤于根据测试结果数据⽣成 Allure报告
--clean : 是⼀个选项,⽤于在⽣成报告之前先清理输出⽬录,以确保报告是最新的。
./allure_results : 是存储测试结果数据的⽬录路径。这个命令告诉 Allure ⼯具从该⽬录中读取测试结果数据。
-o ./allure_report : 是指定⽣成的 Allure 报告的输出⽬录路径。这个命令告诉Allure ⼯具将⽣成的报告存储在 ./allure_report ⽬录中。你可以根据需要更改为其他⽬录路径。
我们打开网页如下所示

6.allure-pytest的⾏为驱动标记
在 Allure 报告中, feature 和 story 被称为⾏为驱动标记,⽤于描述测试⽤例所 属的功能和故事。
feature 标记⽤于标识测试⽤例所属的功能或模块。它表示被测试的系统中的 ⼀个主要功能。可以将 feature 视为⼀个⼤的分类或主题,⽤于组织和描述相 关的测试⽤例
story 标记⽤于进⼀步细分 feature ,描述测试⽤例所属的具体故事或场景。 它表示在功能中的⼀个具体情境或使⽤案例。可以将 story 视为 feature 的 ⼦分类,⽤于更详细地描述测试⽤例
例子如下
import allure
@allure.feature("⽤户管理")
@allure.story("创建⽤户")
def test_create_user():
assert True
@allure.feature("⽤户管理")
@allure.story("删除⽤户")
def test_delete_user():
assert True
在 Allure 报告中, feature 和 story 标记将以层次结构的形式显示,帮助你更好 地组织和理解测试⽤例的关系。这样的标记可以提供更丰富的上下⽂信息,使测试报 告更易读、易懂,同时也⽅便进⾏功能和故事的筛选和过滤。
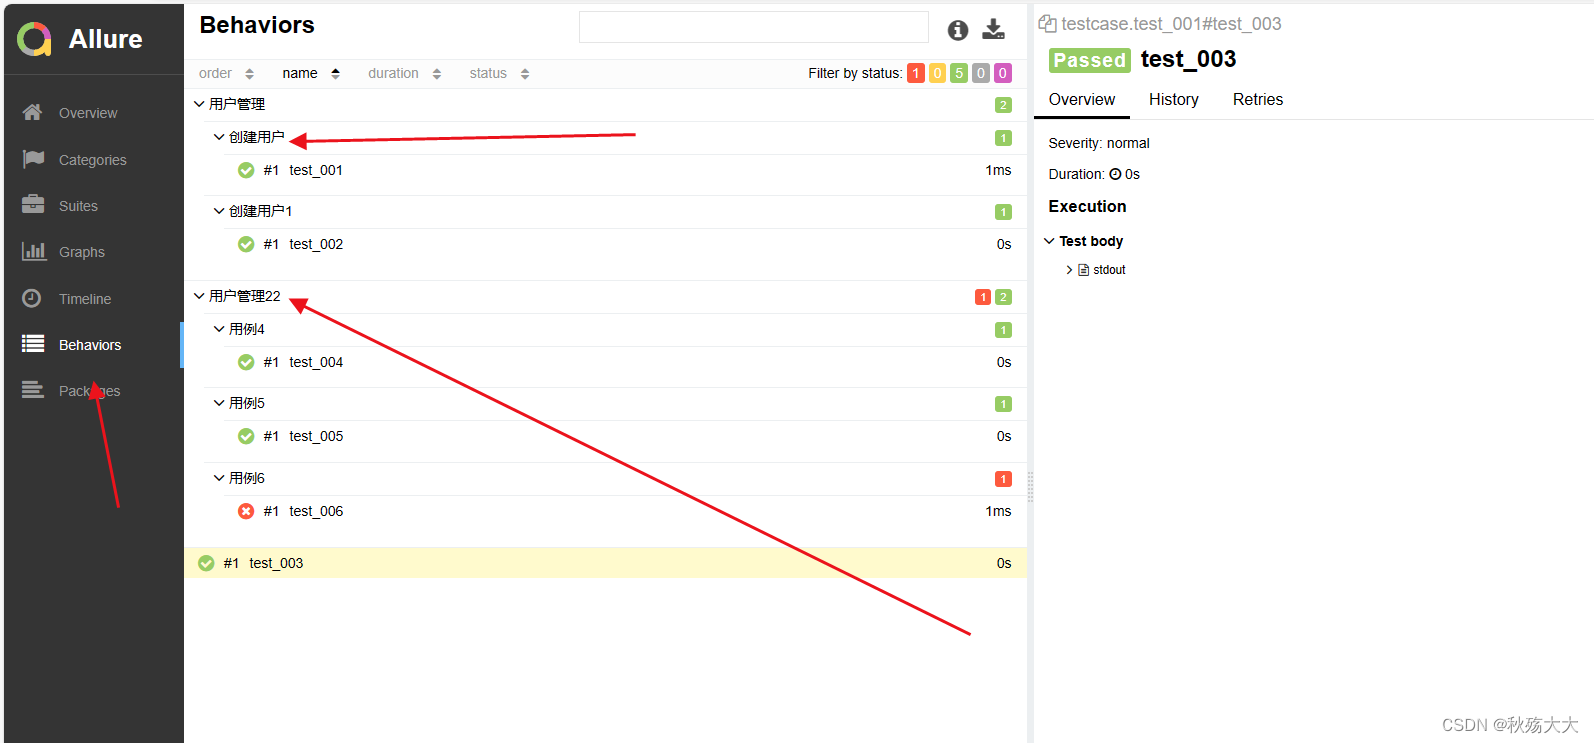
如上图所示 ,我们分成了用户管理和用户管理22 这便是由feture来管理,而用户管理下面的创建用户和创建用户1 这些则是由story来进行管理
7.allure-pytest的步骤管理
Allure-pytest 提供了步骤管理功能,可以帮助在测试⽤例中记录和展示测试步骤的执 ⾏情况。步骤管理可以提供更详细的测试过程描述,帮助定位问题和跟踪测试执⾏。
下⾯是使⽤ Allure-pytest 进⾏步骤管理的简单步骤:
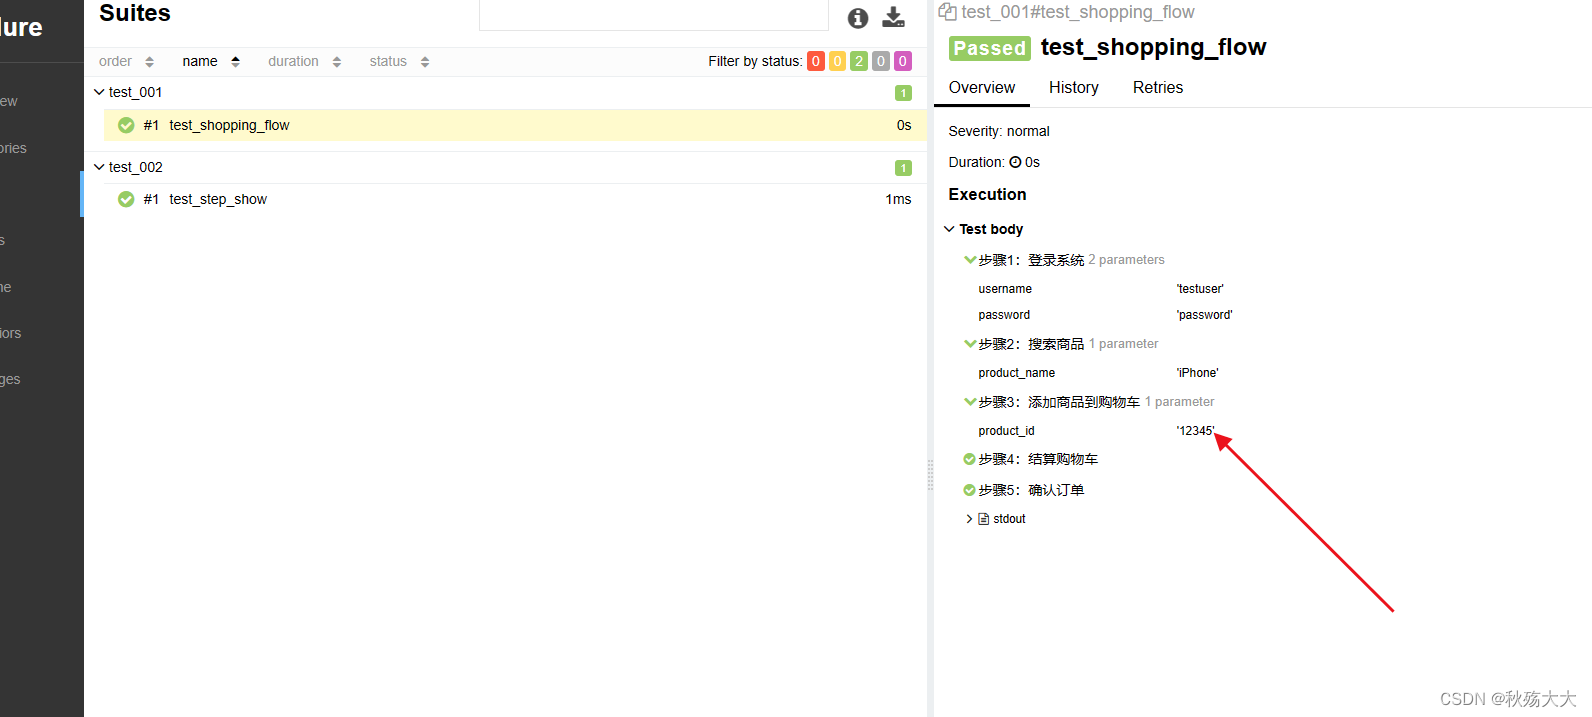
1. 在测试⽤例中使⽤ @allure.step 装饰器定义步骤:
import allure


@allure.step("步骤1:登录系统")
def step_login_system(username, password):
    # 登录系统的代码逻辑
    print("登录", username, password)


@allure.step("步骤2:搜索商品")
def step_search_product(product_name):
    # 搜索商品的代码逻辑
    print("搜索商品", product_name)


@allure.step("步骤3:添加商品到购物车")
def step_add_to_cart(product_id):
    # 添加商品到购物车的代码逻辑
    print("添加商品id:", product_id, "到购物车")


@allure.step("步骤4:结算购物车")
def step_checkout_cart():
    # 结算购物车的代码逻辑
    print("结算购物车")


@allure.step("步骤5:确认订单")
def step_confirm_order():
    # 确认订单的代码逻辑
    print("确认订单")
2. 在测试⽤例中按照顺序调⽤定义的步骤:
def test_shopping_flow():
    step_login_system("testuser", "password")
    step_search_product("iPhone")
    step_add_to_cart("12345")
    step_checkout_cart()
    step_confirm_order()
    assert True
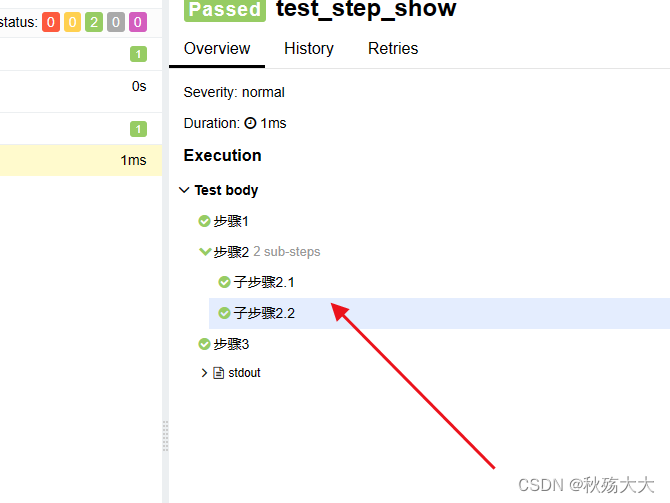
3. 在 Allure 报告中,每个步骤都将被记录和展示,并且可以查看每个步骤的执⾏状 态、⽇志和截图等信息。这样的步骤管理可以帮助测试⼈员更好地理解测试过 程,快速定位和排查问题
 。
。
我们还可以在每个步骤中都创建出子步骤
import allure


def test_step_show():
    with allure.step("步骤1"):
        print("步骤1的逻辑代码")

    with allure.step("步骤2"):
        print("步骤2的逻辑代码")

        with allure.step("子步骤2.1"):
            print("子步骤2.1的逻辑代码")

        with allure.step("子步骤2.2"):
            print("子步骤2.2的逻辑代码")

    with allure.step("步骤3"):
        print("步骤3的逻辑代码")
8.allure-pytest在报告中添加图⽚
添加图⽚可以提供更直观的信息展示,帮助测试⼈员和利益相关者更好地理解测试结 果。
Allure-pytest 测试框架中使⽤ @allure.attach 装饰器将图⽚作为附件添加到报告 中。
通过以下步骤实现在 Allure 报告中添加图⽚:
1. 将图⽚准备好,可以是⽂件路径或者已经编码为 base64 的图⽚内容。
with open(image_path, 'rb') as image_file:
allure.attach(image_file.read(), name='Uploaded
Image', attachment_type=allure.attachment_type.PNG)
2. 使⽤ allure.attach ⽅法将图⽚作为附件添加到报告中。
3. 指定附件的名称和类型,通常是 PNG 或 JPEG 格式。
def test():
    image_path = "png.png"
    with open(image_path, 'rb') as image_file:
        allure.attach(image_file.read(), name='图片的名称', attachment_type=allure.attachment_type.PNG)
9.allure-pytest的异常时添加图⽚实现
@pytest.hookimpl(hookwrapper=True)  # 写死的
def pytest_runtest_makereport(item, call):  # 写死的
    outcome = yield
    report = outcome.get_result()
    if report.when == "call":  # 过滤 前置,和后置,只保留运行中的状态
        if report.outcome != "passed":
            """失败截图数据"""
            image_path = "png.png"  # 这里你可以换成你的图片路径
            with open(image_path, 'rb') as image_file:
                allure.attach(image_file.read(), name='异常截图', attachment_type=allure.attachment_type.PNG)
10Pytest的数据驱动⽅案
数据驱动是⼀种常⻅的测试⽅案,它允许我们使⽤不同的测试数据来执⾏相同的测试 ⽤例。这种⽅法可以帮助我们提⾼测试覆盖率,减少代码冗余,并更好地组织测试代 码
pytest⽀持多种数据驱动的⽅案,下⾯是⼏种常⻅的⽅法:
1.使⽤@pytest.mark.parametrize装饰器:
pytest提供了⼀个装饰器 @pytest.mark.parametrize ,它可以⽤来将测试函数参数 化。通过这个装饰器,我们可以指定多个参数值的组合,pytest会⾃动为每个组合⽣ 成⼀个独⽴的测试⽤例。
import pytest


@pytest.mark.parametrize("input1, input2, expected", [
    (1, 2, 3),
    (5, 5, 10),
    (10, -2, 8)
])
def test_addition(input1, input2, expected):
    print("input1的数据", input1)
    print("input2的数据", input2)
    print("expected的数据", expected)
    assert input1 + input2 == expected
在上⾯的示例中, test_addition 函数被参数化为三个参数: input1 , input2 和 expected 。 @pytest.mark.parametrize 装饰器定义了参数值的组合,每个组 合都会⽣成⼀个独⽴的测试⽤例。
2..使⽤fixtures和数据⽂件:
我们可以结合pytest的fixtures来实现数据驱动。在这种⽅法中,我们可以使⽤fixture 读取和处理数据⽂件,并将数据作为参数传递给测试函数
import pytest


@pytest.fixture(params=[
    (1, 2, 3),
    (5, 5, 10),
    (10, -2, 8)
], name="test_data")
def data(request):
    return request.param


 955
955

 被折叠的 条评论
为什么被折叠?
被折叠的 条评论
为什么被折叠?
 到【灌水乐园】发言


