


group标签的几个常用属性:
-
android:name:组名
-
android:rotation:指定该组图像的旋转度数
-
android:pivotX:定义缩放和旋转时该组的X参考点。该值是相对于vector的viewport值来指定的
-
android:pivotY:定义缩放和旋转该组时的Y参考点。该值是相对于vector的viewport值来指定的
-
android:scaleX:x轴缩放大小
-
android:scaleY:y轴缩放大小
-
android:translateX:指定该组沿X轴平移的距离
-
android:translateY:指定该组沿y轴平移的距离
如何制作SVG图像
-
如果有绘图基础就是用Illustrator或在线SVG工具制作SVG图像,或者通过SVG源文件下载网站下载后进行编辑。
-
Iconfont
Iconfont是一种比较成熟的SVG解决方案,原理是把想要的矢量图打包成一个.ttf文件,在Android中应用这个ttf文件来加载和指定图标。
Android中引入SVG图像
在Android中是不支持SVG图像解析的,我们必须将SVG图像转化为vector标签描述。
这里有两个方法进行转化:
- 在线转换
拿到SVG图像后,将其拖入在线转换网站http://inloop.github.io/svg2android/,就可以得到对应的vector标签。
- 通过Android Studio引入
Android Studio2.0以上后就支持创建SVG图像。在 右键单击drawable - Vector Asset 之后,就可以生成Vector图像了。
动态Vector
前面简述了vector的标签的一些应用,而动态Vector实现的SVG效果才是SVG图像在Android应用中的精髓。
要实现Vector动画,首先需要vector图像和它所对应的的动画。
这里用之前做的那个SVG的一条线。
然后定义一个Animator文件:
<?xml version="1.0" encoding="utf-8"?><objectAnimator xmlns:android=“http://schemas.android.com/apk/res/android”
android:propertyName=“trimPathStart”
android:valueFrom=“0”
android:valueTo=“1”
android:duration=“2000”>
这里指定的propertyName为path标签的“trimPathStart”属性,动画效果为从开始到结尾渐渐消失
做好一个vector图像和animator动画后,我们需要将这两个标签关联,Android 提供了关联的标签animated-vector,通过它就能关联动画和SVG了。
<animated-vector xmlns:android=“http://schemas.android.com/apk/res/android”
android:drawable="@drawable/svg_img1">
<target
android:name=“bar”
android:animation="@animator/anim_trim_start">
animated-vector中的drawable属性指的是svg文件, target标签有两个属性,name为svg中的某个path的name,是对应的,animation为使用的动画。
其中animated-vector下可以有多个target,因为如果vector标签中有多个path、group,这里就可以使用多个target了。
《Android学习笔记总结+最新移动架构视频+大厂安卓面试真题+项目实战源码讲义》
【docs.qq.com/doc/DSkNLaERkbnFoS0ZF】 完整内容开源分享
接下来在代码中声明动画:
AnimatedVectorDrawableCompat avdCompat = AnimatedVectorDrawableCompat.create(MainActivity.this, R.drawable.line_animated_vector);
iv = findViewById(R.id.iv);
iv.setImageDrawable(avdCompat);
((Animatable) iv.getDrawable()).start();
最后需要在build.gradle脚本中添加对vector兼容性的支持,因为Android APPT是默认是在Lolipop版本以上使用Vector,而在Lolipop版本以前使用Gradle生成相应的PNG图片,所以加了以下属性来关闭这个妥协:
defaultConfig {
vectorDrawables.useSupportLibrary = true
}
最后显示的效果如下:

接下来跟着书做一个复杂点的SVG动画。该动画是点击输入框后产生一个搜索的图标
首先准备一个SVG图像:
<?xml version="1.0" encoding="utf-8"?><vector xmlns:android=“http://schemas.android.com/apk/res/android”
android:width=“150dp”
android:height=“24dp”
android:viewportWidth=“150”
android:viewportHeight=“24”>
<path
android:name=“search”
android:pathData=“M141,17 A9,9 0 1,1 142,16 L149,23”
android:strokeWidth=“2”
android:strokeColor="@android:color/darker_gray"/>
<path
android:name=“bar”
android:trimPathStart=“0”
android:pathData=“M0,23 L149,23”
android:strokeWidth=“1”
android:strokeColor="@android:color/darker_gray"/>
得到如下的图片:
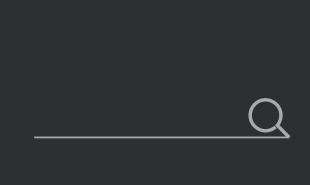
动画的效果首先让下面横线渐渐消失,然后放大镜图标同时显现,所以这里使用了两个动画。
//下面横线消失的动画
<?xml version="1.0" encoding="utf-8"?><objectAnimator xmlns:android=“http://schemas.android.com/apk/res/android”
android:duration=“500”
android:propertyName=“trimPathStart”
android:valueFrom=“0”
android:valueTo=“1”
android:valueType=“floatType”>
//这个是让放大镜从无到有的动画
<?xml version="1.0" encoding="utf-8"?><objectAnimator xmlns:android=“http://schemas.android.com/apk/res/android”
android:duration=“500”
android:propertyName=“trimPathEnd”
android:valueFrom=“0”
android:valueTo=“1”
android:valueType=“floatType”>
创建好vector图像和animator后,要做的就是用animated-vector来关联它们,我们这里的animated-vector使用了两个target,分别来对应放大镜和下面的横线:
<?xml version="1.0" encoding="utf-8"?><target
android:animation="@animator/anim_search_trim_end"
android:name=“search”/>
<target
android:animation="@animator/anim_bar_trim_start"
android:name=“bar”/>
接下来就是在xml文件中使用这个svg图:
<?xml version="1.0" encoding="utf-8"?><FrameLayout xmlns:android=“http://schemas.android.com/apk/res/android”
xmlns:app=“http://schemas.android.com/apk/res-auto”
xmlns:tools=“http://schemas.android.com/tools”
android:layout_width=“match_parent”
android:layout_height=“match_parent”
android:background="#f7f8fa"
android:orientation=“vertical”
tools:context=".MainActivity">
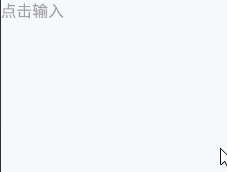
<EditText
android:id="@+id/et"
android:layout_width=“150dp”
android:layout_height=“24dp”
android:background="@null"
android:hint=“点击输入” />
<ImageView
android:id="@+id/iv"
android:layout_width=“150dp”
android:layout_height=“24dp” />
这里用的是FrameLayoout,因为要让EditText和ImageView重合。
那么接下来就是在代码中使用这段动画啦(我们在让EditText取得焦点 即我们点击它的时候 实现这段SVG动画):
//一开始imageview获取焦点
iv.setFocusable(true);
iv.setFocusableInTouchMode(true);
iv.requestFocus();
iv.requestFocusFromTouch();
//当EditText获取焦点时开始动画
et.setOnFocusChangeListener(new View.OnFocusChangeListener() {
@Override
public void onFocusChange(View v, boolean hasFocus) {
if (hasFocus) {
AnimatedVectorDrawableCompat animatedVectorDrawableCompat =
AnimatedVectorDrawableCompat.create(MainActivity.this, R.drawable.animated_vector_search);
iv.setImageDrawable(animatedVectorDrawableCompat);
((Animatable) iv.getDrawable()).start();
}
}
});


 711
711


 被折叠的 条评论
为什么被折叠?
被折叠的 条评论
为什么被折叠?
 到【灌水乐园】发言


