


文章目录
前言
本系列实验为移动开发技术课程实验,如有问题欢迎指正!
一、问题陈述
根据移动开发课程内容设计类微信界面:
目标一、请根据课程内容设计一个app的门户框架,需要实现3-4个tab切换效果;本功能要求需要的技术为:activity、xml、fragment。
目标二、在任一tab页中实现列表效果;本功能的实现需要使用recycleview。
二、开发工具
Android Studio(2022.3.1.19-windows) Virtual Device(Android API 34
Google APIs | x86_64)
三、设计流程
1.实现目标一——需要的技术为activity、xml、fragment。
activity:Android中的Activity是用户界面的基本组件之一,它代表一个用户界面屏幕,用户可以使用该屏幕与应用程序进行交互。Activity通常与XML布局文件配合使用,通过设置布局来实现用户界面的展示与交互。
XML:XML(可扩展标记语言)是一种用于描述数据的标记语言。在Android中,XML最常用于描述用户界面。在XML中,我们可以定义各种UI控件的属性、布局方式、样式等信息,然后将这些信息传递给Activity,从而实现用户界面的展示。
Fragment:Fragment是Android中用于构建灵活用户界面的一种技术,它可以将一个屏幕分成多个部分并在其中展示一些相关的UI组件。Fragment可以与Activity进行交互,也可以在Fragment之间进行数据传递。通过使用Fragment,我们可以轻松地创建一个可扩展、可重用、可配置的用户界面。
2.实现目标二——需要的技术为recycleview。
RecyclerView是Android中的一个视图容器,类似于ListView。它可以用于显示大量的数据,并且可以进行灵活的布局和交互。Adapter类是RecyclerView的关键组件之一,用于将数据与视图进行绑定。Adapter类继承自RecyclerView.Adapter类,用于管理数据源,并且创建和绑定ViewHolder类。通过Adapter类,我们可以实现自定义的布局和交互,以及对数据源的管理和显示。
四、代码解析
1.项目文件目录

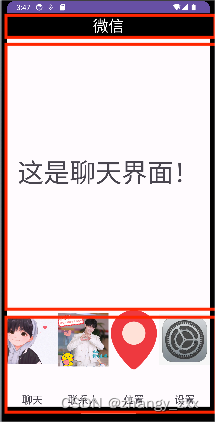
2.layout部分
上面top.xml部分,设置一个LinearLayout布局器存放textView组件;
中间利用FrameLayout布局器实现tab内容切换效果;
下面bottom.xml部分先设置一个水平方向的LinearLayout布局器,再在其中设置四个小的垂直方向的LinearLayout布局器,每个布局器中imageButton对应每个图标,textView对应文字。
(1)标题栏top.xml
使用一个LinearLayout布局器存放textView组件,形成标题部分。
<?xml version="1.0" encoding="utf-8"?>
<LinearLayout xmlns:android="http://schemas.android.com/apk/res/android"
    android:layout_width="match_parent"
    android:layout_height="wrap_content">
    <TextView
        android:id="@+id/top"
        android:layout_width="wrap_content"
        android:layout_height="wrap_content"
        android:layout_weight="1"
        android:background="@color/black"
        android:gravity="center"
        android:text="微信"
        android:textColor="@color/white"
        android:textSize="30sp" />
</LinearLayout>
(2)底部导航bottom.xml
在一个LinearLayout布局器中存放四个LinearLayout,每个LinearLayout存放ImageView和textView组件,ImageView内为图片设置信息,textView内为文本设置信息。
如何对textView进行设置可参考:ImageView设置
<?xml version="1.0" encoding="utf-8"?>
<LinearLayout xmlns:android="http://schemas.android.com/apk/res/android"
    xmlns:tools="http://schemas.android.com/tools"
    android:layout_width="match_parent"
    android:layout_height="wrap_content">

    <LinearLayout
        android:id="@+id/LinearLayout1"
        android:layout_width="match_parent"
        android:layout_height="wrap_content"
        android:layout_weight="1"
        android:orientation="vertical">

        <ImageView
            android:id="@+id/imageView1"
            android:layout_width="match_parent"
            android:layout_height="200dp"
            android:layout_weight="1"
            android:src="@drawable/num1" />

        <TextView
            android:id="@+id/textView11"
            android:layout_width="match_parent"
            android:layout_height="wrap_content"
            android:gravity="center"
            android:text="聊天"
            android:textSize="20sp" />
    </LinearLayout>

    <LinearLayout
        android:id="@+id/LinearLayout2"
        android:layout_width="match_parent"
        android:layout_height="wrap_content"
        android:layout_weight="1"
        android:orientation="vertical">

        <ImageView
            android:id="@+id/imageView2"
            android:layout_width="match_parent"
            android:layout_height="200dp"
            android:src="@drawable/num2" />

        <TextView
            android:id="@+id/textView22"
            android:layout_width="match_parent"
            android:layout_height="wrap_content"
            android:gravity="center"
            android:text="联系人"
            android:textSize="20sp" />
    </LinearLayout>

    <LinearLayout
        android:id="@+id/LinearLayout3"
        android:layout_width="match_parent"
        android:layout_height="match_parent"
        android:layout_weight="1"
        android:orientation="vertical">

        <ImageView
            android:id="@+id/imageView3"
            android:layout_width="match_parent"
            android:layout_height="200dp"
            android:src="@drawable/num3" />

        <TextView
            android:id="@+id/textView33"
            android:layout_width="match_parent"
            android:layout_height="wrap_content"
            android:gravity="center"
            android:text="位置"
            android:textSize="20sp" />
    </LinearLayout>

    <LinearLayout
        android:id="@+id/LinearLayout4"
        android:layout_width="match_parent"
        android:layout_height="match_parent"
        android:layout_weight="1"
        android:orientation="vertical">

        <ImageView
            android:id="@+id/imageView4"
            android:layout_width="match_parent"
            android:layout_height="200dp"
            android:src="@drawable/num4" />

        <TextView
            android:id="@+id/textView44"
            android:layout_width="match_parent"
            android:layout_height="wrap_content"
            android:gravity="center"
            android:text="设置"
            android:textSize="20sp" />
    </LinearLayout>
</LinearLayout>
(3)main.xml\item.xml
main.xml
使用"include"将bottom包含进main,xml文件中
<?xml version="1.0" encoding="utf-8"?>
<LinearLayout xmlns:android="http://schemas.android.com/apk/res/android"
    android:layout_width="match_parent"
    android:layout_height="match_parent"
    android:orientation="vertical">

    <include layout="@layout/top" />

    <FrameLayout
        android:id="@+id/content1"
        android:layout_width="match_parent"
        android:layout_height="wrap_content"
        android:layout_weight="1">
    </FrameLayout>

    <include layout="@layout/bottom" />
</LinearLayout>
item.xml
<?xml version="1.0" encoding="utf-8"?>
<LinearLayout xmlns:android="http://schemas.android.com/apk/res/android"
    android:layout_width="match_parent"
    android:layout_height="wrap_content">

    <TextView
        android:id="@+id/textView"
        android:layout_width="wrap_content"
        android:layout_height="wrap_content"
        android:layout_weight="1"
        android:height="60dp"
        android:gravity="center"
        android:text="TextView"
        android:textColor="@android:color/holo_red_light"
        android:textSize="30dp" />
</LinearLayout>
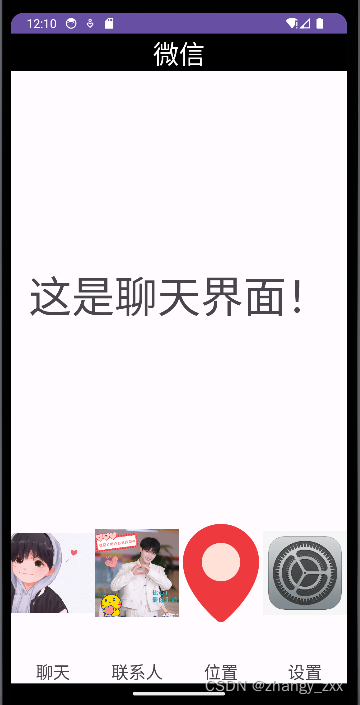
(4)四个切换界面
四个tab界面实现对应标签内容,均使用一个LinearLayout布局器存放textView组件。
如何对textView进行设置可参考:textView设置
tab1.xml
<?xml version="1.0" encoding="utf-8"?>
<FrameLayout xmlns:android="http://schemas.android.com/apk/res/android"
    xmlns:tools="http://schemas.android.com/tools"
    android:layout_width="match_parent"
    android:layout_height="wrap_content">

    <!-- TODO: Update blank fragment layout -->
    <TextView
        android:id="@+id/textView1"
        android:layout_width="match_parent"
        android:layout_height="520dp"
        android:gravity="center"
        android:text="这是聊天界面!"
        android:textSize="50dp"/>
</FrameLayout>
tab2.xml
<?xml version="1.0" encoding="utf-8"?>
<FrameLayout xmlns:android="http://schemas.android.com/apk/res/android"
    xmlns:tools="http://schemas.android.com/tools"
    android:layout_width="match_parent"
    android:layout_height="wrap_content">

    <!-- TODO: Update blank fragment layout -->
    <TextView
        android:id="@+id/textView2"
        android:layout_width="match_parent"
        android:layout_height="520dp"
        android:gravity="center"
        android:text="这是联系人界面!"
        android:textSize="50dp"/>
</FrameLayout>
tab3.xml
<?xml version="1.0" encoding="utf-8"?>
<FrameLayout xmlns:android="http://schemas.android.com/apk/res/android"
    xmlns:tools="http://schemas.android.com/tools"
    android:layout_width="match_parent"
    android:layout_height="wrap_content">

    <!-- TODO: Update blank fragment layout -->
    <TextView
        android:id="@+id/textView3"
        android:layout_width="match_parent"
        android:layout_height="520dp"
        android:gravity="center"
        android:text="这是位置界面!"
        android:textSize="50dp"/>
</FrameLayout>
tab4.xml
<?xml version="1.0" encoding="utf-8"?>
<FrameLayout xmlns:android="http://schemas.android.com/apk/res/android"
    xmlns:tools="http://schemas.android.com/tools"
    android:layout_width="match_parent"
    android:layout_height="wrap_content">

    <!-- TODO: Update blank fragment layout -->
    <TextView
        android:id="@+id/textView4"
        android:layout_width="match_parent"
        android:layout_height="520dp"
        android:gravity="center"
        android:text="这是设置界面!"
        android:textSize="50dp"/>
</FrameLayout>
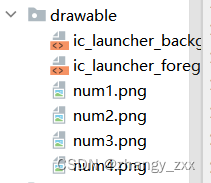
如果不想要Android自带的图片,可以将自定义img放入drawable目录中。可直接将图片CV到drawable中,或者找到drawable文件夹将图片放入文件夹中。
注意:命名规则不能为纯数字或中文!!!
3.Java代码部分
(1)四个Fragment文件
四个Fragment文件分别与对应的tab.xml文件进行连接。
Fragment1
public class Fragment1 extends Fragment {
    @Override
    public View onCreateView(LayoutInflater inflater, ViewGroup container,
                             Bundle savedInstanceState) {
        // Inflate the layout for this fragment
        return inflater.inflate(R.layout.tab1, container, false);
    }
}
Fragment2
public class Fragment2 extends Fragment {
    @Override
    public View onCreateView(LayoutInflater inflater, ViewGroup container,
                             Bundle savedInstanceState) {
        // Inflate the layout for this fragment
        return inflater.inflate(R.layout.tab2, container, false);
    }
}
Fragment3
public class Fragment3 extends Fragment {
    @Override
    public View onCreateView(LayoutInflater inflater, ViewGroup container,
                             Bundle savedInstanceState) {
        // Inflate the layout for this fragment
        return inflater.inflate(R.layout.tab3, container, false);
    }
}
Fragment4
public class Fragment4 extends Fragment {
    @Override
    public View onCreateView(LayoutInflater inflater, ViewGroup container,
                             Bundle savedInstanceState) {
        // Inflate the layout for this fragment
        return inflater.inflate(R.layout.tab4, container, false);
    }
}
(2)MainActivity.java
主要由几个函数组成:
fragmenthide()
在切换页面时,需要对其他页面进行隐藏。
private void fragmenthide() {
    FragmentTransaction ft= fm.beginTransaction()
            .hide(fragment1)
            .hide(fragment2)
            .hide(fragment3)
            .hide(fragment4);
    ft.commit();
}
initial()
给Fragment页面初始化。利用activity_main.xml中间布局的控件id:content和fragmentManager将四个Fragment压入中间主体部分。
private void initial() {
        FragmentTransaction ft=fm.beginTransaction()   //交互,事务管理,写在外部不利于事务独立性
                .add(R.id.content1,fragment1)
                .add(R.id.content1,fragment2)
                .add(R.id.content1,fragment3)
                .add(R.id.content1,fragment4);
        ft.commit();//必须单独分行写
    }
onClick()
对底部按键框的四个按键进行监听,根据监听结果调用fragment界面。利用条件语句或者switch-case语句实现。
public void onClick(View view) {//view全屏幕
        fragmenthide();

        if(view.getId()==R.id.LinearLayout1) fragmentshow(fragment1);
        if(view.getId()==R.id.LinearLayout2) fragmentshow(fragment2);
        if(view.getId()==R.id.LinearLayout3) fragmentshow(fragment3);
        if(view.getId()==R.id.LinearLayout4) fragmentshow(fragment4);
    }
fragementshow()
展示当前fragment界面。
    private void fragmentshow(Fragment fragment) {
        FragmentTransaction transaction=fm.beginTransaction()
                .show(fragment);
        transaction.commit();
    }
}
主函数onCreate()
四个LinearLayout变量对应四个tab界面,四个Fragment变量对应四个fragment界面,并创建一个管理对象fragment变量。先全局初始化,再隐藏,首界面展示调用,最后监听。
    @Override
    protected void onCreate(Bundle savedInstanceState) {
        super.onCreate(savedInstanceState);
        setContentView(R.layout.main);

        fragment1=new Fragment1();
        fragment2=new Fragment2();
        fragment3=new Fragment3();
        fragment4=new Fragment4();

		linearLayout1=findViewById(R.id.LinearLayout1);
      	linearLayout2=findViewById(R.id.LinearLayout2);
       	linearLayout3=findViewById(R.id.LinearLayout3);
        linearLayout4=findViewById(R.id.LinearLayout4);

        fm=getSupportFragmentManager();

        initial();
        fragmenthide();
        fragmentshow(fragment1);

        linearLayout1.setOnClickListener(this);
        linearLayout2.setOnClickListener(this);
        linearLayout3.setOnClickListener(this);
        linearLayout4.setOnClickListener(this);
(3)Myadapter.java
在Myadapter类中,我们需要重写三个方法:
onCreateViewHolder()
用于创建ViewHolder类,保存item中各个控件的引用,方便后续的操作,连接到item.xml文件。
 public Myholder onCreateViewHolder(@NonNull ViewGroup parent, int viewType) {
        View view= LayoutInflater.from(context1).inflate(R.layout.item,parent,false);
        Myholder holder=new Myholder(view);
        return holder;
    }
onBindViewHolder()
用于将数据绑定到ViewHolder中的视图上。
list1是保存数据的一个List,通过position参数可以获取该item应该显示的数据,将数据填充到ViewHolder中的各个控件。
  public void onBindViewHolder(@NonNull Myholder holder, int position) {
        holder.textView.setText(list1.get(position));
    }
getItemCount()
public int getItemCount() {           //item行
        return list1.size();
    }
Myholder
定义一个名为Myholder的自定义ViewHolder类,表示每个数据项的视图,注意textView的值是item.xml的id。
    public class Myholder extends RecyclerView.ViewHolder{
        TextView textView;
        public Myholder(@NonNull View itemView) {
            super(itemView);
            textView=itemView.findViewById(R.id.textView);
        }
    }
}
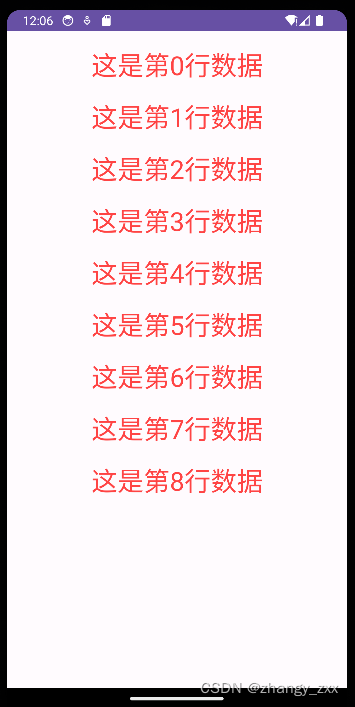
(4)recycrview.java
public class recyclerview extends AppCompatActivity {
    RecyclerView recyclerView;
    List list;
    Context context;
    Myadapter adapter;

    @Override
    protected void onCreate(Bundle savedInstanceState) {
        super.onCreate(savedInstanceState);
        setContentView(R.layout.activity_main2);
recyclerView=findViewById(R.id.recyclerview);
        list =new ArrayList();
        for(int i=0;i<9;i++) {
            list.add("这是第"+i+"行数据");
        }

        context=this;

        adapter = new Myadapter(this, list);
        recyclerView.setAdapter(adapter);

        LinearLayoutManager manager = new LinearLayoutManager(this);
        manager.setOrientation(RecyclerView.VERTICAL);
        recyclerView.setLayoutManager(manager);
    }
}
五、实现效果
界面转换:在AndroidManifest.xml文件内修改
 <activity
            android:name=".MainActivity"
            android:exported="false" />
        <activity
            android:name=".recyclerview"
            android:exported="true">
            <intent-filter>
                <action android:name="android.intent.action.MAIN" />

                <category android:name="android.intent.category.LAUNCHER" />
            </intent-filter>
        </activity>
<activity
            android:name=".recyclerview"
            android:exported="false" />
        <activity
            android:name=".MainActivity"
            android:exported="true">
            <intent-filter>
                <action android:name="android.intent.action.MAIN" />

                <category android:name="android.intent.category.LAUNCHER" />
            </intent-filter>
        </activity>
六、实验总结
目前通过课程收获最大的是:不要怕报错!不要怕报错!不要怕报错!!!
报错——直接将鼠标移动到红色灯泡处,查看推荐解决问题的方法。
没有错误但闪退——查看日志文件,在界面下方的logcat,会发现里面一堆错误,但是看不懂hhh,还是具有参考意义滴!
图标和文字堆叠到一起或多个部分整合在一起时叠加——LinearLayout布局器的水平方向和垂直方向设置错误,类名前面加上了abstract导致不能实例化错误,控件id写错,布局参数不对等等问题。
总之,通过本次实验,了解了AS基本的功能及插件,希望通过以后的实验学习更多关于Android开发,最后能做一个自己喜欢的APP啊!
源码仓库地址:https://gitee.com/zhangy_zxx/android-project.git
reference:https://blog.csdn.net/m0_74113407/article/details/133824164


 8880
8880


 被折叠的 条评论
为什么被折叠?
被折叠的 条评论
为什么被折叠?
 到【灌水乐园】发言


