


由于训练和推理都需要较大显存和算力,因此此后文章都围绕linux进行学习开发,便于大家花点小钱租个服务器就可以复现学习理解!(在这里许愿希望自己可以全部学完,立个flag!)
目录
1.我们克隆x-flux进行微调XLabs-AI/x-fluxhttps://github.com/XLabs-AI/x-flux
报告与跟踪设置 (report_to, tracker_project_name)
训练相关参数 (train_batch_size, learning_rate, lr_scheduler, etc.)
检查点设置 (checkpointing_steps, checkpoints_total_limit)
梯度累积 (gradient_accumulation_steps)
一、服务器
对服务器的现存要求很高,需要80G,如果实在不够可以微调蒸馏模型
二、环境部署
1.我们克隆x-flux进行微调XLabs-AI/x-flux https://github.com/XLabs-AI/x-flux
git clone https://github.com/XLabs-AI/x-flux2.虚拟环境
跑实验当然免不了虚拟环境,我们创建一个虚拟环境
conda create -n dif python=3.10创建完成之后需要初始化一下终端
conda init然后重启终端(叉掉重新开一个)激活环境
conda activate dif3.安装各种包
requirements里面的包不全,配置好之后根据自己需要的配件自行安装
cd x-flux

pip install -r requirements.txt

pip install huggingface_hub
三、网络、环境配置
首先要挂上autodl的学术加速:
source /etc/network_turbo建议使用huggingface的镜像(避免加载模型消耗大量时间):
export HF_ENDPOINT=https://hf-mirror.com(可选)更改环境变量--huggingface模型缓存位置
# modelsope下载模型
echo 'export MODELSCOPE_CACHE="/root/autodl-tmp/model"' >> ~/.bashrc

# huggingface环境变量
echo 'export HF_HOME="/root/autodl-tmp/model"' >> ~/.bashrc
echo 'export HUGGINGFACE_HUB_CACHE="/root/autodl-tmp/model"' >> ~/.bashrc

# 使更改生效
source ~/.bashrc
登录huggingface:
# 安装 huggingface_hub 库
pip install huggingface_hub

#登录 Hugging Face
huggingface-cli login
出现这个界面之后输入huggingface的token就可以了
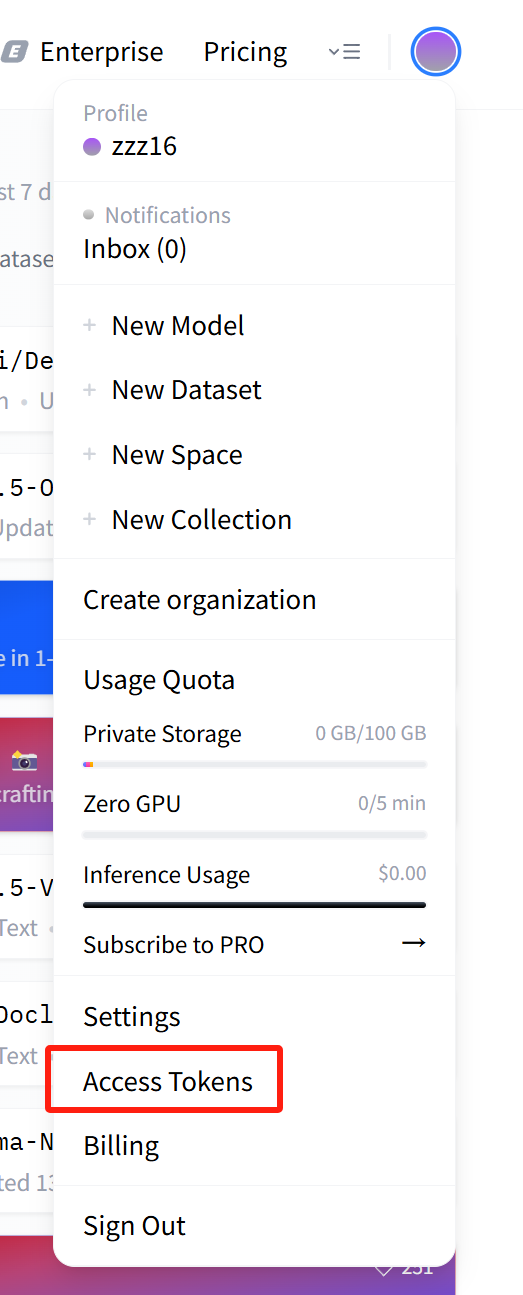
token的获取:Hugging Face – The AI community building the future.点个人头像下面的Access Tokens进行获取,create一个新token,配置默认就行可以
还有实验过程可视化工具也需要配置一下,根据自己的需要进行选择性配置:WandB,TensorBoardr等,教程网上很多,这里就不赘述了。
四、微调
微调直接看x-flux的readme就可以:https://github.com/XLabs-AI/x-flux
分为LoRA微调:
accelerate launch train_flux_lora_deepspeed.py --config "train_configs/test_lora.yaml"和ControlNet微调:
accelerate launch train_flux_deepspeed_controlnet.py --config "train_configs/test_canny_controlnet.yaml"我们打开train_configs/test_lora.yaml文件查看具体的参数:
model_name: "flux-dev"
data_config:
  train_batch_size: 1
  num_workers: 18
  img_size: 512
  img_dir: images/
  random_ratio: true
report_to: wandb
train_batch_size: 1
output_dir: lora2/
max_train_steps: 10000
learning_rate: 5e-6
lr_scheduler: constant
lr_warmup_steps: 10
adam_beta1: 0.9
adam_beta2: 0.999
adam_weight_decay: 0.01
adam_epsilon: 1e-8
max_grad_norm: 1.0
logging_dir: logs
mixed_precision: "bf16"
checkpointing_steps: 200
checkpoints_total_limit: 1
tracker_project_name: lora_test
resume_from_checkpoint:
gradient_accumulation_steps: 4
rank: 16
single_blocks: "1,2,3,4"
double_blocks: null
disable_sampling: false
sample_every: 100 # sample every this many steps
sample_width: 1024
sample_height: 1024
sample_steps: 20
sample_prompts:
    - "The aerial view captures a rugged mountain landscape with wind turbines and a narrow road"
    - "The aerial view presents a coastal highway with road signs, power lines, and passing vehicles"
参数详情如下
模型名称 (model_name)
-
model_name: "flux-dev":定义了模型的名称或标识符。这个名称可以用来区分不同的模型或实验版本。
数据配置 (data_config)
-
train_batch_size: 1:每个训练步骤的批处理大小为 1。这表示每次训练时,只会用一个样本进行计算。
-
num_workers: 18:定义数据加载的工作线程数。使用多线程加速数据加载。
-
img_size: 512:训练时输入图像的尺寸大小,图像将被调整为 512x512 像素。
-
img_dir: images/:训练数据图像所在的目录。
images/是存放图像的文件夹路径。 -
random_ratio: true:启用多裁剪(multi-crop)数据预处理方式,可能意味着每张图片将会以不同的比例和裁剪方式进行处理,以增强数据的多样性。
报告与跟踪设置 (report_to, tracker_project_name)
-
report_to: wandb:表示使用 WandB 进行实验的跟踪和记录,所有训练的指标和结果将上传到 WandB 平台进行可视化。
-
tracker_project_name: lora_test:在 WandB 上创建的项目名称为
lora_test,所有的实验结果都将在这个项目下进行记录。
训练相关参数 (train_batch_size, learning_rate, lr_scheduler, etc.)
-
train_batch_size: 1:每个训练步骤的批处理大小设为 1,和数据配置中的批量大小一致。
-
output_dir: lora2/:训练过程中的输出文件会保存在
lora2/目录中。这个目录会存储模型检查点、日志等输出。 -
max_train_steps: 10000:训练的最大步骤数。训练将在 10000 步之后结束。
-
learning_rate: 5e-6:学习率设置为 5e-6,影响模型权重更新的速度。
-
lr_scheduler: constant:学习率调度方式为常数(constant),即在训练过程中保持学习率不变。
-
lr_warmup_steps: 10:学习率预热步数为 10,在这 10 步中,学习率将逐渐从较小的值增加到指定的学习率。
-
adam_beta1: 0.9:Adam 优化器的第一个动量参数,常用于控制一阶矩估计的衰减。
-
adam_beta2: 0.999:Adam 优化器的第二个动量参数,常用于控制二阶矩估计的衰减。
-
adam_weight_decay: 0.01:Adam 优化器的权重衰减参数(L2 正则化),用于减少过拟合。
-
adam_epsilon: 1e-8:Adam 优化器中的小常数,防止在计算梯度时出现除零错误。
-
max_grad_norm: 1.0:梯度裁剪的最大值。如果梯度的 L2 范数大于该值,梯度会被缩放以防止梯度爆炸。
-
logging_dir: logs:日志文件将被存储在
logs目录中,包含训练过程中的信息和监控数据。
混合精度 (mixed_precision)
-
mixed_precision: "bf16":表示使用 bfloat16 精度进行混合精度训练,这有助于提高训练速度和节省内存。
检查点设置 (checkpointing_steps, checkpoints_total_limit)
-
checkpointing_steps: 200:每训练 200 步保存一个检查点,即定期保存模型的状态。
-
checkpoints_total_limit: 1:只保留最新的一个检查点,旧的检查点会被覆盖。
梯度累积 (gradient_accumulation_steps)
-
gradient_accumulation_steps: 4:设置梯度累积的步数为 4,这意味着每 4 个批次后,累积的梯度才会被更新一次,这相当于将批次大小扩展为 4。
其他参数
-
rank: 16:可能与分布式训练相关,表示当前模型的 GPU 或训练进程的编号。
-
single_blocks: "1,2,3,4":指示模型中应该使用哪些单个块进行处理。可能与模型架构相关。
-
double_blocks: null:未指定双重块,可能是模型的一部分未使用。
-
disable_sampling: false:禁用采样设置为
false,表示在训练过程中不禁用数据采样。 -
sample_every: 100:每 100 步进行一次采样,通常是生成样本图像或检查模型输出。
-
sample_width: 1024:采样时生成图像的宽度为 1024 像素。
-
sample_height: 1024:采样时生成图像的高度为 1024 像素。
-
sample_steps: 20:每次生成图像时,采样的步骤数为 20。
-
sample_prompts:定义了采样时用来生成图像的文本提示(prompts):
-
"The aerial view captures a rugged mountain landscape with wind turbines and a narrow road" -
"The aerial view presents a coastal highway with road signs, power lines, and passing vehicles"
-
五、构造自己的数据集
数据集的构造格式如下:每一张图片对应着一个prompt文件
├── images/
│ ├── 1.png
│ ├── 1.json
│ ├── 2.png
│ ├── 2.json
│ ├── ...
大家可以直接用我的代码进行prompt的生成 :
import os
# 设置 Hugging Face 模型缓存目录
os.environ["HF_HOME"] = "/root/autodl-tmp/models"
import json
from tqdm import tqdm
from transformers import BlipProcessor, BlipForConditionalGeneration
from PIL import Image

# 1. 加载 BLIP 模型
processor = BlipProcessor.from_pretrained("Salesforce/blip-image-captioning-base", use_fast=True)
model = BlipForConditionalGeneration.from_pretrained("Salesforce/blip-image-captioning-base").to("cuda")

# 2. 生成图片描述
def generate_caption(image_path):
    image = Image.open(image_path).convert("RGB")
    inputs = processor(image, return_tensors="pt").to("cuda")
    caption = model.generate(**inputs)
    return processor.decode(caption[0], skip_special_tokens=True)


# 3. 生成 JSON 文件
def generate_captions_to_json_every(dataset_path="images"):
    image_extensions = (".jpg", ".jpeg", ".png")

    # 遍历图片文件夹
    for filename in tqdm(os.listdir(dataset_path), desc="Generating JSONs"):
        if filename.lower().endswith(image_extensions):
            image_path = os.path.join(dataset_path, filename)

            # 生成图片描述
            caption = generate_caption(image_path)

            # 创建与图片同名的 JSON 文件
            json_file_path = os.path.join(dataset_path, f"{os.path.splitext(filename)[0]}.json")

            # 保存描述到 JSON 文件
            with open(json_file_path, "w", encoding="utf-8") as json_file:
                json_data = {"caption": caption}
                json.dump(json_data, json_file, ensure_ascii=False, indent=4)

    print(f"🚀 所有图片描述已保存为 {dataset_path} 文件夹中的 JSON 文件!")


# 4. 运行代码
if __name__ == "__main__":
    dataset_folder = "images"  # 你的数据集路径
    generate_captions_to_json_every(dataset_folder)  # 生成 JSON
六、生成
我们通过--lora_local_path "./lora/checkpoint-11600/lora.safetensors" 调用未调好的lora模型进行生成:
python3 main.py \
 --prompt "The aerial view shows a highway cutting through plains, flanked by wind turbines and trees" \
 --use_lora \
 --lora_local_path "./lora/checkpoint-11600/lora.safetensors" \
 --width 1024 --height 1024 \
 --guidance 4 \
 --num_steps 25 \
 --seed 42


 1485
1485

 被折叠的 条评论
为什么被折叠?
被折叠的 条评论
为什么被折叠?
 到【灌水乐园】发言


